The Ultimate Guide to Stone Backsplashes: Design, Installation, and Care for Your Kitchen
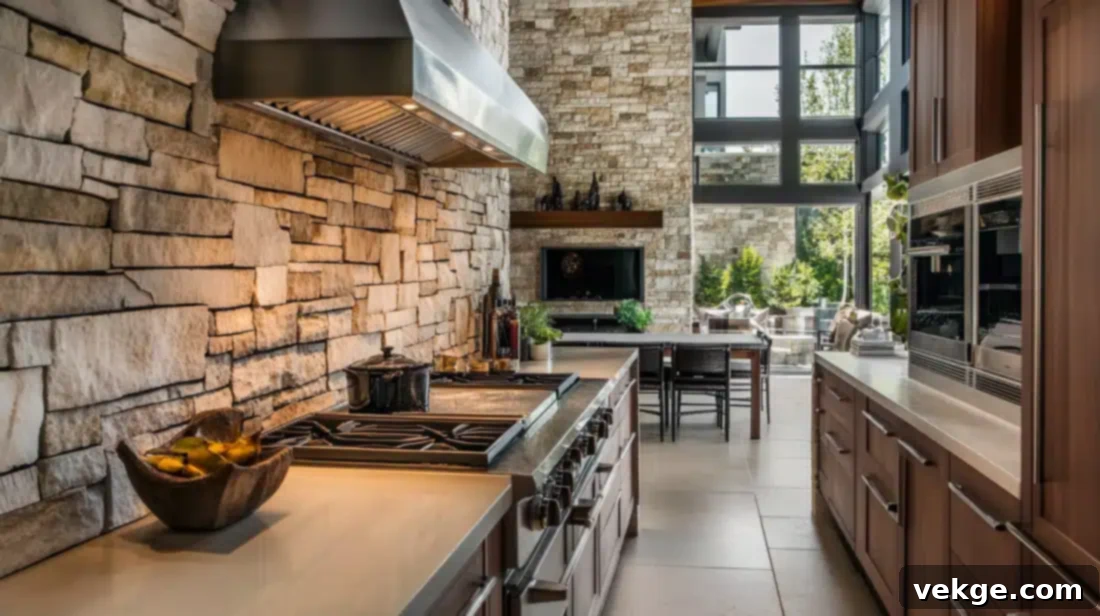
Stone backsplashes have consistently ranked as a premier choice for homeowners looking to elevate the aesthetics and functionality of their kitchens and bathrooms. Renowned for their inherent beauty, durability, and versatility, these natural elements bring a timeless elegance that synthetic materials simply cannot replicate. From the rustic charm of tumbled stone to the sleek sophistication of polished marble, stone backsplashes offer an unparalleled array of textures, colors, and patterns, ensuring there’s a perfect match for any interior design style. Beyond their visual appeal, stone materials boast exceptional resilience against daily wear and tear, including resistance to heat and moisture, making them an ideal and long-lasting investment for high-traffic areas.
This comprehensive guide is meticulously crafted for both enthusiastic DIYers and homeowners contemplating a kitchen or bathroom refresh. Whether you’re embarking on a full renovation or simply seeking to add a touch of natural luxury, you’ll discover invaluable insights. We will delve into the myriad of stone backsplash designs, provide a detailed, step-by-step installation process, and offer expert tips on maintaining your stone to preserve its pristine condition for decades to come. Even if you’re just exploring home improvement possibilities, this resource will equip you with the knowledge needed to make informed decisions about integrating the enduring beauty of natural stone into your living space.
What to Know Before You Get Started on Installing Stone Backsplashes
Pros and Cons of Stone Backsplashes
The choice of a stone backsplash for your kitchen or bathroom involves weighing several key factors. Understanding the advantages and disadvantages will help you make the best decision for your home renovation project.
| Pros of Stone Backsplashes | Cons of Stone Backsplashes |
|---|---|
| Exceptional Durability: Stone backsplashes are renowned for their strength. They are inherently resistant to high heat, making them perfect for areas behind cooktops, and offer remarkable scratch and impact resistance from daily kitchen activities. This robust nature ensures a long lifespan and enduring beauty for your kitchen backsplash. | Higher Initial Cost: The premium quality and natural origin of stone often translate to a higher price point compared to manufactured alternatives like ceramic, porcelain, or glass tiles. This investment can be significant, especially for larger areas or rarer stone types, impacting your overall kitchen renovation budget. |
| Unmatched Aesthetic Appeal: Each piece of natural stone is unique, boasting distinct veining, colors, and textures that add a luxurious, timeless, and sophisticated touch to any space. Stone backsplashes can become a striking focal point, enhancing your home’s overall design and increasing its value. | Specific Maintenance Requirements: To maintain their beauty and integrity, most natural stones, particularly porous types like marble or limestone, require regular sealing. This preventative measure is crucial for protecting against stains from food, liquids, and general kitchen spills, necessitating a consistent maintenance routine. |
| Vast Variety and Customization: The geological diversity of stone offers an extensive selection. Options like granite, marble, travertine, slate, and quartzite come in an astonishing array of colors, patterns, and finishes, allowing for limitless customization to perfectly complement your existing decor or inspire a new design scheme for your kitchen backsplash. | Considerable Weight: Natural stone is significantly heavier than most other backsplash materials. For extensive installations or on walls that might lack sufficient structural support, additional reinforcement may be necessary. This factor can also influence shipping and handling costs and complicate DIY stone backsplash installation. |
| Eco-Friendly Natural Material: As a product of nature, stone is an environmentally conscious choice. Opting for reclaimed stone or sourcing materials from local quarries can further reduce the environmental footprint, contributing to sustainable home improvement practices and a healthier living environment. | Complex Installation Process: Due to its weight, rigidity, and the need for specialized cutting tools, installing a stone backsplash can be more intricate and labor-intensive than installing lighter tiles. While DIY is possible for experienced renovators, many homeowners prefer to hire professional installers for precise and secure placement. |
| Superior Heat Resistance: In a kitchen environment, exposure to heat is common. Stone backsplashes excel in this regard, easily withstanding high temperatures from stovetops and ovens without warping, discoloring, or sustaining damage, thereby protecting your walls effectively and providing peace of mind. | Inherent Porosity: Certain types of natural stone are naturally porous, meaning they have tiny holes that can absorb liquids. Without proper sealing, these stones are highly susceptible to staining and moisture damage, which can lead to discoloration or the growth of mold and mildew over time, especially in a kitchen backsplash setting. |
Choosing the Right Stone Type for Your Backsplash
Selecting the ideal stone type is paramount to achieving your desired aesthetic and ensuring longevity for your stone backsplash. Each variety offers distinct characteristics in terms of appearance, durability, and maintenance requirements:
- Marble: Revered for its luxurious appearance, marble features elegant veining and a smooth, often polished finish. It’s a classic choice that adds a sophisticated touch, available in a spectrum from pure white (Carrara, Calacatta) to greens and blacks. However, marble is relatively porous and softer than other stones, making it more susceptible to etching from acidic liquids and staining if not consistently sealed. It requires diligent care but rewards with unparalleled beauty.
- Granite: A highly popular and incredibly durable option, granite is an igneous rock formed under intense heat and pressure, making it exceptionally hard and resistant to scratches, heat, and stains (especially when sealed). Its speckled or mottled appearance comes in an immense range of colors and patterns, from subtle earth tones to bold, exotic variations, offering great versatility for any kitchen backsplash design.
- Slate: Known for its rugged, earthy appeal, slate is a metamorphic rock that often presents a naturally cleft or textured surface. It typically comes in darker hues such as charcoal, deep greens, blues, and purples, providing a grounding and rustic aesthetic. Slate is very durable and non-porous (or minimally porous) when properly sealed, making it a low-maintenance choice that can withstand heavy use in a kitchen environment.
- Travertine: A type of limestone, travertine is characterized by its distinct porous texture and warm, inviting earth tones, including beige, cream, and brown. It evokes an old-world, Mediterranean charm and can be finished in various ways – honed, polished, or tumbled – each offering a unique look. While beautiful, travertine is softer and more porous than granite, necessitating careful sealing to prevent staining and maintain its appearance as a kitchen backsplash.
- Quartzite: Often mistaken for marble due to its similar veining, quartzite is actually much harder and more durable, offering granite-like resilience with a marble-like aesthetic. It’s highly resistant to scratches and etching, making it an excellent choice for a low-maintenance yet elegant stone backsplash that combines beauty with practicality.
- Limestone: Softer than marble but still a beautiful option, limestone brings a refined, understated elegance with its subtle patterns and earthy, muted tones. It’s porous and requires sealing, but its natural variations can add significant character to a kitchen, offering a softer alternative for your stone backsplash.
Budget Considerations for Your Stone Backsplash
While a stone backsplash is a significant investment, understanding the various factors that influence its cost can help you plan your project effectively. The overall expense is influenced by several key elements:
- Stone Type: As discussed, certain types of natural stone are inherently more expensive due to their rarity, quarrying process, and aesthetic demand. Exotic granites, premium marbles like Calacatta, and some quartzites typically command higher prices per square foot than more common granites or slate.
- Square Footage: The size of the area you intend to cover directly impacts the material cost. Larger backsplash areas will naturally require more stone and, consequently, a higher budget for your stone backsplash project.
- Fabrication and Finish: Custom cuts, intricate designs, and specialized finishes (e.g., polished, honed, tumbled, leathered) can add to the fabrication costs. Edge profiles for any exposed edges also contribute to the final price.
- Installation Labor: Professional installation will add a significant cost to your project. However, given the weight, precision cutting, and sealing requirements of natural stone, this can be a worthwhile investment to ensure a flawless and long-lasting result, especially for complex layouts. DIY installation can save on labor costs, but only if you possess the necessary skills and tools for a stone backsplash.
- Sealing and Maintenance Products: Don’t forget to factor in the cost of quality sealers and appropriate cleaning products, which are essential for protecting your stone backsplash and preserving its beauty over time.
By carefully considering these aspects, you can set a realistic budget and explore options that align with both your design aspirations and financial plan for your natural stone backsplash.
Measuring the Area for Your Stone Backsplash
Accurate measurement is a critical first step to avoid costly errors and ensure you purchase enough material for your stone backsplash. To precisely determine the amount of stone you’ll need for your project:
- Measure Width: Use a tape measure to determine the total horizontal length of the wall sections you plan to cover. Measure from cabinet to cabinet, or from the counter edge to the end of the desired backsplash area.
- Measure Height: Measure the vertical height from the countertop to the underside of the upper cabinets (or to the desired finished height if there are no upper cabinets).
- Calculate Square Footage: For each distinct section, multiply the width by the height to get the square footage. Sum these calculations for all areas to get your total square footage for the stone backsplash.
- Add Waste Factor: Always add an additional 10% to 15% to your total square footage. This crucial “waste factor” accounts for cuts needed around outlets, windows, and corners, as well as any potential miscuts or broken tiles during installation. Having extra material is far better than running short in the middle of your stone backsplash installation project.
Double-check all your measurements to ensure accuracy before placing your order for natural stone tiles or slabs.
Step-By-Step Stone Backsplash Installation Process
Tools and Materials Needed for Your DIY Stone Backsplash
Before beginning your stone backsplash installation, ensure you have all the necessary tools and materials readily available. This will streamline the process and prevent interruptions. Below is a comprehensive list:
| Category | Item | Purpose |
|---|---|---|
| Tools | Coarse sandpaper (80-100 grit) | Essential for thoroughly roughening the wall surface, creating a better mechanical bond for the thin-set mortar and ensuring strong tile adhesion for your stone backsplash. |
| Trowel (½ inch x ½ inch square notch recommended) | Used to spread the thin-set mortar evenly onto the wall. The specific notch size helps create optimal ridges for proper tile bonding and coverage for heavy stone tiles. | |
| Tile saw (wet saw with a diamond blade) | Indispensable for making precise, clean cuts through stone tiles, especially for fitting around electrical outlets, windows, and corners. Safety glasses are a must when operating this tool for your DIY stone backsplash. | |
| Utility knife or Grout bag | A utility knife is useful for scoring and snapping small ceramic tiles or for opening material bags. A grout bag is ideal for neatly applying grout into the joints, especially with uneven stone surfaces, ensuring a clean finish. | |
| Caulk gun | Required for applying caulk neatly and efficiently along the edges where the backsplash meets countertops and cabinets, creating a watertight and flexible seal. | |
| Level (2-foot or longer) | Crucial for ensuring that your tile rows are perfectly straight and plumb, creating a professional and aesthetically pleasing finish for your stone backsplash. | |
| Safety glasses and gloves | Non-negotiable personal protective equipment to shield your eyes from debris during cutting and sanding, and to protect hands from thin-set and grout chemicals. | |
| Sponge and clean rags | Used for cleaning excess thin-set mortar from tile surfaces during installation and for wiping off extra grout and caulk during the finishing stages, maintaining a clean workspace. | |
| Measuring tape and pencil | For accurate measurements and marking cut lines on your stone tiles, ensuring precise fitting and minimizing waste during your stone backsplash project. | |
| Materials | Stone Backsplash Tiles | The primary material for your backsplash. Ensure you have the correct square footage plus the recommended waste factor. Choose the stone type that best fits your design vision. |
| Modified Thin-Set Mortar (non-slip, suitable for walls) | A high-quality adhesive specifically formulated for bonding stone tiles to vertical surfaces. Modified thin-set offers increased strength and flexibility, essential for heavy stone. | |
| Tile Spacers (1/8 inch, or appropriate size for your stone) | Small wedges or T-shaped spacers that ensure consistent and even grout lines between tiles, which is vital for a professional and uniform look for your natural stone backsplash. | |
| Grout (sanded or unsanded, depending on joint size) | Fills the gaps between your installed tiles. Sanded grout is typically used for wider joints (1/8 inch or more), while unsanded is for narrower joints. Choose a color that complements your stone. | |
| Tile Sealer (penetrating sealer for natural stone) | A crucial protective barrier applied to porous stone and grout to prevent staining from water, oils, and other liquids, significantly extending the life and beauty of your stone backsplash. | |
| Caulk (color-matched to grout if possible) | Used to seal expansion joints where the backsplash meets the countertop, cabinets, and other surfaces, providing flexibility and preventing water penetration. | |
| Wax paper, plastic sheeting, or painter’s tape | Essential for protecting adjacent surfaces like countertops, cabinets, and flooring from mortar, grout, and accidental spills during the installation process, keeping your kitchen clean. | |
| Mixing bucket and drill with paddle mixer attachment | For thoroughly mixing thin-set mortar and grout to the correct consistency, ensuring proper adhesion and an even finish for your stone backsplash. |
Step 1: Prepare the Wall and Protect Surfaces

- Begin by thoroughly cleaning the wall surface to remove any grease, dirt, or loose paint. A clean, dry surface is essential for proper adhesion of your stone backsplash tiles.
- Use coarse sandpaper (80-100 grit) to rough up the glossy finish of painted walls. This crucial step creates a textured surface that the thin-set mortar can firmly grip, ensuring your stone tiles adhere securely and prevent slippage.
- Carefully cover your countertops, cabinets, and flooring with wax paper, plastic sheeting, or painter’s tape. This protection will shield them from mortar drips, grout haze, and accidental damage during the stone backsplash installation process. Turn off power to any outlets in the backsplash area at the circuit breaker and remove outlet covers for safety.
Step 2: Mix and Apply Thinset
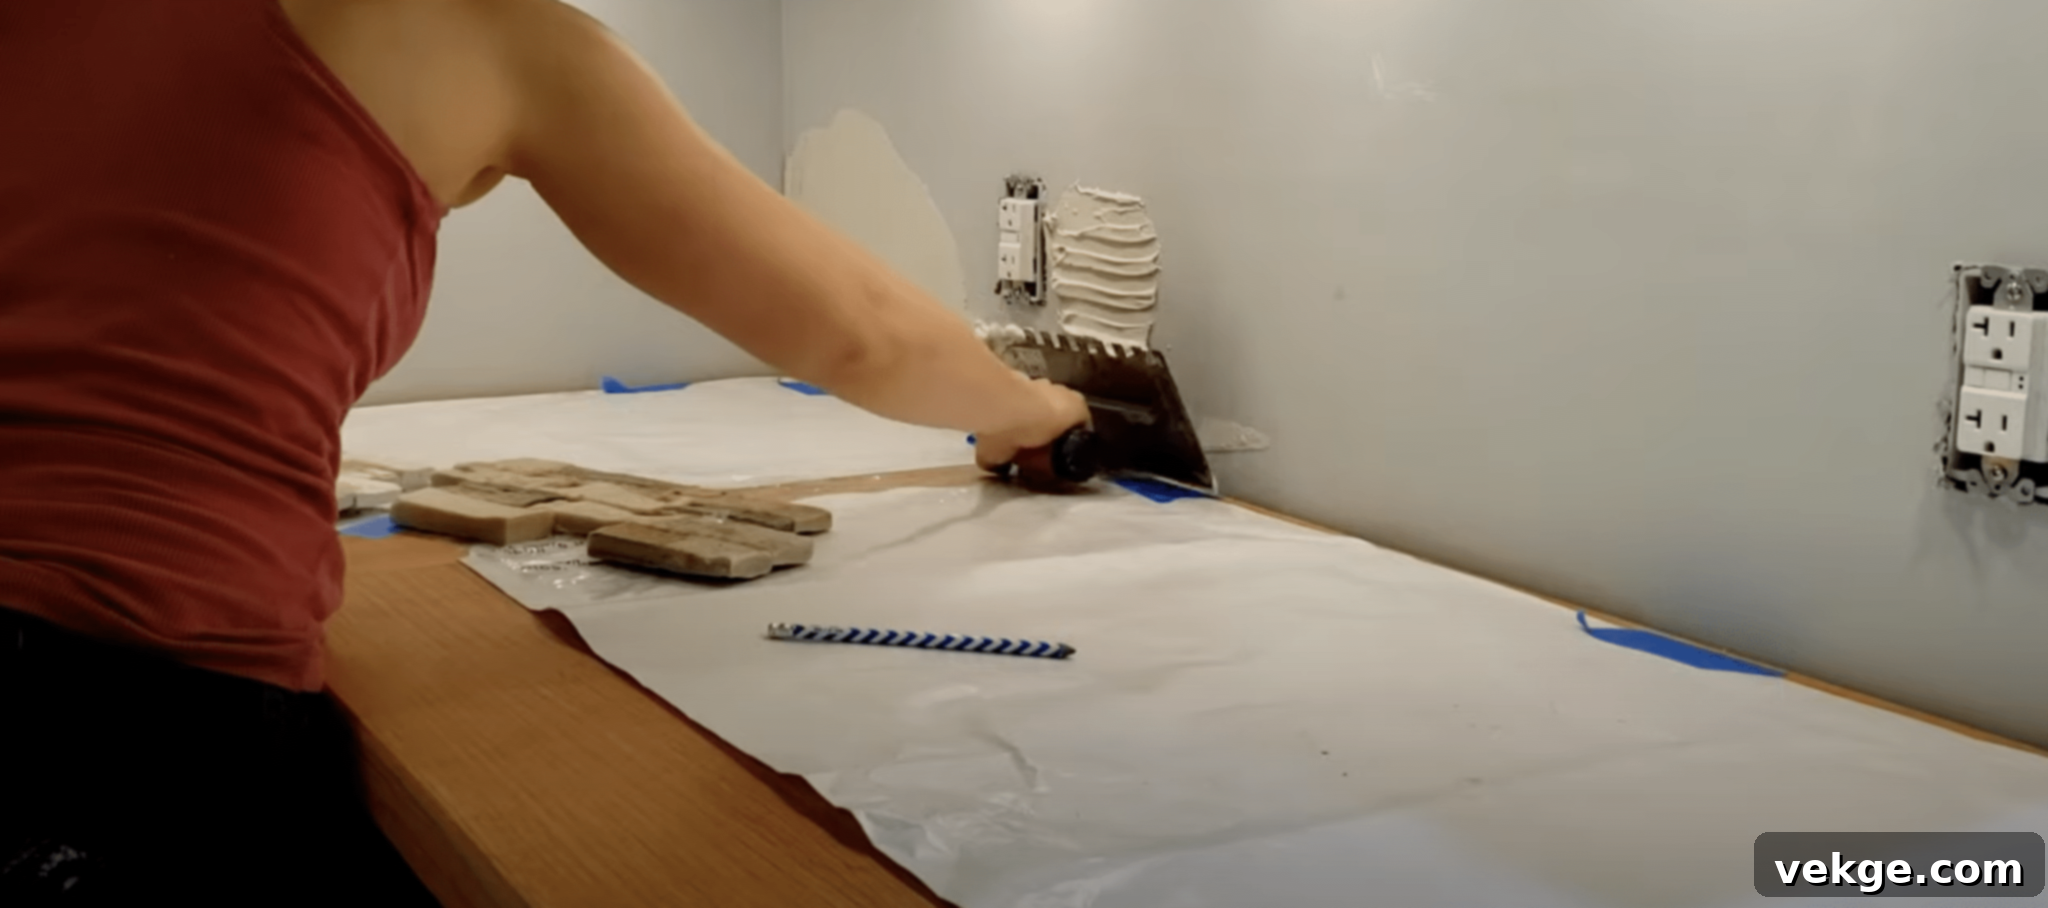
- Following the manufacturer’s instructions, mix your modified thin-set mortar in a clean bucket using a drill with a paddle mixer attachment. Aim for a peanut butter-like consistency – firm enough to hold a ridge but smooth enough to spread easily without being too runny.
- Using the notched edge of your trowel, spread a thin, even layer of thin-set onto a small section of the prepared wall. Hold the trowel at a 45-degree angle to create consistent ridges. Avoid spreading too much at once, as thin-set can dry quickly, especially in warmer conditions.
- Before applying thin-set, ensure your countertops are well-protected with wax paper or plastic. This prevents permanent bonding of any drips or spills and makes cleanup much easier.
Step 3: Lay the First Row of Tiles for Your Stone Backsplash
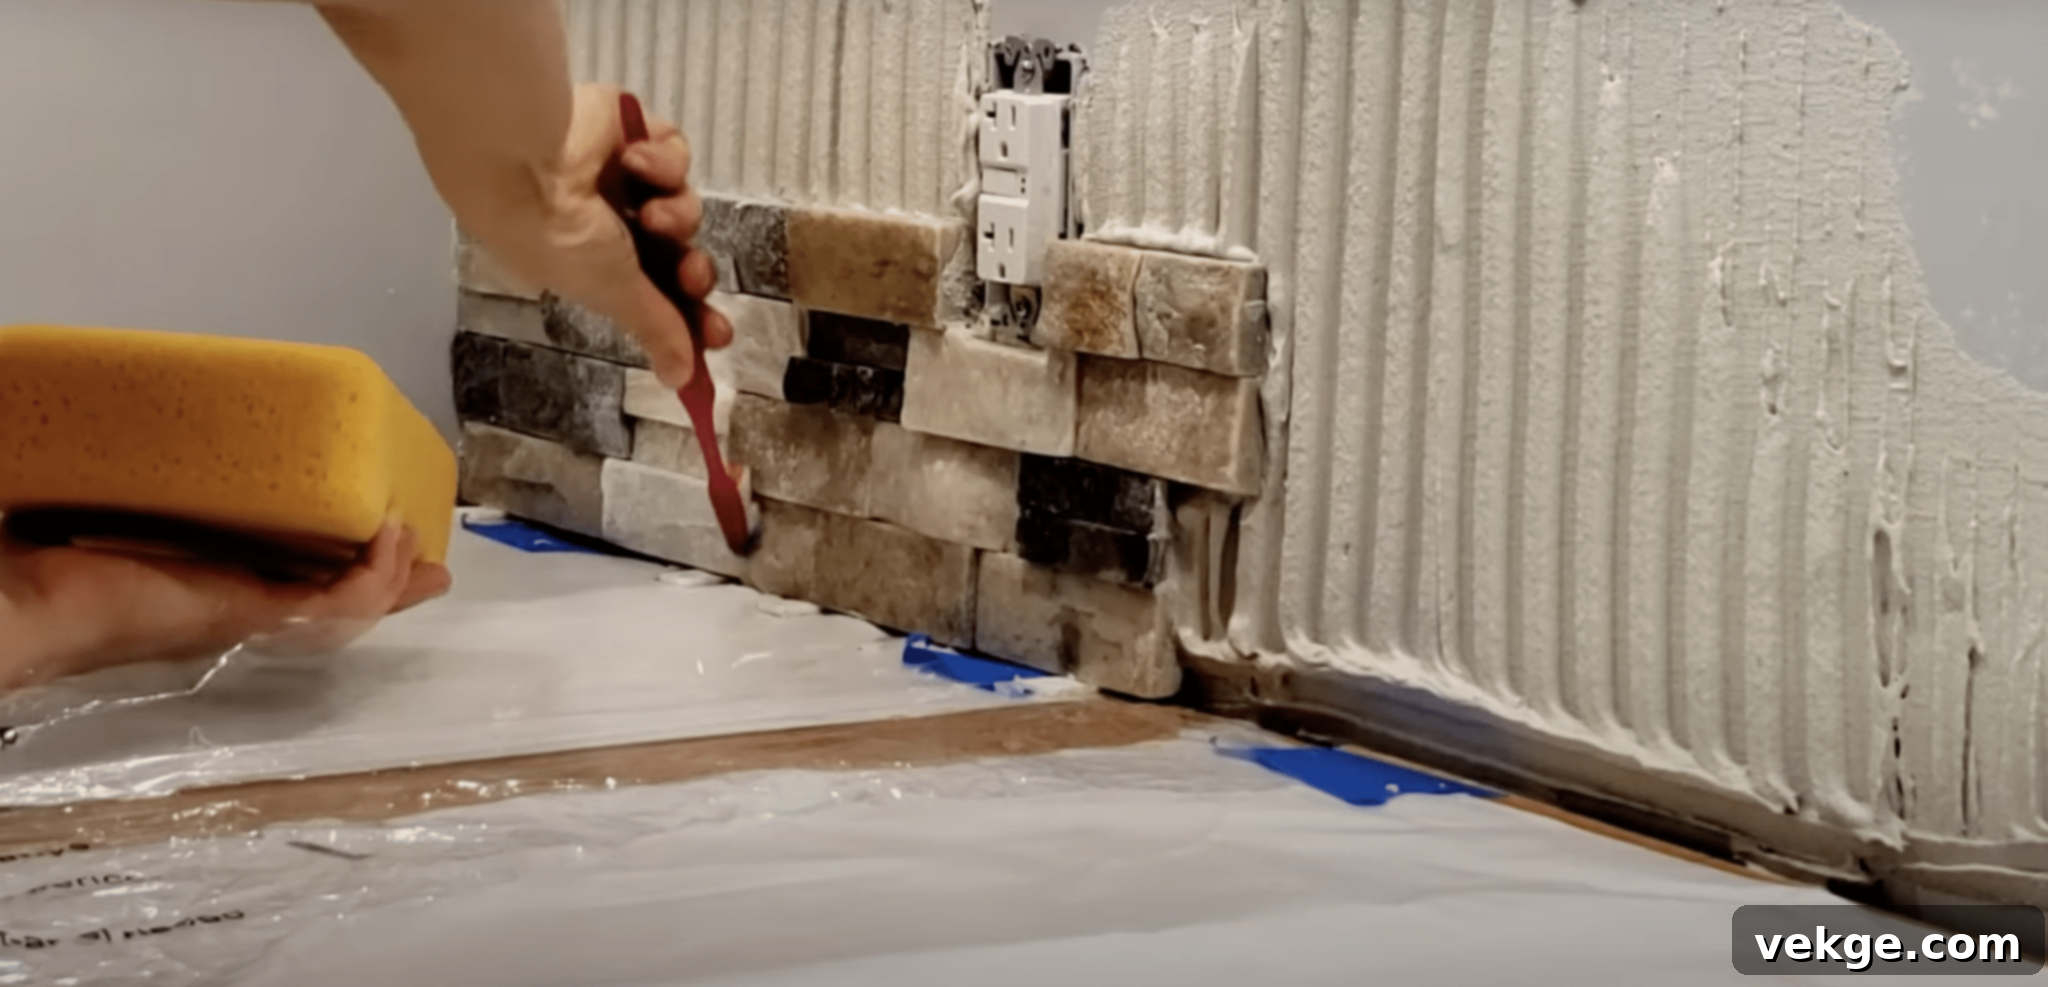
- Starting from the bottom row, gently press the first stone tile into the thin-set, wiggling it slightly to ensure good contact and even distribution of the adhesive. Work horizontally across the wall.
- Insert tile spacers (typically 1/8 inch for stone, but adjust based on your stone type and desired grout line) between each tile to maintain consistent gaps. This is vital for uniform grout lines and a professional, visually appealing finish for your stone backsplash.
- For heavier stone tiles or full slabs, “back-butter” each tile by applying a thin layer of thin-set directly to its back before placing it on the wall. This ensures maximum adhesion and prevents hollow spots or air pockets behind the tile. Use a level frequently to check that your tiles are straight and even, making adjustments as needed.
Step 4: Cut and Fit Tiles
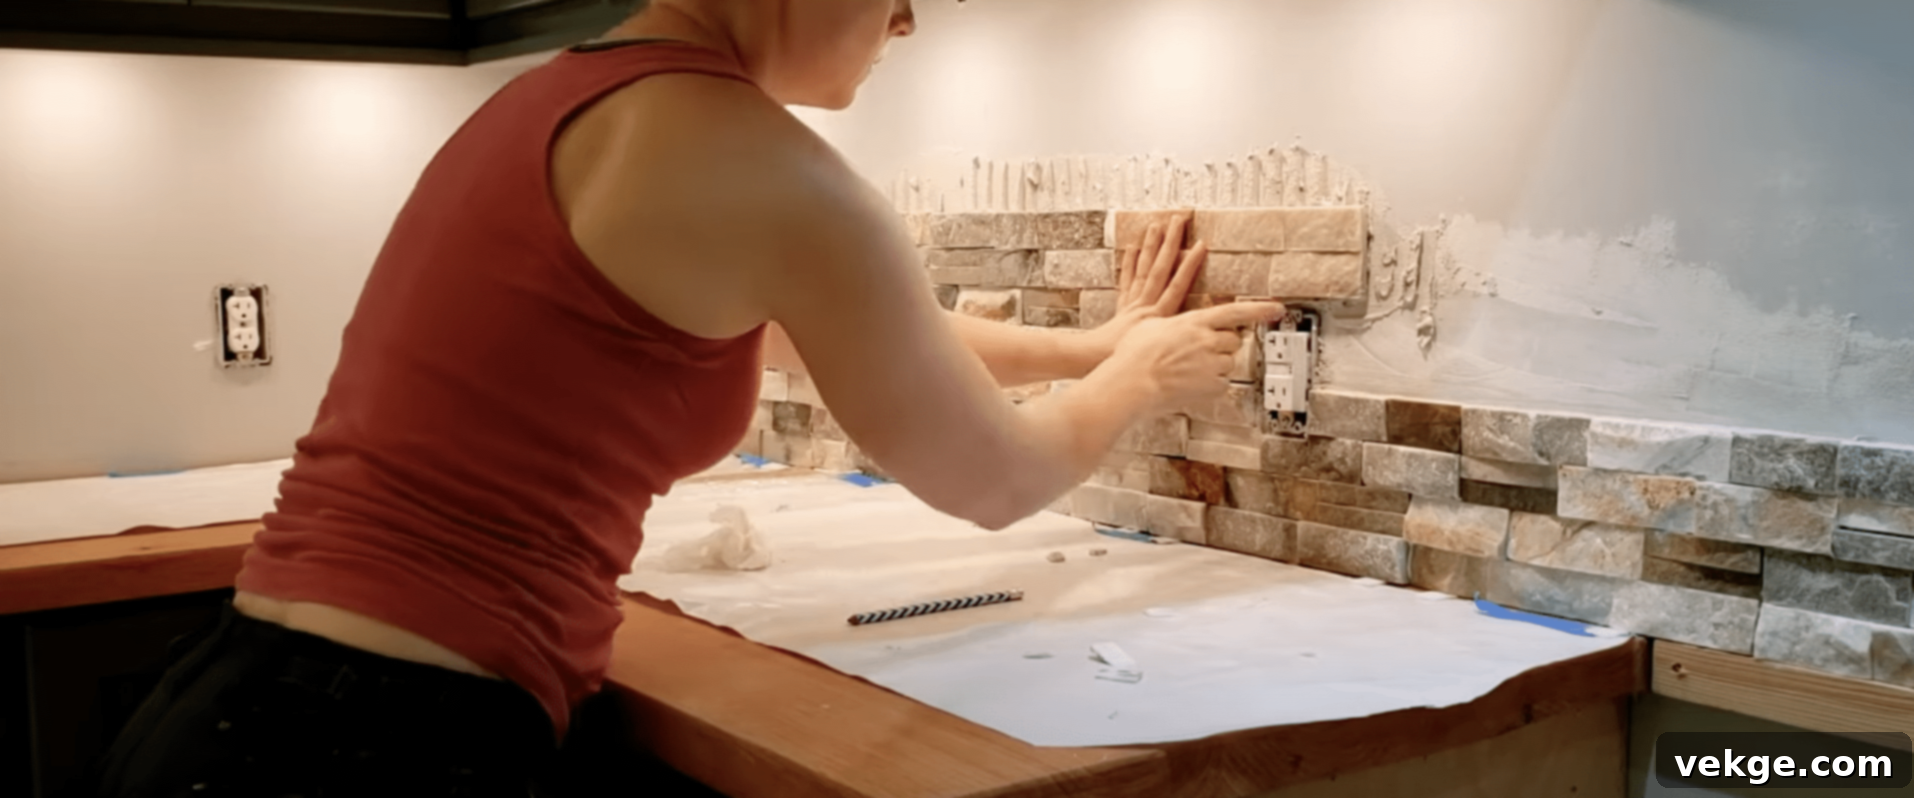
- As you encounter obstacles like electrical outlets, window frames, or corners, you’ll need to cut your stone tiles. Use a tile saw with a diamond blade for precise and clean cuts through natural stone. Always wear safety glasses when operating the saw to protect your eyes from debris.
- Measure carefully, mark your cut lines with a pencil, and double-check before cutting. For outlets, you’ll likely need to make L-shaped or square cuts to fit snugly around the electrical boxes, ensuring the outlet covers will fit properly later.
- Don’t rush this step, as accurately cut tiles contribute significantly to the overall aesthetic and professional appearance of your stone backsplash. Take your time to achieve clean, straight edges.
Step 5: Clean and Allow to Set
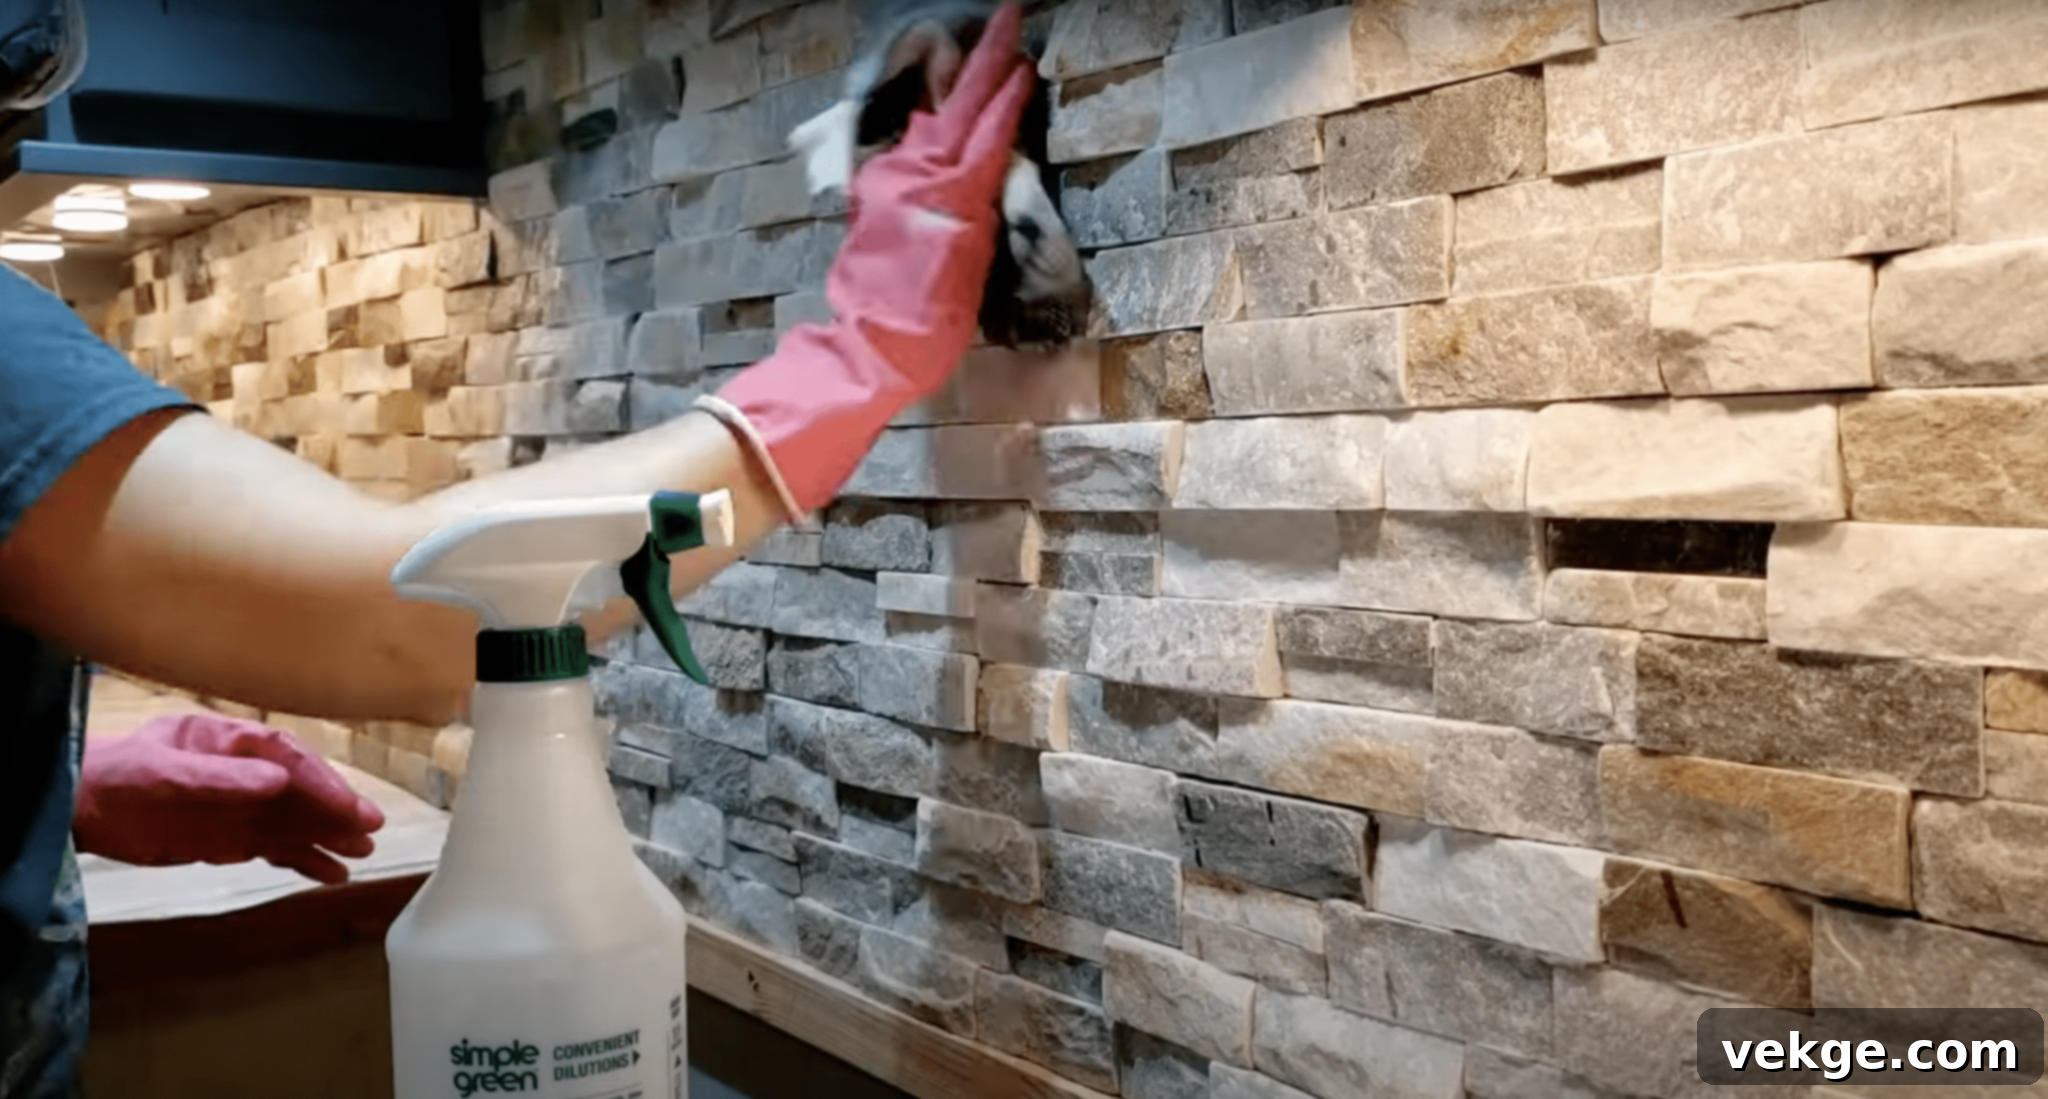
- As you lay the tiles, immediately wipe off any excess thin-set that squeezes out from between the tiles or gets onto the tile surface using a damp sponge or rag. Dried thin-set is much harder to remove later and can obscure the beauty of your stone backsplash.
- Once all tiles are in place, allow the thin-set to cure completely. This typically takes a minimum of 24 hours, but always refer to the specific thin-set manufacturer’s recommendations on drying times. During this time, avoid touching or disturbing the tiles to ensure a strong, lasting bond.
- Proper drying is crucial before moving on to the grouting stage. Attempting to grout too soon can compromise the adhesive bond and lead to issues down the line.
Step 6: Apply Sealer and Grout
- After the thin-set has fully cured, and before grouting, apply a penetrating stone sealer to your tiles. This step is especially important for porous natural stones like marble, travertine, and some granites, as it protects them from absorbing moisture and stains from grout during application. Follow the sealer’s instructions carefully for application and drying time.
- Once the pre-grout sealer has dried, mix and apply your chosen grout (sanded for wider joints, unsanded for thinner). Use a grout float to press the grout firmly into the joints, ensuring they are completely filled and smooth. Wipe off excess grout from the tile faces with a damp sponge in a diagonal motion.
- After grouting and cleaning the haze, allow the grout to cure as per instructions (usually 24-48 hours). Then, apply a second coat of penetrating sealer to both the stone and the grout for enhanced, long-lasting protection against moisture and stains.
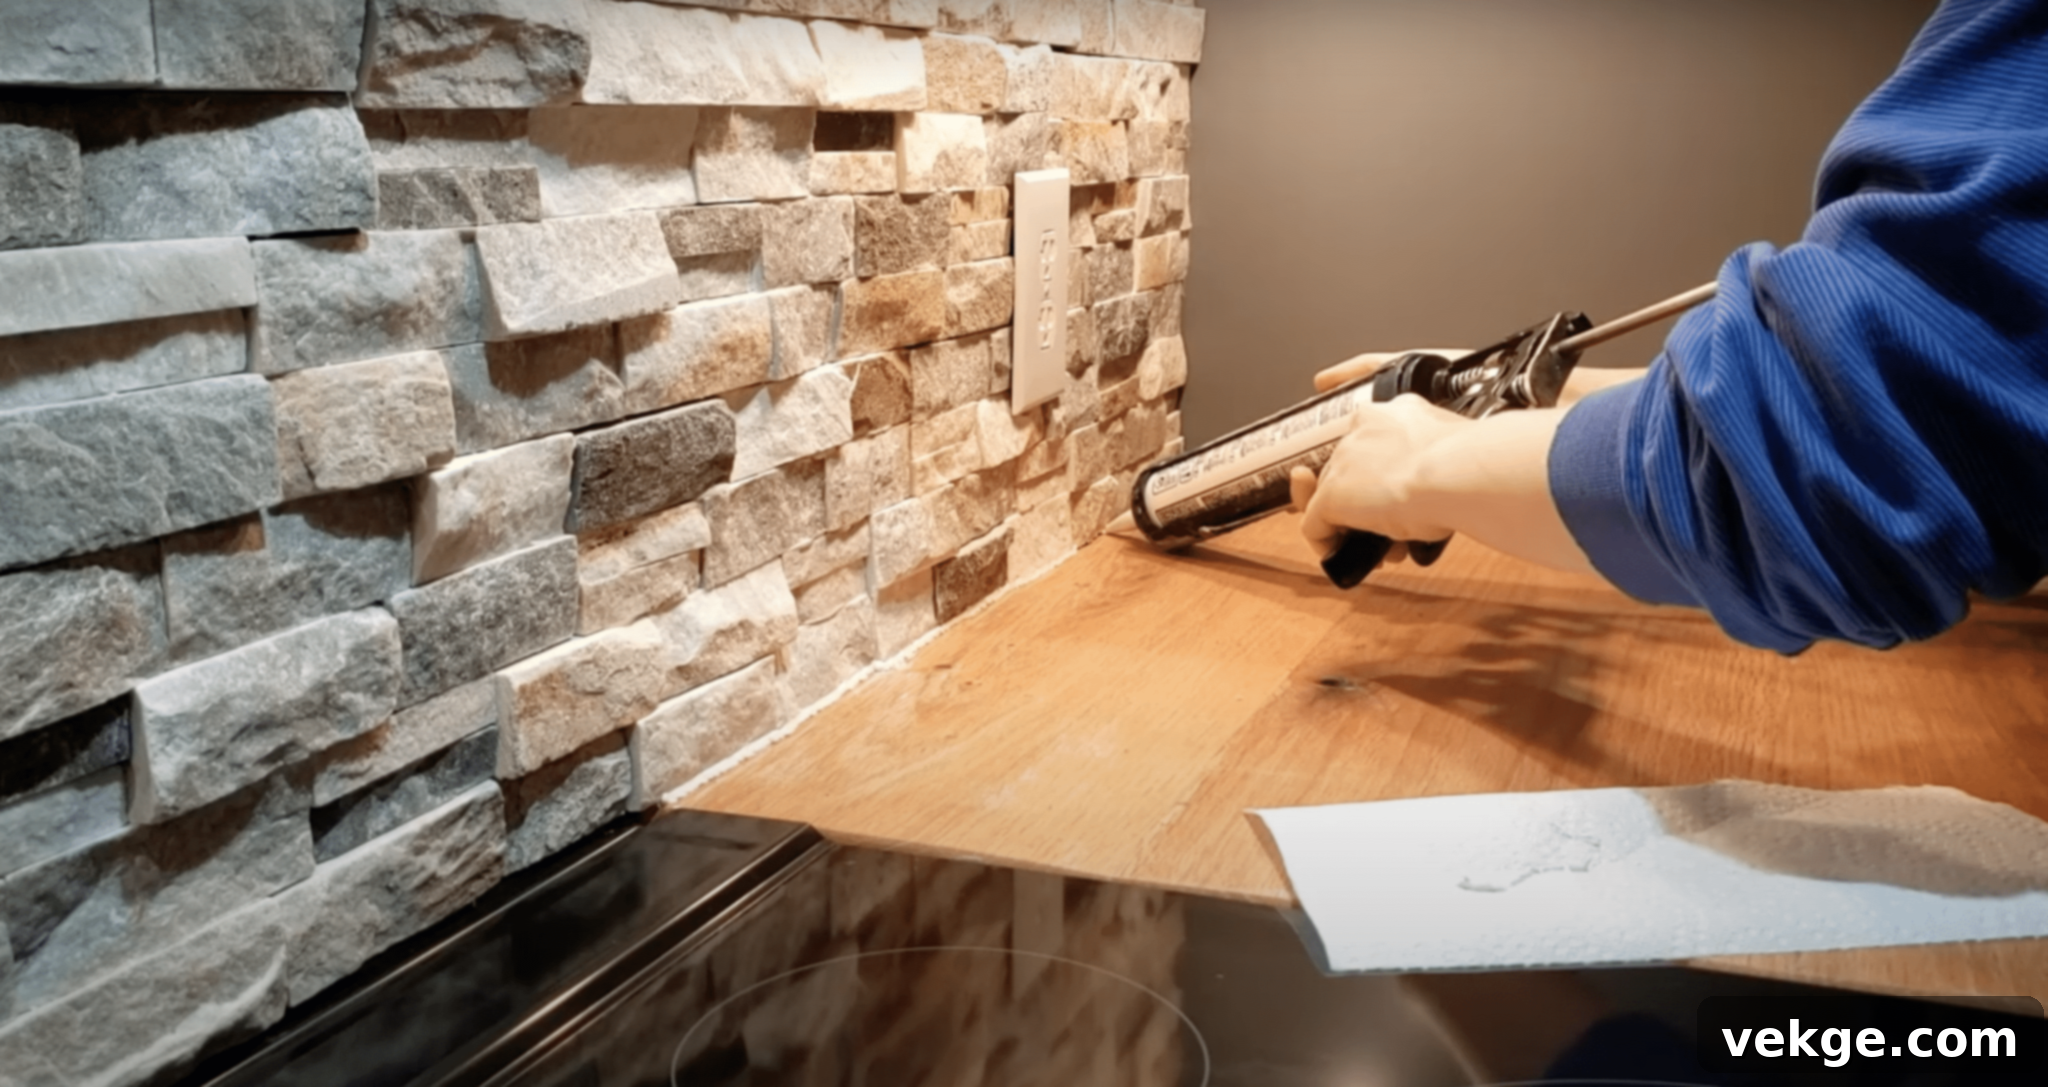
- Finally, use a caulk gun to apply a continuous bead of color-matched caulk along the seam where the bottom row of tiles meets the countertop, and also where the backsplash meets any adjacent cabinets or walls. This provides a flexible, watertight seal that accommodates movement.
Step 7: Adjust Outlets and Fill Gaps
- Once the stone tiles and grout are fully set and cured, you may find that your electrical outlets are now recessed due to the added thickness of the stone backsplash. Use outlet extenders or box extenders to bring the outlets flush with the new backsplash surface, ensuring they are safe, accessible, and meet electrical codes.
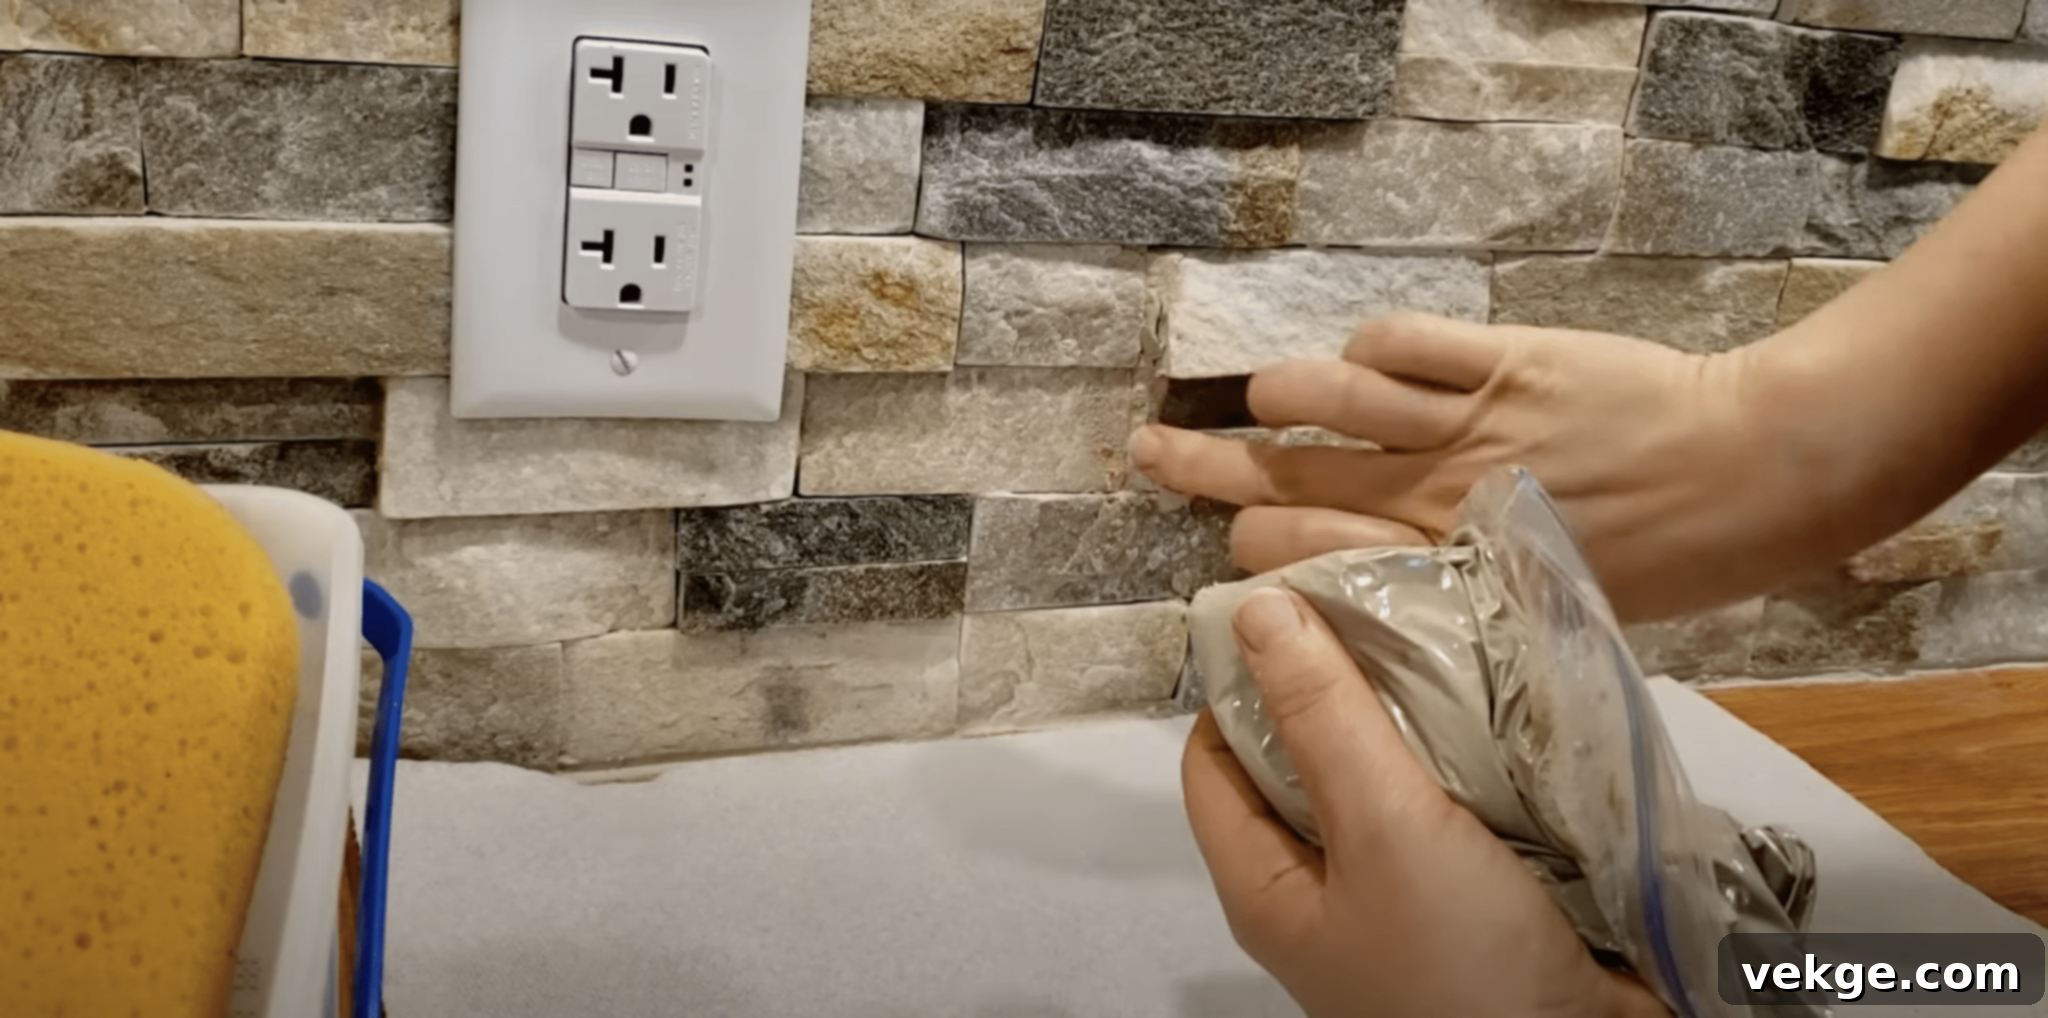
- For any larger gaps that might exist between the tiles and the wall (though consistent spacing with spacers should minimize these), or if you opted for a ledger stone style that has natural, irregular gaps, fill these with grout using a grout bag or utility knife carefully. Smooth the grout lines for a clean, cohesive finish.
- Ensure all electrical work, including the installation of outlet extenders, is handled safely. It’s crucial to turn off the power at the circuit breaker before beginning any work on electrical components.
Step 8: Finishing Up Your New Stone Backsplash
- Perform a final thorough cleaning of your newly installed stone backsplash. Use a damp sponge to wipe away any remaining grout haze or caulk residue from the tile surfaces. For stubborn haze, a specialized grout haze remover for natural stone may be needed.
- Once the backsplash is pristine and completely dry, reattach all electrical outlet covers and switch plates, ensuring they fit snugly and securely over the extended outlets.
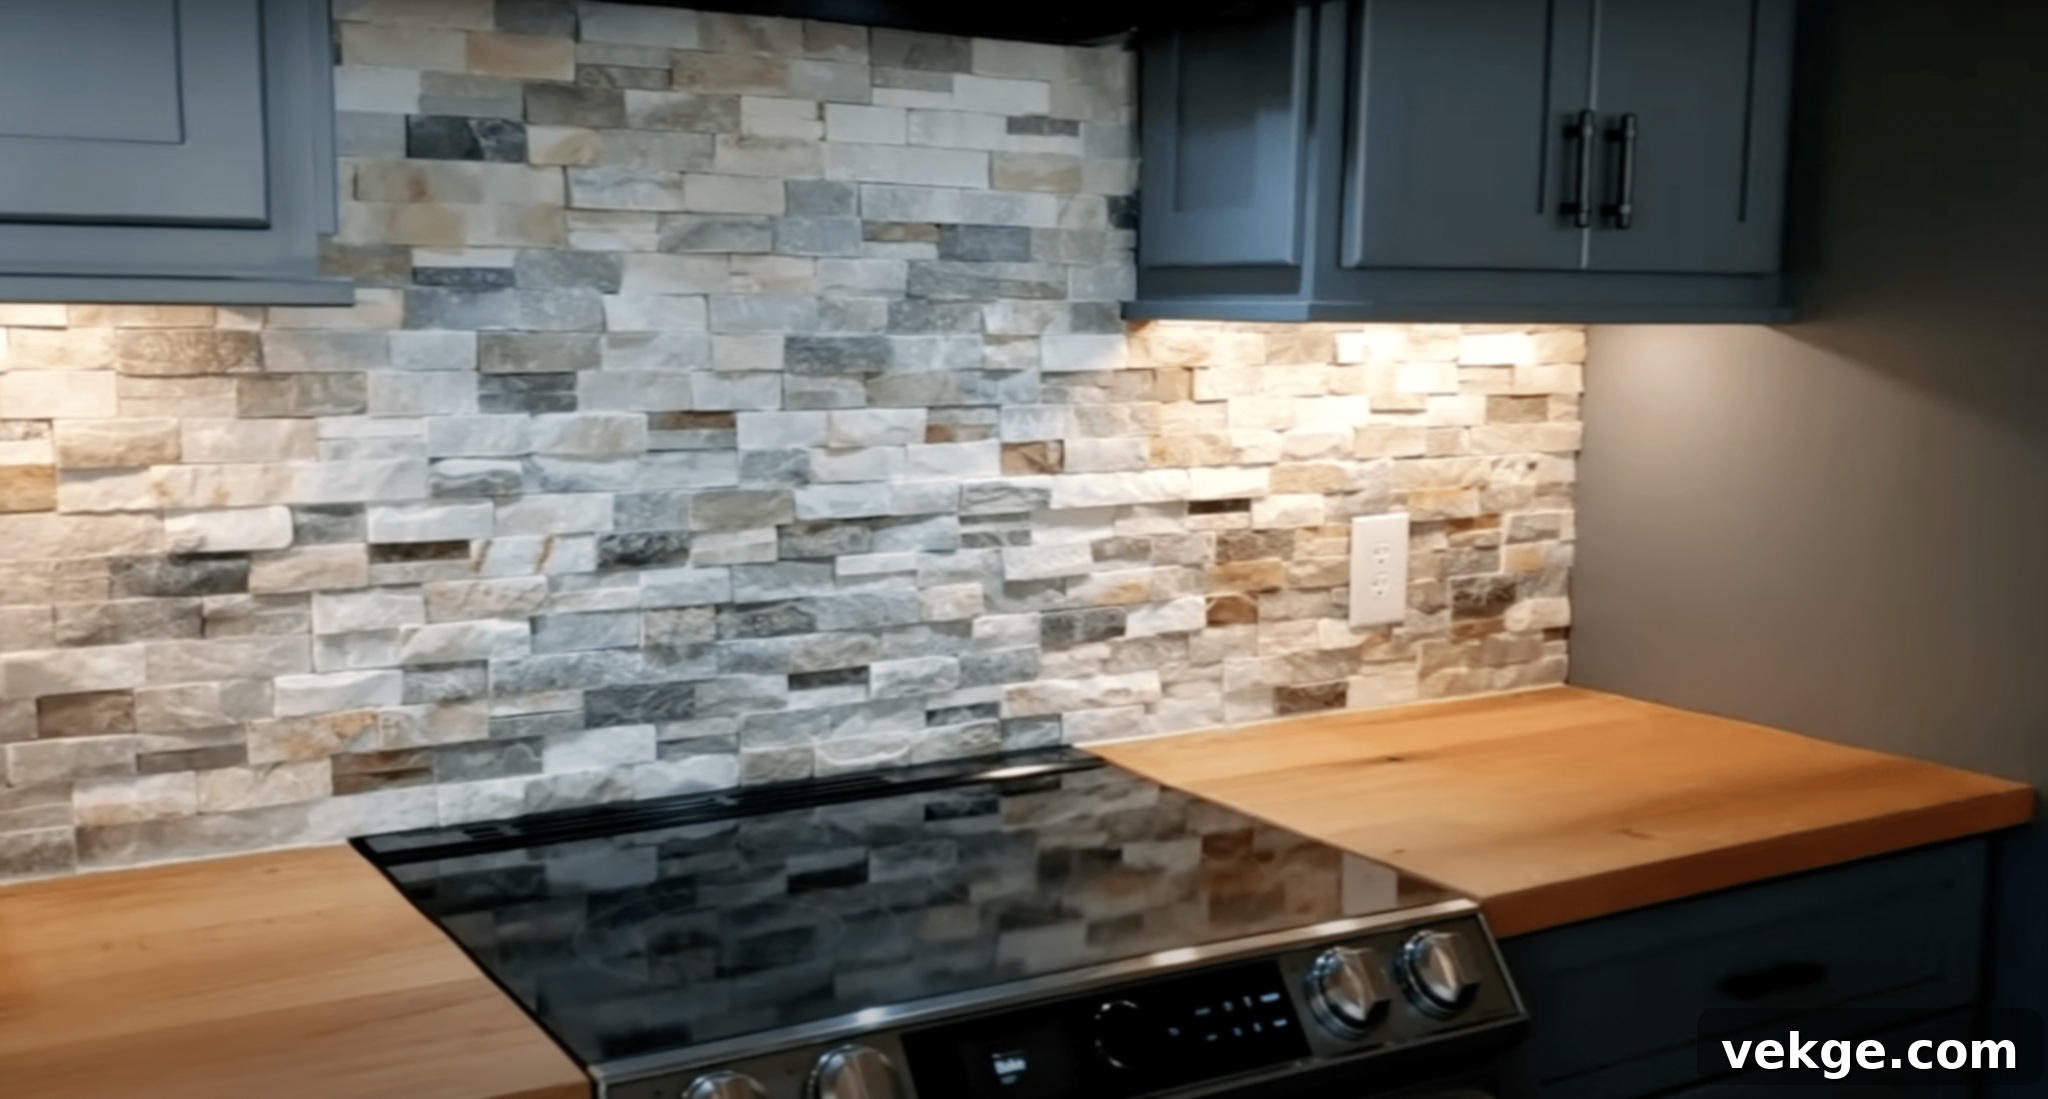
- Step back and admire your handiwork! Your beautiful, durable stone backsplash is now complete, ready to enhance the aesthetic and functionality of your kitchen or bathroom for years to come. Enjoy the natural elegance you’ve added to your home.
For a visual aid and more detailed instructions, consider watching a full video tutorial. You can find comprehensive guides online, such as this one: Full Detailed Video Tutorial for Stone Backsplash Installation.
Stone Backsplash Ideas for Your Kitchen Design
1. Rustic Stone Backsplash: Embracing Natural Warmth
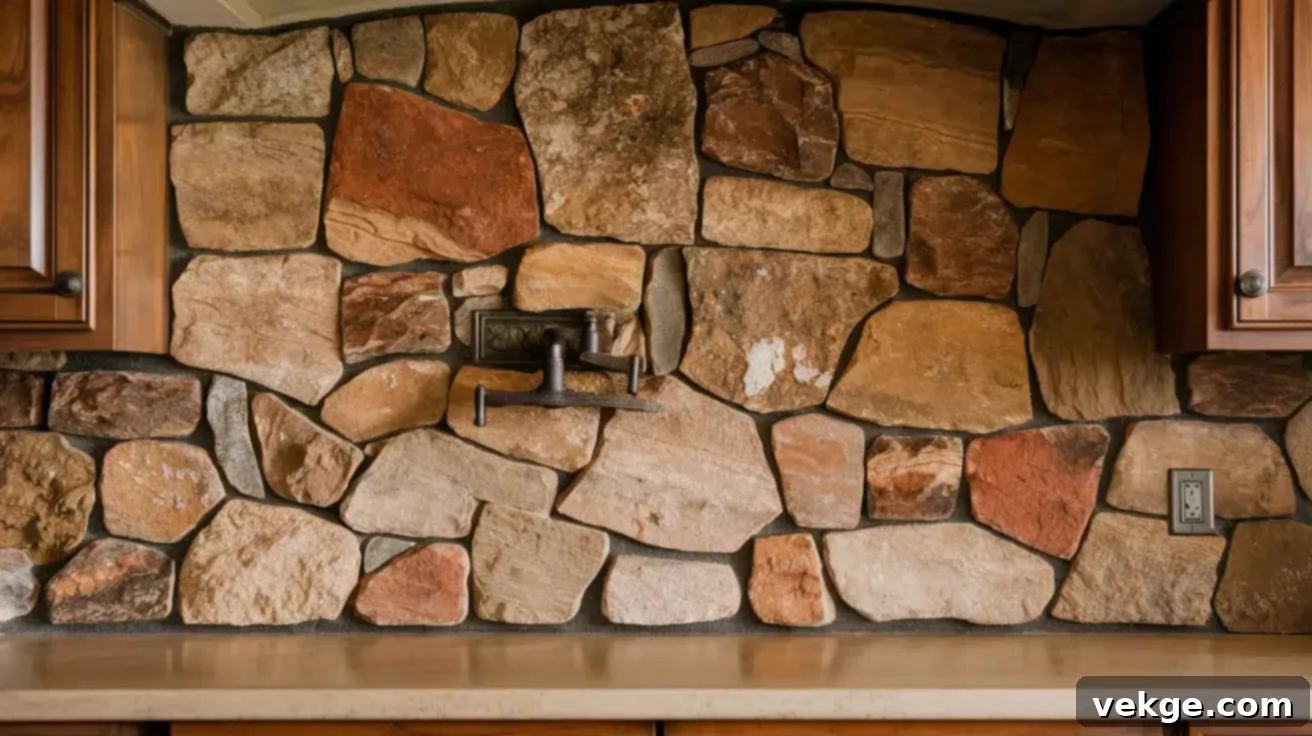
A rustic stone backsplash is the epitome of cozy, natural charm, instantly transforming your kitchen into a warm and inviting retreat. This style typically features rough-cut, irregular stones, often with varying thicknesses, creating a beautiful, organic texture. The color palette usually gravitates towards warm earth tones such as deep browns, sandy tans, soft creams, and rich reddish hues, which evoke a sense of history and connection to nature. The uneven, three-dimensional surface of a rustic stone backsplash adds incredible depth and character to your walls, making it a focal point that feels both substantial and authentic, perfect for a country kitchen or farmhouse aesthetic.
Design Tips for a Rustic Stone Backsplash:
- Vary Stone Sizes and Shapes: For an even more authentic, natural aesthetic, don’t be afraid to mix different sizes and irregular shapes of stones. This creates a visually dynamic and less uniform pattern, mirroring natural rock formations.
- Complement with Wood Accents: Pair your rustic stone backsplash with natural wood cabinets, exposed beams, or a butcher-block countertop. The combination of wood and stone creates a cohesive, earthy, and undeniably rustic kitchen style.
- Incorporate Metal Fixtures: Introduce elements like wrought iron light fixtures, antique bronze cabinet pulls, or a hammered copper sink to perfectly complement the raw, industrial edge often found in rustic designs.
- Consider Textured Grout: Instead of smooth grout, opt for a rougher, sand-textured grout in a complementary color to enhance the natural, unrefined feel of the stone.
- Warm Lighting: Use warm-toned lighting, such as pendant lights with Edison bulbs, to highlight the stone’s texture and enhance the cozy ambiance.
- Herringbone or Stacked Patterns: While irregular stones are common, if using cut stone, a herringbone pattern can add a subtle layer of visual interest, or a simple stacked pattern can bring a clean yet rustic feel.
2. Natural Stone Backsplash: Celebrating Earth’s Artistry
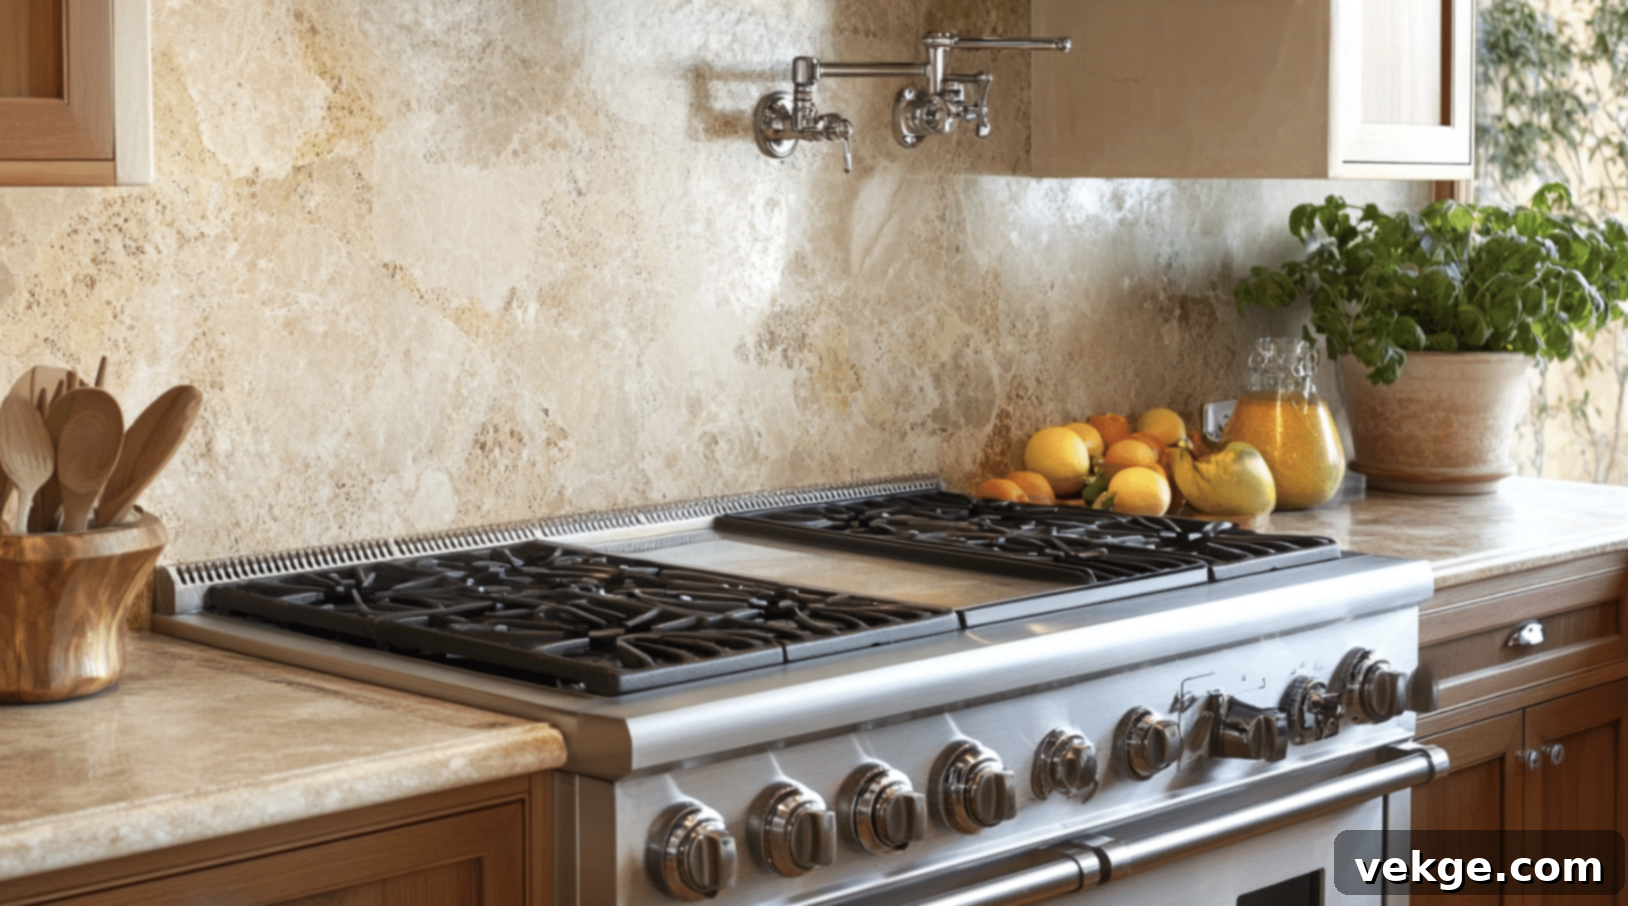
A natural stone backsplash is all about celebrating the raw, unadulterated beauty of geological formations. Unlike manufactured tiles, each slab or tile of natural stone — be it granite, marble, slate, travertine, or quartzite — is a unique piece of art, showcasing distinct veining, color variations, and crystalline structures forged over millennia. This inherent individuality ensures that your kitchen will possess a one-of-a-kind character, brimming with authenticity and sophisticated elegance. The rich textures and depth of natural stone add an organic warmth and luxurious feel that elevates the entire space, making your kitchen backsplash a true statement of natural design.
Design Tips for a Natural Stone Backsplash:
- Amplify Space with Lighter Hues: Opt for natural stones in lighter colors such as white marble, pale gray granite, or creamy travertine. These lighter shades reflect light, making your kitchen feel more open, airy, and visually expansive.
- Modern Twist with Large Format Tiles: While traditional smaller tiles are beautiful, using large format natural stone tiles can introduce a sleek, modern aesthetic. Larger tiles minimize grout lines, creating a more continuous, expansive surface that emphasizes the stone’s natural patterns.
- Create a Statement with a Focal Point: Select a particularly striking slab or a unique pattern of natural stone to create a dramatic focal point, especially behind your range or cooktop. This can be a full-height slab or an intricate mosaic panel that draws the eye and highlights the stone’s inherent beauty.
- Seamless Integration with Countertops: For a truly cohesive and high-end design, consider extending your countertop material upwards to form a full-height natural stone backsplash. This creates a seamless, elegant flow that unifies the kitchen’s surfaces, often seen in luxurious designs.
- Mix Finishes: Experiment with different finishes on your natural stone – honed (matte), polished (glossy), or leathered (textured matte) – to add subtle variations in visual appeal and tactile experience.
- Under-Cabinet Lighting: Install under-cabinet lighting to beautifully illuminate the natural stone, highlighting its intricate patterns, colors, and textures, especially in the evenings, adding warmth and depth.
3. Modern Stone Backsplash: Contemporary Elegance
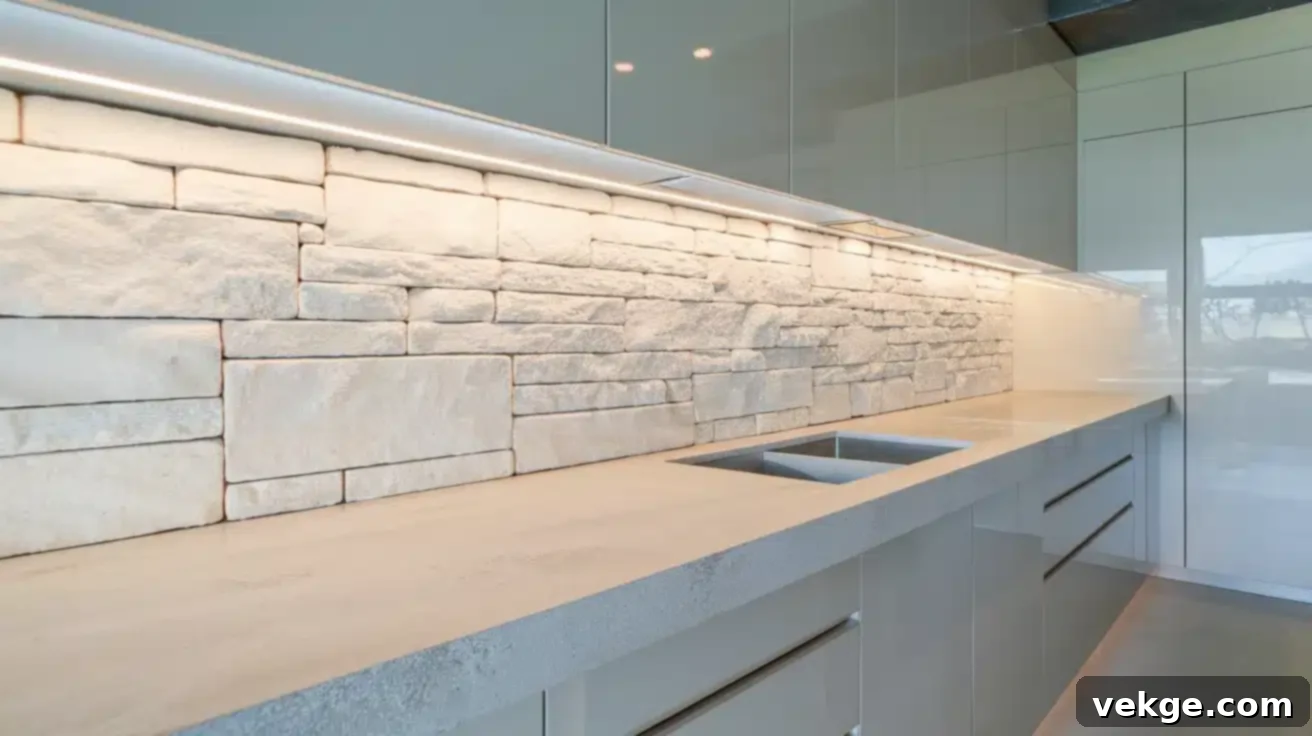
A modern stone backsplash embodies sophistication through clean lines, minimalist aesthetics, and often, smooth, unblemished surfaces. This style moves away from rustic imperfections towards sleek refinement, making it perfect for contemporary kitchen designs. Modern stone backsplashes typically feature large, flat pieces of stone, often in a monochromatic or subtle color palette that includes pristine whites, cool pale grays, understated beiges, or deep charcoals. The emphasis is on texture and subtle variations within the stone itself, rather than busy patterns, creating a serene and polished environment that speaks volumes in understated luxury.
Design Tips for a Modern Stone Backsplash:
- Sleek Horizontal Layouts: Opt for long, rectangular stone tiles arranged horizontally. This layout accentuates the width of the kitchen, creating a sense of expansiveness and a distinctly modern, linear aesthetic.
- Glossy Cabinetry Pairing: Combine your modern stone backsplash with high-gloss or matte-finish flat-panel cabinets. This pairing enhances the contemporary, high-end feel, reflecting light and creating a clean, seamless look.
- Highlight with Under-Cabinet Lighting: Install discreet LED strip lighting under your upper cabinets. This lighting will wash down the backsplash, beautifully highlighting the stone’s subtle textures and elegant patterns, adding depth and a touch of drama.
- Waterfall Countertop Edge: For the ultimate modern statement, extend your countertop material down the sides of an island or cabinet run to create a “waterfall” edge. This design mirrors the clean, continuous lines of a modern stone backsplash and elevates the overall design.
- Minimal Grout Lines: Choose a grout color that closely matches your stone to minimize its visibility. Alternatively, select large format slabs to reduce the number of grout lines, creating a more monolithic and fluid surface.
- Neutral Color Palette: Stick to a neutral color scheme for both the stone and surrounding elements. This allows the subtle beauty of the stone and the clean lines of the design to speak for themselves, maintaining a sophisticated and uncluttered look.
4. Gray Stone Backsplash: Versatile and Chic
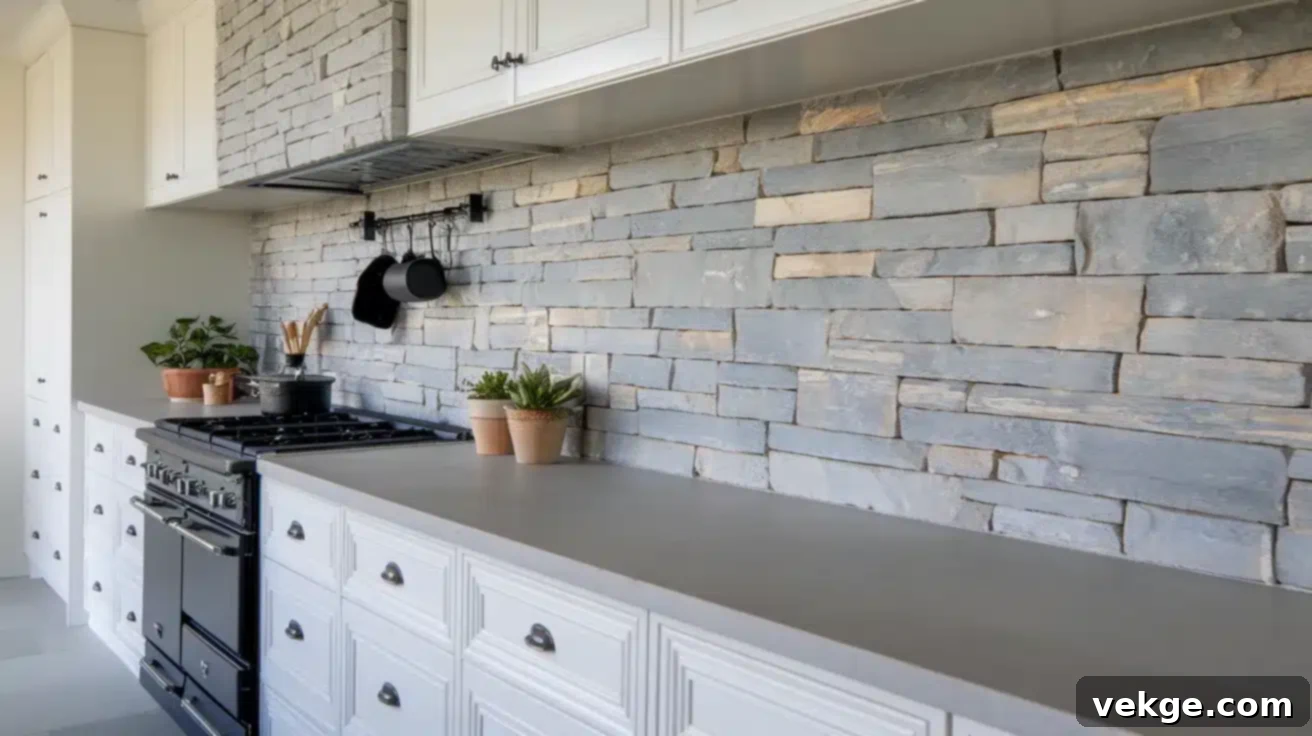
A gray stone backsplash is a remarkably versatile choice, offering a sophisticated and neutral backdrop that effortlessly integrates with a myriad of kitchen styles, from contemporary to farmhouse. The spectrum of gray in natural stone is vast, encompassing everything from luminous light silver and soft dove gray to deep, moody charcoal and near-black tones. This color family also allows for a wide range of textures, from silky smooth, honed finishes to dramatically textured, cleft surfaces, providing endless possibilities for creating visual interest and depth in your kitchen design. Gray stone provides a calming and elegant foundation that can be easily customized with other design elements.
Design Tips for a Gray Stone Backsplash:
- Subtle Layering with Shades: Incorporate different shades of gray stone or grout to create a nuanced, layered effect. This prevents the backsplash from appearing flat and adds a sophisticated depth to your kitchen’s color scheme.
- Classic Pairing with White Cabinets: For a timeless and airy kitchen, combine a gray stone backsplash with crisp white cabinets. This classic combination creates a beautiful contrast that feels both fresh and enduring, suitable for various design aesthetics.
- Infuse Color with Accessories: Leverage the neutral nature of gray by introducing vibrant pops of color through kitchen accessories, small appliances, dishware, or fresh flowers. This allows for easy style updates without changing the permanent fixtures of your stone backsplash.
- Dynamic Mosaic Patterns: To add significant visual intrigue to a monochrome or gray-heavy palette, consider a gray stone mosaic pattern. Intricate patterns, varied tile shapes, or even a mix of finishes within the mosaic can make your backsplash a striking focal point.
- Metallic Accents: Pair gray stone with metallic finishes such as brushed nickel, chrome, or even gold hardware to add a touch of glamour and warmth, creating a well-rounded design.
- Texture Play: If your gray stone is smooth, consider contrasting it with textured elements elsewhere in the kitchen, like woven bar stools or a rough-hewn wooden shelf, to add tactile interest.
5. Blue Kitchenette with Stone: Serene and Stylish
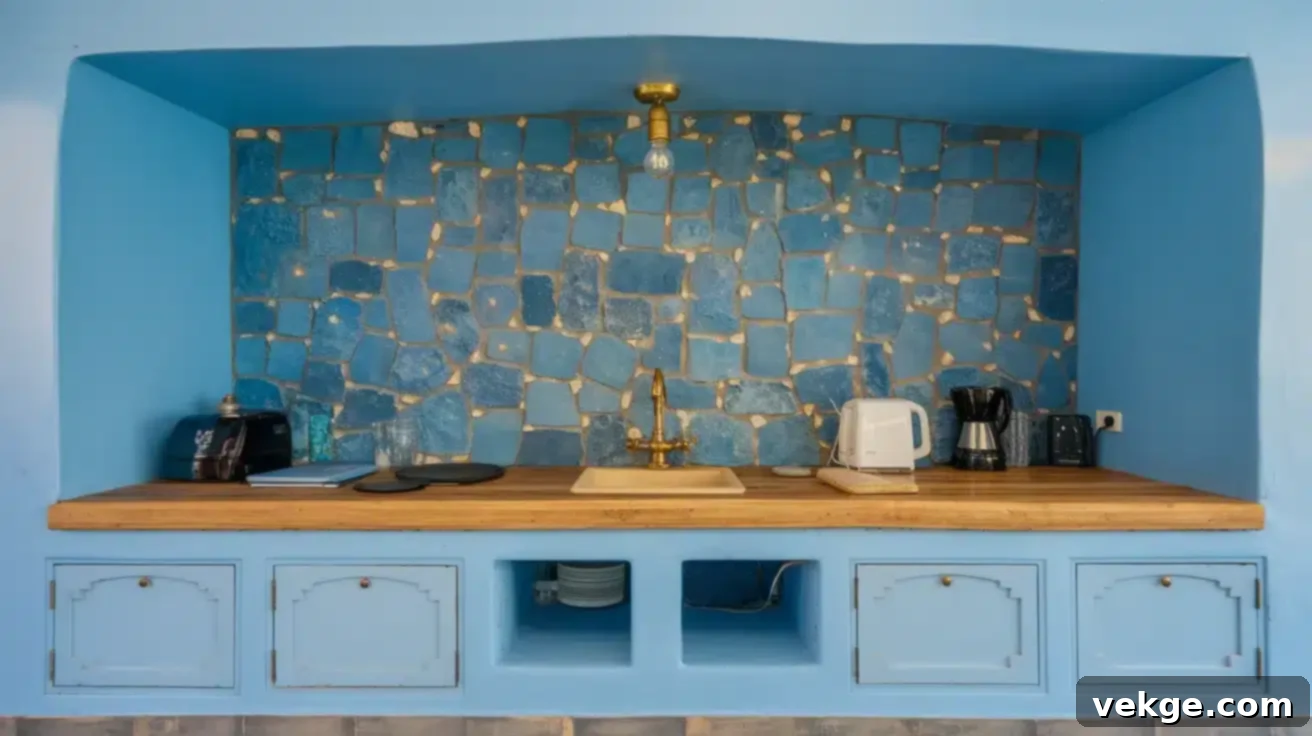
Infusing blue into your kitchenette or kitchen design, especially in combination with a stone backsplash, creates an atmosphere of serene calm and sophisticated coolness. Blue is a remarkably versatile color, ranging from soft sky blues that evoke tranquility to deep navy hues that exude elegance. This design approach can be achieved either by selecting natural stones with inherent blue undertones, such as certain slates or granites, or more commonly, by pairing neutral-toned stone backsplashes (like white marble or gray quartzite) with blue cabinetry, blue accessories, or even blue-tinted glass tiles integrated into the stone. The combination of natural stone and blue tones provides a refreshing and inviting feel.
Design Tips for a Blue Kitchenette with Stone:
- Unique Blend with Blue Glass Tiles: For a distinctive and luminous effect, consider incorporating blue glass tiles alongside natural stone. This mix adds sparkle and depth, with the glass catching the light and the stone providing an earthy counterpoint, creating a truly bespoke backsplash.
- Striking Contrast with Navy Cabinets: Pair a pale blue, white, or light gray stone backsplash with rich navy blue cabinets. The contrast is both bold and sophisticated, giving your kitchenette a luxurious and contemporary edge.
- Warmth Through Metallic Hardware: To balance the coolness of blue and stone, introduce warm metallic hardware. Brass or gold cabinet pulls and fixtures will add a touch of elegance and warmth, creating a harmonious and inviting space.
- Coastal Vibes with Wave Patterns: For a beachy or coastal-inspired kitchenette, consider a stone backsplash that features a wave-like pattern, perhaps achieved with elongated tiles or a mosaic. This visual element, especially when combined with lighter blue tones, evokes the calming rhythm of the ocean.
- Textural Blue Stone: Explore blue-hued natural stones like certain types of slate or quartzite that offer unique textures. The natural variations and subtle blue tones can create a stunning, organic focal point.
- Subtle Blue Grout: If your stone backsplash is predominantly neutral, a light blue-tinted grout can provide a subtle whisper of color without overwhelming the space, tying in with other blue elements.
6. Over-Grouted Stone Backsplash: Vintage and Textured
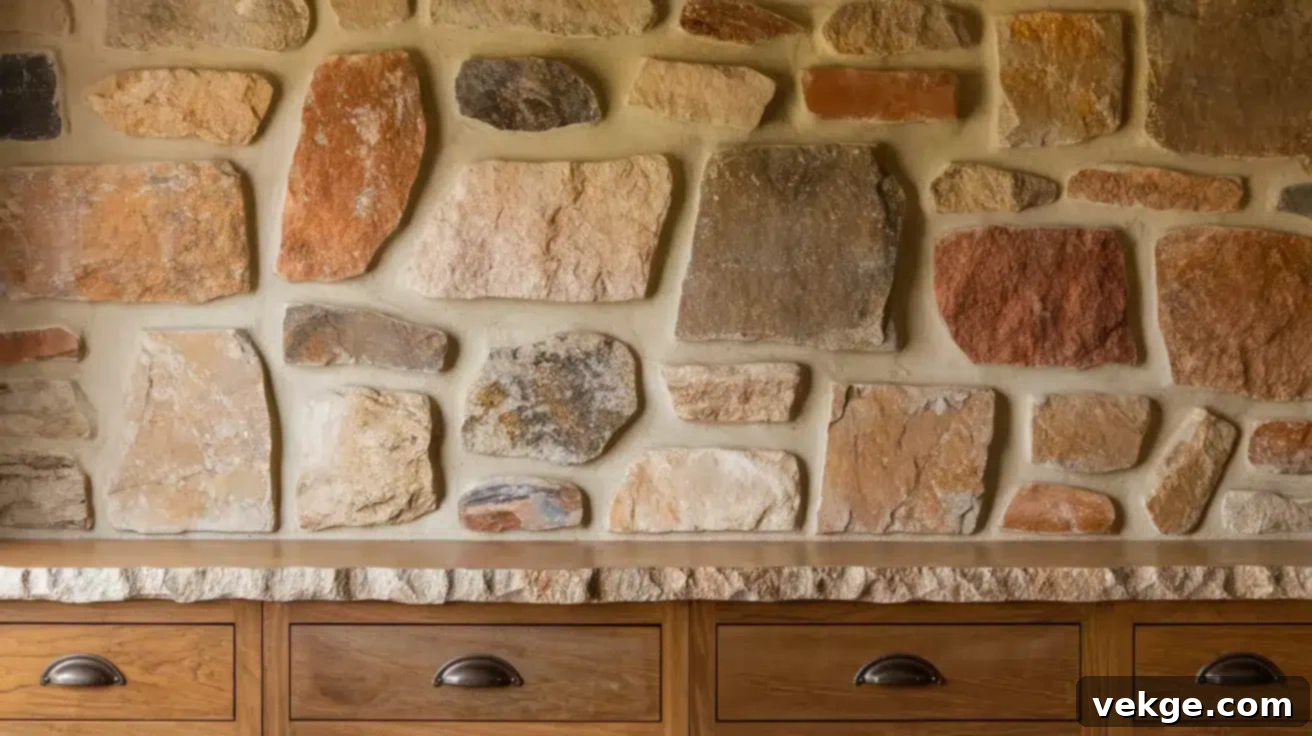
The over-grouted stone backsplash is a distinctive technique where extra grout is intentionally applied to partially cover the edges and sometimes even the faces of the stones. This method creates a visibly thicker and more pronounced grout line, giving the backsplash a wonderfully textured, aged, and robust appearance. It’s an excellent choice for achieving a rustic, farmhouse, or old-world aesthetic, as it mimics the look of traditional masonry work where grout was applied more generously. The visual effect is one of solidness and enduring craftsmanship, adding significant character and tactile interest to your kitchen walls and making it a unique stone backsplash.
Design Tips for an Over-Grouted Stone Backsplash:
- Ideal for Rounded or Irregular Stones: This technique is particularly effective with naturally rounded stones, such as river rocks, pebbles, or irregularly shaped fieldstones. The generous grout helps to secure these varied shapes and enhances their organic contours.
- Highlight Stone Shapes with Contrasting Grout: If you want the individual stones to stand out, use a grout color that subtly contrasts with the stone itself. For instance, a light cream grout against darker stones will make each stone’s unique shape pop, enhancing the textured effect.
- Combine with Distressed Wood: Pair an over-grouted stone backsplash with distressed wood cabinets, antique furniture pieces, or reclaimed wood shelving. This combination reinforces the vintage, timeworn aesthetic, creating a cohesive and charmingly aged kitchen design.
- Extend to a Feature Wall: For a truly dramatic statement, consider extending the over-grouted stone style beyond just the backsplash to an entire feature wall in your kitchen or an adjoining dining area. This creates a powerful architectural element and a strong, unified design impact.
- Natural Grout Colors: Opt for natural-looking grout colors like off-white, beige, or light gray to further enhance the earthy, authentic feel of this style.
- Consider Lighting: Strategic lighting can cast shadows that highlight the depth and texture created by the over-grouting, adding to its visual appeal and enhancing the overall ambiance.
Maintenance and Care Tips for Your Stone Backsplash
Cleaning Your Stone Backsplash: Preserving its Luster
Regular and proper cleaning is vital to maintain the beauty and integrity of your stone backsplash. Natural stone is porous and can react to harsh chemicals, so a gentle approach is always best:
- Daily Wiping: For routine cleaning, simply use warm water and a soft, non-abrasive cloth or sponge. Gently wipe down the backsplash to remove daily dust, splatters, and light grime.
- Immediate Spill Cleanup: Act quickly to clean up any spills, especially acidic liquids like lemon juice, vinegar, or wine, as well as oils and highly pigmented foods. Blot the spill with a clean cloth rather than wiping, which can spread the stain and potentially etch or damage the stone backsplash.
- Use Stone-Specific Cleaners: If your backsplash is particularly dirty or requires a deeper clean, use a pH-neutral cleaner specifically formulated for natural stone. Avoid generic household cleaners, abrasive pads, or acidic/alkaline solutions, as these can etch, dull, or damage the stone and its sealer over time.
- Gentle Scrubbing for Stubborn Dirt: For more stubborn dirt or dried food particles, use a soft-bristled brush (like a soft toothbrush for grout lines) with your stone-safe cleaner and water. Scrub gently to lift the grime without scratching the stone’s surface.
- Rinse and Dry Thoroughly: After cleaning with any solution, always rinse the backsplash thoroughly with clean water to remove all traces of soap. Then, immediately dry the stone surface with a soft, clean towel to prevent water spots and streaks, especially on polished finishes.
- Grout Line Maintenance: For discolored or tough-to-clean grout lines, a paste made of baking soda and water, applied with a toothbrush, can be effective. Rinse thoroughly after use to prevent any residue.
Keeping Your Stone Sealed: Essential Protection
Sealing is the most critical maintenance task for most natural stone backsplashes, as it provides a protective barrier against stains and moisture absorption. The frequency of sealing depends on the stone type and kitchen usage, but typically ranges from every 1 to 3 years.
- The Water Test: To determine if your stone needs resealing, perform a simple water test. Place a few drops of water on a clean, dry section of the stone surface. If the water beads up, your sealer is likely still effective. If the water quickly soaks in and darkens the stone, it’s definitely time to reseal your natural stone backsplash.
- Thorough Cleaning First: Before applying any sealer, ensure your stone backsplash is impeccably clean and completely dry. Any dirt, grease, or moisture trapped under the sealer will be sealed in and become difficult to remove, compromising the sealer’s effectiveness and the stone’s appearance.
- Apply Evenly: Using a clean, soft cloth, sponge applicator, or paint pad, apply the penetrating stone sealer evenly across the entire surface of the stone and grout lines. Avoid pooling; work in small sections if necessary to ensure uniform coverage.
- Follow Manufacturer’s Instructions: Always adhere strictly to the specific instructions provided on your chosen sealer bottle. Pay close attention to recommended application methods, dwell times (how long the sealer should sit), and the number of coats required for optimal protection.
- Wipe Off Excess: After the recommended dwell time (before the sealer dries), use a clean, dry cloth to thoroughly wipe off any excess sealer from the surface. Leaving excess sealer on the surface can result in a hazy film or sticky residue that is difficult to remove. Buff the surface gently to ensure an even finish.
- Curing Time: Allow the sealer to cure for the recommended period, typically 24-72 hours, before exposing the backsplash to moisture or heavy use. This ensures the sealer fully penetrates and bonds with the stone.
Fixing Common Stone Backsplash Problems
Even with the best care, minor issues can arise with your stone backsplash. Knowing how to address common problems can help keep your natural stone looking its best and extend its lifespan:
- Stains (General Spills): As mentioned, blot spills immediately with a clean cloth to prevent them from soaking in. For existing stains, accurately identify the type of stain (oil-based, water-based, organic, etc.) to choose the correct poultice or cleaner for effective removal.
- Oil-Based Stains: For grease, cooking oil, or similar stains on your stone backsplash, create a poultice by mixing baking soda with a small amount of water to form a thick, peanut-butter-like paste. Apply this paste generously over the stain, ensuring it’s completely covered. Cover the paste with plastic wrap and tape the edges to prevent it from drying out too quickly. Leave it for 24-48 hours, then remove the plastic and allow the paste to dry completely before scraping it off. The baking soda draws the oil out of the porous stone.
- Watermarks/Hard Water Stains: These often appear as dull spots or white mineral deposits. For light watermarks, gently rub the area with very fine steel wool (#0000 grade) or a non-abrasive scrubbing pad. For tougher mineral deposits, specialized stone stain removers may be needed, but always test in an inconspicuous area first to avoid damaging your stone backsplash.
- Etching (Acid Damage): Caused by acidic substances (like citrus juices, vinegar, or certain harsh cleaners) reacting with calcium-based stones like marble or travertine, etching appears as dull spots or rough patches. Etching cannot be “cleaned” away; it requires professional honing and re-polishing to restore the stone’s original finish. Prevention through immediate cleanup and diligent sealing is paramount.
- Cracked or Chipped Tiles: If a stone tile cracks or chips, especially in a prominent area of your stone backsplash, it’s best to consult a professional stone repair specialist or tile setter. They can often replace individual tiles or repair chips seamlessly, maintaining the aesthetic integrity of your kitchen backsplash.
- Heat Protection: While natural stone is generally heat resistant, extreme, prolonged direct heat (like a very hot pot taken directly from the stove and placed on a countertop adjacent to the backsplash) can potentially cause thermal shock or affect the sealer over time. Always use pot holders or trivets for hot items near the backsplash on countertops to provide an extra layer of protection.
Comparing Stone Backsplashes to Other Popular Materials
When choosing a backsplash material, it’s helpful to compare natural stone against other common options. Each material offers a unique set of benefits and considerations regarding cost, durability, aesthetics, maintenance, and moisture resistance, helping you make an informed decision for your kitchen backsplash.
| Material | Cost per Sq. Ft. (Material Only) | Durability | Aesthetic | Maintenance | Moisture Resistance |
|---|---|---|---|---|---|
| Natural Stone (e.g., Granite, Marble, Slate) | $15 – $75+ (varies widely by type and rarity) | Generally highly durable, offering excellent resistance to heat and scratches. However, porosity varies by stone type, making some susceptible to staining if not properly sealed and maintained. | Provides a luxurious, timeless, and organic look. Each piece is unique with natural veining and textures, adding significant warmth, character, and perceived value to a kitchen. | Requires more specific maintenance; regular sealing (every 1-3 years) is crucial to protect against stains and moisture. Cleaning should be done with pH-neutral, stone-safe cleaners to avoid damage. | Moderate to High. While the stone itself can be resistant, its porosity means it needs proper sealing to prevent moisture absorption and potential damage or staining, especially in high-splash zones. |
| Ceramic/Porcelain Tile | $2 – $20 | Very durable, scratch-resistant, and can withstand heat well. Porcelain, in particular, is extremely hard and dense. While individual tiles can chip on impact, they are relatively easy to replace. | Offers unparalleled versatility in design, with an enormous range of colors, patterns, sizes, and finishes (glossy, matte, textured) available. Can convincingly mimic other materials like wood or stone. | Low maintenance. Glazed ceramic and porcelain tiles are non-porous and very easy to wipe clean with standard household cleaners. Grout lines may require occasional scrubbing but are generally simple to maintain. | High. Both ceramic and porcelain tiles are highly water-resistant, making them ideal for humid environments like kitchens and bathrooms. Grout lines are the only area where water might penetrate, making proper sealing of grout important. |
| Glass Tile | $10 – $50+ (can be very high for intricate designs) | Fairly durable but more susceptible to cracking or chipping on direct impact compared to ceramic or stone. Some types may show scratches more easily on their reflective surfaces. | Delivers a sleek, modern, and often vibrant aesthetic. The reflective surface adds brightness and depth, bouncing light around the room. Available in a vast array of colors, sizes, and translucencies. | Easy to clean, but its glossy surface is prone to showing smudges, fingerprints, and water spots, requiring frequent wiping for a pristine look. Grout lines need standard cleaning. | High. Glass is entirely non-porous and highly resistant to moisture, making it an excellent choice for wet areas. It will not absorb water or stains, offering great protection for your walls. |
| Stainless Steel | $20 – $70+ (sheets, custom panels, or tiles) | Extremely durable, highly resistant to heat, stains, and corrosion. Offers a professional, hygienic surface. Can dent on heavy impact and show fine scratches over time, which can contribute to a “lived-in” look. | Provides a distinct industrial, commercial kitchen, or ultra-modern look. Its sleek, reflective metallic finish creates a contemporary and functional aesthetic, often paired with professional-grade appliances. | Relatively low maintenance, but its reflective surface readily shows fingerprints, water spots, and smudges, necessitating frequent cleaning with specialized stainless steel cleaners for a polished appearance. | Very High. Stainless steel is virtually impervious to moisture, rust, and water damage, making it an exceptionally hygienic and robust option for any kitchen environment, offering superior protection. |
Ultimately, the best backsplash material for your home will depend on your budget, desired aesthetic, maintenance preferences, and how much protection you need against kitchen activities. While natural stone offers unparalleled natural beauty and long-term value, other materials present compelling alternatives with different benefits.
Conclusion: Embrace the Enduring Beauty of Stone
As we’ve explored throughout this comprehensive guide, stone backsplashes truly offer an exceptional combination of natural beauty, unparalleled durability, and versatile functionality for any kitchen or bathroom. They infuse your cooking space with an organic charm and robust resilience that few other materials can match, transforming it into a focal point of your home and enhancing its overall appeal for years to come.
We’ve journeyed through the diverse world of natural stone, from the luxurious veining of polished marble to the rugged appeal of earthy slate and the enduring strength of granite. We’ve provided comprehensive insights into selecting the right stone type to match your personal style and budget, alongside a detailed, step-by-step installation process designed to guide both novice and experienced DIYers. Crucially, we’ve also equipped you with essential maintenance and care tips, ensuring your investment remains as stunning as the day it was installed, proving the lasting value of a stone backsplash.
While natural stone backsplashes do require a thoughtful approach to maintenance, primarily through regular sealing and appropriate cleaning, their longevity and resistance to heat and wear make them an incredibly worthwhile long-term investment. With the right care, your stone backsplash will gracefully endure for decades, continuing to enhance your home’s value and aesthetic appeal, becoming a cherished element of your interior design.
Whether your vision leans towards a cozy rustic ambiance, a sleek modern statement, or a timeless classic design, there is undoubtedly a stone backsplash option perfectly suited to your aesthetic aspirations. By choosing natural stone, you’re not just selecting a material; you’re bringing a unique piece of geological history and artistry into your home. This deliberate choice elevates your kitchen, making it a distinctly personal and enduring space that truly stands out.
Transform your kitchen with the unmatched elegance and resilience of a stone backsplash – a choice that promises both lasting beauty and exceptional performance, creating a home that reflects your unique taste and appreciation for natural design.
