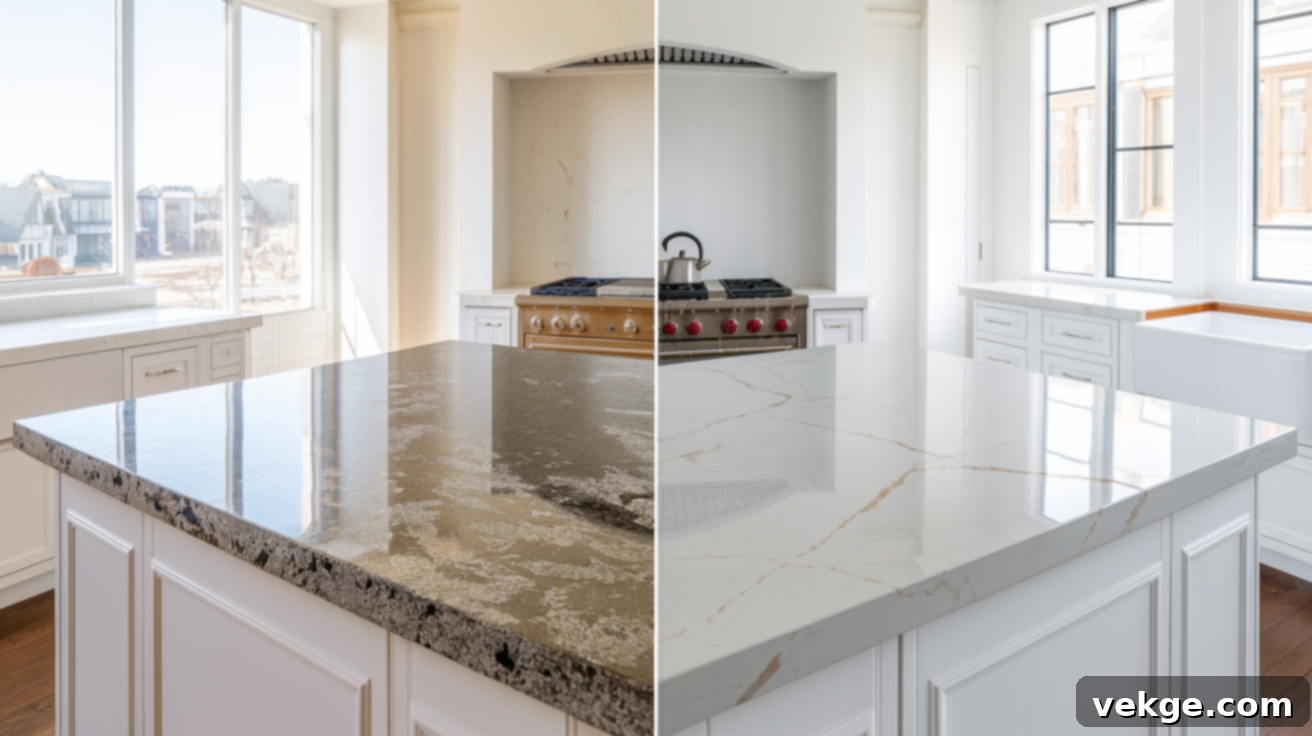
Transform Your Kitchen: A Complete Guide to Painting Granite Countertops for a Modern Look
Are your beloved granite countertops starting to show their age, perhaps looking a bit dated, but a full replacement simply isn’t in your budget right now? Many homeowners, myself included, have found themselves pondering the question: “Can I truly paint granite countertops and achieve a lasting, beautiful result?”
The exciting news is, you absolutely can! With the right preparation, the correct choice of paint, and a meticulous application technique, it’s entirely possible to breathe new life into your existing countertops. I’ve personally experienced the satisfaction of transforming tired granite into a fresh, modern surface, all without the significant expense and disruption of a complete kitchen overhaul. This DIY project can dramatically update your space, offering a high-end look on a humble budget.
In this comprehensive guide, I’ll walk you through every critical step of the process. From meticulously prepping the granite surface to selecting the ideal paint and applying a durable topcoat, we’ll cover everything you need to know. My goal is to empower you to tackle this project with confidence, ensuring those newly painted countertops not only look fantastic but also stand the test of time.
Whether you’re an experienced DIY enthusiast eager for your next home improvement challenge or someone considering professional assistance for this specific task, this detailed guide will equip you with the knowledge to make the best decision for your home and achieve your desired aesthetic.
Benefits and Drawbacks of Painted Granite Countertops
Before you commit to painting your granite countertops, it’s wise to weigh the potential advantages against the challenges. Understanding both the pros and cons will help you determine if this project is the right fit for your lifestyle and expectations.
Advantages of Painting Granite:
- Cost-Effective Renovation: Painting offers a significantly more affordable way to refresh your kitchen or bathroom compared to the hefty price tag of replacing natural stone countertops. It’s an excellent option for a budget-conscious renovation.
- Instant Style Update: You can effortlessly update the color and style of your countertops to match your current decor or a new design vision. Whether you’re aiming for a sleek modern look, a classic marble effect, or a bold contemporary statement, paint provides endless possibilities.
- Temporary or Long-Term Solution: This approach works wonderfully as a temporary fix if you plan on a more extensive renovation or replacement down the line. However, with proper care, painted granite can also serve as a durable, long-lasting surface.
- DIY-Friendly: With the right tools and instructions, painting granite is a manageable DIY project, allowing you to take pride in transforming your home with your own hands.
Challenges and Considerations:
- Durability Concerns: While modern countertop paints and epoxy resins are highly durable, painted granite is generally more vulnerable to scratches, chips, and general wear and tear than the original natural stone. High-traffic areas, like a busy kitchen, will require more vigilance.
- Maintenance Requirements: Painted surfaces require consistent and gentle maintenance. This includes avoiding harsh abrasive cleaners, using soft cloths for cleaning, and being mindful of hot pans or sharp objects.
- Regular Resealing: To maintain its protective barrier and glossy finish, you’ll typically need to reseal the painted surface every one to two years. This helps protect against moisture and stains, ensuring longevity.
- Preparation is Key: The success of your project heavily relies on thorough surface preparation. Any shortcuts in cleaning, sanding, or priming can lead to poor adhesion and a less durable finish.
If you’re comfortable with a bit of ongoing upkeep and appreciate the significant cost savings, painting your granite can be an incredibly smart and rewarding choice for a stunning home transformation.
Choosing the Right Paint for Granite Countertops
When it comes to painting granite countertops, not just any paint will do. You need specialized products designed to withstand the unique demands of kitchen or bathroom surfaces, including heat, moisture, stains, and daily abrasion. Selecting the correct type of paint is crucial for both the aesthetic appeal and the long-term durability of your project.
The best options for countertop transformations are typically epoxy paints or polyurethane paints. These specific formulations are engineered for high-traffic, high-moisture environments and can create a hard, resilient finish that mimics the look of a new stone surface. Many countertop refinishing kits available on the market will include these types of coatings, often with a primer and a clear topcoat.
Key Considerations When Choosing Paint:
- Countertop-Specific Kits: Look for paints or kits specifically marketed for countertops, cabinets, or floors. These products are formulated to adhere well to non-porous surfaces like granite and offer superior resistance to impact and chemicals.
- Epoxy Paint Benefits: Epoxy paint is an excellent choice due to its exceptional hardness and chemical resistance. When properly mixed and applied, it forms a robust, non-porous surface that is highly durable and creates a beautiful, often glossy, finish. It’s renowned for its ability to withstand heavy use.
- Polyurethane for Added Durability: Polyurethane paints or clear coats offer superb abrasion resistance and flexibility. They are less prone to chipping than some other paints and provide a very smooth, often high-gloss, finish that is easy to clean. Some systems combine epoxy for adhesion and polyurethane as a protective topcoat.
- Food Contact Safety: This is paramount for kitchen countertops. Always ensure that the paint and topcoat you choose are labeled as food-safe once cured. While direct food preparation on painted surfaces is still best avoided by using cutting boards, this ensures no harmful chemicals leach into your food over time.
- Adhesion Qualities: Granite is a very dense and smooth surface, making adhesion a challenge. High-quality paints formulated for countertops are designed with superior bonding properties, often requiring a specific primer to ensure the paint grips effectively.
- Finish Type: Consider the finish you desire – glossy, semi-gloss, or satin. Most epoxy topcoats provide a high-gloss, reflective finish that emulates polished stone, which can significantly brighten your kitchen.
Investing in high-quality, specialized paint is not an area to cut corners. The success and longevity of your painted granite countertops depend heavily on this critical decision.
Tools Required for Painting Granite Countertops
A successful countertop transformation requires more than just paint; it demands the right set of tools and materials. Gathering everything you need before you start will ensure a smooth, uninterrupted, and professional-looking result. Here’s a detailed list to prepare for your project:
- Heavy-Duty Cleaner/Degreaser (e.g., TSP or specialized granite cleaner): Absolutely essential for thoroughly cleaning the countertops and removing all traces of grease, dirt, and soap scum, which is critical for paint adhesion.
- Painter’s Tape (Blue or Green): To precisely mask off areas you do not want painted, such as cabinet edges, backsplash, walls, and the sink rim. Opt for high-quality tape that leaves no residue.
- Plastic Sheeting or Drop Cloths: To generously cover and protect surrounding cabinets, floors, appliances, and walls from any drips, splatters, or overspray of primer, paint, and epoxy.
- High-Quality Bonding Primer (White Base): A specialized primer designed to adhere to non-porous surfaces like granite. A white base provides a consistent foundation for your chosen paint color and helps achieve true color.
- Your Chosen Countertop Paint: Whether it’s a specific color for a solid look or a base coat for a faux marble effect.
- Gray or Black Acrylic Paint (for Veining, if desired): For creating realistic marble veining effects. Choose a shade that complements your desired marble look.
- Small Spray Bottle (with water): To lightly mist painted veins, allowing them to blur and soften for a more natural, organic marble appearance.
- Natural Sea Sponge or Soft Cloth: For blending and softening the veining paint, creating diffused and realistic patterns.
- Epoxy Resin Kit: This will include both the resin and hardener (activator). Ensure it’s a countertop-grade, self-leveling epoxy for a durable, glossy finish.
- Foam Rollers (several sizes, including small for edges): For smooth, even application of primer, paint, and especially the epoxy resin. Foam rollers minimize bubbles and brush marks.
- Roller Tray: For holding and distributing primer, paint, and epoxy.
- Mixing Sticks or Power Drill with Mixing Attachment: Crucial for thoroughly combining the two parts of the epoxy resin according to manufacturer instructions. Improper mixing can lead to curing issues.
- Small Angled Paintbrush: Ideal for precision work along edges, corners, and tight spaces where a roller can’t reach.
- Nitrile or Latex Gloves: Essential personal protective equipment for protecting your hands from paints, primers, epoxy, and cleaning chemicals.
- Respirator Mask: Highly recommended, especially when working with epoxy resin, to protect against fumes. Ensure good ventilation.
- Safety Glasses: To protect your eyes from splashes and fumes.
- Plastic Cups/Buckets: For mixing paint and especially for precise measurement and mixing of epoxy components.
- Putty Knife or Scraper: Useful for removing any hardened epoxy drips from protected surfaces, or for carefully cleaning up uncured epoxy.
- Lint-Free Rags/Microfiber Cloths: For wiping down surfaces after cleaning and for general clean-up.
- Fine-Grit Sandpaper (220-400 grit) or Sanding Block: For light sanding between primer coats (if recommended) and for scuffing the granite to improve adhesion.
- Tack Cloths: To remove all fine dust particles after sanding, ensuring a perfectly clean surface before painting.
Having all these items on hand will not only make the process smoother but also contribute significantly to achieving a high-quality, professional finish for your revamped granite countertops.
Paint Granite Countertops: Step-by-Step Process
Transforming your granite countertops is a rewarding project, but it requires careful attention to detail at each stage. Follow these steps meticulously to ensure a smooth, durable, and beautiful finish that will last for years to come.
Step 1: Prepare the Countertops and Area
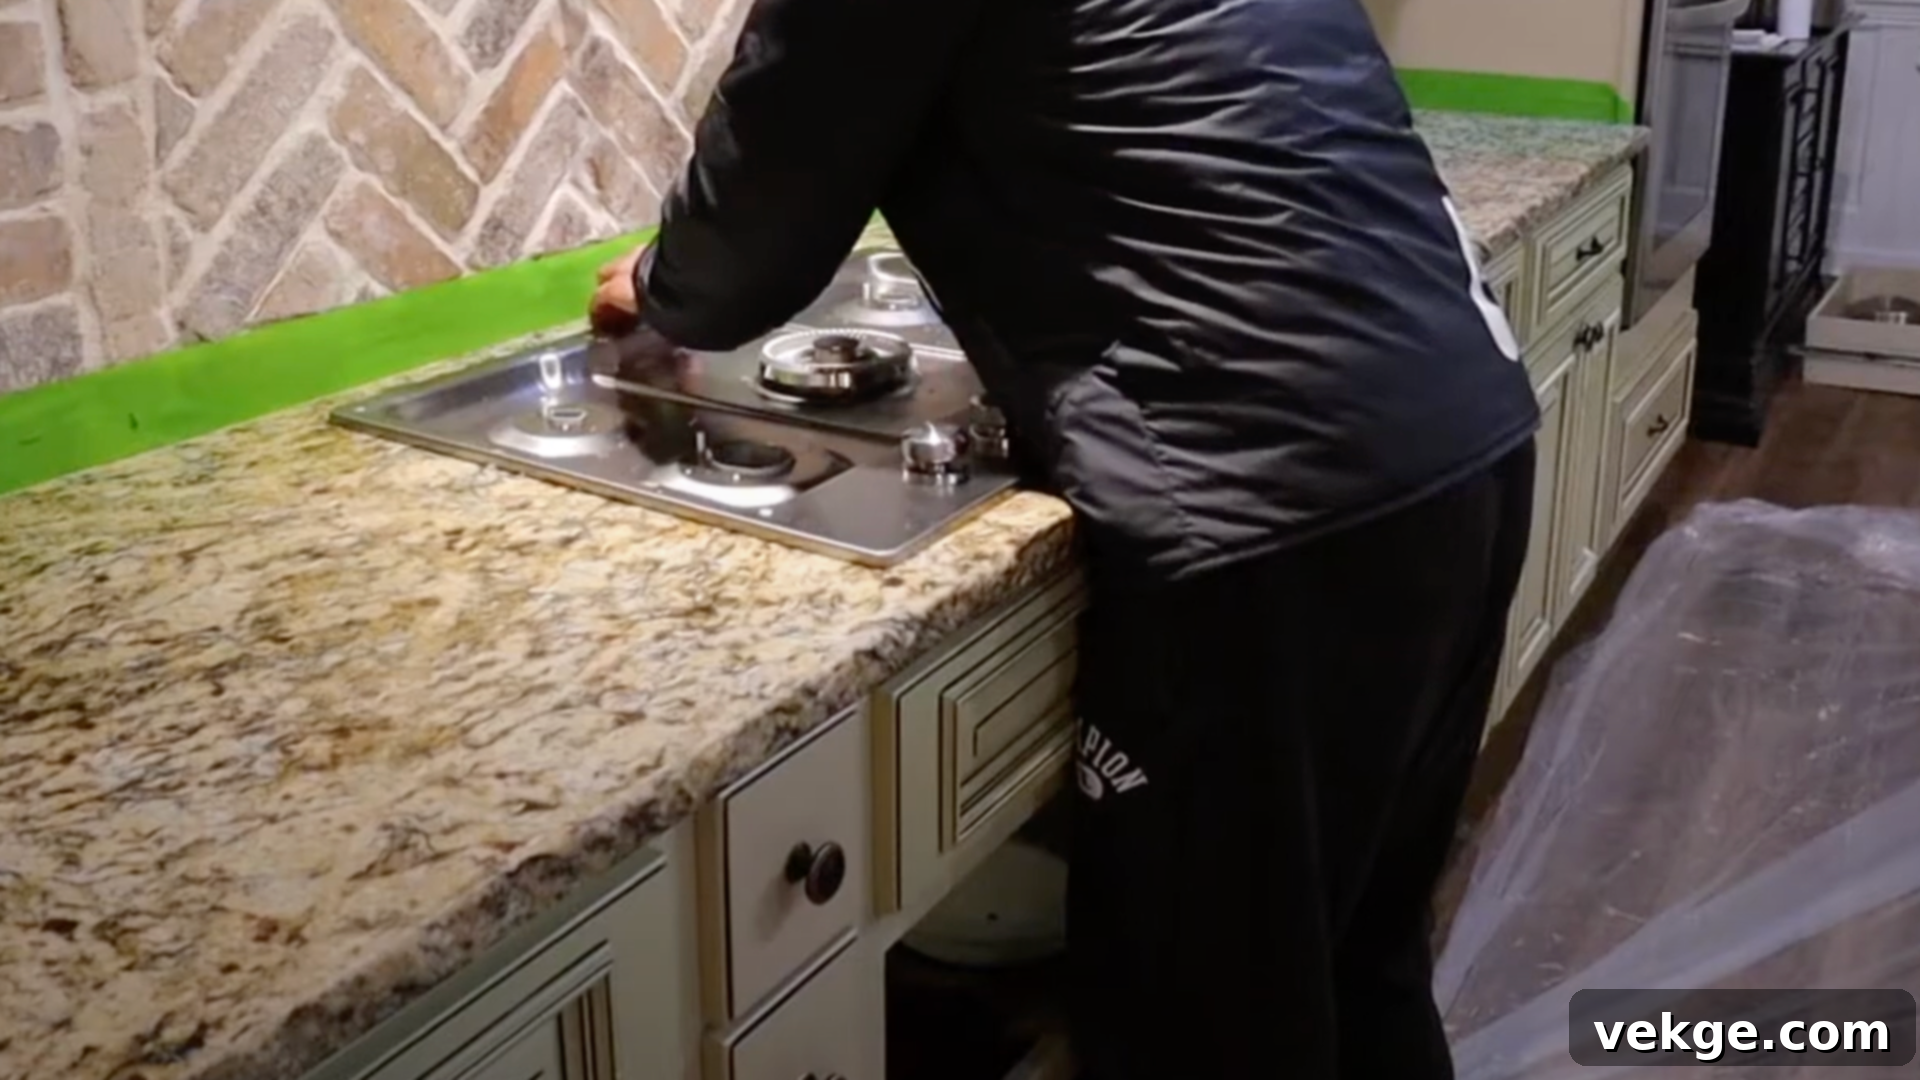
This initial step is the most critical for the success and longevity of your painted countertops. Start by completely clearing your countertops. Remove all appliances, decorative items, and anything else from the surface. If you have a drop-in cooktop or sink, it’s highly recommended to remove them if possible to ensure clean edges and full coverage. Disconnect any plumbing and electrical as needed.
Next, meticulously protect your surrounding areas. Use high-quality painter’s tape to create crisp, clean lines along cabinets, walls, and any backsplashes you don’t intend to paint. Cover your cabinets, floors, and appliances with plastic sheeting or drop cloths to shield them from any accidental drips, splatters, or dust. Good ventilation is also crucial, so open windows or use fans.
Now, thoroughly clean the granite surface. Use a heavy-duty degreaser like TSP (Trisodium Phosphate) or a specialized granite cleaner. Scrub away any grease, dirt, grime, or sealant residue with a stiff brush or a Brillo pad. Rinse the surface multiple times with clean water to ensure all cleaning solution is removed. Allow the countertops to dry completely – any lingering moisture or residue will severely compromise paint adhesion. Some professionals also recommend a light sanding (220-grit) to scuff the surface, followed by a tack cloth wipe down, to further enhance primer bonding.
Step 2: Apply Primer and Let It Dry
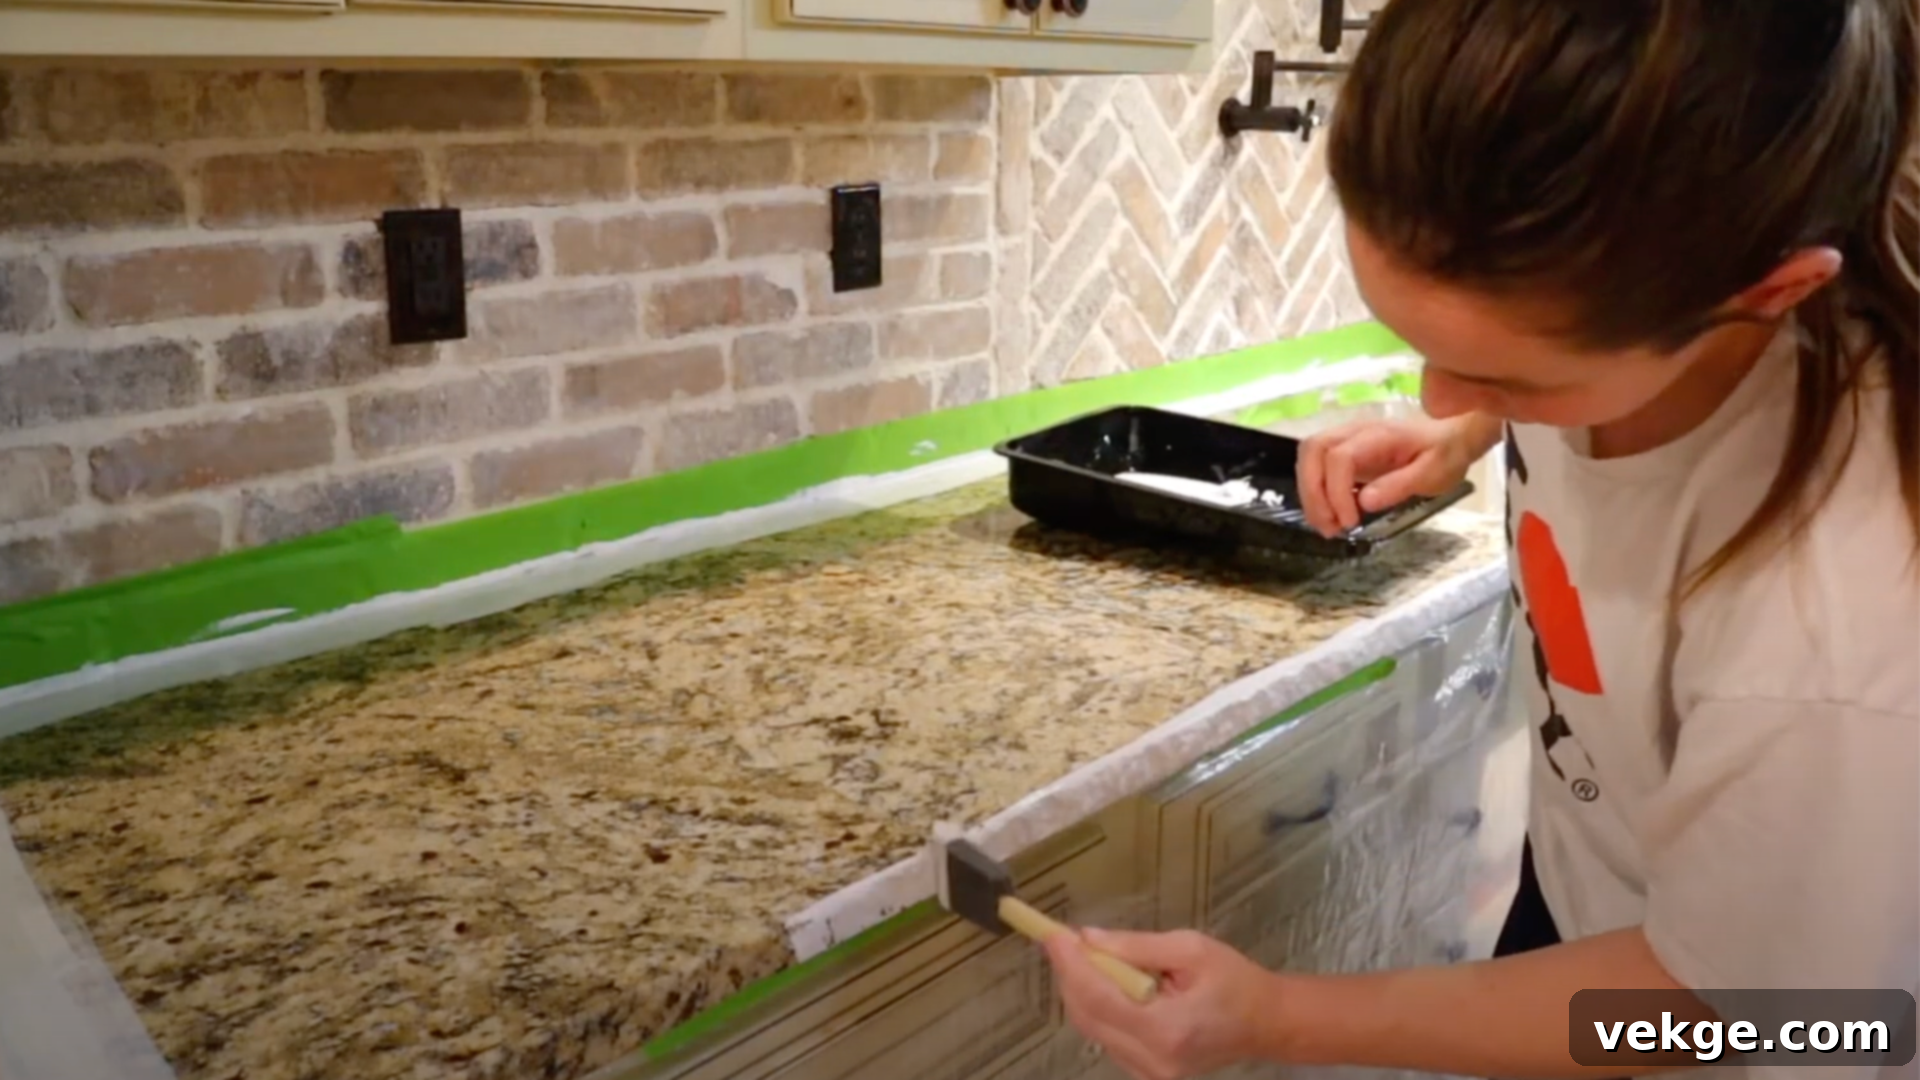
With a perfectly clean and dry surface, it’s time to apply your specialized bonding primer. Use a small paintbrush for the edges and corners, then switch to a foam roller for the main flat surfaces. Apply the primer in thin, even coats, ensuring complete coverage. Avoid thick applications, as this can lead to drips and an uneven final finish. The primer creates the essential bond between the smooth granite and your paint, acting as a crucial adhesive layer.
For optimal results and robust adhesion, apply two thin coats of primer. Allow the first coat to dry according to the manufacturer’s instructions (typically 1-2 hours). Once dry, you may lightly sand with a fine-grit sandpaper (e.g., 400-grit) if recommended by the primer manufacturer, then wipe clean with a tack cloth before applying the second coat. After the second coat, allow it to cure thoroughly. This usually means letting it dry for at least 4-6 hours, or even overnight, depending on humidity and product specifications. A fully cured primer base is paramount for the subsequent layers of paint and epoxy to bond correctly.
Step 3: Add Marble Veining (Optional)
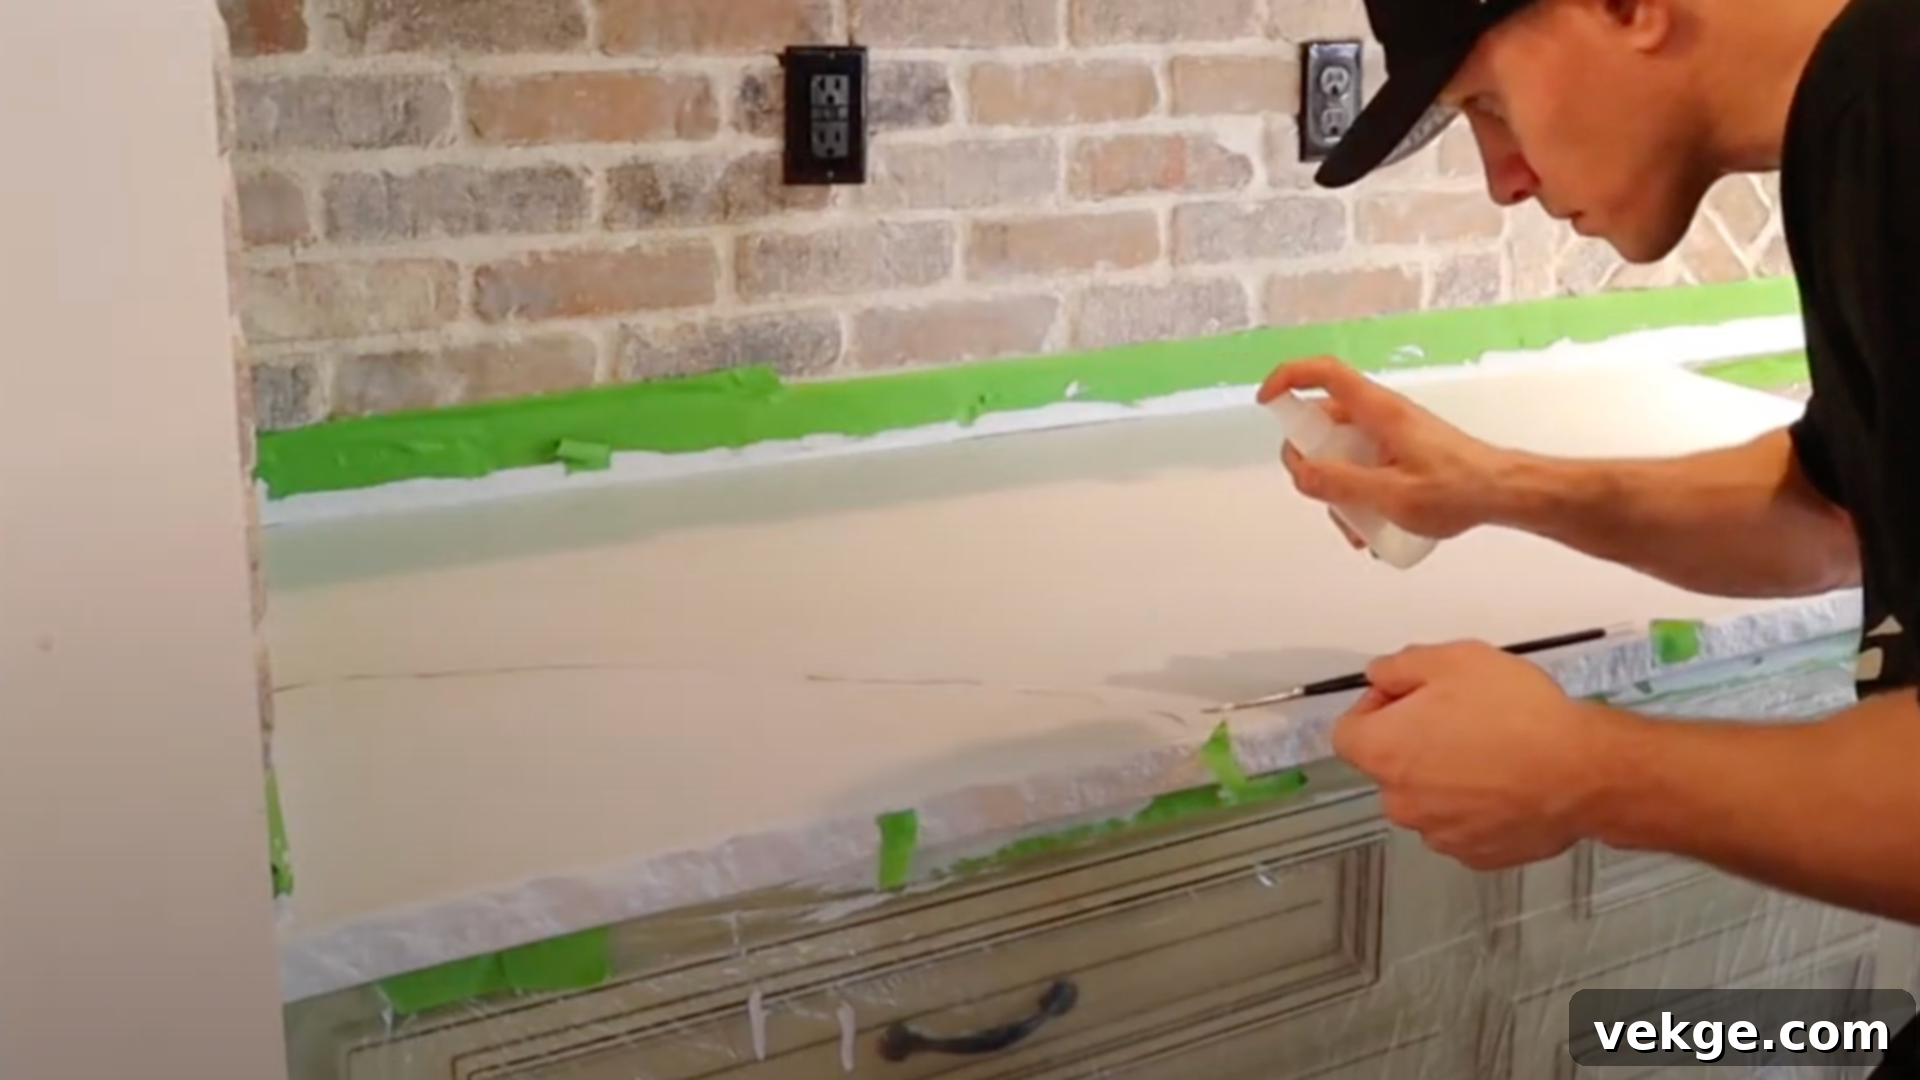
If you’re aiming for a luxurious faux marble look, this is where your artistry comes in. Before applying any paint to your countertop, take some time to plan your vein pattern on a piece of paper. Study real marble patterns for inspiration; natural veins are rarely straight or perfectly uniform.
Using a small artist’s brush or a feather, apply gray or black acrylic paint to create your veining. Focus on drawing natural, flowing lines that meander across the surface, branching off into thinner capillaries. Don’t make them too thick or too uniform.
Immediately after applying a section of veins, lightly mist them with water from a spray bottle. This helps the paint diffuse and blur, softening the edges for a more realistic, organic appearance. Then, gently use a natural sea sponge or a soft cloth to further blend and soften the lines, dabbing and feathering the edges until they look embedded within the surface, rather than sitting on top. Repeat this process across your entire countertop, ensuring the veins complement the overall size and shape of the surface for a balanced and authentic look. Allow the veining to dry completely, typically for at least 2-4 hours, before proceeding.
Step 4: Apply Epoxy Resin
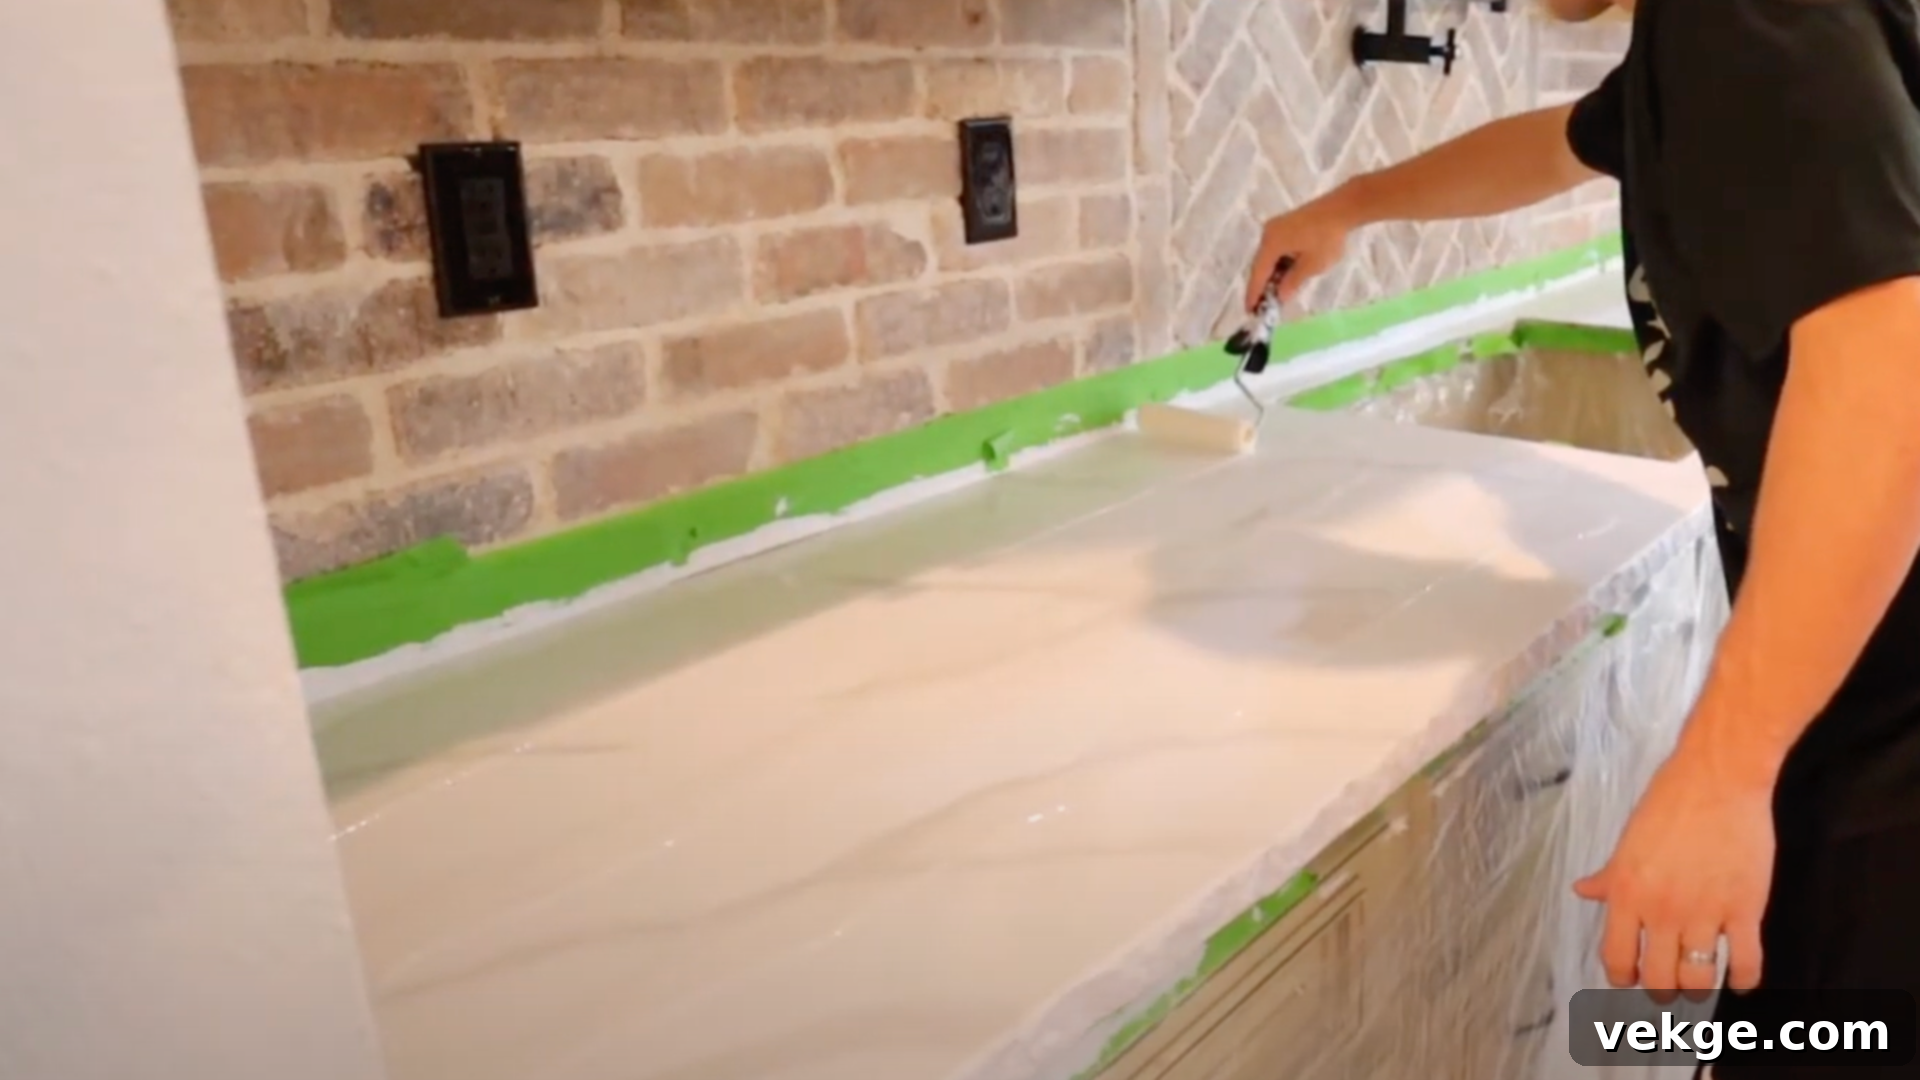
This step creates the durable, glossy finish that truly transforms your countertops. Don your protective gloves and respirator. Carefully mix the two parts of your epoxy resin kit (the activator and the resin) precisely according to the manufacturer’s instructions. This is crucial; typically, you’ll mix for 3-5 minutes, ensuring thorough blending to avoid soft spots or improper curing. Use a power drill with a mixing attachment for the best results, keeping the speed low to minimize air bubbles.
Once mixed, immediately pour the epoxy onto the countertop. Begin by pouring along the edges, then create an S-shape or zigzag pattern across the entire surface. Work quickly but deliberately, as epoxy has a limited “pot life” (working time). The epoxy is typically self-leveling, but use a clean foam roller to gently spread it evenly across the entire countertop, including the edges. Roll lightly to prevent introducing too many air bubbles. Pay close attention to ensuring consistent coverage and that the epoxy flows over the edges, creating a waterfall effect. Have drop cloths or plastic sheeting positioned underneath the edges to catch any drips.
After spreading, you might notice small air bubbles. You can gently pass a heat gun or propane torch (held a few inches above the surface and moved quickly) over the epoxy to pop these bubbles, creating a smoother, clearer finish. Be extremely careful not to scorch the epoxy or hold the heat in one spot for too long.
Step 5: Smooth Out the Epoxy and Clean Edges
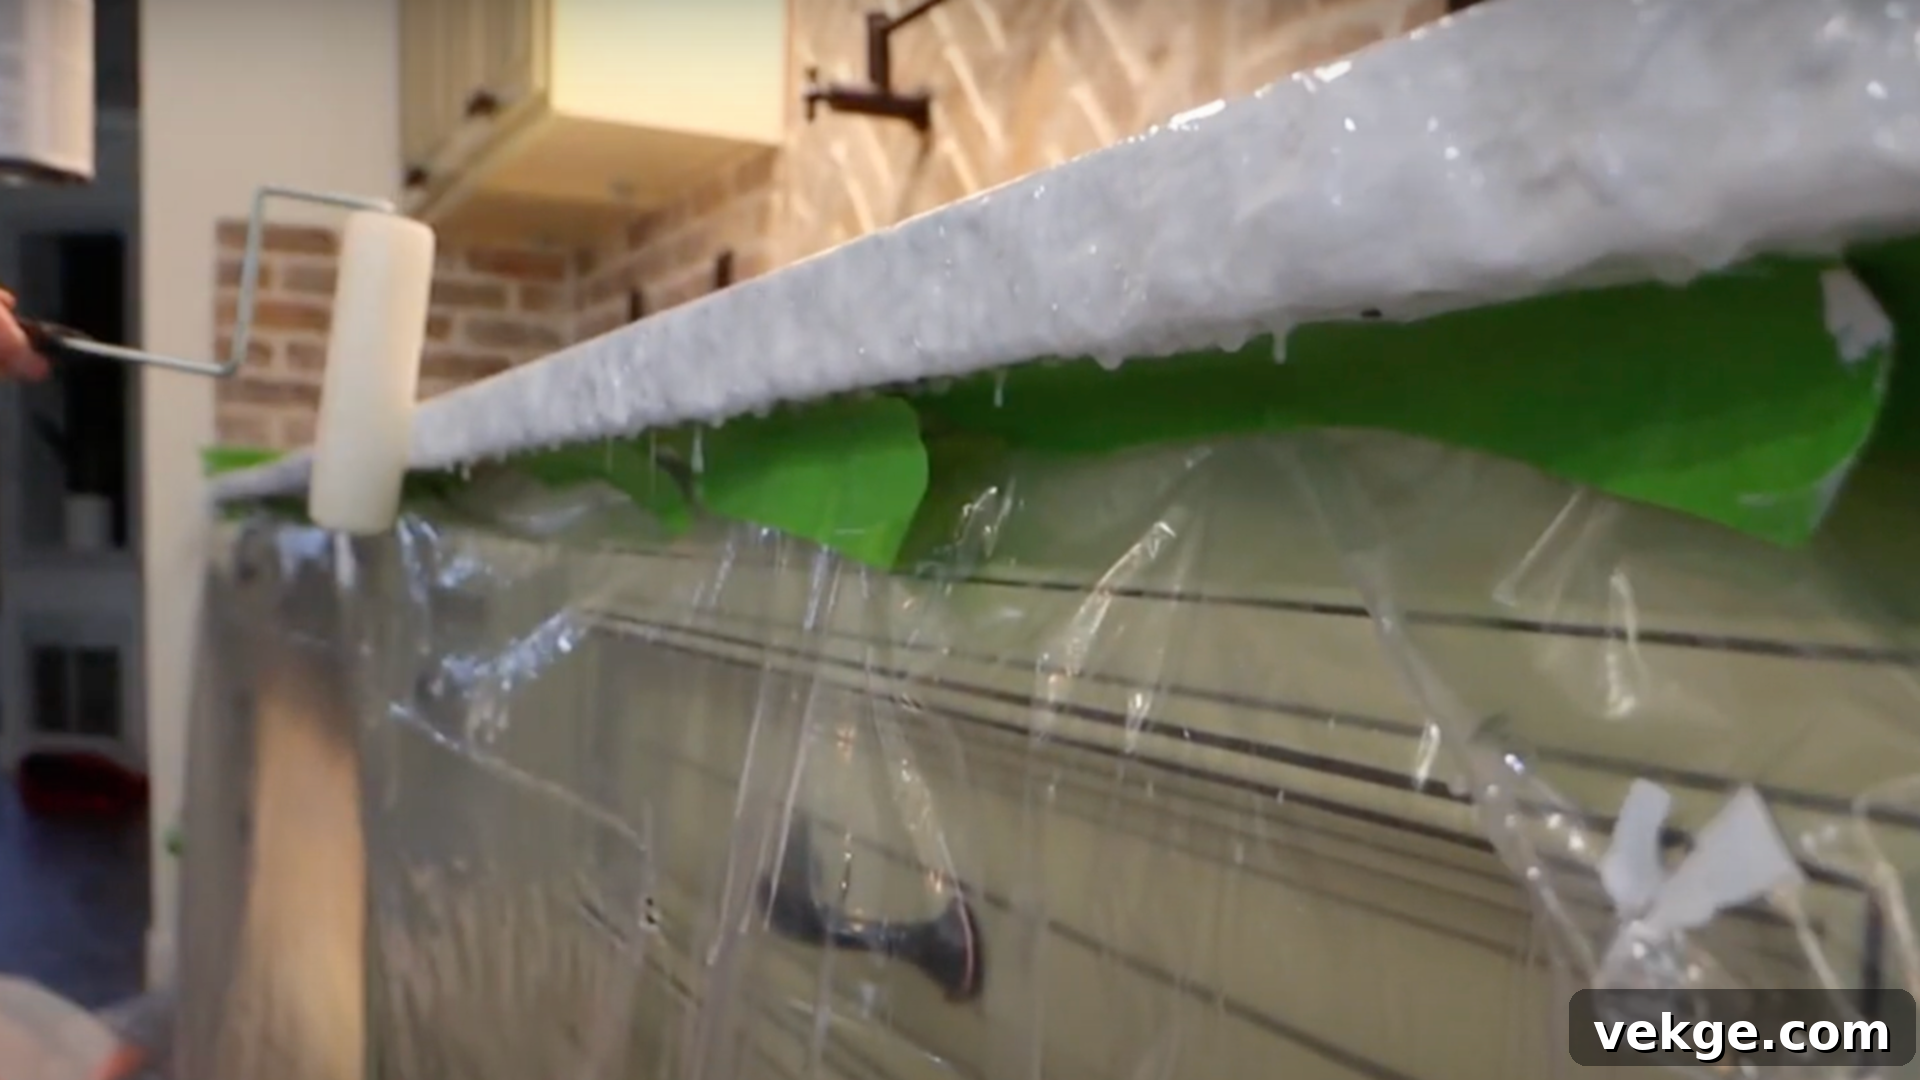
During the initial curing phase (within the first hour or two, depending on the epoxy), keep an eye on your edges. As the epoxy self-levels and drips, it can build up along the bottom edge of your countertop. Use your foam roller or a paintbrush to carefully smooth out any drips or unevenness on the underside of the countertop edge. This ensures a clean, finished appearance from all angles. Continuously check for drips and gently wipe them away or roll them back into the main body of the epoxy.
At this stage, it’s crucial that your surrounding areas remain covered with plastic and painter’s tape. This protection is invaluable in preventing the epoxy from permanently bonding to your cabinets or walls. Once the epoxy has started to thicken but is still pliable enough to manipulate (often after 2-4 hours, but check your product’s specific instructions), carefully remove the painter’s tape and plastic sheeting. Pull the tape slowly at a 45-degree angle to create a sharp, clean line without tearing the partially cured epoxy. Removing it too late can cause the epoxy to cure onto the tape, creating jagged edges. This final step, executed with precision, ensures a clean, professional look without any unwanted mess or jagged edges.
Step 6: Let the Epoxy Cure
This is arguably the most important, and often the most challenging, part of the entire process: patience. Once the epoxy resin has been applied and the edges cleaned, it must be allowed to cure completely. This is not just about being dry to the touch; it’s about reaching full hardness and chemical resistance. Most epoxy systems require a full 7 days (168 hours) to achieve their maximum hardness and durability. During this critical curing period, it is imperative that you refrain from placing anything on the countertops. Do not use your kitchen surfaces for any purpose – no placing dishes, appliances, cutting boards, or even light items.
Allowing the epoxy to harden entirely ensures that it forms a robust, functional, and long-lasting surface that can withstand daily use, heat, and moisture. Rushing this step can lead to indentations, scratches, or a compromised finish that will not perform as intended. Trust the science behind the curing process. After the full curing time has passed, your beautifully transformed countertops will be ready for regular use, looking sleek, modern, and incredibly durable.
Step 7: Final Touches and Clean-Up
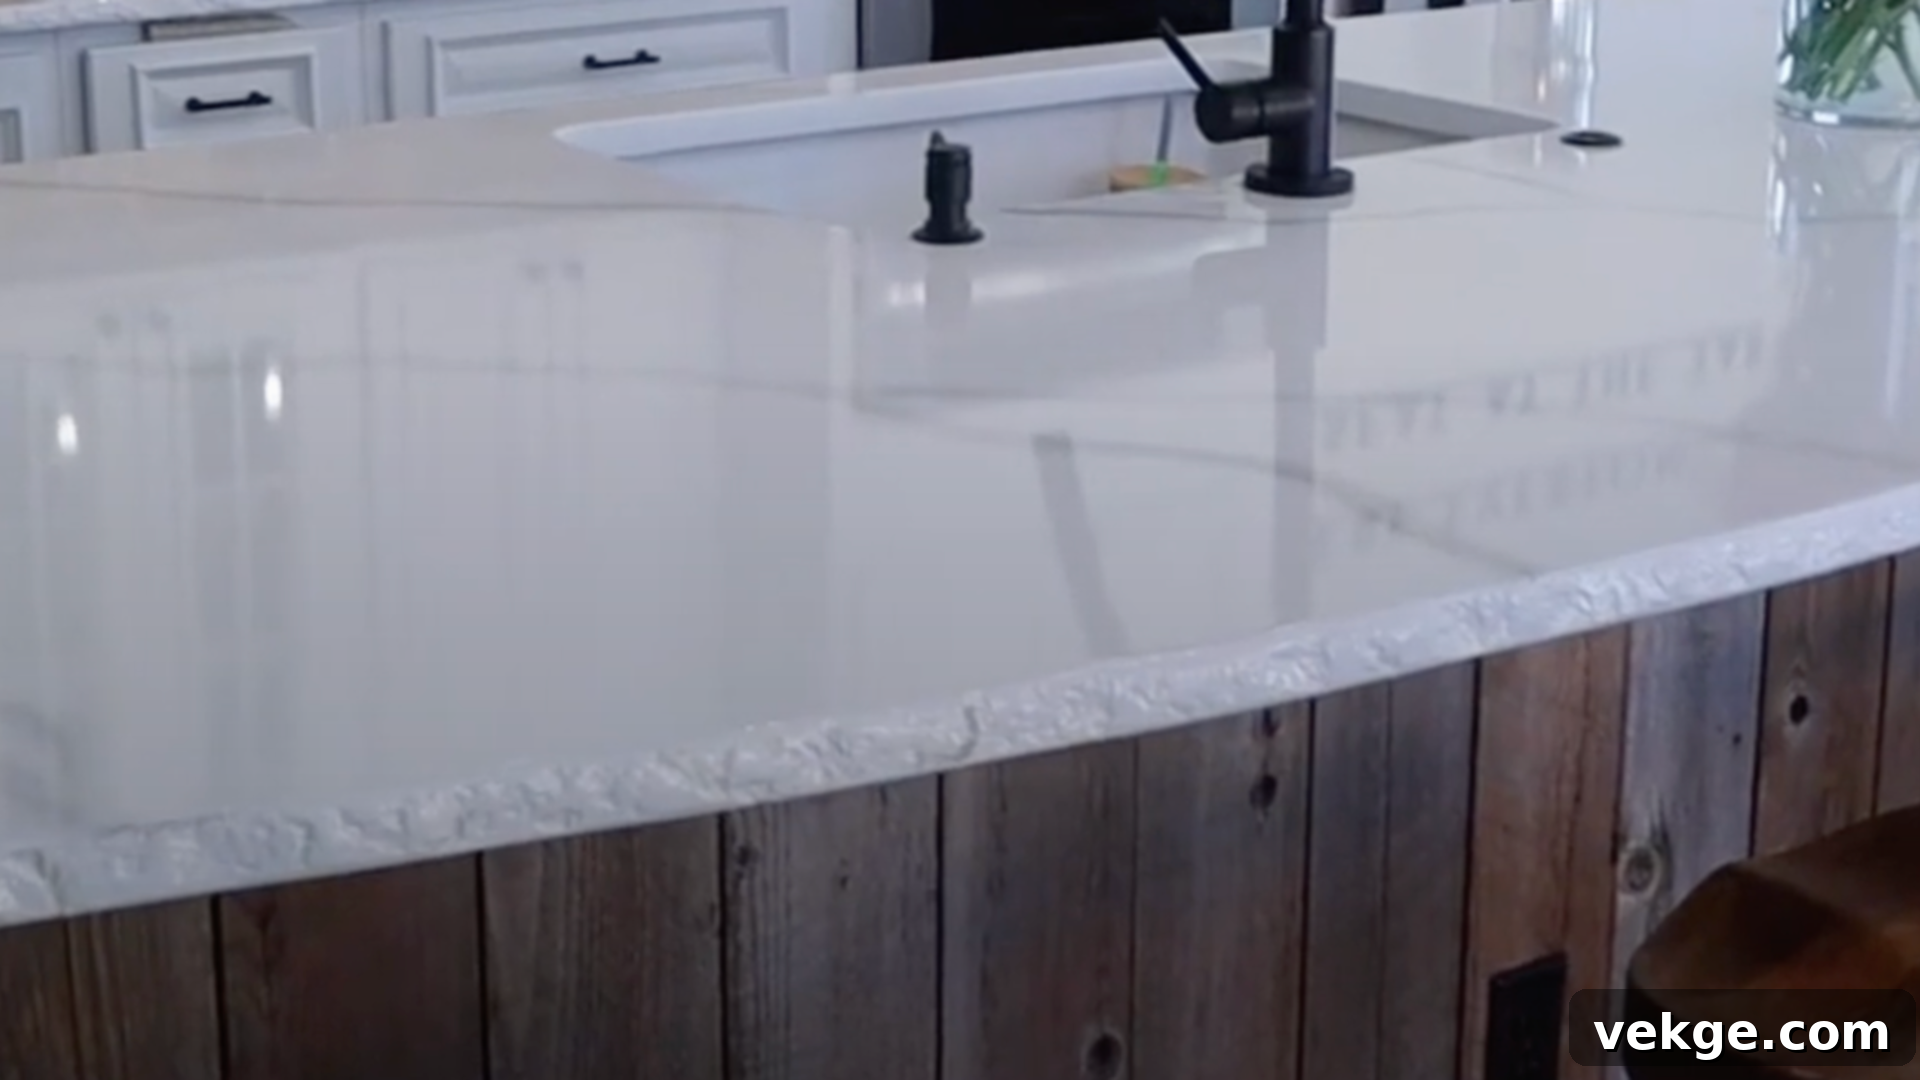
Congratulations! Once your countertops are fully cured and rock-hard, it’s time to reassemble your kitchen. Carefully reinstall your cooktop, sink (if removed), and any other fixtures. Place your appliances and decorative items back onto your beautifully transformed surfaces. Remove any remaining excess tape or plastic from around the countertop area, making sure to clean up any small dust particles or debris that might have settled during the curing process.
Step back and admire your newly revamped kitchen! With fresh, modern countertops, your space will feel entirely new, stylish, and inviting. Remember that ongoing care and maintenance are crucial to preserve the glossy, durable finish you’ve worked so hard to achieve. Enjoy your stunning, budget-friendly kitchen upgrade!
Check out the video below for a detailed walkthrough of the process:
How to Maintain Painted Granite Countertops for Longevity
Proper maintenance is key to extending the life and beauty of your newly painted granite countertops. While they are durable, a little care goes a long way in keeping them looking fresh and pristine. Here are essential tips for maintaining your transformed surfaces:
- Regular, Gentle Cleaning: Make a habit of cleaning your countertops regularly with a soft cloth or sponge and a mild, pH-neutral soap (like dish soap diluted in water). This prevents the buildup of grease, grime, and food residue. Avoid scrubbing vigorously, as this can dull the finish over time.
- Avoid Harsh Chemicals and Abrasives: Steer clear of abrasive cleaners, scouring pads, ammonia-based products, bleach, or any cleaners containing harsh chemicals. These can damage or discolor the paint and epoxy finish, leading to premature wear. Always opt for gentle, non-abrasive solutions.
- Always Use Cutting Boards and Trivets: To prevent scratches, chips, or cuts, always use cutting boards for food preparation. Similarly, protect the surface from heat damage by using trivets or hot pads under hot pots, pans, and appliances like slow cookers or toaster ovens.
- Wipe Up Spills Immediately: Although epoxy is highly stain-resistant, acidic liquids (like lemon juice or vinegar) or strongly pigmented foods (like turmeric or red wine) can potentially etch or stain the surface if left for extended periods. Wipe up spills as soon as they occur.
- Touch-Up Paint and Reseal Regularly: Over time, with heavy use, minor chips or wear might occur. Keep a small amount of your original paint and epoxy on hand for minor touch-ups. Furthermore, to maintain the protective barrier and gloss, plan to reapply a clear, countertop-specific sealer every 1-2 years, or as recommended by your epoxy product manufacturer. This extra layer of protection is vital for long-term durability.
By following these maintenance guidelines, your painted granite countertops will continue to be a beautiful and functional focal point in your home for many years.
Alternatives to Painting Granite Countertops
While painting granite offers a fantastic budget-friendly solution, it’s not the only way to update your kitchen or bathroom. If you’re hesitant about painting, or if your granite is severely damaged, there are other viable options to consider.
Refinishing (Resurfacing) Existing Granite
If you love the natural beauty and pattern of your granite but it has become dull, scratched, or stained over time, refinishing might be the perfect solution. This process involves professional grinding and polishing of the granite surface to remove imperfections, shallow scratches, and etches. After the surface is restored, a fresh sealant is applied to enhance its natural color and shine, bringing it back to its original glory. Refinishing is excellent for restoring the natural stone’s inherent beauty and durability without changing its fundamental appearance. However, it won’t allow you to change the color or pattern, meaning if you’re tired of the granite’s original look, this option may not fully satisfy your desire for a style change.
Countertop Replacement
For a complete and permanent transformation, or if your existing granite is beyond repair or simply doesn’t fit your aesthetic vision anymore, a full countertop replacement is the ultimate upgrade. While this is the most expensive option, it offers unparalleled freedom to choose from a vast array of materials, colors, and patterns. You can opt for brand new granite with a different shade, explore other natural stones like marble or quartz, or consider engineered materials like solid surface or laminate for different looks and price points. Replacement allows for a total redesign of your kitchen or bathroom, ensuring the countertops perfectly match your long-term style and functional needs. This is the choice for homeowners seeking a fresh start and a significant investment in their property value.
Each alternative comes with its own set of costs, benefits, and levels of effort. Evaluate your budget, desired outcome, and the current condition of your granite before making a final decision.
DIY or Hire a Professional for Countertop Painting?
Deciding whether to tackle the granite countertop painting project yourself or enlist the help of a professional is a significant consideration. Your comfort level with detailed DIY tasks, your available time, and your desired level of perfection will largely influence this decision. Here’s a more detailed comparison to help you choose:
DIY (Do-It-Yourself)
Taking on the task of painting granite countertops can be an incredibly rewarding project for those with a penchant for home improvement. If you possess basic painting skills, have a keen eye for detail, and are comfortable with meticulous surface preparation, the DIY route is definitely feasible. You’ll be responsible for every step: thoroughly cleaning, lightly sanding (or etching) the granite, taping off surrounding areas, applying multiple thin coats of primer, expertly creating any desired faux marble veining, and finally, mixing and applying the protective epoxy sealer. The most compelling advantage of the DIY approach is the significant cost savings; it’s by far the most budget-friendly option. However, be prepared to invest considerable time and patience. Achieving a smooth, durable, and professional-looking finish requires adherence to precise instructions, careful application, and allowing adequate curing times between each layer. Mistakes in mixing epoxy or uneven application can lead to a less-than-perfect, or even compromised, finish.
Professional Help
Hiring a professional countertop refinisher or painter is often the ideal choice if you’re unsure about the process, lack the time, or simply desire a flawless, factory-like result without the stress. Professionals bring a wealth of experience, specialized knowledge, and commercial-grade tools and materials to the job. They are adept at handling potential issues, ensuring proper adhesion, precise application, and a durable finish that will stand the test of time. Their expertise minimizes the risk of common DIY errors like uneven coatings, trapped bubbles in epoxy, or poor adhesion. While hiring a professional is a more expensive option upfront, it can save you time, effort, and potentially costly rectifications in the long run, ensuring your painted granite countertops look impeccable and last for many years. It’s an investment in peace of mind and quality craftsmanship.
Ultimately, your choice depends on balancing your budget, your confidence in your DIY abilities, and your expectations for the final outcome. Both options can lead to a beautifully updated kitchen, but they offer different paths to get there.
Conclusion: Yes, You Can Paint Your Granite Countertops!
So, to answer the initial question definitively: yes, you absolutely can paint granite countertops! With the right tools, high-quality materials, and a meticulous step-by-step approach, you have the power to give your outdated granite a stunning, fresh, and modern look. The key to a successful and long-lasting transformation lies in thorough preparation and patient application.
Before embarking on this exciting home improvement journey, carefully consider your budget and timeline. Whether you decide to tackle this project yourself, embracing the satisfaction of a DIY achievement, or opt to hire a seasoned professional for a guaranteed flawless finish, the investment in time and effort will be well worth it. Proper surface preparation, selection of durable countertop-specific paints and epoxy, and allowing adequate curing time are non-negotiable for achieving a durable and beautiful result that you’ll love for years to come.
Transforming your granite countertops is a fantastic way to achieve a high-impact kitchen or bathroom makeover without the daunting cost of a full renovation. Take the leap, refresh your space, and enjoy the beauty of your newly revamped home!
Ready for more inspiring home improvement projects and clever DIY ideas? Be sure to explore my other blogs for additional tips and insights to help you continuously update and personalize your living spaces.
