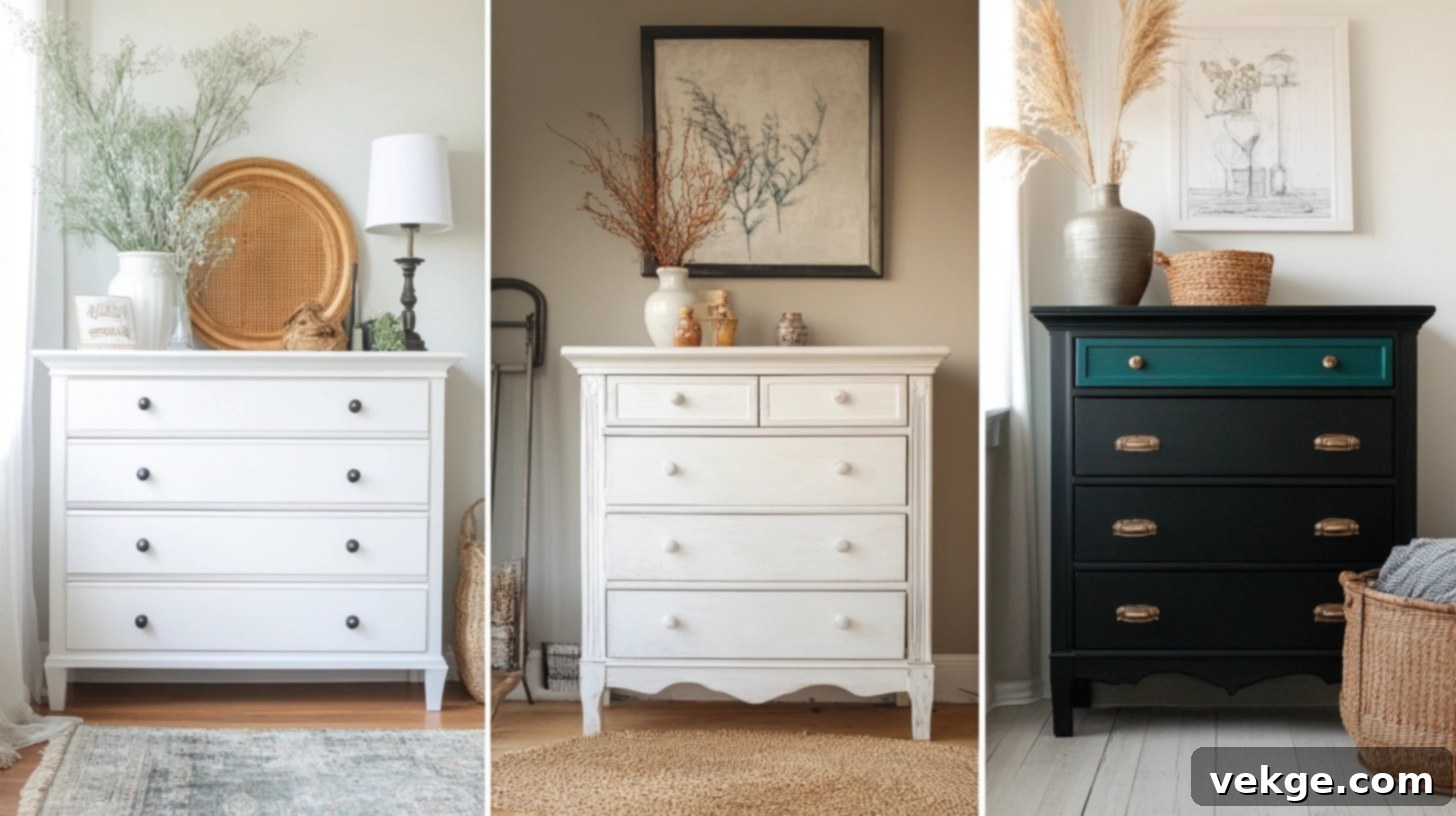
Unlock Your Furniture’s Potential: Stunning Painted Furniture Ideas Before & After & DIY Guide
Do you look at your old furniture and feel it’s just… dull? Perhaps it no longer fits your home’s evolving style, or simply looks tired and worn. I’ve been there! Instead of giving up on a perfectly good piece, I decided to grab a paintbrush. What happened next wasn’t just a simple refresh; it completely transformed my living space and sparked a passion for furniture upcycling.
In this comprehensive guide, I’m excited to share a wealth of painted furniture ideas, showcasing incredible before-and-after transformations that inspired me to turn forgotten pieces into cherished treasures. Whether your taste leans towards the soft, romantic appeal of vintage styles or the vibrant energy of bold, contemporary colors, you’ll find inspiration categorized by room, color palette, and painting technique. Plus, I’ve packed it with beginner-friendly tips designed to save you time and money, making your DIY journey both rewarding and accessible.
Forget the need for expensive tools or professional expertise. All you truly need is a dash of creativity, a bit of patience, and a can of paint. Are you ready to dive in and transform outdated furniture into the favorite, most talked-about pieces in your home?
Why Painted Furniture Makeovers Are So Popular
The trend of painting and repurposing furniture has exploded in popularity, and for good reason. It’s more than just a passing fad; it’s a smart, sustainable, and incredibly satisfying way to refresh your home.
Budget-Friendly Home Updates: Let’s face it, buying new furniture can be incredibly expensive. Painting an old piece is one of the most cost-effective ways to give a room a dramatic refresh without breaking the bank. Instead of spending hundreds or even thousands on new dressers, chairs, or tables, a single can of paint, a few brushes, and a bit of your time can breathe new life into existing items. This allows you to reallocate your budget to other home improvement projects or simply save money.
Sustainability and Eco-Conscious Living: In an era where environmental responsibility is more important than ever, furniture makeovers offer a powerful way to reduce waste. Instead of discarding perfectly functional furniture that might end up in a landfill, more people are embracing the idea of reusing what they already own or giving secondhand finds a second life. This not only lessens your carbon footprint but also promotes a mindful approach to consumption, benefiting both your wallet and the planet.
Innovative Expression and Uniqueness: Perhaps the most exciting aspect of painted makeovers is the unparalleled opportunity for personal expression. Unlike mass-produced furniture, a hand-painted piece is truly unique. You can select any color imaginable, experiment with intricate patterns, or even try fun textures to perfectly reflect your individual style and personality. No two pieces will ever turn out exactly the same, which means every transformed item becomes a special, one-of-a-kind statement piece that tells a story.
Painted Furniture Ideas Before and After: Tools, Prep, and Paint Basics
Embarking on your first furniture painting project can feel daunting, but knowing the right tools, understanding different paint types, and mastering essential prep steps will make all the difference, ensuring a beautiful and durable finish.
Essential Tools You’ll Need
Having the correct tools on hand not only simplifies the job but also significantly improves the final outcome of your project. Here’s a rundown of what you’ll want in your DIY toolkit:
- High-Quality Brushes: Invest in a few good angled brushes for precise work in corners, intricate details, and trim. Larger flat brushes are useful for covering expansive surfaces quickly.
- Rollers: Mini foam rollers are excellent for achieving a smooth, even finish on flat surfaces like tabletops and dresser fronts, minimizing brush marks.
- Paint Sprayer (Optional): If you’re tackling multiple pieces or seeking an ultra-smooth, factory-like finish with speed, a paint sprayer can be a valuable investment. Just be aware that cleanup is more involved.
- Sandpaper: You’ll need various grits. Medium-grit (120-180) is for rough areas and removing old finishes, while fine-grit (220-320) is crucial for smoothing between coats and achieving a silky finish.
- Drop Cloth or Old Sheets: Protect your floors and surrounding areas from paint splatters and dust.
- Mild Cleaner: A diluted solution of mild soap (like dish soap or Murphy’s Oil Soap) is perfect for thoroughly cleaning your furniture, removing dirt, grease, and old polish residues.
- Wood Filler: Essential for repairing any holes, cracks, or imperfections in the wood surface, ensuring a smooth canvas for painting.
- Tack Cloths: These sticky cloths are indispensable for picking up every last speck of dust after sanding, preventing grit from getting trapped in your paint.
Having these items ready before you start will save time, prevent frustration, and help you avoid unnecessary messes.
Best Paint Types for Furniture
Choosing the right paint is paramount to achieving the desired look and ensuring the longevity of your furniture makeover. Each type offers distinct characteristics:
- Chalk Paint: Extremely beginner-friendly, chalk paint rarely requires extensive sanding or priming. It provides a beautiful, soft, ultra-matte finish, making it ideal for vintage, shabby chic, or rustic styles. However, it is porous and absolutely requires a topcoat (wax or polycrylic) to seal and protect it from daily wear and tear.
- Milk Paint: Often chosen for its eco-friendly properties and ability to create an authentic, naturally distressed, or “chippy” look, especially when painted over a glossy surface without a bonding agent. Milk paint can flake if not sealed properly or if a bonding agent isn’t used for a consistent finish. It offers a unique, aged aesthetic.
- Latex Paint (Acrylic Latex): The most common and versatile option, available in an endless array of colors and sheens (matte, eggshell, satin, semi-gloss, gloss). Latex paint is durable and easy to clean, but it typically requires thorough sanding and priming for optimal adhesion and a smooth, long-lasting finish. Satin or semi-gloss finishes are often recommended for furniture due to their durability and ease of maintenance.
- Mineral Paint: A newer option that combines the low-prep benefits of chalk paint with the durability of traditional latex. It often has a built-in topcoat, reducing extra steps, and offers a smooth, matte to satin finish.
Your choice should align with the desired finish, the level of prep you’re willing to do, and the expected durability for the furniture’s use.
Prep Tips for a Smooth and Lasting Finish
Good preparation isn’t just important; it’s the cornerstone of a professional-looking and long-lasting furniture makeover. Skimping on prep will inevitably lead to a disappointing finish that chips or peels prematurely.
- Clean Thoroughly: Remove all hardware (knobs, hinges) first. Then, clean the entire surface with a mild soap and water solution (e.g., Murphy’s Oil Soap, diluted dish soap). Pay special attention to hidden crevices where dirt and grime accumulate. Rinse with clean water and allow the piece to dry fully—this is crucial to prevent moisture issues under the paint.
- Repair Imperfections: Fill any holes, cracks, or deep scratches with wood filler. Apply it smoothly with a putty knife, let it dry completely according to package instructions, then sand it flush with the surrounding surface.
- Sand the Surface: Lightly sand the entire piece. If there’s a glossy finish, you want to “scuff sand” it to dull the shine, creating a better “tooth” for the paint to adhere to. If there’s old, peeling paint, you’ll need to sand it down to a smooth, stable surface. Use medium-grit sandpaper (120-180) for initial smoothing, followed by fine-grit (220-320) for a silky smooth feel.
- Remove Dust: After sanding, meticulously wipe away all dust with a damp cloth, followed by a tack cloth. Dust is the enemy of a smooth paint finish!
- Prime Strategically: Priming is essential for raw wood, dark wood (to prevent bleed-through), or if you’re using latex paint over a glossy surface. It ensures better adhesion, hides previous colors, and creates a uniform base for your chosen paint. Opt for a stain-blocking primer for challenging pieces.
- Test Your Paint: Always test your chosen paint and topcoat on a small, inconspicuous area (like the back or inside a drawer) to ensure you like the color, adhesion, and finish before committing to the entire piece.
These meticulous steps help your paint adhere perfectly, resulting in a clean, smooth, and durable finish that you’ll be proud of.
Step-by-Step Guide: How to Paint Furniture Like a Pro
Ready to transform your old furniture into stunning, custom pieces? This expert step-by-step guide is designed to help beginners achieve a smooth, professional-grade finish, ensuring your DIY project looks like it was done by a seasoned artisan.
Step 1: Clean and Prep the Surface for Flawless Adhesion
Start by carefully removing all existing hardware such as knobs, pulls, and hinges. Label them if necessary to remember where they belong. Next, give your furniture a thorough cleaning. A diluted solution of mild soap, like Murphy’s Oil Soap, works wonders for removing years of dirt, grease, and grime, especially important for pieces that have been stored or are heavily used. Rinse with clean water and allow the piece to dry completely.
Inspect the surface for any damage. Fill small holes, cracks, or deep scratches with a high-quality wood filler, smoothing it out with a putty knife. If there are prominent wood knots that might bleed through paint, consider using a shellac-based primer specifically on those areas. Let the filler dry fully, then lightly sand the entire surface. The goal isn’t to remove all existing finish, but to dull any glossy areas, create a ‘tooth’ for the paint to grip, and smooth out filled areas. Use fine-grit sandpaper for this. Once sanding is complete, meticulously wipe down the piece with a tack cloth to remove every particle of dust.
Step 2: Apply Primer for Durability and Even Color
Priming is a non-negotiable step for achieving a durable, professional finish, especially if you’re using latex paint or working with raw or dark wood. Use an angled brush to precisely coat crevices, edges, and intricate details. For larger, flat surfaces, a mini foam roller will help you achieve a smooth, even application with minimal texture. Apply one thin, even coat of primer, ensuring full coverage. Avoid thick coats, as they can lead to drips and uneven drying.
Once the primer is completely dry (check manufacturer’s instructions, usually 1-4 hours), lightly sand the entire piece again using a fine sanding sponge (220+ grit). This crucial step smooths out any minor texture from the primer and ensures a silky base for your paint. Wipe clean with a tack cloth to eliminate any dust generated.
Step 3: Paint in Thin, Even Coats for a Professional Finish
Now for the exciting part – applying your chosen color! Employ the same careful technique used for priming: use your angled brush for details and tight spots, and your mini foam roller for broad, flat areas. Apply your first thin coat of paint evenly across the furniture. Thin coats are key to preventing drips, ensuring faster drying, and achieving a harder, more durable finish. It’s better to apply several thin coats than one thick one.
Allow the first coat to dry completely. This can take several hours depending on humidity and paint type. Once dry, lightly sand the piece again with a fine sanding sponge. This step removes any minor imperfections or dust nibs, making each subsequent coat adhere better and result in the smoothest possible finish. Wipe clean with a tack cloth. Apply a second thin coat of paint, repeating the sanding and wiping steps in between. A third coat might be necessary, especially with lighter colors or if you want deeper saturation.
For optimal durability and easy cleaning, experts like Erin often recommend water-based paints such as Behr Marquee or Benjamin Moore, specifically in satin or semi-gloss finishes.
Step 4: Apply a Protective Topcoat for Lasting Beauty
After your final coat of paint has dried thoroughly (typically 24-48 hours, or longer for darker colors), it’s time to seal your masterpiece with a protective finish. This step is critical for protecting the paint from scratches, moisture, and general wear and tear, significantly extending the life of your painted furniture.
Popular choices include Minwax Polycrylic (a water-based topcoat that won’t yellow over time) or paste wax. If using polycrylic, apply it in thin, even coats with a high-quality brush or foam applicator. For paste wax, apply a thin layer using a soft cloth (like cheesecloth), let it sit for 10–15 minutes to cure, then buff it gently with a clean, lint-free cotton cloth to achieve your desired level of shine and protection. Repeat with additional wax coats for enhanced durability. This final layer ensures your transformed piece stands up to daily use and looks fantastic for years to come.
Troubleshooting and Pro Tips for Perfect Results
Even seasoned DIYers encounter issues. Here are some solutions and tips to help you along:
- Dealing with Drips, Roller Marks, or Brush Strokes: If you notice any imperfections after a coat has dried, don’t despair! Lightly sand down the affected areas with fine-grit sandpaper until smooth. Wipe away the dust and reapply a thin, even coat of paint over the area.
- Keeping Brushes and Rollers Fresh: To prevent your tools from drying out between coats or overnight, simply wrap brushes and rollers tightly in plastic wrap or place them in an airtight plastic bag. This saves cleanup time and keeps your tools pliable.
- Choosing the Right Sheen: While matte paint finishes offer a beautiful, sophisticated look, Erin suggests avoiding them on high-traffic furniture pieces. Matte finishes are more porous and tend to be harder to clean and maintain compared to satin or semi-gloss, which offer better durability and wipeability.
- Consider a Paint Sprayer for Large Projects: For very large pieces or multiple items, a paint sprayer can provide an exceptionally smooth and fast finish. However, be prepared for a more involved cleanup process and ensure you have proper ventilation.
For a visual walkthrough that brings these steps to life, watch the full tutorial video below:
Learn how to paint furniture like a pro with this detailed video guide, covering prep, painting techniques, and finishing touches from start to finish. You’ll gain confidence and see exactly how to apply each step for beautiful results.
Painted Furniture Ideas Before and After: Your Ultimate Inspiration Gallery
Get ready to be inspired! This collection of painted furniture ideas, complete with striking before-and-after transformations, will show you how to breathe new life into any old piece. From refreshing bold colors to soothing neutrals, these makeovers are not only budget-friendly and stylish but also perfectly achievable for beginners.
White & Neutral Painted Furniture Transformations
White and neutral tones are timeless for a reason. They effortlessly brighten any piece of furniture, seamlessly integrate into any room’s existing decor, and evoke a sense of calm, cleanliness, and spaciousness. Explore these easy makeover ideas that offer enduring appeal.
1. Farmhouse White Dresser Makeover
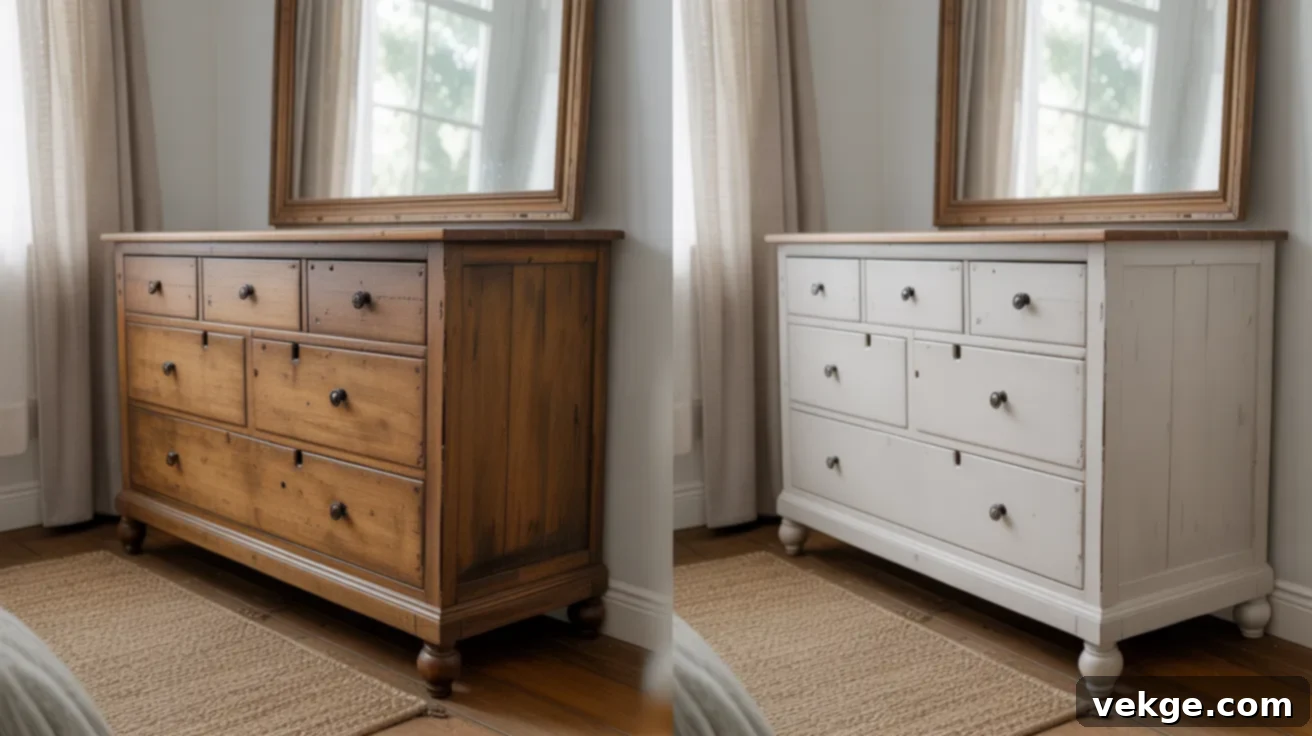
Witness the stunning transformation of an old, tired dresser into a bright, timeless farmhouse focal point. With a crisp white paint application, this piece goes from neglected to noteworthy. After proper prep, a few coats of chalk or latex paint, sealed with a clear topcoat, bring out its clean lines and make any room feel instantly fresher and more expansive. Complement this look with classic black cup pulls or natural wooden knobs for an authentic touch. This versatile makeover is perfect for bedrooms, hallways, or even as extra storage in a rustic dining room.
2. Creamy Off-White Bedside Table
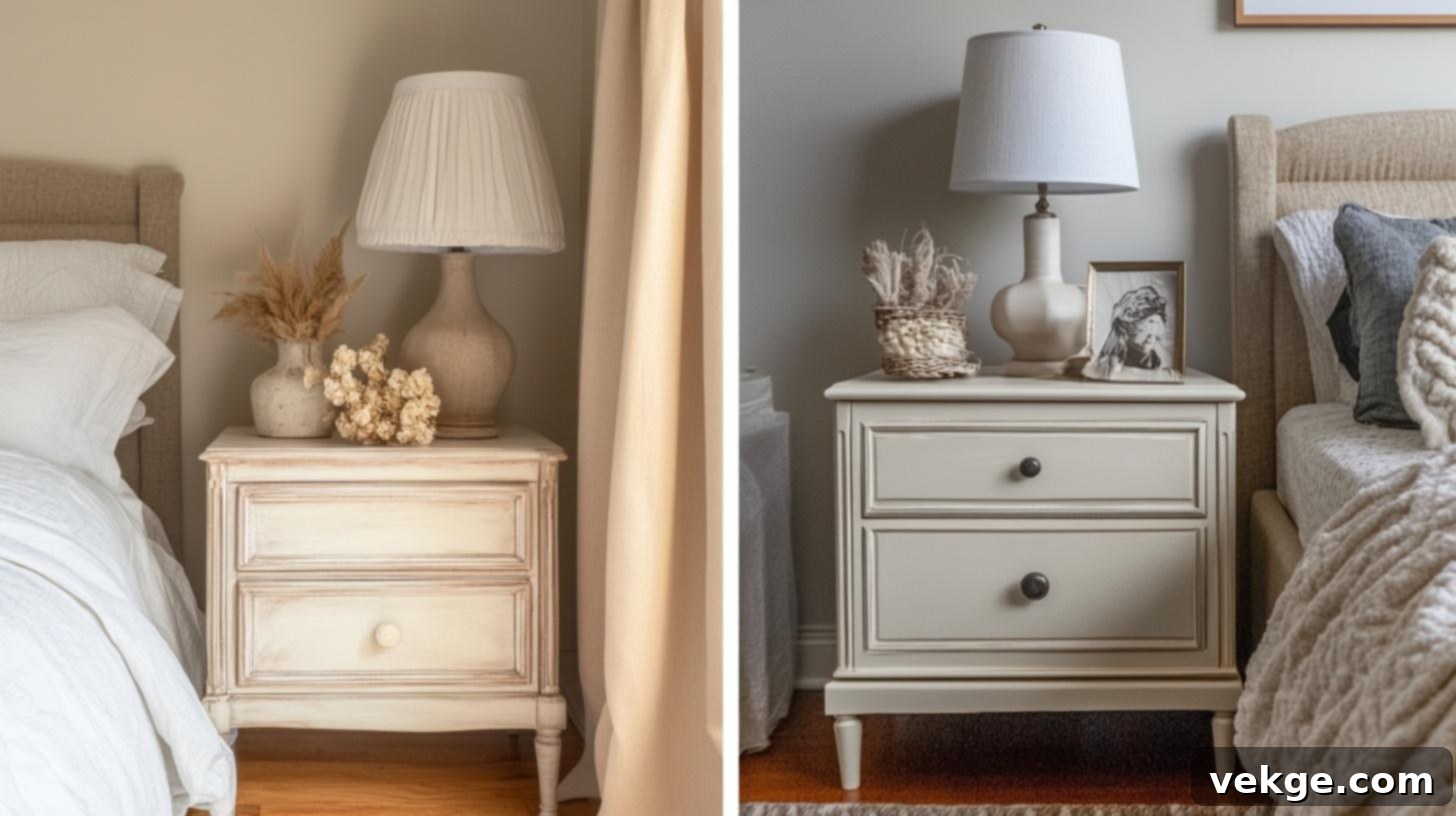
Infuse warmth and softness into your bedroom with a creamy off-white bedside table. This inviting hue creates a cozy yet clean aesthetic, making it an ideal choice for a piece that sits next to your bed. A quick clean and sand, followed by creamy paint, revives an old table, transforming it into a chic and functional accent. Finishing with a simple, elegant knob or drawer pull elevates its class. This gentle color palette beautifully complements both modern minimalist and classic traditional room designs, proving that sometimes, the simplest changes yield the biggest impact.
3. Ivory Bookshelf with Distressed Finish
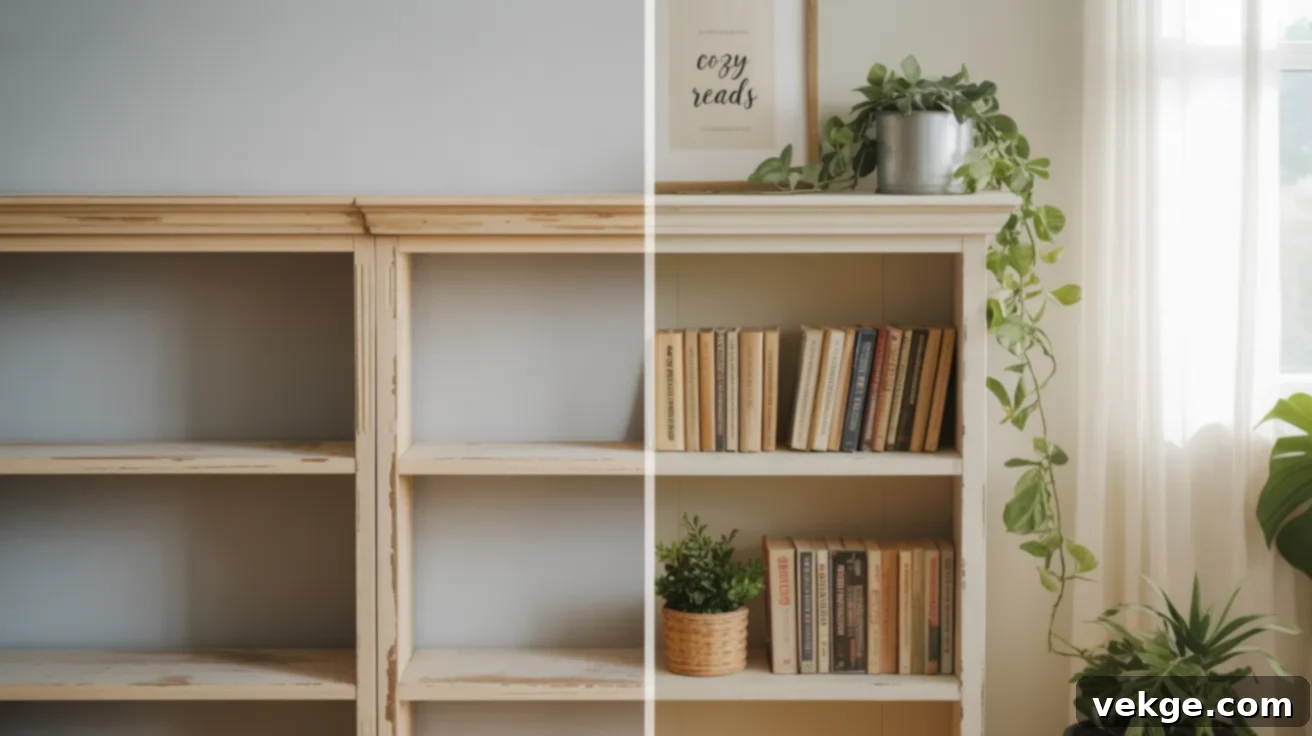
Transform a plain or outdated bookshelf into a charming, character-filled display piece with ivory paint and a carefully applied distressed finish. After painting with a soft ivory, lightly sand the edges, corners, and raised details. This technique creates a gently aged appearance, as if the piece has been cherished for decades. The distressed finish adds depth and a story, making the shelf look full of history. It’s an exquisite way to showcase books, vibrant plants, or decorative baskets in living rooms, bedrooms, or even a child’s reading nook, adding warmth and personality.
4. Beige Sideboard with Matte Seal
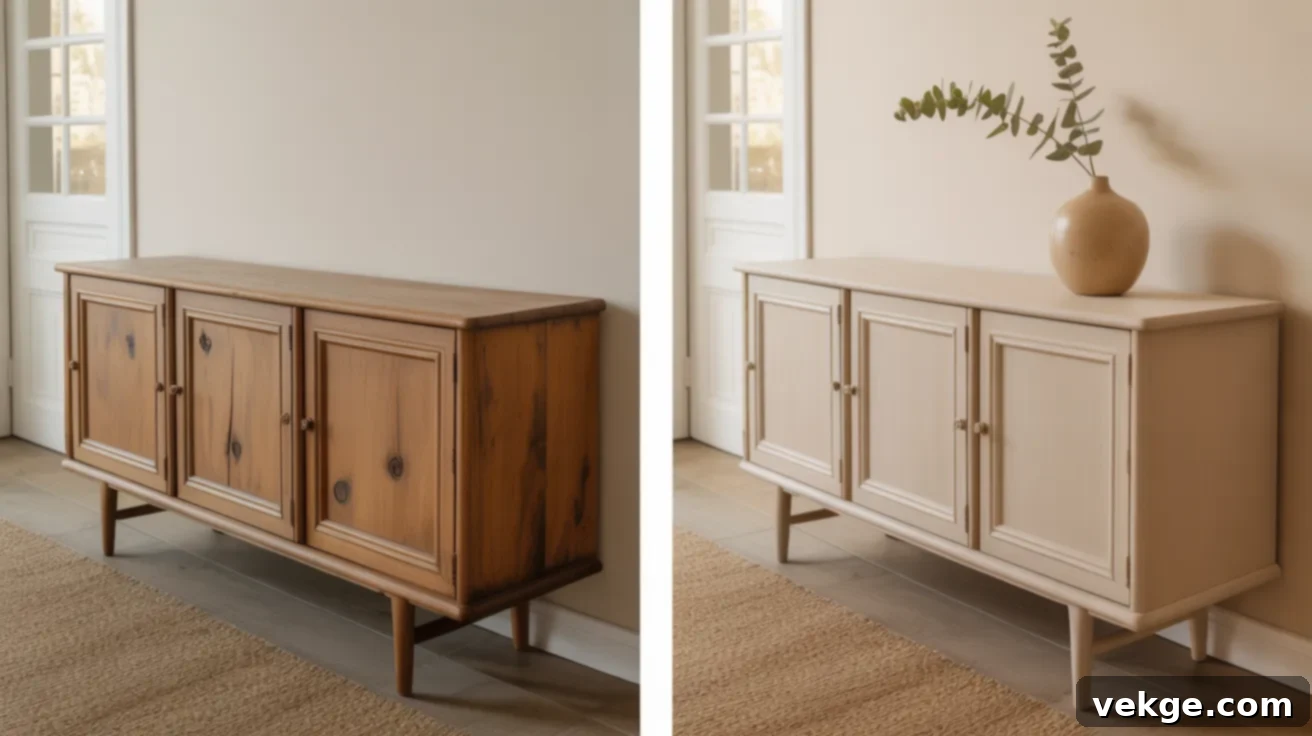
A sideboard painted in a calming beige, especially when finished with a matte seal, exudes understated elegance and a sense of neatness. Begin by prepping the piece, then apply a soft beige tone. Once dry, a clear matte topcoat provides protection while eliminating any unwanted shine, resulting in a sophisticated, muted look. This serene aesthetic integrates effortlessly into kitchens, dining areas, or entryways, bringing a peaceful and clean feeling. Beige’s versatility allows it to harmonize with a wide range of colors and interior styles, making it a reliable choice for a refined makeover.
5. Two-Toned Neutral Chest of Drawers
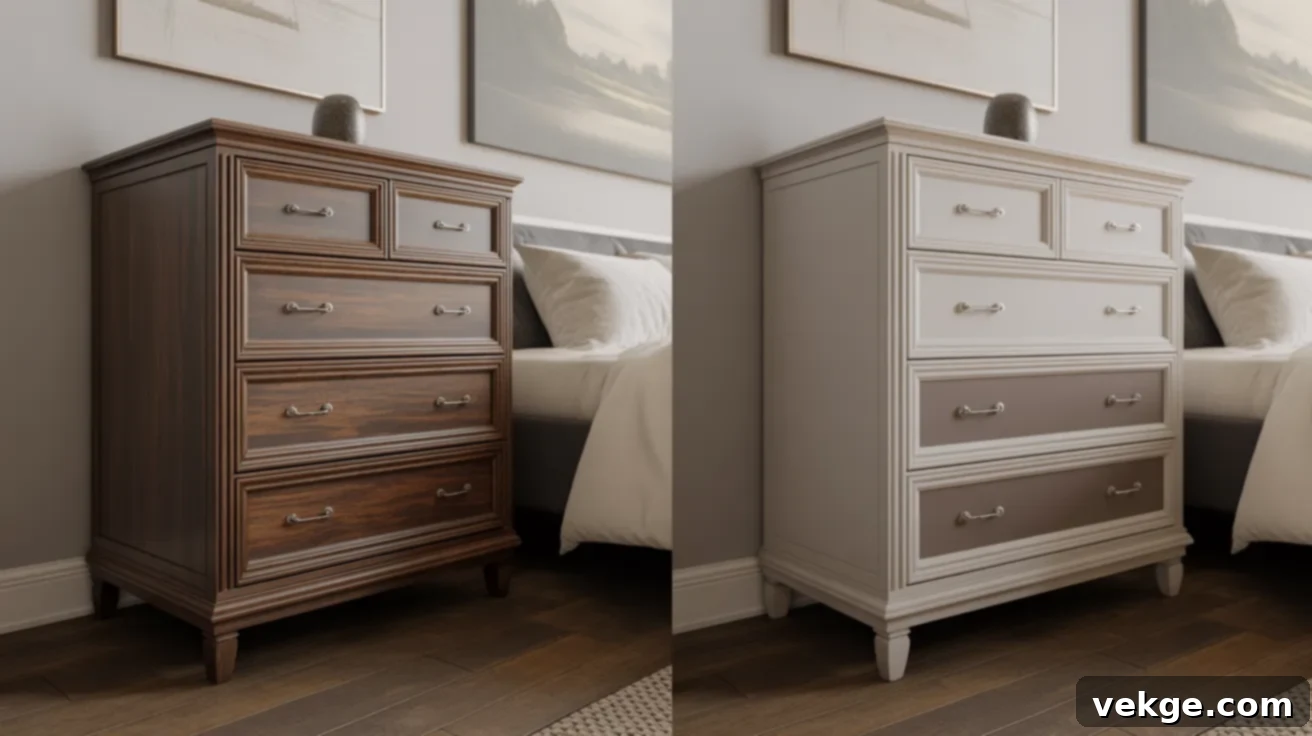
Add subtle depth and visual interest to a chest of drawers by employing a sophisticated two-toned neutral palette. Paint the main body of the chest in a light, airy neutral like pale gray or soft beige, then use a slightly darker, complementary tone for the drawer fronts. This gentle contrast creates a stylish and dynamic look without being overtly bold, maintaining a sense of calm. Finish the piece with simple metal or understated wooden knobs to enhance its elegant appeal. This chic makeover is ideal for bedrooms or guest rooms, providing an easy way to make your space feel more cohesive and thoughtfully designed.
Bold & Colorful Statement Pieces
Sometimes, a dash of daring color is all it takes to completely revolutionize a piece of furniture and invigorate an entire room. These bold paint ideas inject fun, personality, and vibrant energy into any space, offering a striking update without the need for a full room renovation.
6. Teal Buffet Table Before and After
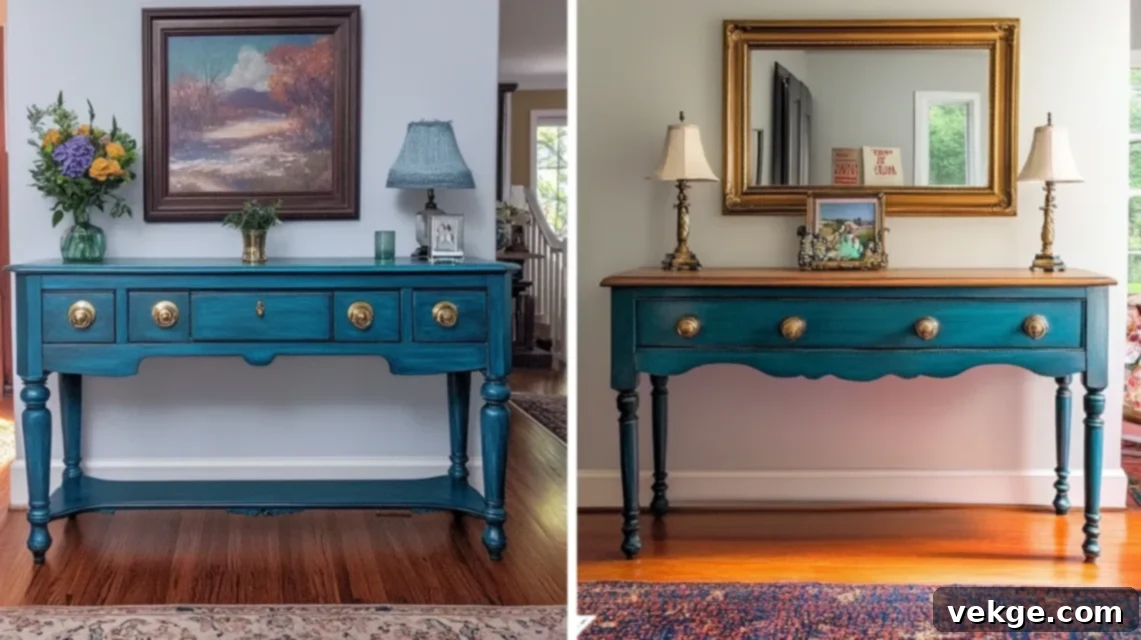
Watch a plain, overlooked buffet table become an undeniable showstopper with a luxurious coat of teal paint. This rich, deep blue-green hue instantly commands attention, exuding sophistication and style. After proper sanding and cleaning, two coats of vibrant teal paint, sealed with clear wax or a durable topcoat, will make it truly shine. Elevate the look further with elegant silver or gold knobs that pop against the deep color. Position it in your dining room or hallway to store dishes, linens, or cherished decor. This bold yet versatile color easily blends with various decor styles, proving that a single piece can anchor and transform a room’s aesthetic.
7. Coral Painted Desk with Gold Pulls
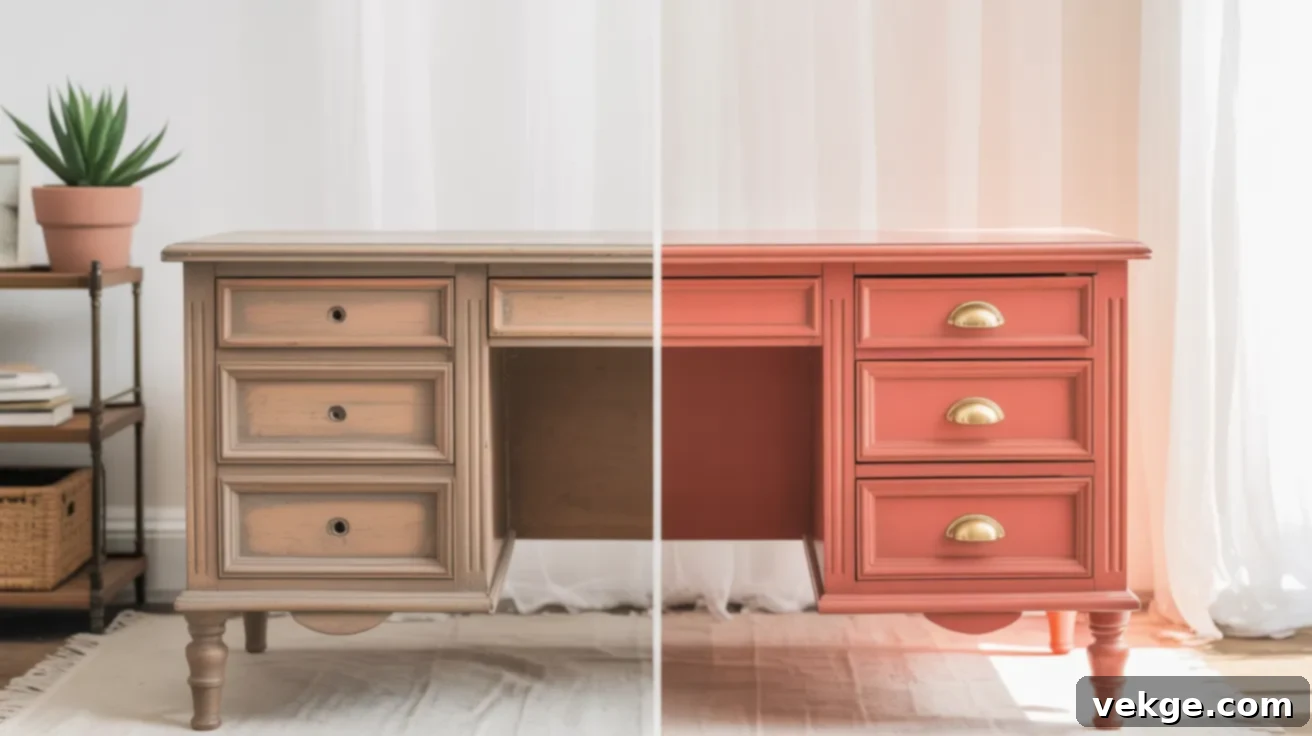
Infuse youthful energy and playful charm into a tired desk with a vibrant coral paint job. This cheerful shade instantly makes an old piece feel fresh and fun. After a light sand and clean, cover the desk with a radiant coral paint, then adorn it with shiny gold pulls for a touch of unexpected glamour. This lively color is perfect for home offices, creative kids’ rooms, or inspiring craft corners. It becomes a cheerful piece that radiates positivity and adds a delightful burst of life to any part of your home, encouraging creativity and joy.
8. Yellow Entry Bench Revival
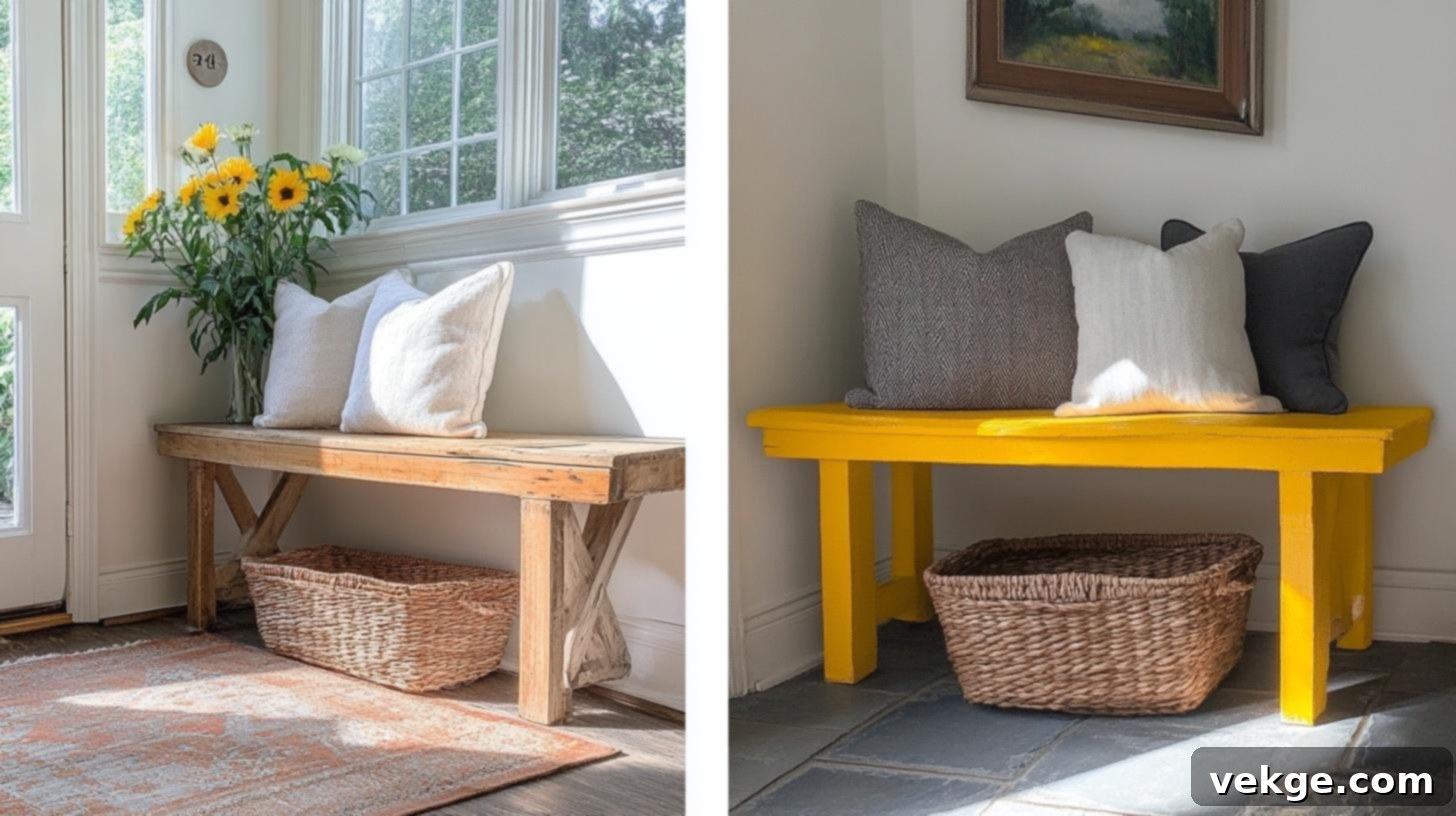
Welcome guests with a burst of sunshine by transforming your entryway bench with bright yellow paint. Clean the bench thoroughly, sand away any rough patches, and then apply a bold, mood-lifting yellow that instantly brightens the space. Enhance its functionality and charm with some plush, decorative pillows or a stylish basket tucked underneath for shoe storage. This lively bench is perfect for sitting down to put on shoes or dropping your bag upon arrival. The vibrant color radiates warmth and energy, making your front door area feel inviting and cheerful from the moment you step inside.
9. Forest Green China Cabinet
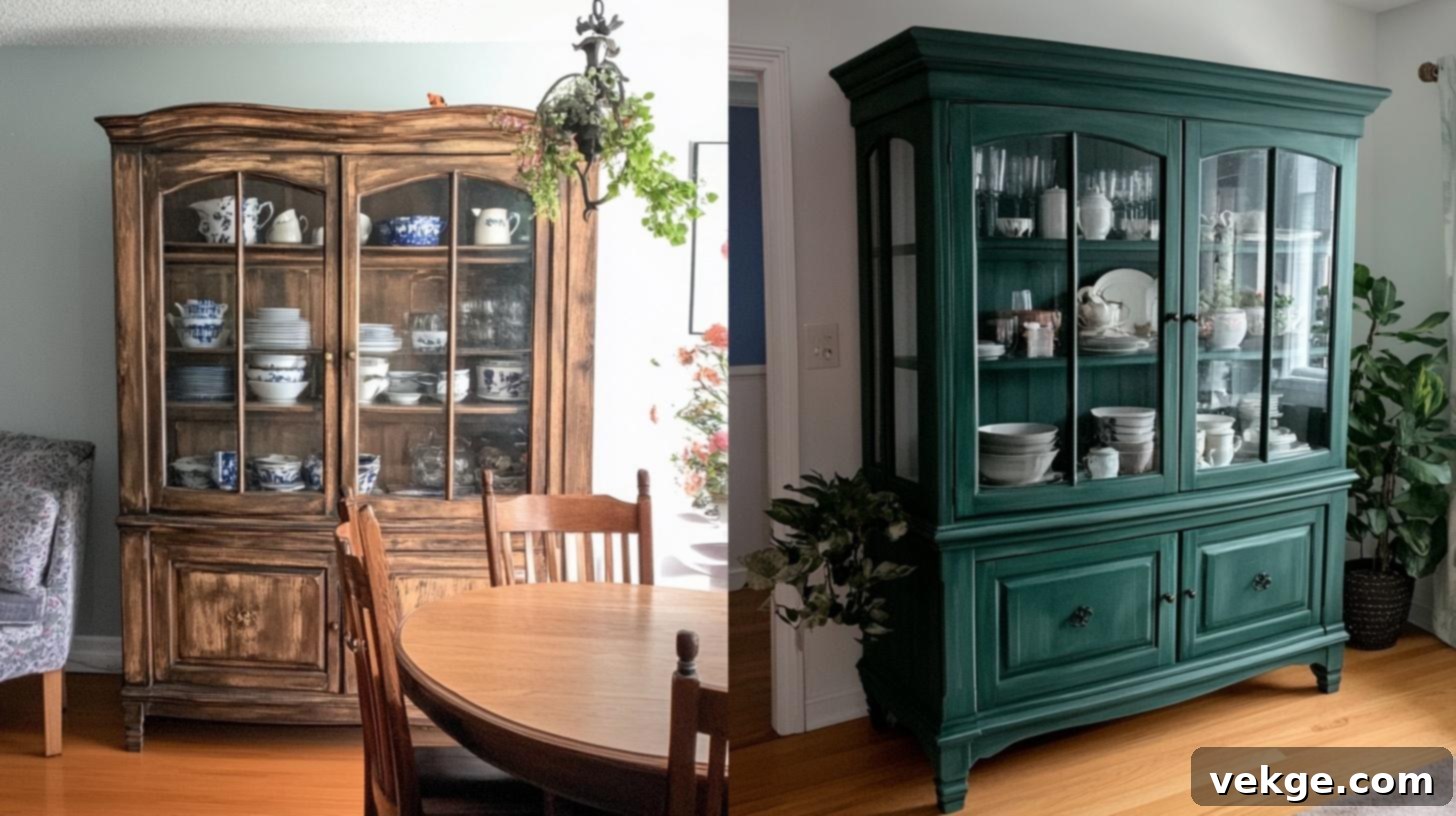
A deep, rich forest green cabinet adds a sophisticated, calming, yet luxurious feel to any space, reminiscent of a serene woodland. After thorough prepping, paint the entire piece in this majestic hue and seal it with a clear matte finish to preserve its elegant depth. If your cabinet features glass doors, they become an ideal canvas to beautifully display your finest dishes, treasured keepsakes, or curated decor. This commanding green works exceptionally well in dining rooms or kitchens, creating a striking contrast against light wood floors or crisp white walls. It’s a bold choice that feels wonderfully grown-up and timeless.
10. Raspberry Pink Kids’ Dresser
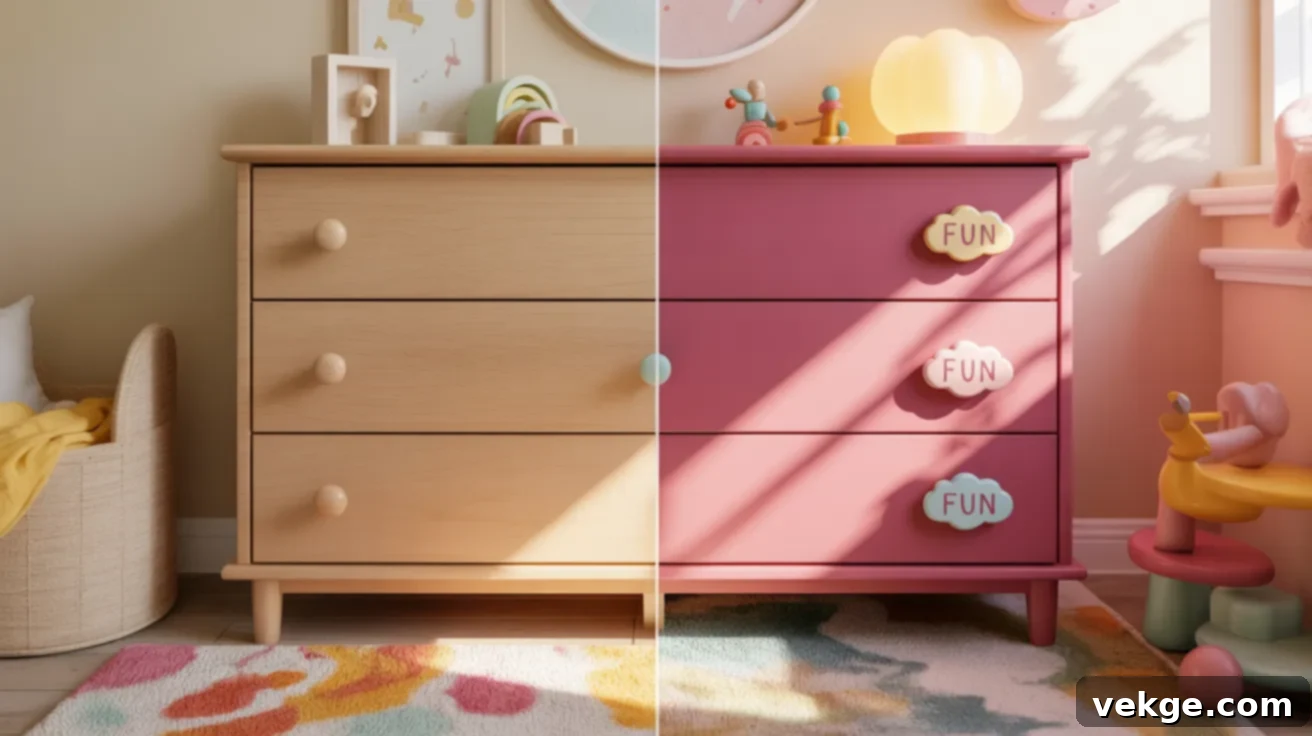
Inject a playful dose of fun and personality into a child’s room with a dresser painted in a vibrant raspberry pink. This energetic and cheerful shade adds an exciting pop of color that’s hard to miss. Ensure a smooth, durable result by sanding and priming first, then apply the raspberry pink paint, finishing with a protective sealant. For an extra special touch, consider involving your child in picking out new, whimsical knobs or handles. This simple makeover transforms a mundane piece into something they’ll absolutely adore, making their room uniquely special and full of joyful character.
Blue & Black Painted Furniture Projects
Embrace the dramatic and sophisticated with dark hues. Colors like deep blue and inky black can profoundly alter a room’s mood, lending a bold, elegant, and somewhat mysterious ambiance. These makeovers are perfect if you desire furniture that truly stands out with a touch of refined drama.
11. Navy Blue Dining Chairs
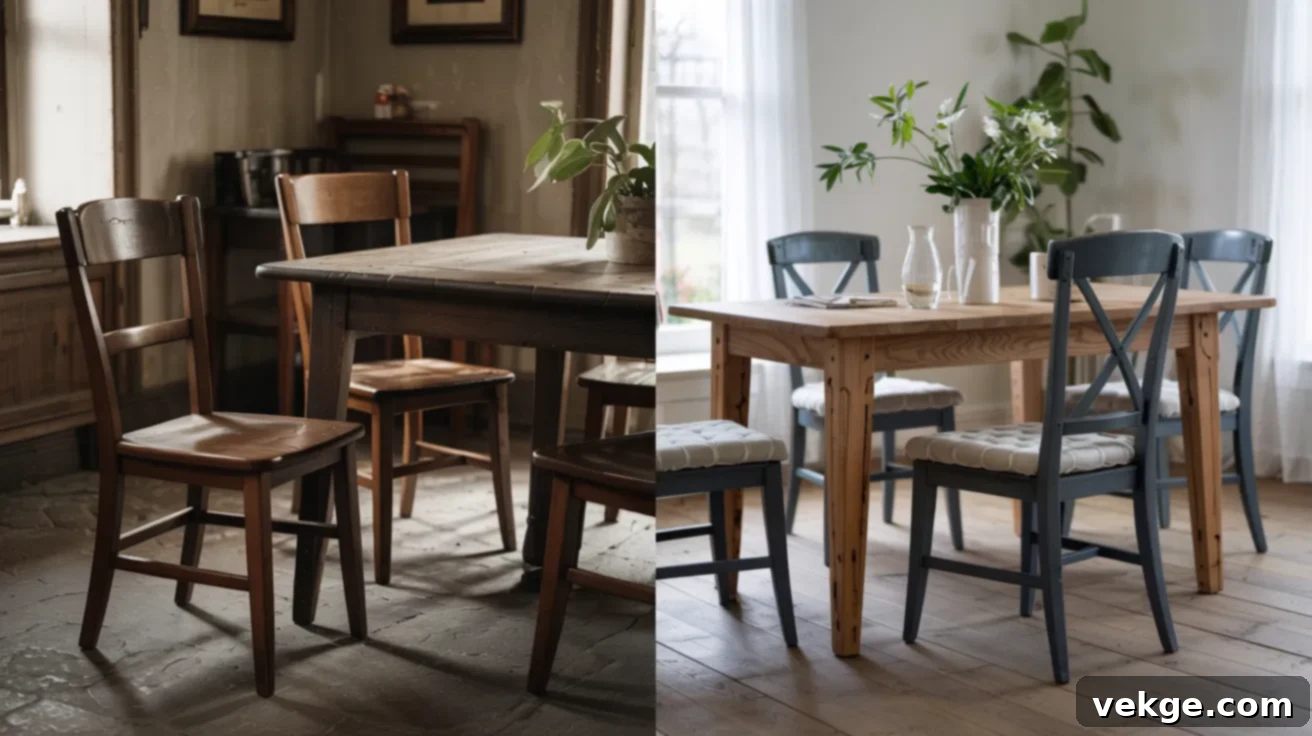
Give a set of old dining chairs a stunning, fresh identity with a classic navy blue paint job. This deep, sophisticated color immediately elevates the entire dining area, adding a touch of class without feeling overwhelmingly dark. After thorough sanding and cleaning, apply two even coats of navy paint, allowing each to dry completely for a smooth, durable finish. Navy blue harmonizes beautifully with both light-toned and rich wood tables, making it a versatile choice for modern, coastal, or even country-style dining rooms. Enhance comfort and visual appeal by adding soft seat cushions or mixing in patterned fabric to create an inviting and stylish dining experience.
12. Inky Black Console Table
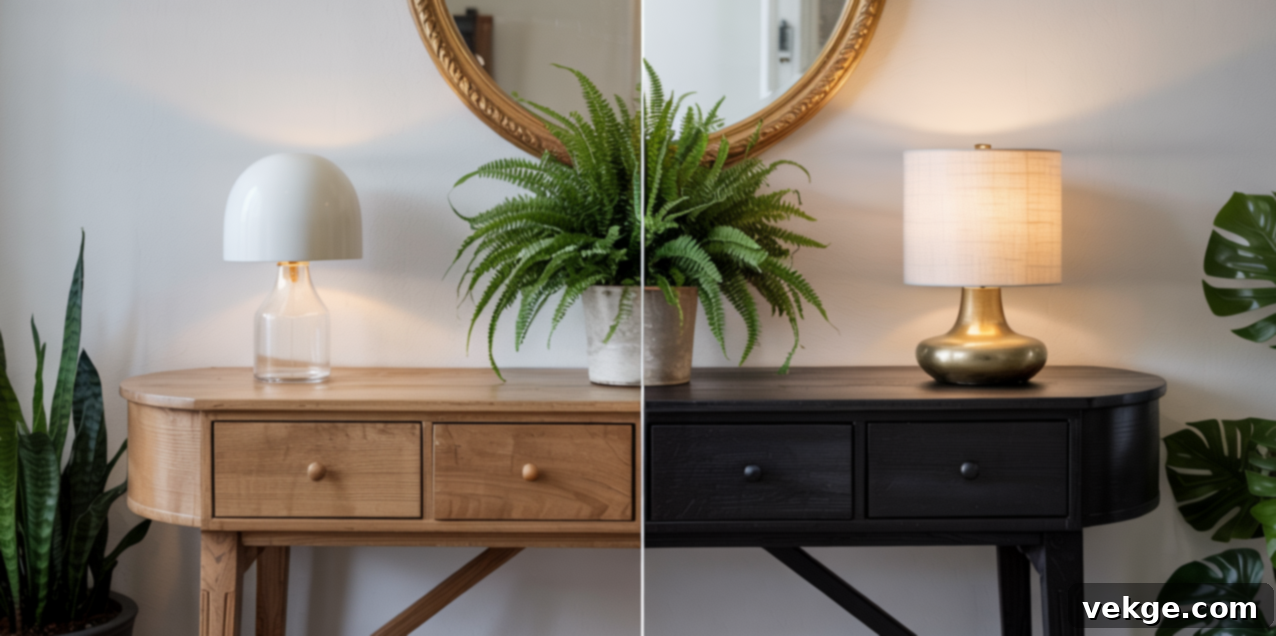
Transform a basic hallway or entryway table into a striking focal point with a dramatic inky black paint finish. This deep, rich color instantly imparts a clean, modern aesthetic that serves as a powerful backdrop for various decor elements, pairing exceptionally well with metallic accents, glass pieces, or natural wood elements. After thorough sanding and priming, apply two thin, even coats of black paint. Opt for a matte or satin finish to achieve a softer, more sophisticated style that absorbs light beautifully. Top it with a stylish lamp, an elegant mirror, or a woven basket for essential storage, creating a sleek, eye-catching spot that makes a powerful first impression.
13. Midnight Blue Dresser Flip
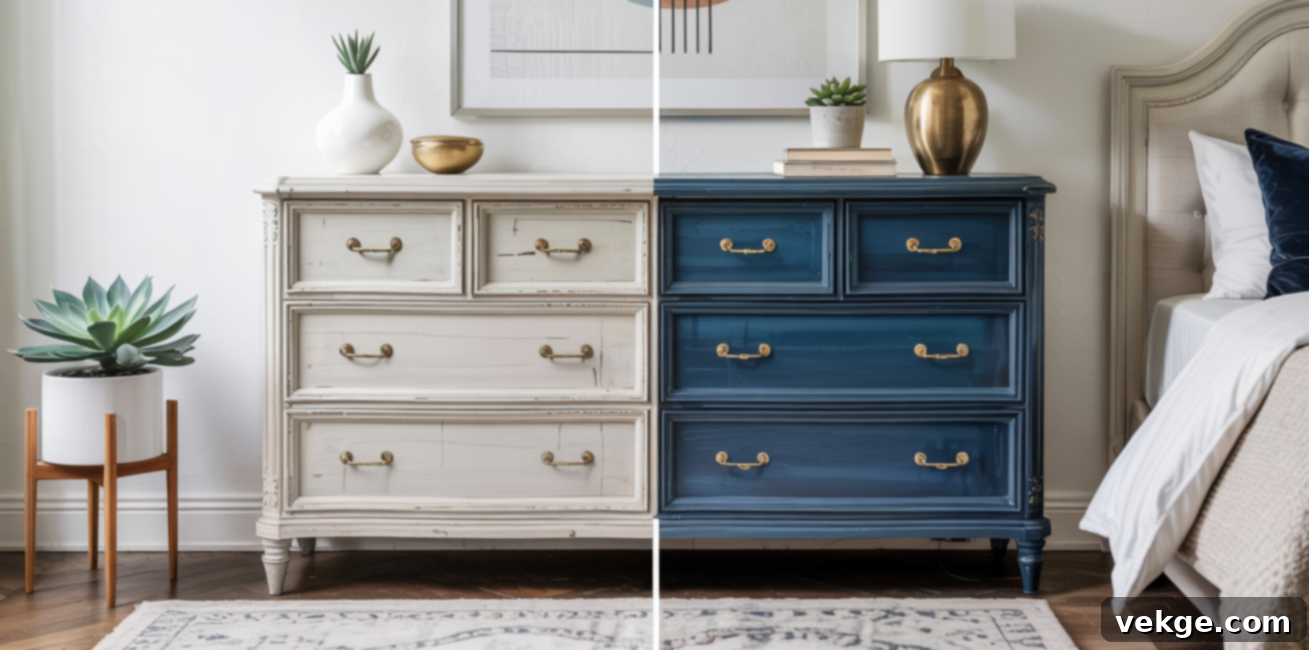
A worn-out dresser can experience a complete rebirth with the application of a luxurious midnight blue paint. This deep, velvety shade feels both cozy and boldly sophisticated, offering a rich backdrop for any bedroom decor. After meticulous prepping, apply the paint with a steady hand, ensuring even coverage, and seal it with a clear, durable topcoat for protection. The addition of gleaming brass or polished silver handles will provide a stunning contrast, adding a touch of elegant shine. This midnight blue makeover is perfect for bedrooms or guest rooms, providing essential storage with a stylish, grown-up upgrade that feels entirely new without the cost.
14. Matte Black Vanity Table
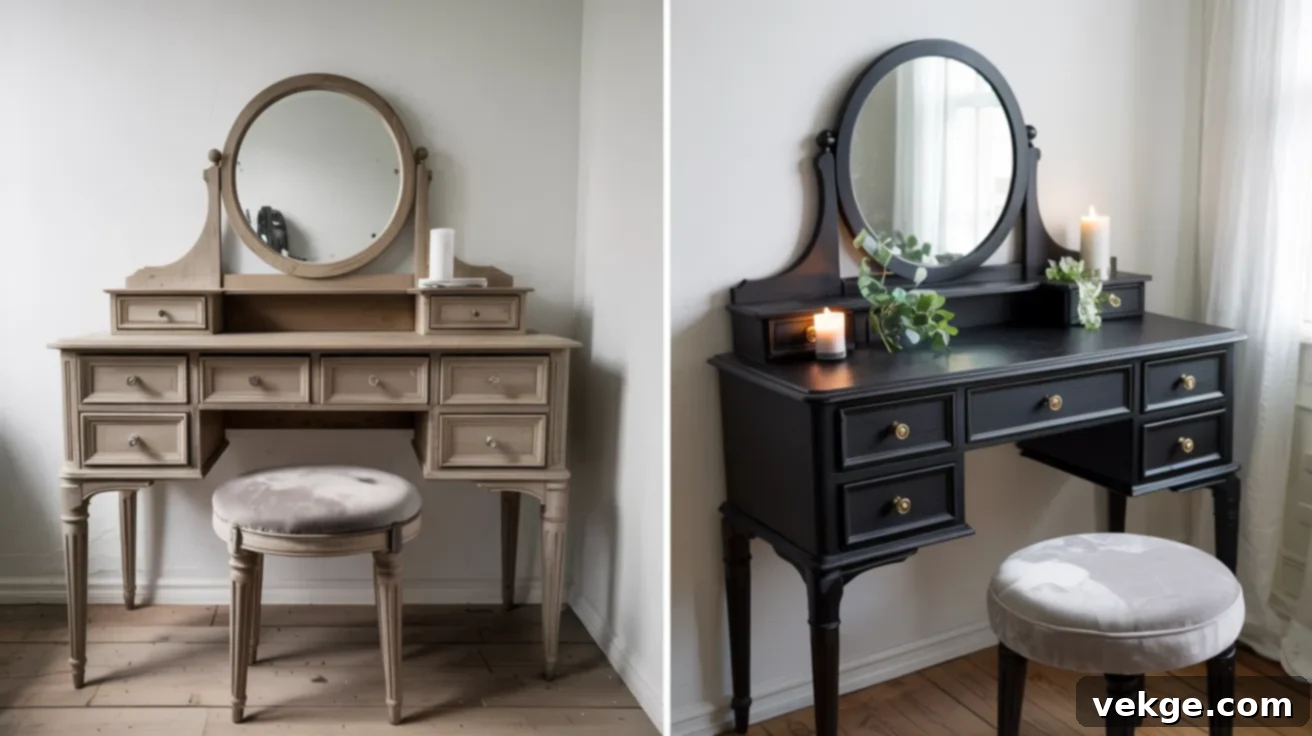
A matte black finish bestows furniture with an unmistakably clean, sharp, and contemporary look, and a vanity table is an ideal candidate for this chic transformation. After thoroughly cleaning and sanding, apply the matte black paint, ensuring each thin coat dries completely before applying the next to achieve a flawless finish. Opt for simple black or elegant gold knobs or pulls to maintain a sleek, sophisticated aesthetic. This look perfectly complements bedrooms or bathrooms, creating a sense of understated luxury. It feels distinctly fancy and stylish yet remains versatile enough to blend with a wide array of existing decor styles.
15. Dusty Blue Painted Hutch
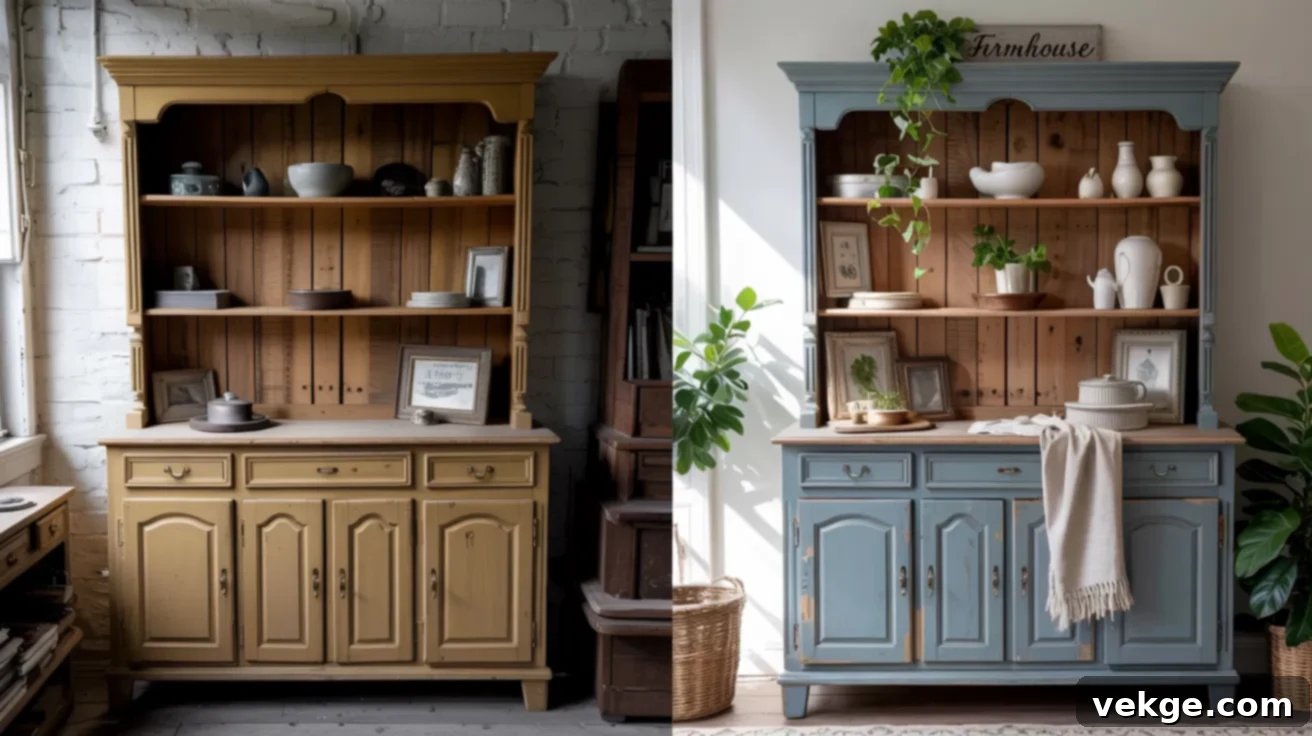
Dusty blue offers a unique balance of softness and strength, making it an exquisite choice for a hutch in a dining room or kitchen. Begin by thoroughly sanding and cleaning the surface, then apply the serene dusty blue paint, sealing it with a clear protective coat. This nuanced color beautifully harmonizes with white, gray, or natural wood surroundings, creating a cohesive and inviting atmosphere. Utilize the hutch to gracefully display dishes, organize your favorite books, or store charming baskets filled with essentials. The calm blue tone adds a quiet, enduring beauty, infusing the space with a sense of peace and sophisticated charm.
Farmhouse & Vintage Makeovers: Timeless Charm
If you adore the classic elegance and cozy appeal of old-time furniture, these farmhouse and vintage paint projects are designed for you. Utilizing soft color palettes, carefully aged finishes, and subtle distressing techniques, these makeovers effortlessly bring that beloved, well-worn, and inviting look into the heart of your home.
16. Antique Buffet in Light Gray Chalk
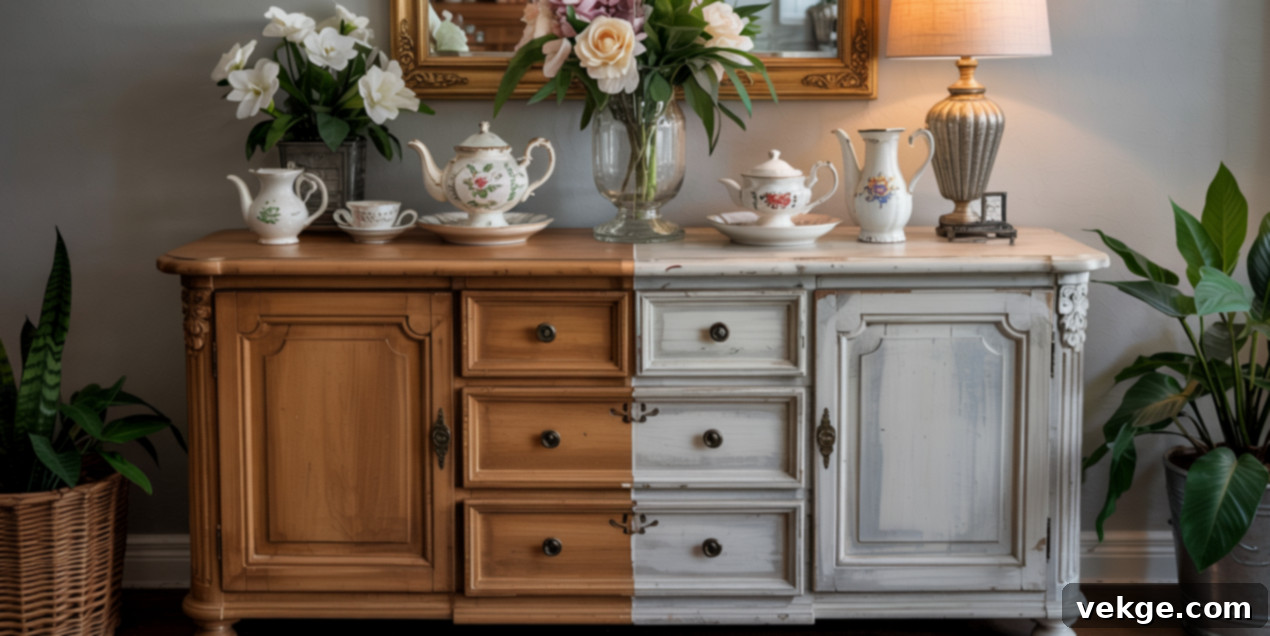
An antique buffet table, lovingly painted in light gray chalk paint, instantly evokes a soft, old-world charm that feels both elegant and inviting. After applying the paint, lightly sand the edges and corners to reveal subtle hints of the original finish, creating a natural, authentically worn look. Enhance this vintage style with classic glass or distressed metal knobs that complement its historic appeal. This transformed piece is ideal for dining rooms or entryways, offering generous storage while acting as a serene, classic anchor. It’s the kind of makeover that feels intrinsically part of the home, as if it has always belonged, exuding calm and timeless beauty.
17. Farmhouse Green Storage Bench
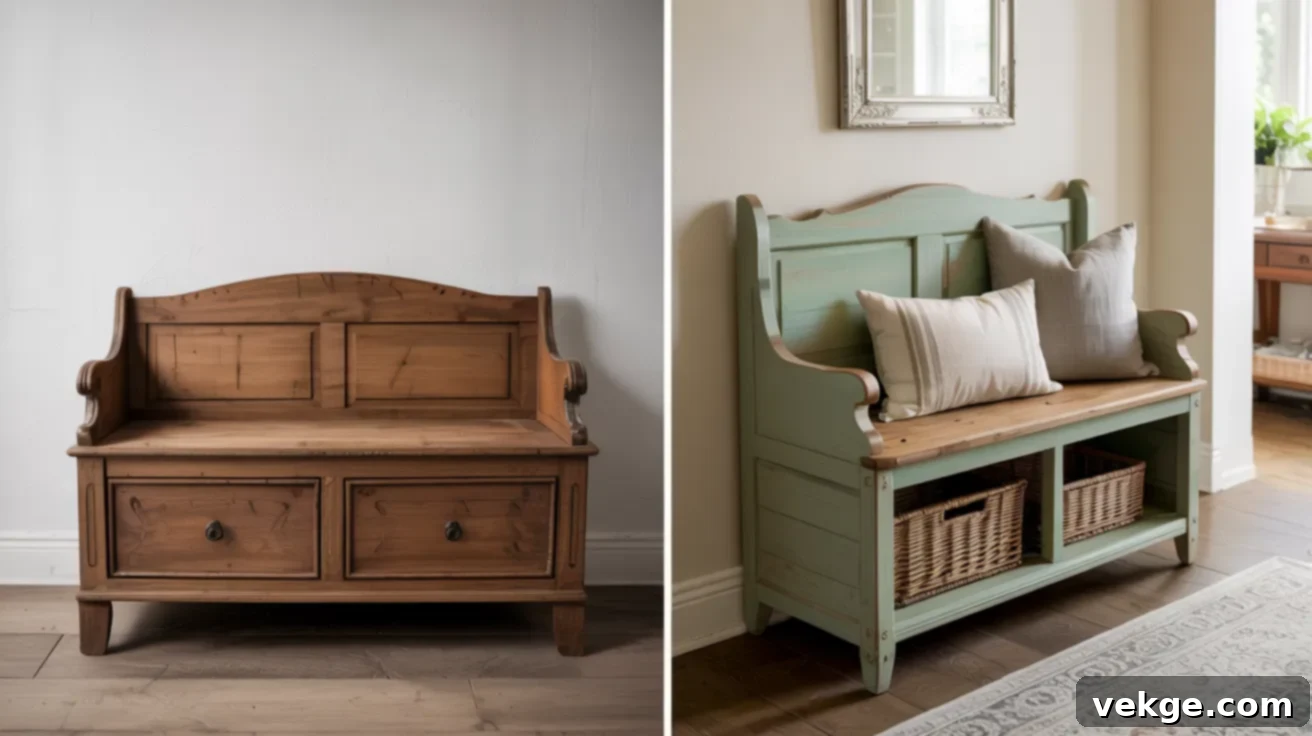
Create a simple yet remarkably useful and charming piece by painting a storage bench in a muted farmhouse green. This earthy color adds a natural warmth and subtle sophistication without being overly bold. For an authentic touch, use chalk paint and lightly distress the corners and edges once dry, mimicking years of gentle use. This versatile bench can be placed by the front door for shoe removal, in a hallway for quick storage, or even at the foot of your bed. It’s a cozy, classy addition that helps keep clutter at bay while perfectly embodying that cherished old-fashioned style.
18. Vintage Vanity with Aged White Finish
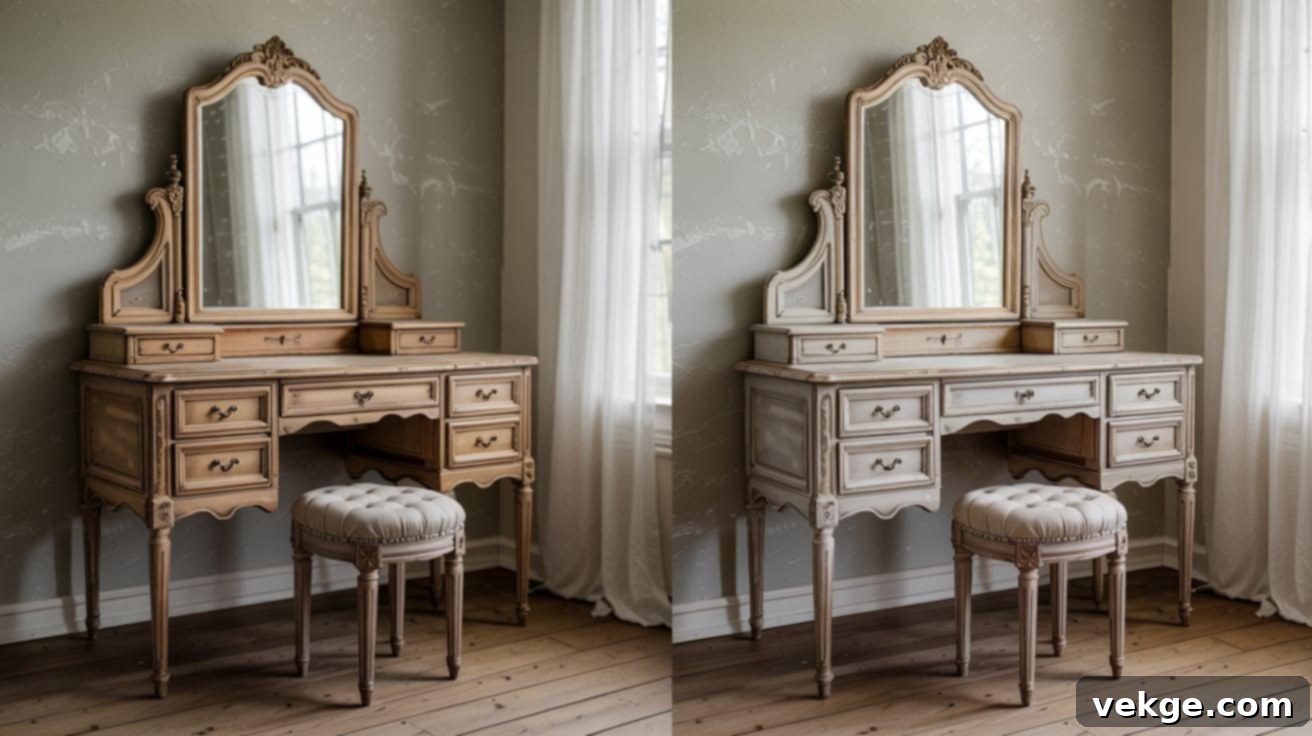
Transform an unassuming old vanity into a truly special piece with a beautifully aged white paint finish. After thorough sanding and painting, gently rub off a little extra paint from the corners and raised details to create an authentic timeworn appearance, revealing hints of the original wood beneath. Complete the look with a small, complementary stool and an elegant mirror, turning it into a serene beauty station. This vintage-inspired makeover is perfect for bedrooms or guest rooms, radiating soft, romantic vibes. It’s a project that elevates an old piece into something exquisitely sweet and full of classic charm.
19. Distressed Cream Secretary Desk
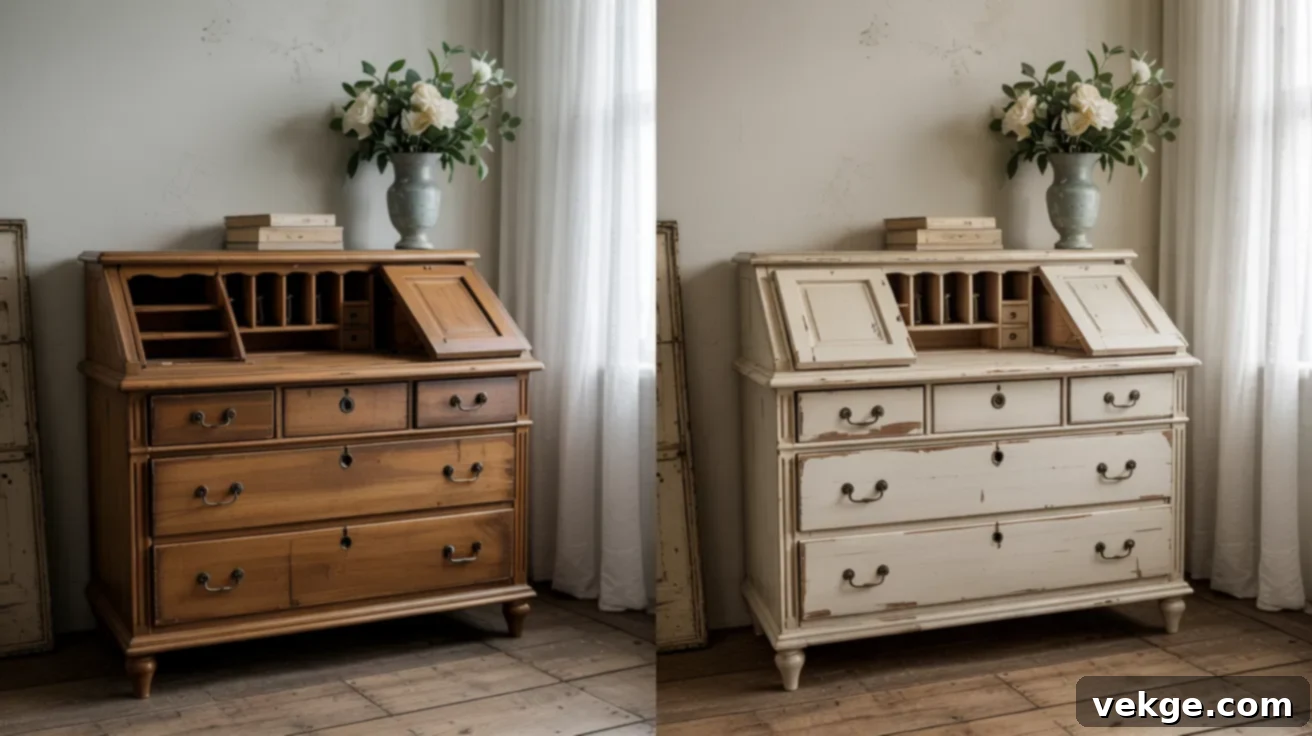
A secretary desk, thoughtfully revitalized with creamy paint and a distressed finish, seamlessly merges vintage style with practical functionality. After meticulously cleaning and sanding, apply a gentle cream chalk or milk paint. Once dry, delicately distress the edges and high-traffic areas to achieve that coveted aged look. Enhance the contrast and charm with dark, antique-style knobs or handles. This versatile desk looks stunning in living rooms, quiet bedroom corners, or dedicated study areas. It’s a perfect blend of aesthetic appeal and essential storage, ideal for writing, managing bills, or beautifully displaying your most cherished decorative items.
20. Rustic Blue Rocking Chair
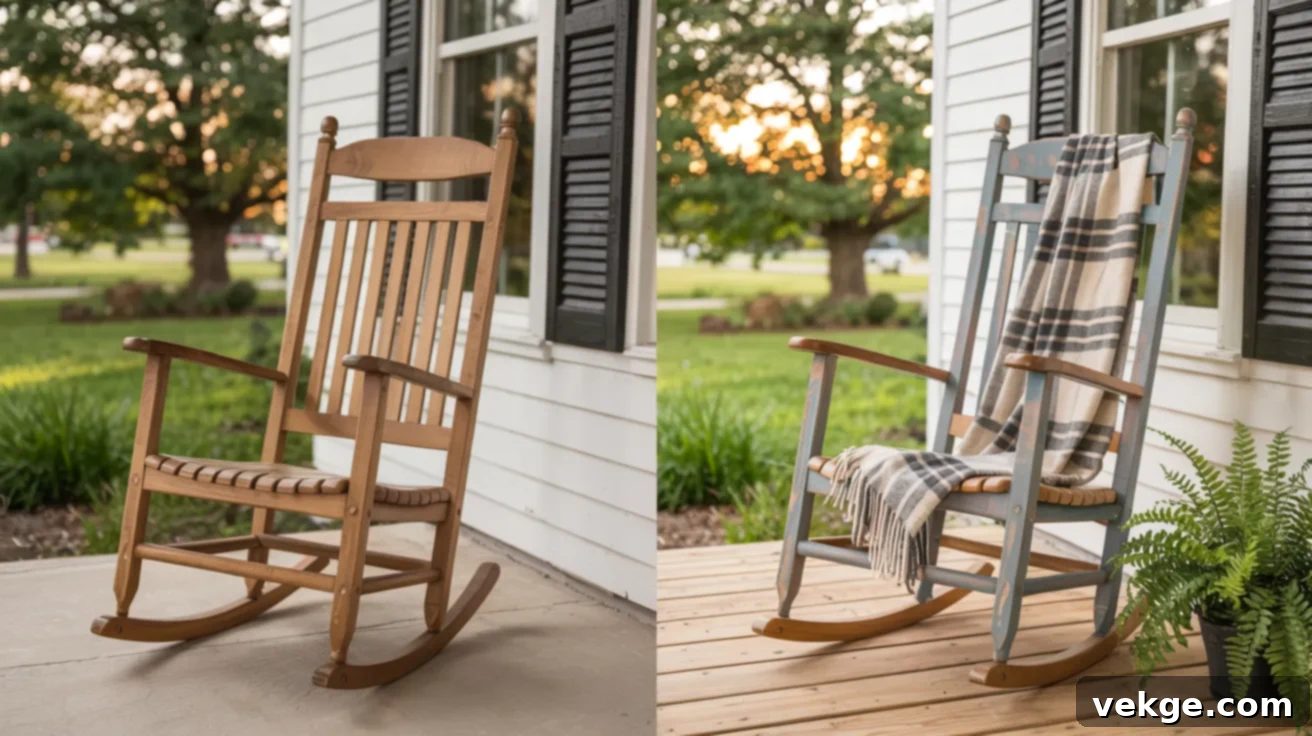
A classic wooden rocking chair, painted in a faded, rustic blue, adds an instant touch of class and comforting charm to any space. Opt for a soft, dusty blue paint and, after it dries, sand lightly in strategic areas to achieve that perfectly worn, rustic finish. Imagine it gracing a welcoming porch, nestled in a cozy reading nook, or positioned elegantly beside a crackling fireplace. Enhance its comfort with a small, inviting pillow or a warm throw blanket. This simple yet profound makeover creates a piece that feels peacefully timeless, as if it has been lovingly passed down through generations, even if you just painted it yourself.
Chalk Paint Projects with Character
Chalk paint is a dream for DIY enthusiasts, offering a distinctive soft, matte look that’s brimming with character. Its ease of use makes it perfect for giving old pieces a gentle, vintage-style makeover, infusing them with real personality and charm without extensive prep work.
21. Soft Gray Chalk Painted Dresser
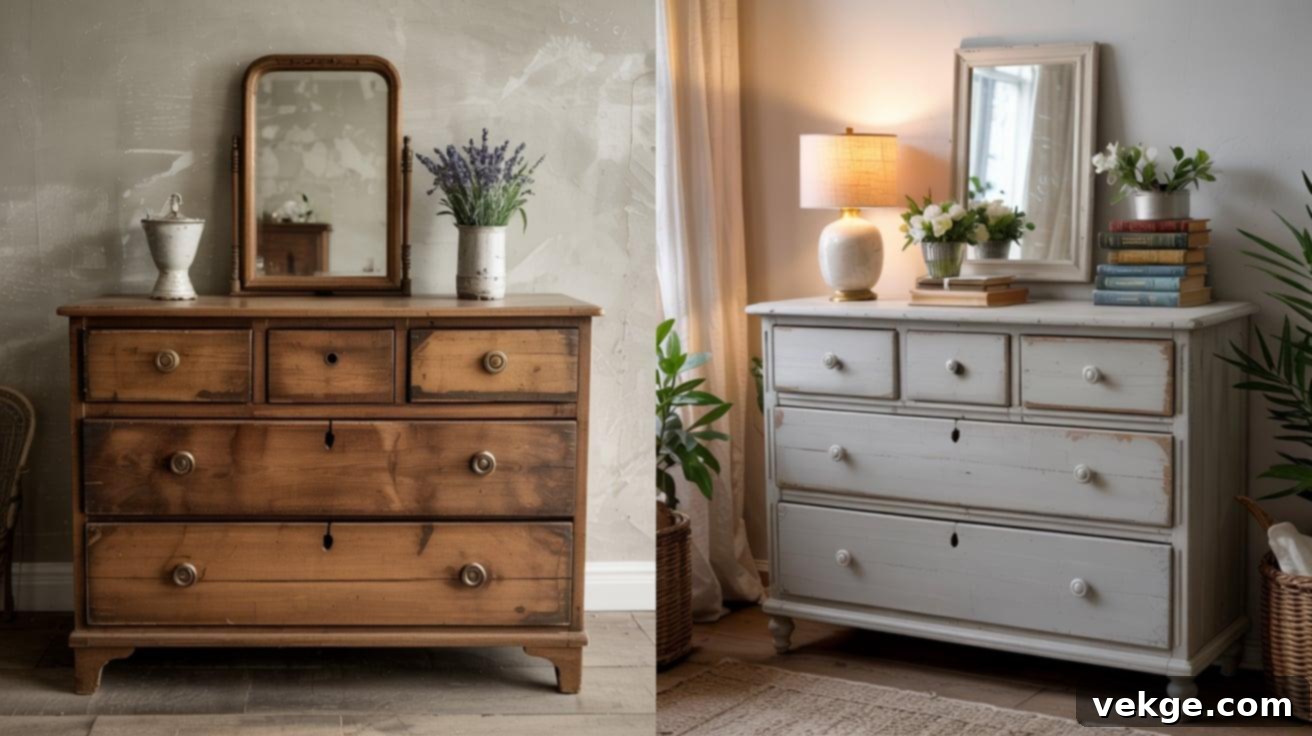
A dresser transformed with soft gray chalk paint exudes a serene and cozy ambiance, fitting effortlessly into any room’s decor. Chalk paint is known for its smooth application and minimal preparation requirements, making this an ideal beginner project. After painting, lightly sand the edges and corners to create subtle signs of wear, adding to its charming, aged appeal. Finish the look with clean white or elegant silver knobs for a refined touch. This makeover is perfectly suited for bedrooms or guest rooms, where its versatile neutral tone harmonizes with almost any existing color scheme. It’s a simple, classic update that makes old furniture feel wonderfully fresh and inviting again.
22. Antique White Side Table with Wax Finish
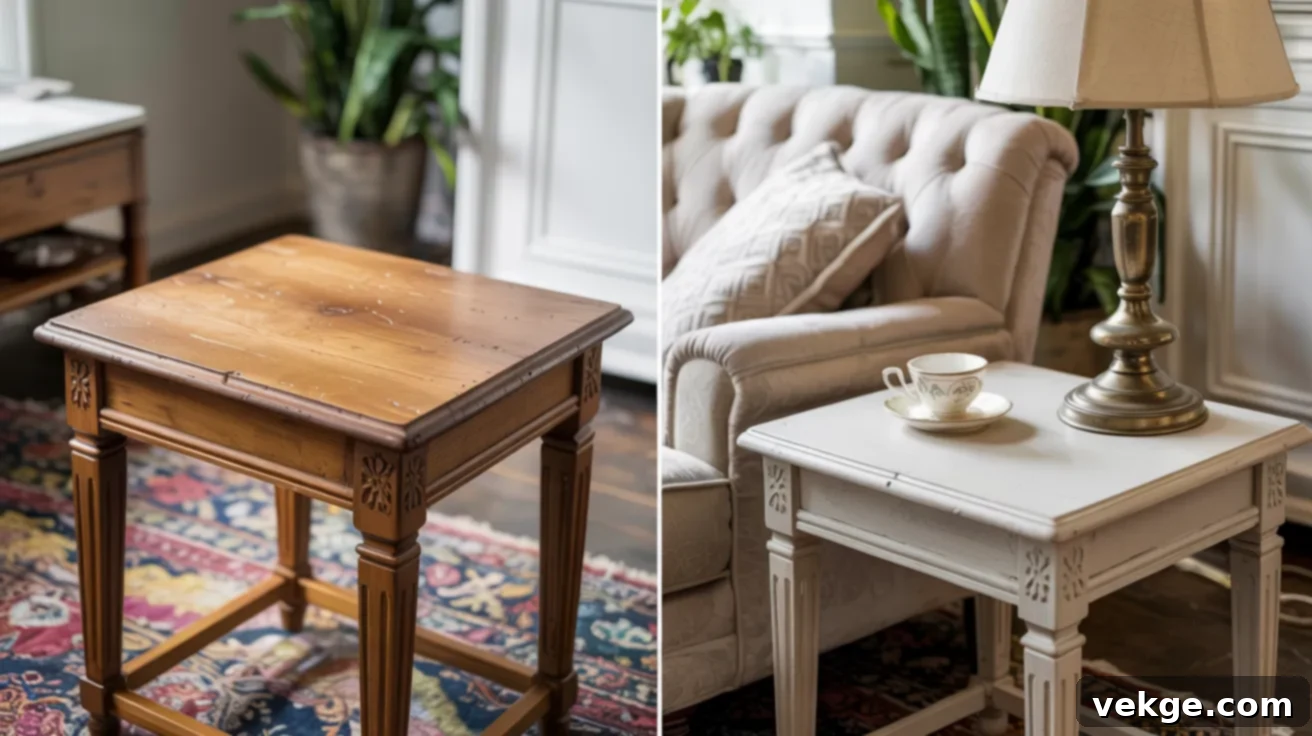
Give a small side table a pristine yet vintage appeal with antique white chalk paint. This paint naturally creates a beautiful matte finish. To protect it and add a subtle, soft sheen, apply a layer of clear wax. Gently rub the wax into the surface with a soft, lint-free cloth, allowing it to penetrate and seal the paint. This elegant look is perfectly suited for placement next to a sofa or bedside. Its light and pretty aesthetic effortlessly brings a gentle, understated style to any little corner of your home, making it feel bright and charming.
23. Lavender Chalk Painted Armoire
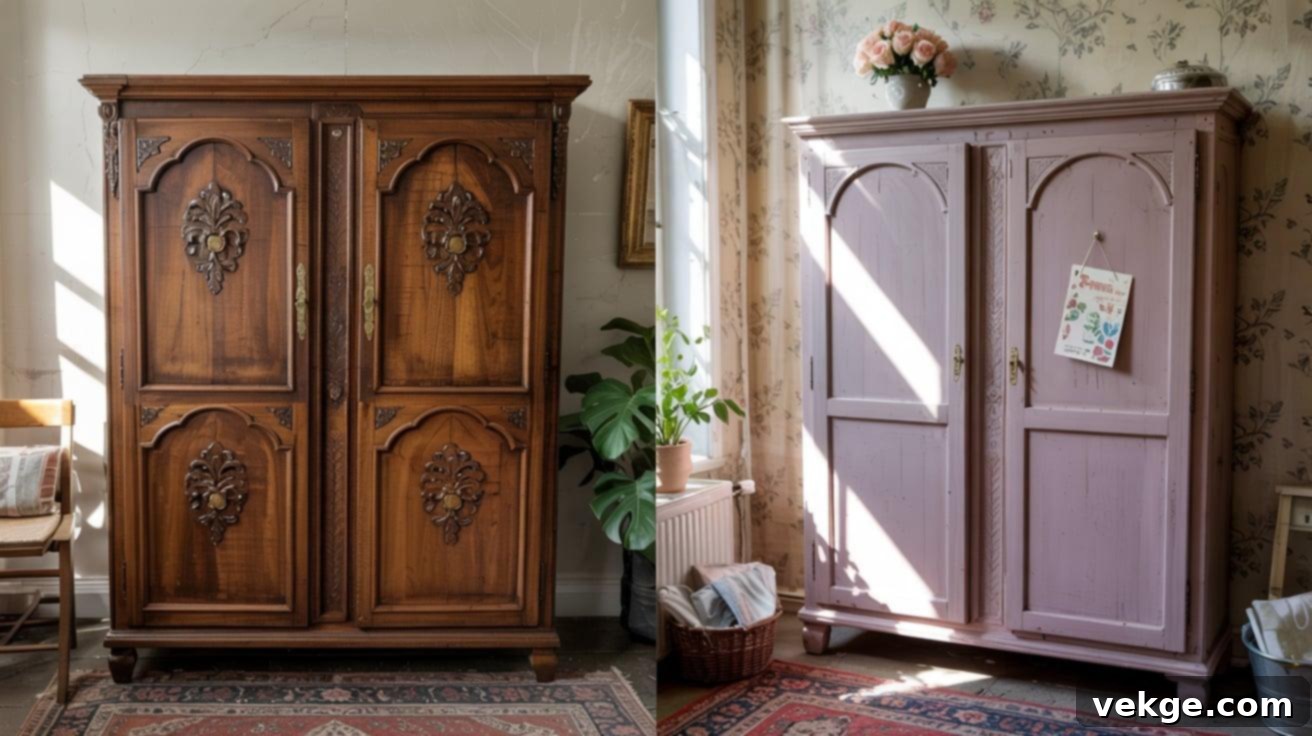
For a touch of whimsical elegance, consider lavender for a statement armoire. This soft, slightly unexpected hue is perfect for creating a focal point that feels both playful and gentle. Chalk paint allows for an easy, smooth application, and you can lightly distress the edges if you desire a charming, worn-in look. Elevate its appeal with delicate glass or ornate floral knobs for an extra layer of sophistication. This unique color works wonderfully in bedrooms, creative craft rooms, or tranquil nurseries. It introduces just enough color to be fun and intriguing, while still maintaining a gentle and calming presence.
24. Warm Beige Console with Layered Effect
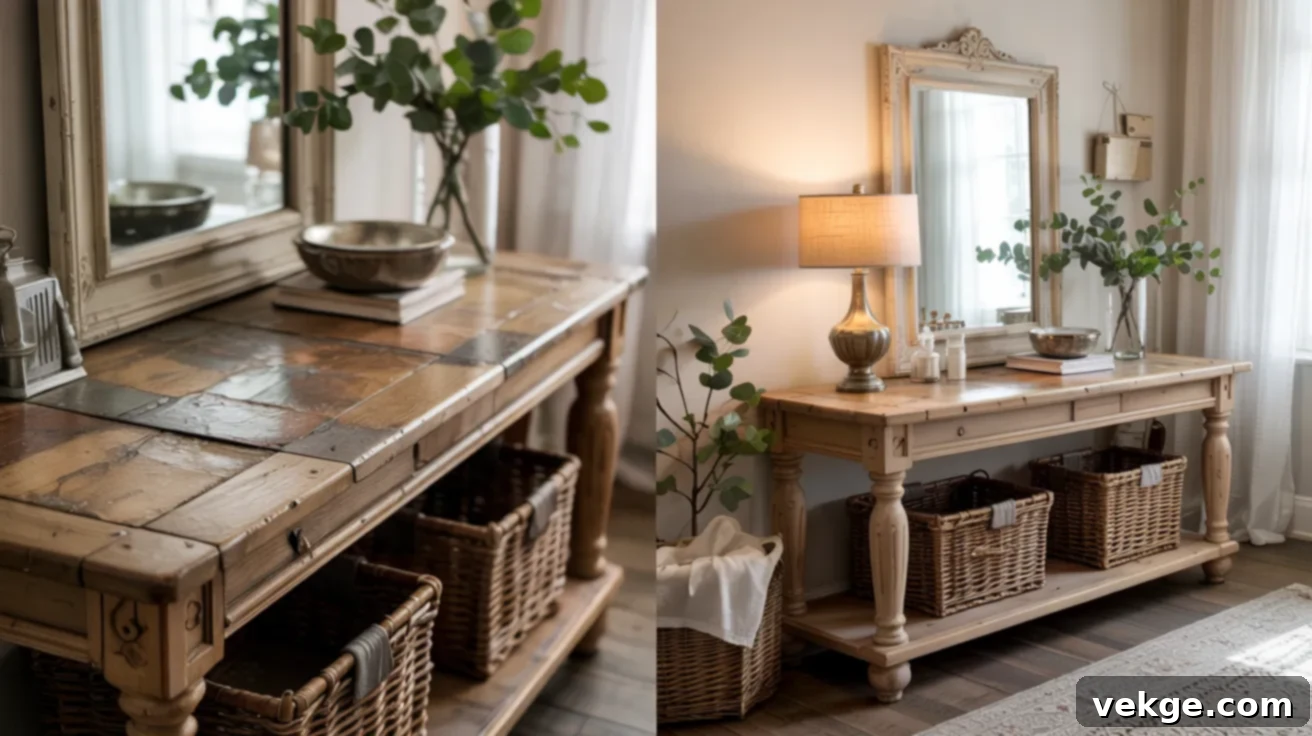
Achieve a rich, rustic, and wonderfully textured look with a layered chalk paint finish in warm beige tones for your console table. Begin by applying a solid base coat of one beige shade. Once dry, lightly brush a second, slightly different beige tone over the top, allowing some of the base color to peek through. For even more depth, strategically wipe back areas while the second coat is still wet to reveal both colors in a charming, organic way. Finish with clear wax for a soft, inviting glow and added protection. This technique creates a console that feels warm, collected, and as if it has been a treasured part of your home’s story for many years.
25. Robin’s Egg Blue Chalk Painted Shelf
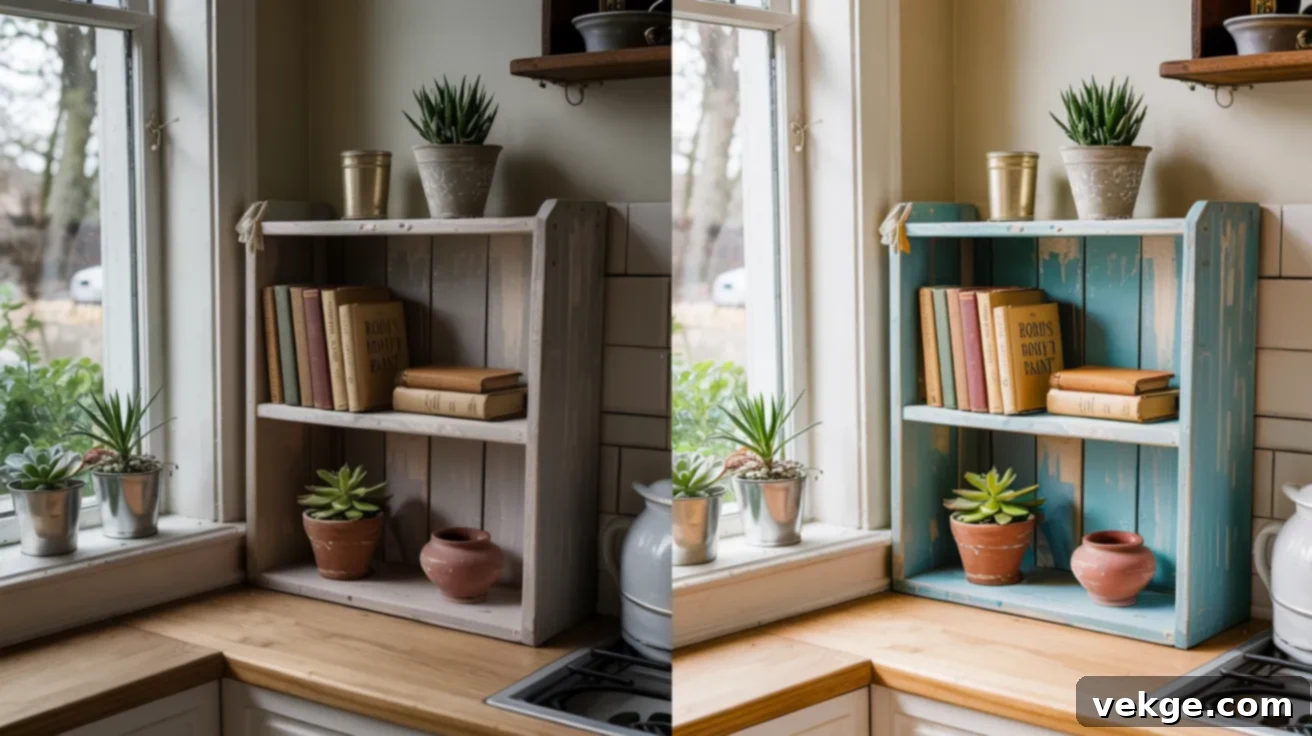
Infuse a plain shelf with delightful freshness and charm using robin’s egg blue chalk paint. This happy, vibrant color instantly brings new life and a touch of serene cheerfulness to any space. Chalk paint ensures a beautifully smooth and soft-looking finish with minimal fuss. Once transformed, this shelf becomes the perfect spot to display lush plants, cherished books, or small decorative treasures. This makeover is wonderfully versatile, working well in kitchens, bathrooms, or bedrooms, offering a small project with a significant impact. It’s an ideal way to experiment with chalk paint and introduce a gentle pop of color to your home.
Milk Paint Furniture Before and Afters: Authentic Age and Charm
Milk paint delivers a wonderfully soft, authentic old-world finish that makes furniture appear as if it has been lovingly passed down through generations. These before-and-after transformations beautifully illustrate how this natural, eco-friendly paint can create a big impact with its unique, subtly worn aesthetic.
26. Chippy Green Milk Paint Hutch
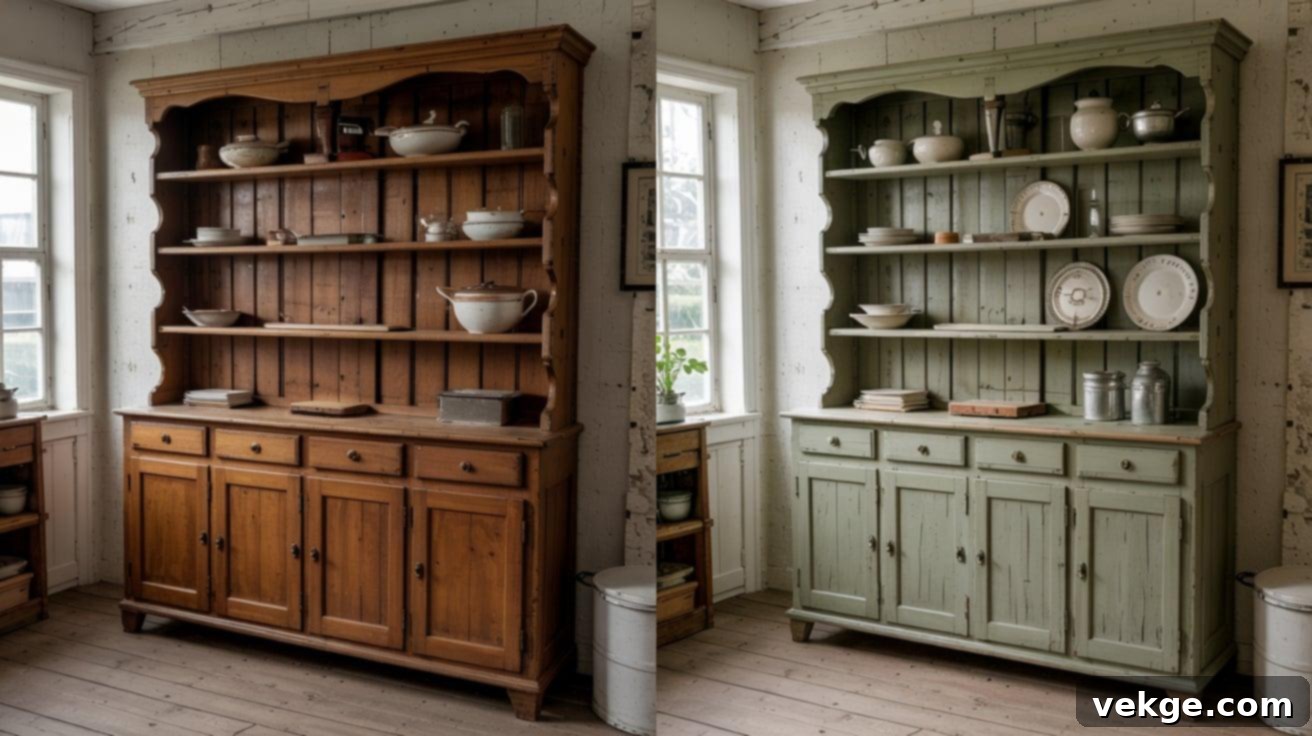
This old hutch gains an entirely new level of character and charm with a chippy green milk paint finish. The beauty of milk paint lies in its unpredictable nature; mix the powdered paint and apply it in thin layers. Don’t worry if the paint naturally cracks, flakes, or “chips” in some areas as it dries – this is precisely the sought-after, authentic aged style. You can gently assist the chipping process by lightly sanding once dry to enhance the worn look. This transformed piece is perfect for displaying dishes, plants, or providing essential storage. It brings a cheerful farmhouse vibe and makes even the most worn-out furniture feel vibrant and full of life again.
27. Soft Blue Milk Painted Nightstand
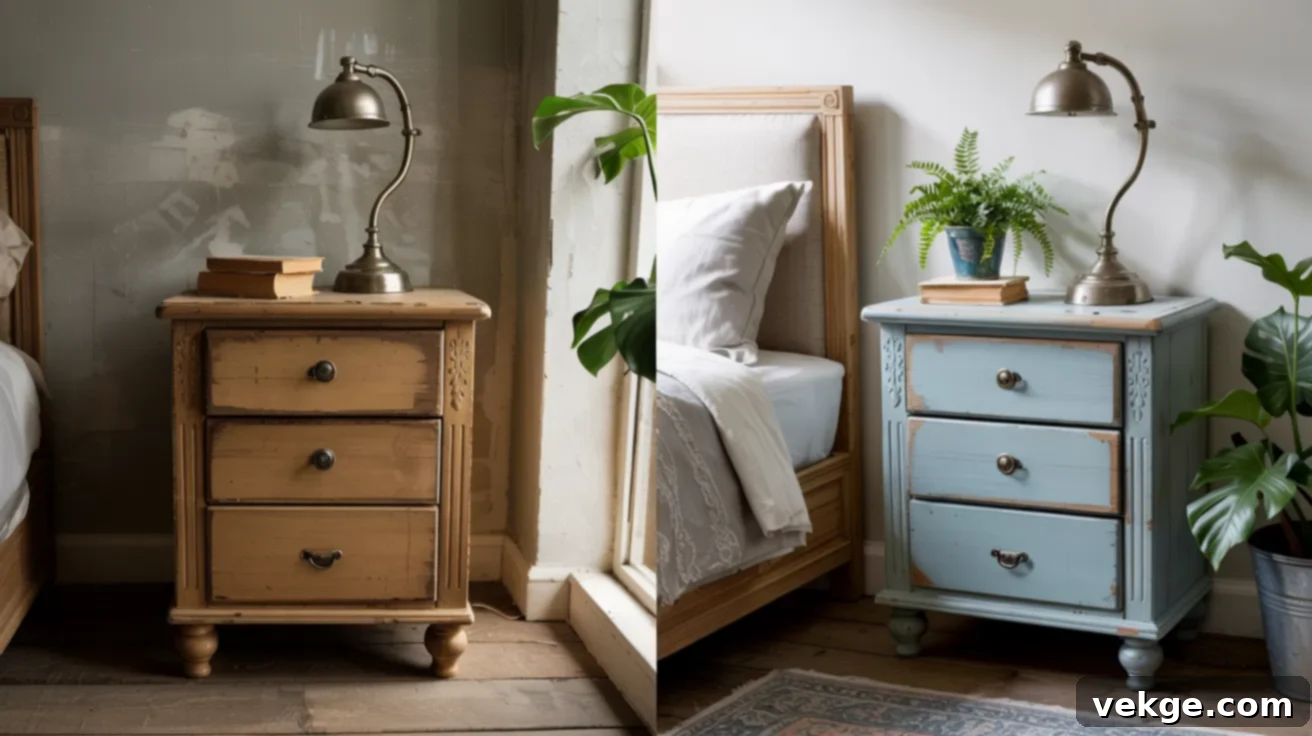
A small nightstand, painted in a serene soft blue milk paint, introduces a wonderful sense of calm and tranquility to any bedroom. The inherent thinness of milk paint allows the wood grain to subtly show through, lending an airy, natural, and beautifully textured look. To protect the finish and enhance the color, seal the piece with hemp oil or a clear wax. This project is an excellent starting point for those new to milk paint, as it’s quick, easy, and yields a sophisticated result with minimal effort. It proves that even small pieces can make a significant stylistic impact.
28. Deep Red Vintage Milk Paint Table
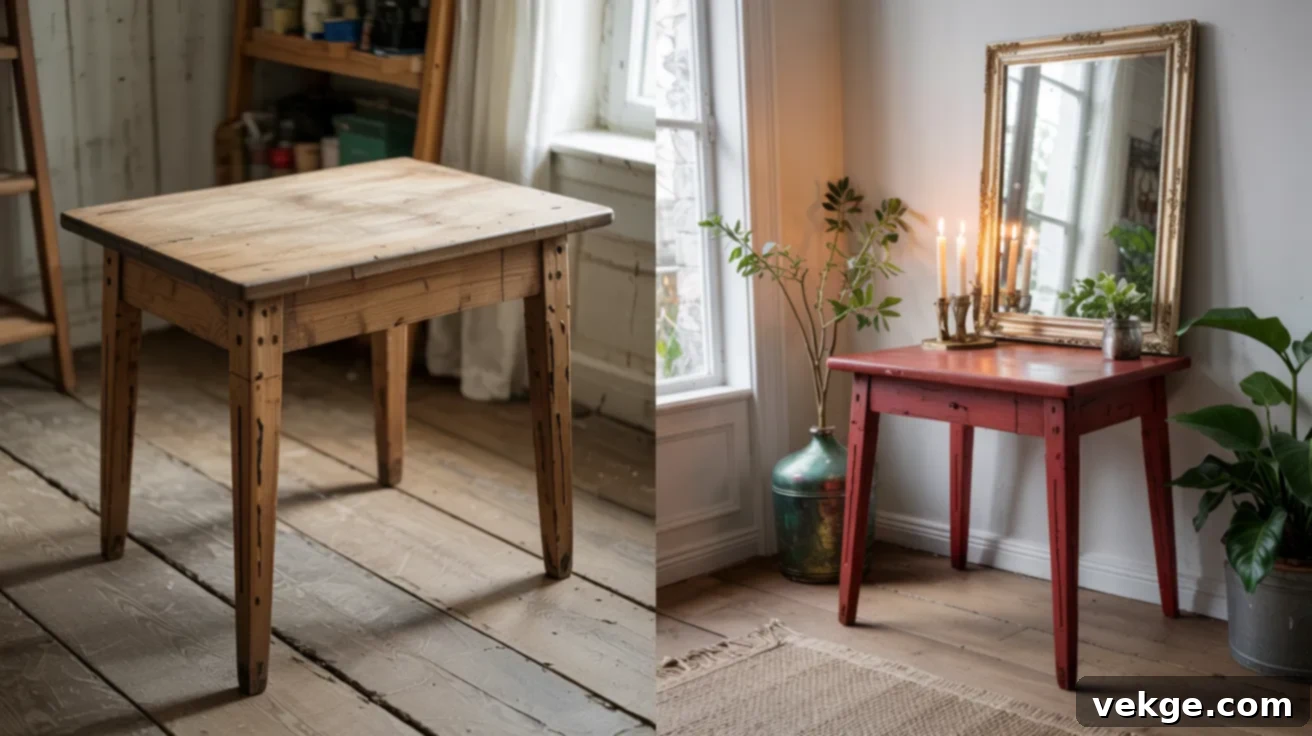
Infuse an old table with warmth, character, and a touch of drama using a rich, deep red milk paint. After mixing and applying the paint, embrace the natural chipping and flaking that can occur as it dries – this contributes to its authentic vintage charm. You can gently encourage this aged effect by lightly sanding key edges once dry. This bold and inviting color works beautifully in dining rooms, or as a striking accent piece in a hallway or living area. It evokes a cozy, time-honored feel, reminiscent of cherished pieces found in an old country cottage or a rustic farmhouse.
29. Warm Mustard Sideboard
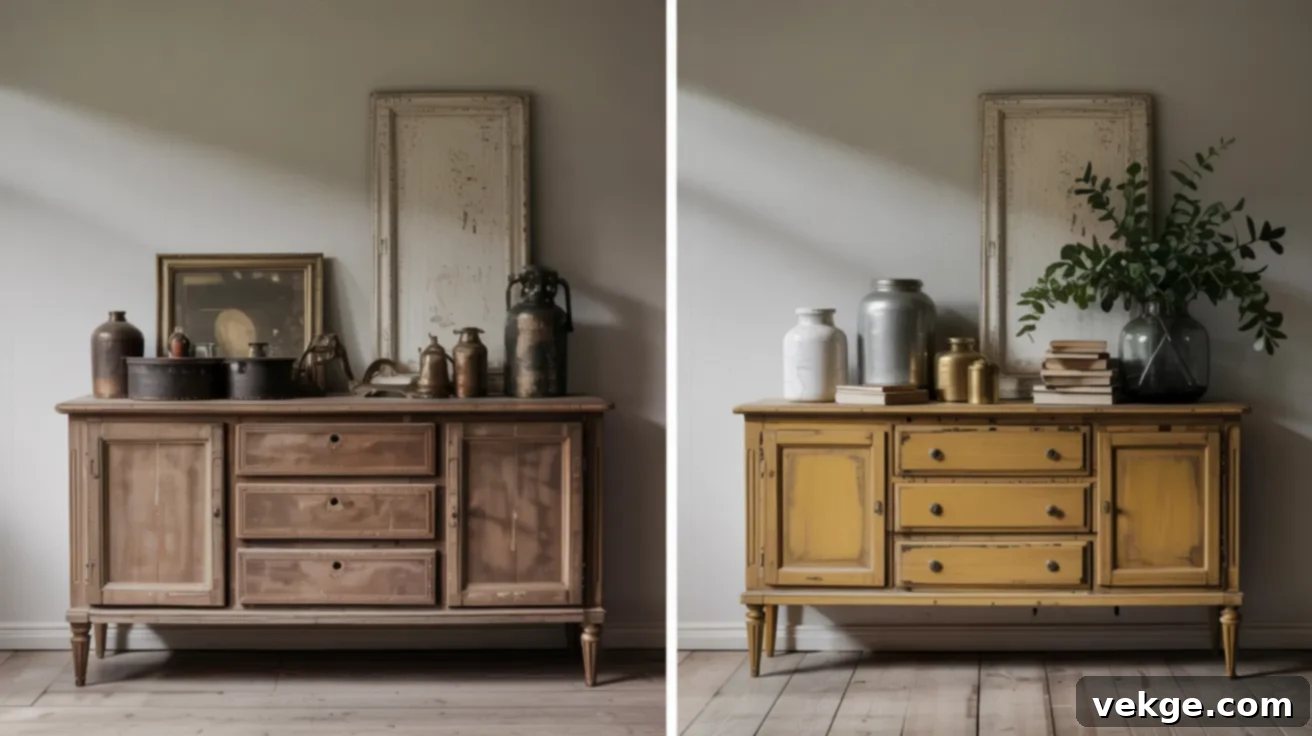
A sideboard transformed with warm mustard yellow milk paint creates a wonderfully happy and eye-catching statement piece. Mix your milk paint carefully and apply it in thin layers, resisting the urge to overwork it; any imperfections will only add to its unique character. Once completely dry, seal the piece with a natural oil or wax to protect the finish and deepen the color. Complement the look with simple black or natural wood knobs to maintain its grounded, old-fashioned appeal. This piece is perfect for kitchens or living rooms, introducing just the right amount of boldness while still feeling deeply rooted and charmingly vintage.
30. Whitewashed Cabinet with Milk Paint
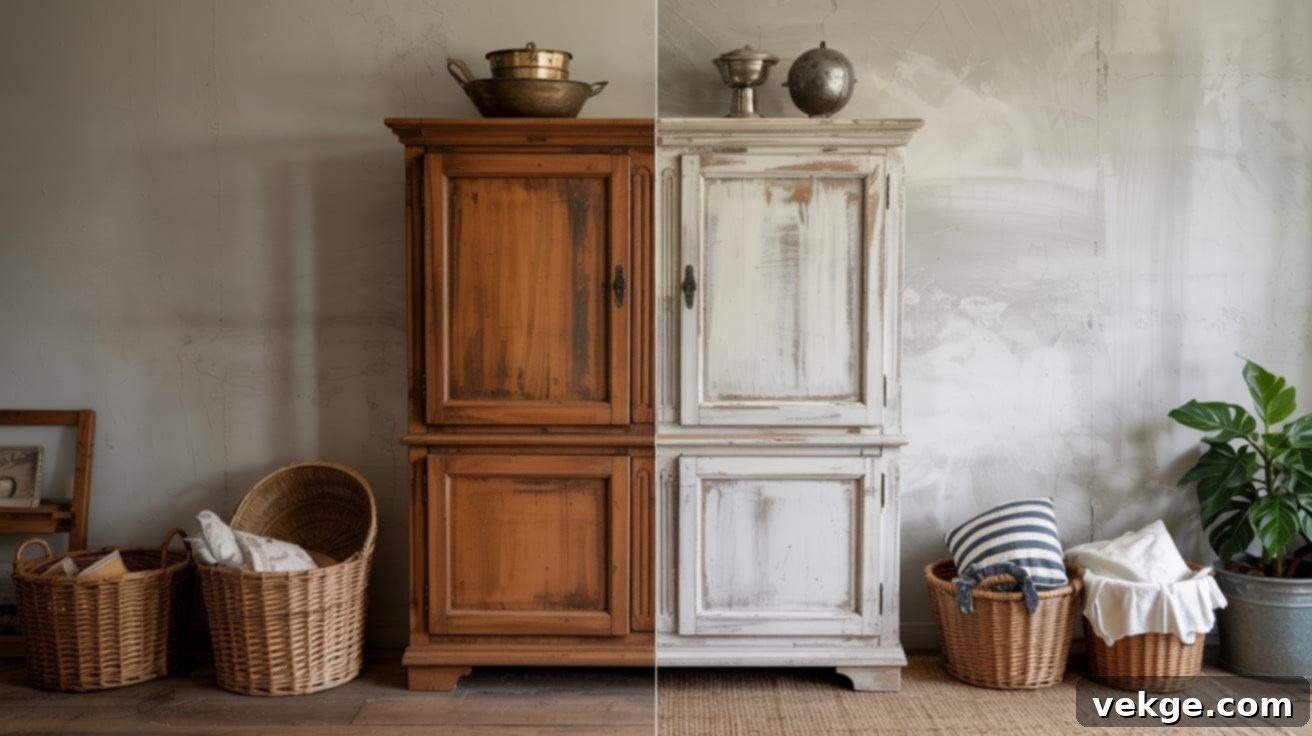
For a soft, airy, and effortlessly beachy feel, consider whitewashing a cabinet using milk paint. Achieve this by mixing the milk paint thinner than usual, creating a translucent wash. Brush it on lightly, allowing the natural wood grain and texture to subtly show through beneath the white. You can layer the wash until you achieve your desired level of opacity and coverage. This beautiful technique works exceptionally well for display cabinets, charming bookcases, or even functional bathroom storage. It’s a simple, fresh approach that imparts a peaceful, well-loved, and wonderfully bright look to any space.
Functional Room-Specific Ideas: Tailored Transformations
Some furniture makeovers shine brightest when specifically tailored to the unique needs and aesthetics of a particular room. These room-based transformation ideas aren’t just about making furniture look pretty; they’re about adding crucial function, smart storage solutions, and bespoke style precisely where you need it most in your everyday living spaces.
31. Nursery Changing Table in Light Blue
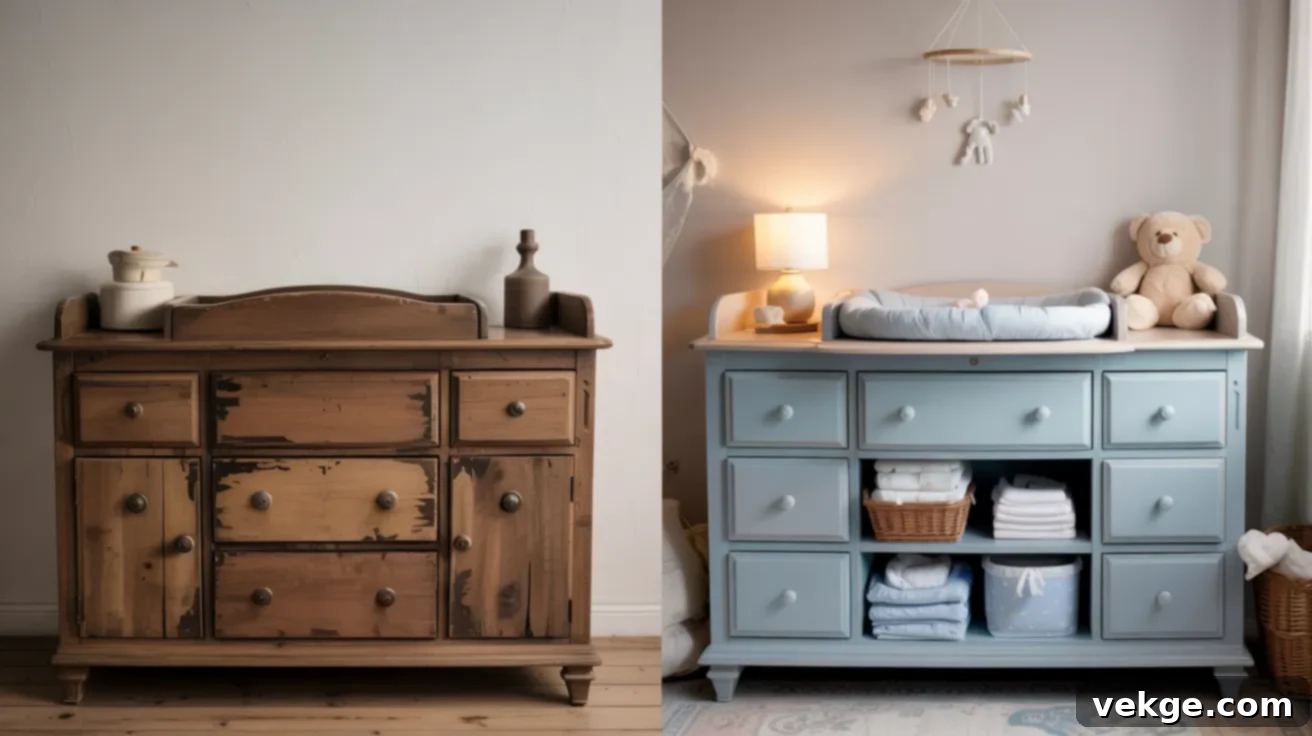
Create a serene and calming environment in a nursery by painting a changing table in a soft, gentle light blue. When undertaking this project, ensure you use non-toxic, baby-safe paint and seal it with an equally gentle, child-friendly topcoat. Enhance its practicality and charm with cute, playful knobs or soft, fabric storage baskets tucked underneath for convenient access to diapers and supplies. This universally appealing color works beautifully for both boys’ and girls’ nurseries, and the durable piece can seamlessly transition into a regular dresser as your child grows. It’s a sweet, soothing update that transforms a simple item into a lovely, functional focal point of the nursery.
32. Kitchen Island Flip in Pale Yellow
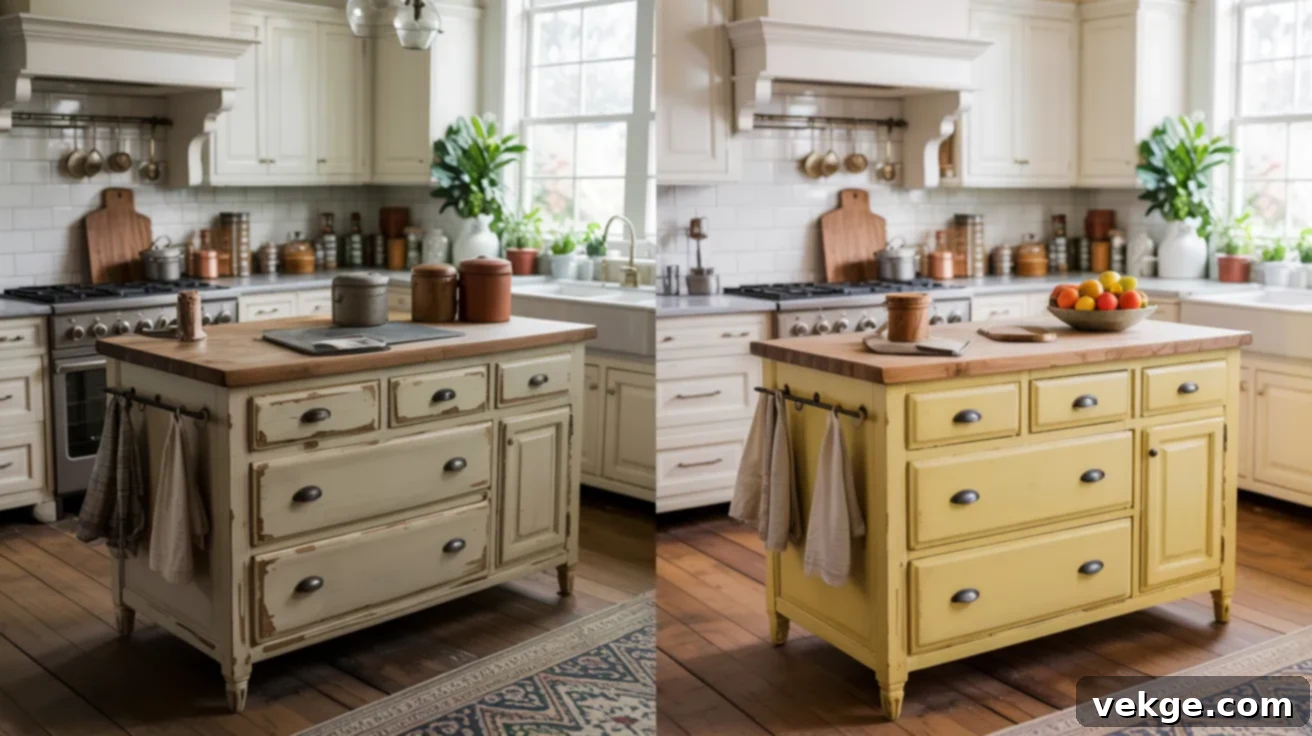
Inject a delightful dose of sunshine and warmth into your kitchen by repainting an old island in a cheerful pale yellow. Ensure a lasting finish by thoroughly sanding the piece and using a durable, high-quality paint that can withstand the demands of a busy kitchen, including spills and frequent cleaning. Maximize its functionality by adding practical hooks on the side for dish towels or an easily accessible towel bar. This inviting yellow shade makes the entire kitchen space feel sunny, welcoming, and vibrant without being overly bold. It’s an ingenious way to reuse an old dresser or cart, transforming it into a hard-working, stylish centerpiece for your culinary haven.
33. Painted Entryway Table with Hooks
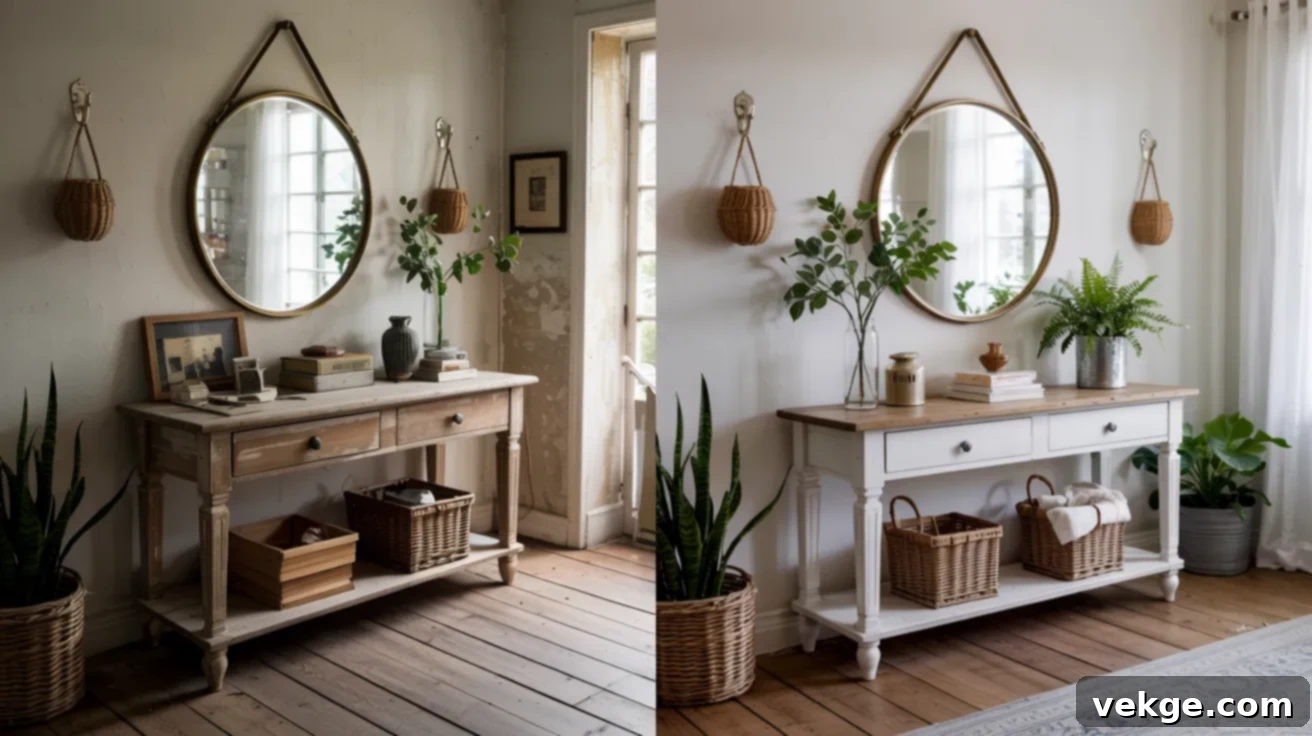
Craft a perfectly organized and stylish entryway by painting a small table in a color that beautifully complements your walls or front door. Above the table, install a few sturdy hooks for keys, bags, or hats, keeping essentials easily accessible. Tuck elegant baskets underneath to neatly store shoes, mail, or other grab-and-go items. This thoughtfully designed piece instantly makes your front door area feel neat, welcoming, and purposeful. Choose a highly durable paint that can withstand the daily wear and tear of a busy entryway. It’s a smart and simple makeover that adds both organization and refined style to your home’s first impression.
34. Living Room Side Table Refinish
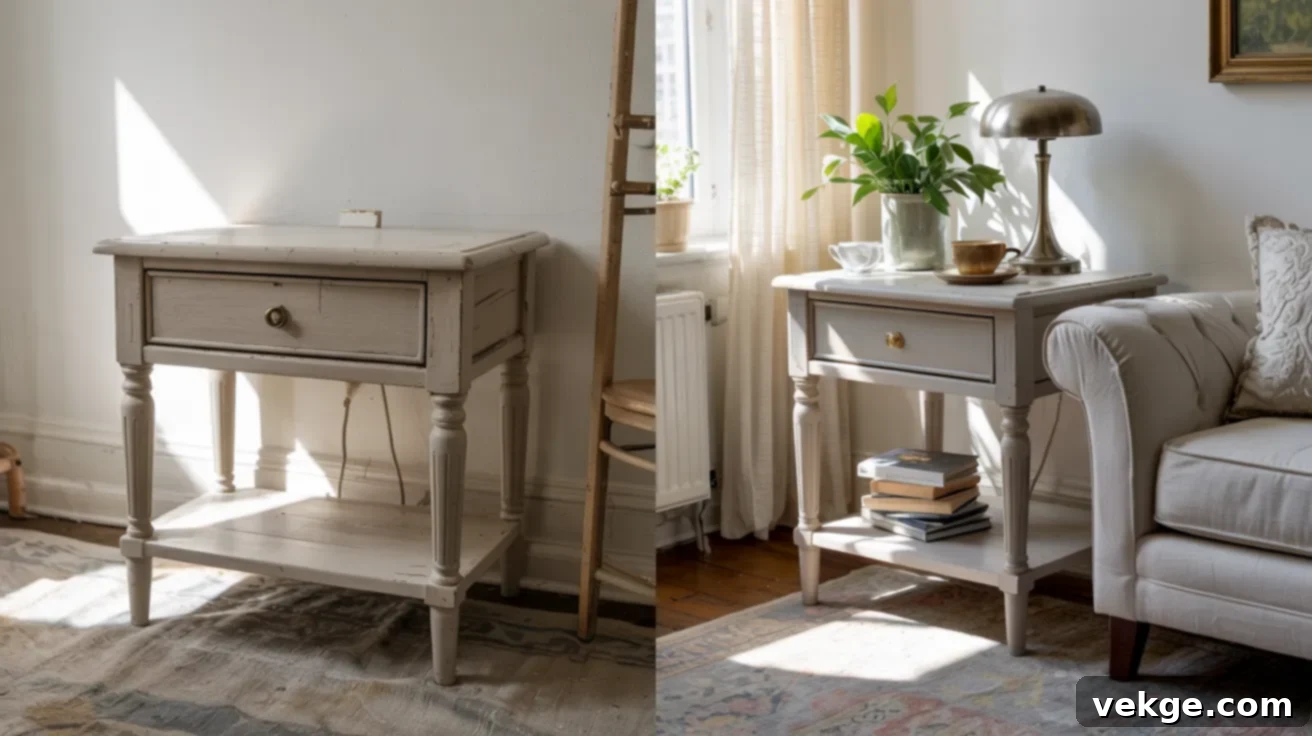
Breathe new life into a tired side table to effortlessly give your living room a fresh, updated look. Begin by sanding off any old, worn finish, then paint it in a color that perfectly harmonizes with your existing decor—consider a serene soft gray, a sophisticated navy, or a timeless creamy white. For an extra touch of creativity, add a stylish new knob or stencil a simple, elegant design on the tabletop. This seemingly small upgrade makes a significant difference in the overall ambiance of your living space, providing a chic and functional spot for books, remote controls, or your morning coffee cup.
35. Laundry Room Storage Hutch
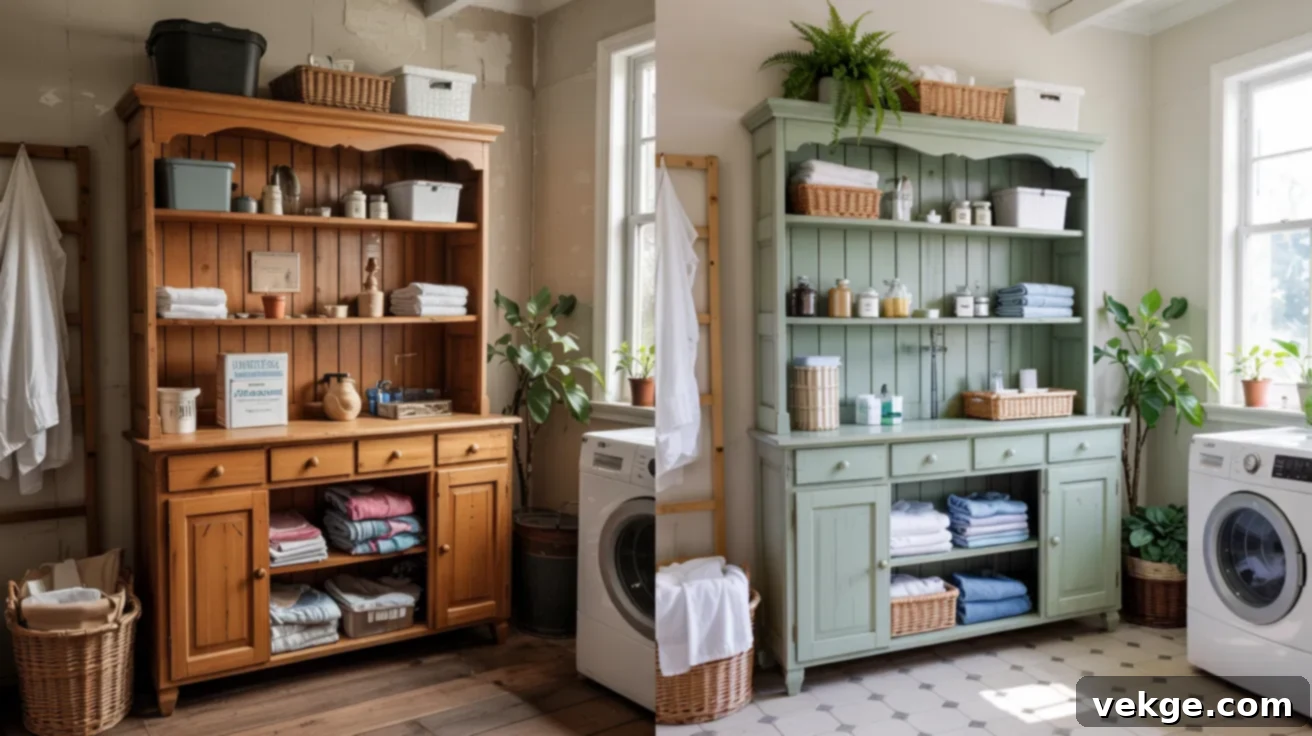
Maximize the utility and cheerfulness of your laundry room with a freshly painted hutch for enhanced storage. Opt for a bright or clean color palette such as crisp white, a calming green, or even an invigorating blue, painting both the interior and exterior for a truly cohesive and finished look. Integrate practical baskets or clear jars for neatly holding laundry detergent, clothespins, towels, and other essentials. This transformative makeover revitalizes a often-overlooked space, making it feel more useful, organized, and genuinely cheerful. It helps keep everything in its designated place, making the chore of laundry a little bit easier and more pleasant.
Unique Techniques & Finishes: Beyond the Solid Color
Ready to move past basic solid paint jobs and explore more artistic expressions? These furniture projects employ special techniques like ombre, stenciling, and clever tricks to create one-of-a-kind finishes that guarantee any piece will stand out as a true work of art.
36. Ombre Painted Tallboy
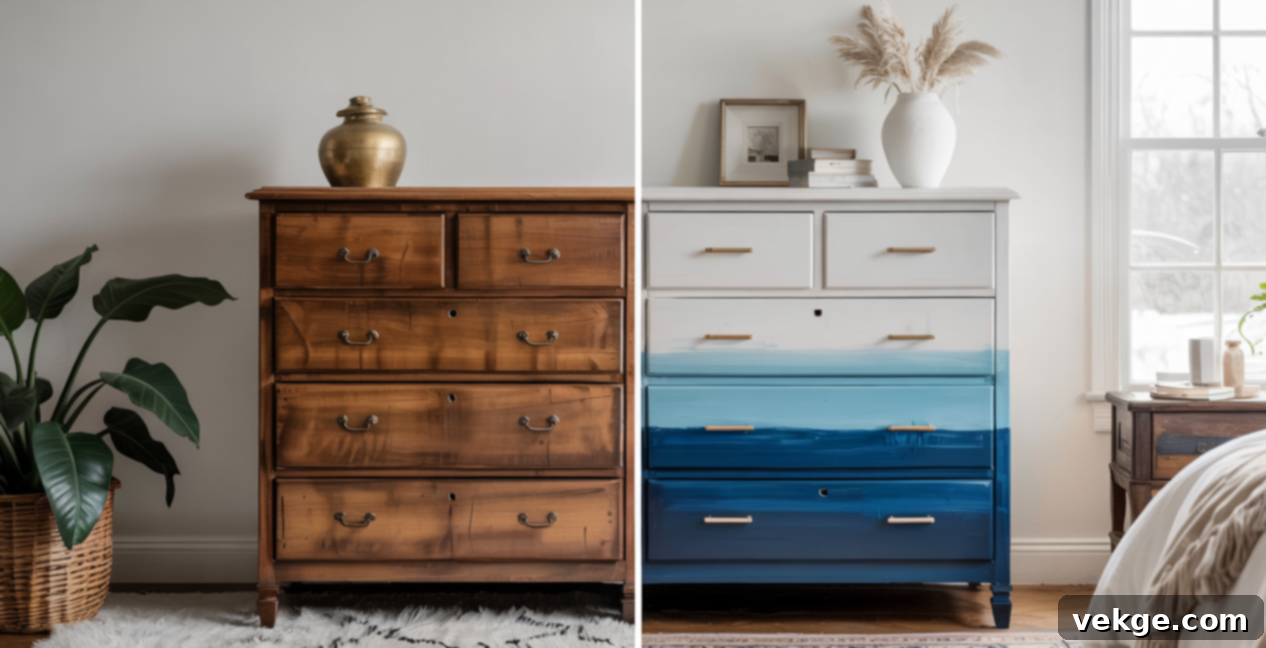
An ombre effect, characterized by a soft, gradual fade from dark to light, is an incredibly striking technique perfectly suited for a tall dresser or ‘tallboy.’ Select a single primary color and then create progressively lighter versions of it by mixing in white or a lighter shade for each subsequent drawer. Begin with the darkest shade on the bottom drawer and seamlessly work your way up to the lightest at the top. Use painter’s tape meticulously between drawers to ensure crisp, clean lines for the color transitions. This sophisticated look adds immense depth and modern style without appearing overly busy, offering a cool and creative way to showcase color.
37. Stenciled Coffee Table
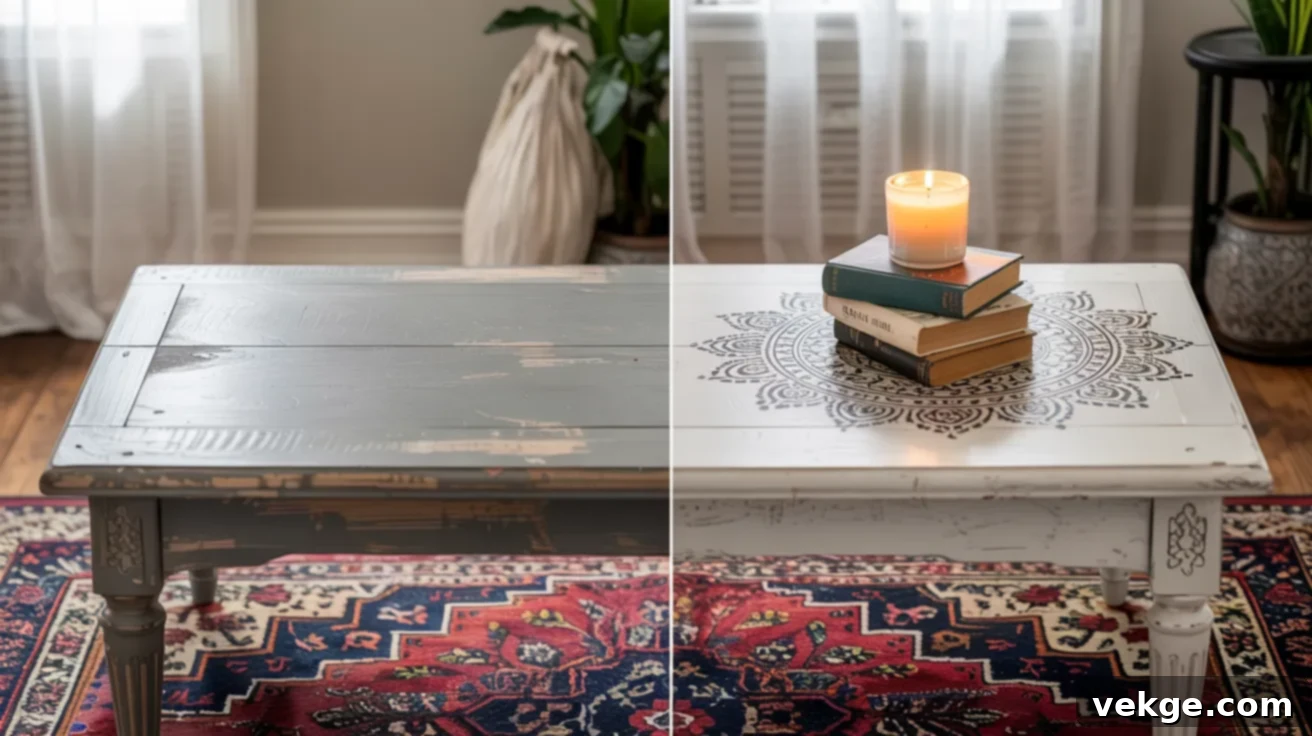
Add exquisite detail and personalized flair to a plain coffee table using stencils. After applying your base paint color and ensuring it’s completely dry, carefully position a stencil on top. Gently dab a second, contrasting or complementary color over the stencil using a sponge or a small, stiff-bristled brush. Once the paint is dry, slowly and carefully peel back the stencil to reveal your beautifully rendered pattern. You can experiment with intricate florals, bold geometric shapes, or even elegant letters to personalize your piece. This method is fun, surprisingly easy, and bestows your table with a high-end, designer touch without requiring any fancy tools or artistic talent.
38. Two-Tone Cabinet with Wood Accent
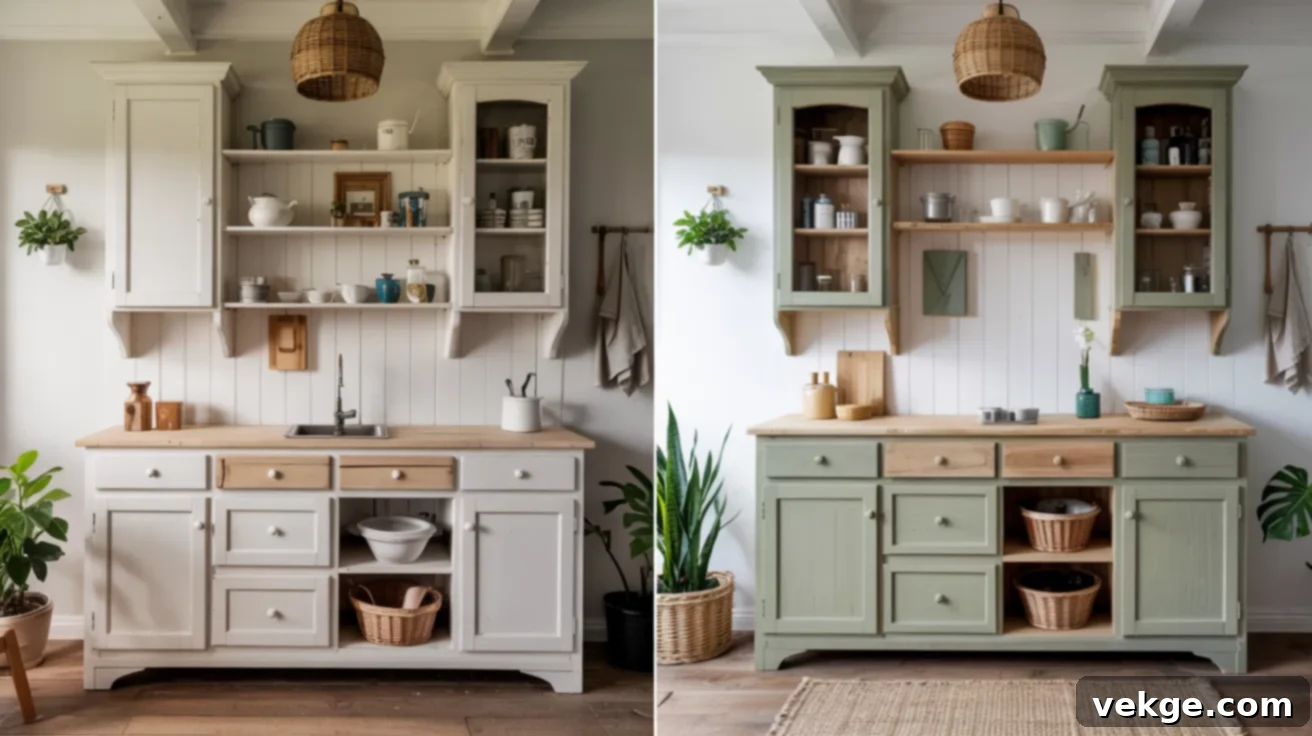
Achieve a clean, contemporary, and incredibly sophisticated look by skillfully mixing paint with natural wood elements. Paint the main body of a cabinet in a chic neutral color like muted olive green or a light, airy gray, but intentionally leave the top surface or the drawer fronts in their beautiful natural wood finish. Ensure the exposed wood is properly sanded, stained (if desired), and then sealed to highlight its rich grain and ensure its durability. This stylish technique works wonderfully in kitchens, bathrooms, or living rooms, elegantly showcasing the timeless beauty of natural wood while simultaneously introducing a fresh, painted aesthetic that feels distinctly modern.
39. Color-Dipped Chair Legs
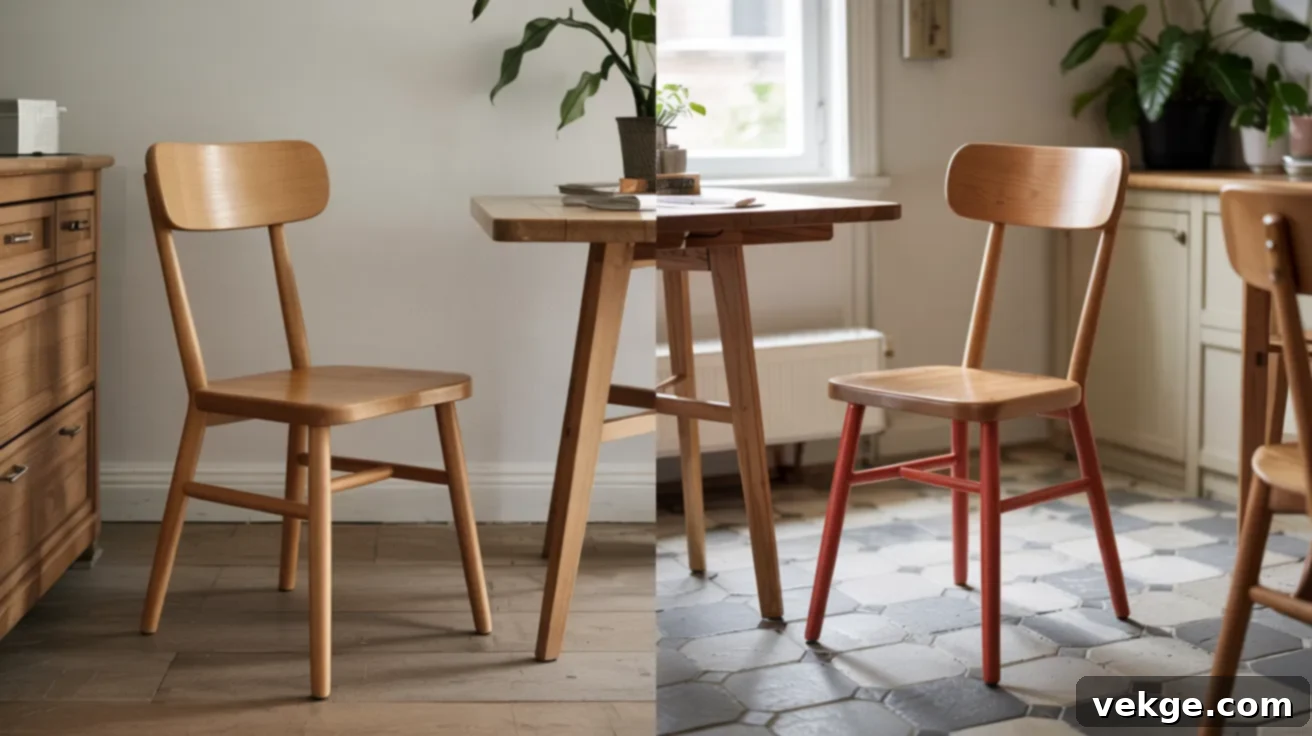
For a playful yet sophisticated twist on your dining chairs or stools, try the “color-dipping” technique. Using painter’s tape, carefully mask off the bottom few inches of each chair leg to create a clean, sharp line. Then, paint only the exposed bottom portion in a bright, bold, or contrasting color. Allow the paint to dry thoroughly before gently removing the tape to reveal a perfectly crisp color-dipped line. This quick and simple method adds just enough unexpected color to make a unique statement without the commitment of repainting the entire piece. It’s a fun, modern update that can transform ordinary chairs into charming conversation starters.
40. Faux-Aged Chest Using Vaseline Method
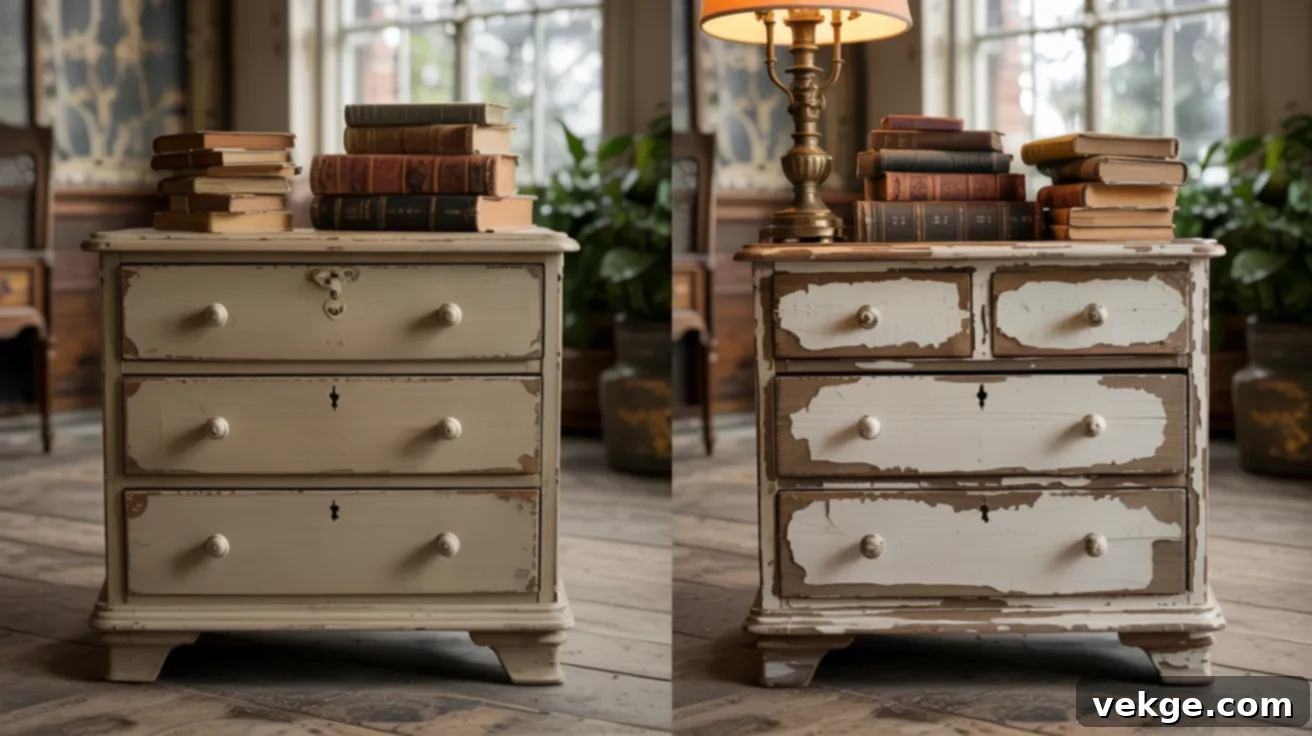
Craving a beautifully worn, rustic, or distressed look quickly? The Vaseline trick is your secret weapon! Begin by rubbing a small amount of Vaseline onto the specific areas where you want the topcoat of paint to resist and eventually lift – typically edges, corners, raised details, or around handles. Then, proceed to paint over the entire piece as usual. Once the paint is completely dry, simply wipe off the Vaseline areas with a cloth. The paint will effortlessly lift off where the Vaseline was applied, instantly creating a natural, authentically aged appearance. It’s an incredibly easy and effective method for achieving that coveted vintage farmhouse style.
Final Thoughts: Your Journey to Transformed Furniture Begins
You’ve now journeyed through an inspiring gallery of painted furniture ideas, witnessing firsthand the powerful transformations possible with just a little paint and vision. From tired and forgotten pieces to stunning, personalized statements, the potential for creative upcycling is truly limitless.
Whether you’re eager to tackle a thrift store find or looking to revitalize a cherished old dresser, you now possess the essential tools, proven techniques, and a wealth of creative ideas to start your own furniture painting journey with confidence. Remember, the goal isn’t always about achieving absolute perfection; it’s about the joy of creating something that genuinely reflects your unique style and makes your space feel more authentically “you.”
Don’t be afraid to start small, trust the process, and most importantly, have fun with it! Each brushstroke is an opportunity to express yourself and give new life to an old item. Want even more makeover ideas, in-depth tutorials, or expert paint tips to keep your inspiration flowing? Be sure to explore my other DIY guides and join a community passionate about creating beautiful, sustainable homes. Happy painting!
