How to Build a Horizontal Fence on Sloped or Uneven Ground: A Comprehensive DIY Guide
Building a beautiful, sturdy fence on property with varying elevations can seem like a daunting task. Slopes, hills, and uneven terrain often present unique challenges that can frustrate even experienced DIY enthusiasts. However, with the right planning and techniques, you can successfully construct a stylish horizontal fence that not only provides privacy and security but also enhances the aesthetic appeal of your sloped yard. This ultimate guide is designed for homeowners, offering clear, actionable steps to build a horizontal fence on a slope without making common, costly mistakes.
From understanding your yard’s unique terrain to selecting the most suitable design style for sloped areas, we cover every essential detail. You’ll learn about crucial local building codes, the necessary tools and materials, and a detailed, step-by-step methodology for construction. Furthermore, we provide valuable insights on how to maintain visual appeal through proper height adjustments and the integration of landscaping elements like rocks and plants. By following this comprehensive guide, anyone can confidently build a strong, modern horizontal fence that perfectly complements their unique yard, adding significant value and curb appeal to their home.
Why Choose a Horizontal Fence for Your Property?
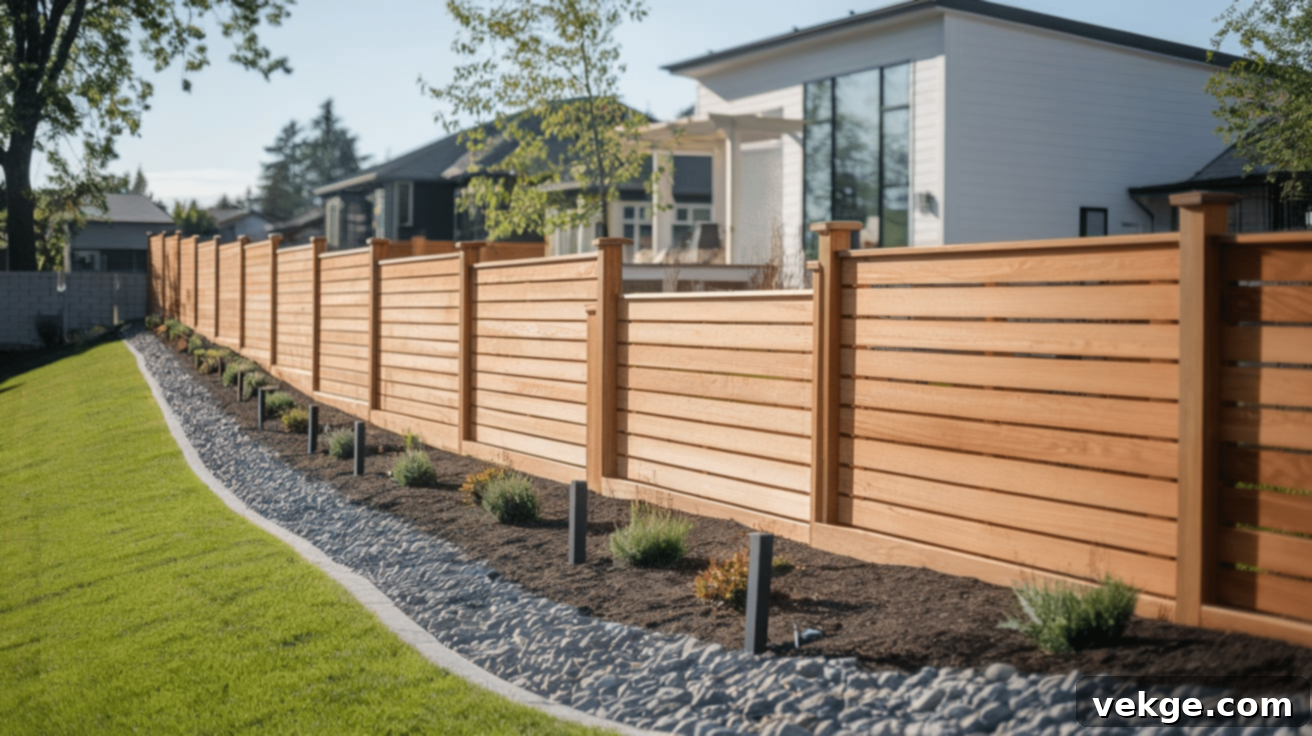
Horizontal fences have rapidly gained popularity, offering a fresh, contemporary aesthetic that often captures immediate attention and admiration from neighbors and passersby. Unlike traditional vertical board fences, the sideways orientation of boards in a horizontal fence creates clean, elongated lines that contribute to a distinctly modern and sophisticated look. This design choice often makes a property feel more expansive and thoughtfully designed, appealing to those who appreciate minimalist or mid-century modern architectural styles.
Beyond their striking visual appeal, horizontal fences are highly effective in providing robust privacy and enhancing the overall security of your yard. The continuous lines help to obscure views more effectively, creating a secluded oasis within your property. This design versatility means a horizontal fence can seamlessly integrate with a variety of home styles, from new builds to renovated properties looking for an updated edge. Many homeowners opt for this style precisely because it offers a noticeable departure from conventional fencing, establishing a unique character for their outdoor space. A well-designed horizontal fence can transform even the simplest yard into an updated, well-curated environment, significantly boosting your home’s curb appeal and potential resale value.
Planning Your Horizontal Fence Project on a Slope
Thorough planning is the bedrock of any successful home improvement project, especially when tackling the complexities of building a fence on uneven terrain. Investing time upfront in detailed planning will help you anticipate challenges, mitigate risks, and ensure your fence project progresses smoothly from conception to completion.
Understand Your Yard’s Terrain and Slope
The very first step is to gain an intimate understanding of your yard’s topography. Simply looking at your yard might not reveal the exact degree of its slope. Begin by walking your property lines, noting any significant high and low spots. To accurately measure the slope, use a reliable level tool – a long carpenter’s level or, even better, a laser level with a tripod can provide precise readings over longer distances. Place stakes at regular intervals along your proposed fence line and run a string line between them, using the level to determine the vertical drop or rise between each stake.
Mapping out these elevations will provide a clear picture of your yard’s true shape and the extent of the slope. This critical information dictates which fence design style will be most effective and how you will need to adjust your construction methods. Even seemingly minor slopes can impact post height, board length, and overall fence stability if not properly accounted for during the planning phase. Documenting these measurements is key to a perfectly aligned fence.
Fence Design Styles for Sloped Yards
When building a fence on a slope, you essentially have three primary design options, each with its own aesthetic and construction considerations:
- Option 1: Sloped Bottom (Following the Grade)
In this style, the bottom of the fence panels closely follows the natural contour of the ground. This creates a very organic and seamless look that blends well with the landscape. However, it is generally the most challenging option to build, as each horizontal board needs to be cut at a precise angle to maintain a consistent gap from the ground. This method requires advanced carpentry skills and meticulous measurements, often resulting in complex cuts and increased material waste. While aesthetically pleasing and effective at preventing gaps, it demands significant precision and effort. - Option 2: Level Top, Gaps at the Bottom
This design maintains a perfectly level top line for the entire fence, which presents a very clean and uniform appearance, especially when viewed from a distance or from a higher elevation. The challenge here is that as the ground slopes, varying gaps will appear at the bottom of the fence panels. These gaps can be filled with custom-cut trim boards, stacked rocks, or other landscaping elements to prevent animal intrusion and improve aesthetics. This option is easier to construct than a fully sloped bottom but requires creative solutions for the base gaps. - Option 3: Stair-Step Panels (Stepped Fence)
The stair-step method is arguably the most common and often the most practical solution for moderate to steep slopes. In this approach, each fence panel or section is built level, but the panels themselves are stepped down from one another, creating a “staircase” effect as the fence descends the slope. This style simplifies construction significantly, as individual panels are straightforward to build and install level. The stepped transitions are usually made at each fence post. While it may not look as fluid as a naturally sloped fence, it is highly functional, offers excellent privacy, and provides a clear, architectural statement. This option works exceptionally well for steeper slopes where a continuous sloped bottom would be impractical.
Each of these options has unique advantages and disadvantages depending on the severity of your yard’s slope, your aesthetic preferences, your budget, and your construction skill level.
Check Local Building Codes and Homeowners Association (HOA) Rules
Before you even break ground, it is absolutely crucial to research and understand all local building codes and any applicable HOA regulations. Many municipalities impose strict limits on fence height, typically allowing up to 6 feet in backyards and 4 feet in front yards, though this can vary significantly by location. You’ll also need to know setback requirements – how far your fence must be from property lines, sidewalks, or other structures.
Furthermore, many areas require homeowners to obtain a permit before starting any fence construction. The permit application process often involves submitting detailed plans, including property surveys and fence dimensions. HOAs can be even more restrictive, potentially dictating approved fence styles, materials, colors, and even the orientation of boards. Failing to adhere to these rules can lead to costly fines, mandatory modifications, or even the forced removal of your newly built fence. Always check these rules first by contacting your local planning department and HOA to avoid expensive mistakes and ensure your project complies with all regulations.
Materials and Tools You’ll Need for Your Horizontal Fence
Having the right materials and tools ready before you begin will streamline your building process and help ensure the structural integrity and longevity of your horizontal fence. Here’s a comprehensive list:
Essential Materials for Building a Horizontal Fence:
- Wood for Fence Boards:
- Cedar: A popular choice for its natural resistance to rot and insects, attractive appearance, and pleasant aroma. It weathers beautifully to a silver-grey if left unstained.
- Redwood: Similar to cedar in durability and beauty, offering rich natural colors. It’s often more expensive and less available outside of the western U.S.
- Pressure-Treated Wood: More affordable and highly resistant to rot and insects due to chemical treatment. It’s a durable option but may not offer the same aesthetic as cedar or redwood without staining.
- Composite Boards: A low-maintenance alternative made from recycled plastic and wood fibers. More expensive initially but offers superior durability and no need for staining.
- Fence Posts (4×4 or 6×6 inches):
- Typically pressure-treated pine for ground contact.
- Choose 6×6 posts for taller or heavier fences, or where extra stability is desired.
- Ensure posts are long enough to be buried deep (at least 1/3 of their length, plus extra for slope adjustments) and extend to the desired fence height.
- Exterior-Grade Screws (Stainless Steel or Galvanized):
- Crucial for durability and preventing rust stains.
- Use screws that are long enough to penetrate both the horizontal boards and the posts securely (e.g., 2.5-3 inch screws for 1-inch thick boards).
- Ensure they are rated for outdoor use to withstand weather exposure.
- Concrete Mix: Fast-setting concrete specifically designed for post setting, providing a strong, stable base.
- Gravel: Used at the bottom of post holes to improve drainage and prevent wood rot.
- String Line: For establishing straight fence lines and checking level.
- Landscaping Fabric: (Optional but recommended) To suppress weeds along the fence line.
- Sealant or Stain: (Optional but highly recommended) Protects wood from UV damage, moisture, and enhances its appearance.
- Trim Boards: (Optional) For filling gaps at the bottom of the fence on sloped yards or for creating a decorative top cap.
- Post Caps: (Optional) Protect the top of posts from water damage and add a decorative finish.
Essential Tools for Building a Horizontal Fence:
- Post Hole Digger: Manual clam-shell digger or a powered auger for digging post holes efficiently.
- Shovel and Trowel: For general digging, mixing concrete, and leveling.
- Measuring Tape: Accurate measurements are critical for layout and cutting.
- Level (Long Carpenter’s Level or Laser Level): Essential for ensuring posts are plumb and boards are level.
- Circular Saw or Miter Saw: For precise and efficient cutting of fence boards and posts. A miter saw is excellent for angled cuts.
- Drill/Driver: For pre-drilling holes and driving screws. Impact drivers are highly recommended for driving screws efficiently.
- Adjustable Wrench or Socket Set: If using lag bolts for any structural connections.
- Hammer: For minor adjustments or tapping things into place.
- Wheelbarrow and Mixing Hoe: For mixing concrete if not using pre-mixed bags.
- Safety Gear: Gloves, safety glasses, ear protection, and sturdy work boots are non-negotiable for personal safety.
- Stakes and Spray Paint: For marking out your fence line and post locations.
- Clamps: To hold boards in place while fastening.
- Spacers: Small blocks of wood (e.g., 1/2-inch thick) to ensure consistent gaps between horizontal boards.
Step-by-Step Guide to Building Your Horizontal Fence on a Slope
Follow these detailed steps to construct a strong, visually appealing, and long-lasting horizontal fence on your sloped property.
1. Site Preparation and Marking Post Locations
Before any digging, clear the fence line of any debris, rocks, or vegetation. Based on your initial terrain assessment and chosen design style (especially for a stair-step design), mark the exact locations for each fence post. Typically, posts are spaced 6 to 8 feet apart, but closer spacing may be needed for very heavy fences or strong winds. Use stakes and a string line to establish a perfectly straight fence line. Double-check property lines and setback requirements to ensure your fence is correctly positioned and does not encroach on neighboring land.
2. Setting the Fence Posts Securely
Properly set posts are the foundation of a durable fence. Dig post holes that are at least one-third the height of the exposed post, plus an additional 6 inches for the gravel base. For example, if your fence is 6 feet tall, your posts should be 9 feet long, with 3 feet in the ground. The hole diameter should be 3-4 times the width of the post (e.g., 12 inches for a 4×4 post).
Add 4-6 inches of gravel to the bottom of each hole for drainage. Place the post into the hole, ensuring it is plumb (perfectly vertical) using a post level. Mix your concrete according to the manufacturer’s instructions. Pour the concrete into the hole, gently tapping the post to settle the mix and eliminate air pockets. Slope the concrete away from the post at the top to shed water. Brace each post securely with temporary supports to keep it plumb and in place until the concrete fully cures (typically 24-72 hours). This step is critical for a stable fence, especially on a slope.
3. Implement a Stair-Step Design (Recommended for Slopes)
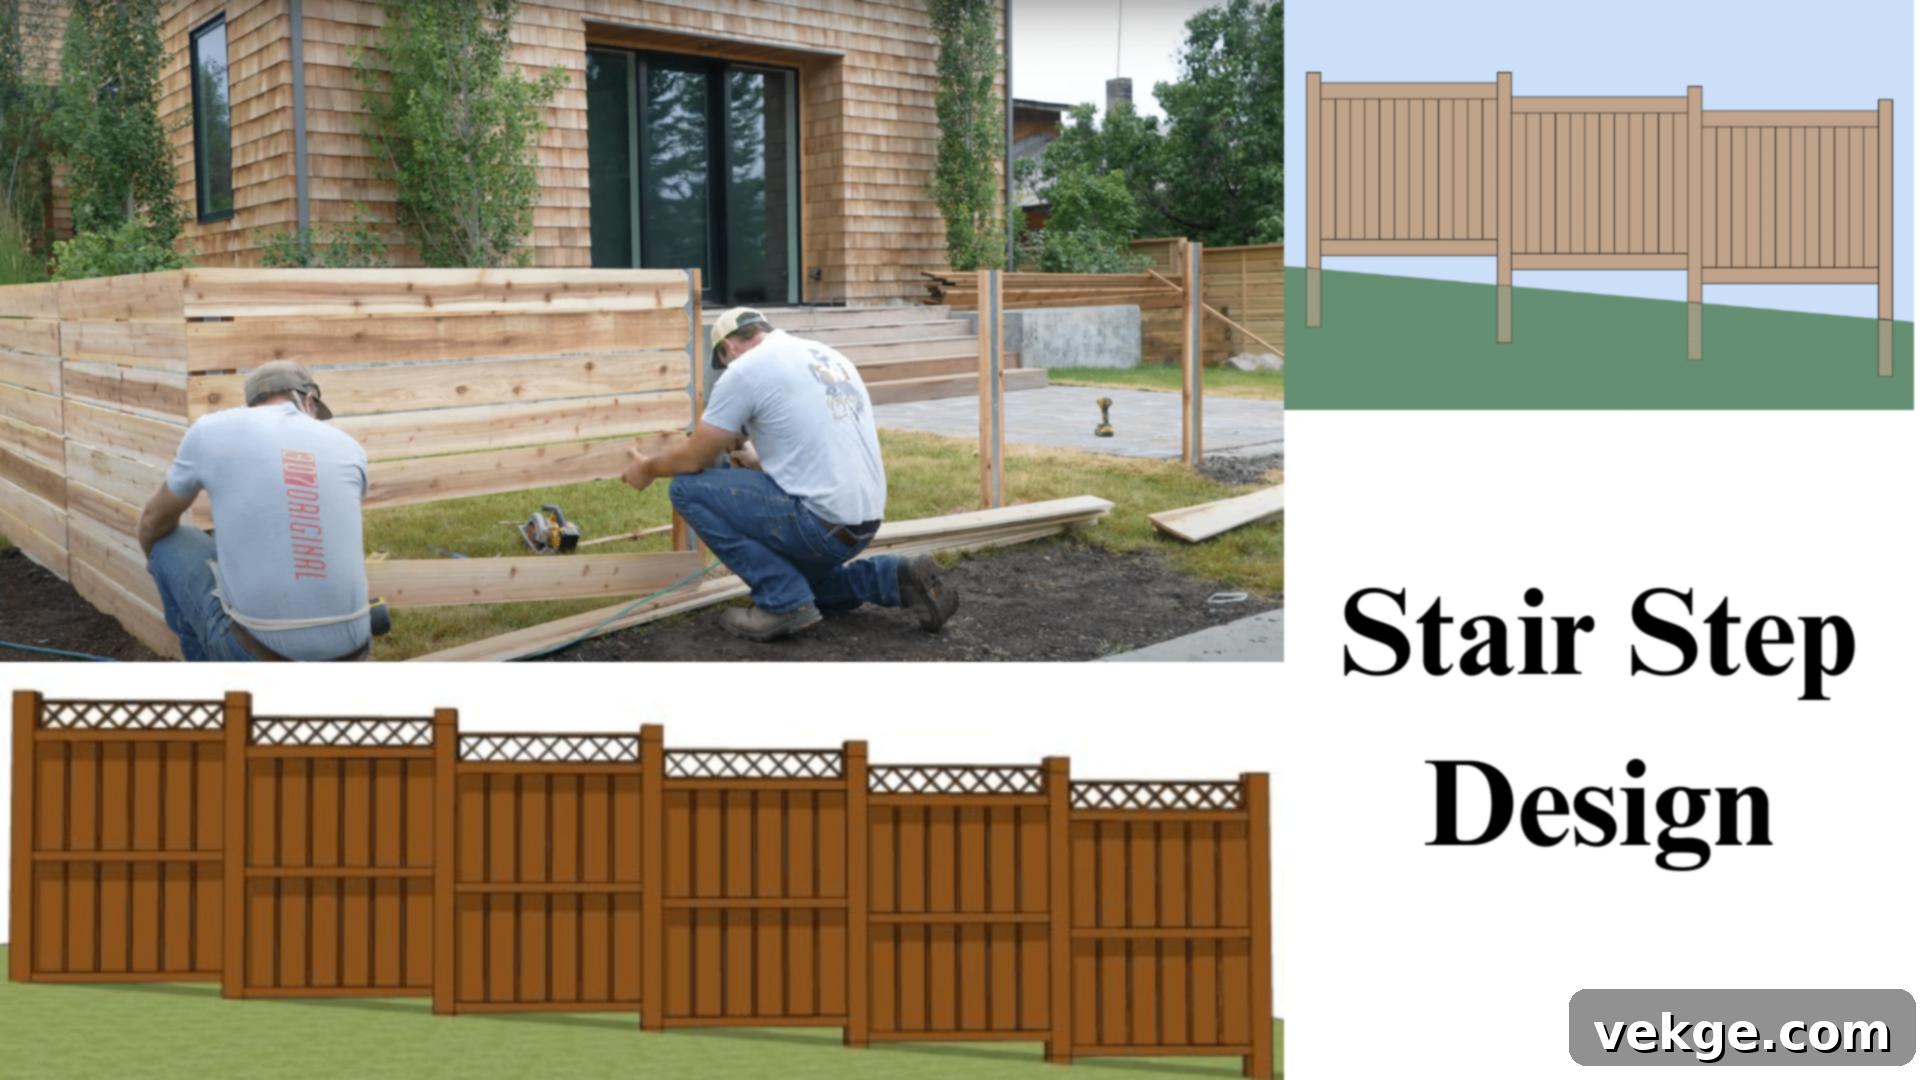
For yards with significant slopes, the stair-step pattern is generally the most practical and aesthetically pleasing approach for horizontal fences. Instead of forcing the entire fence to slant, each section or panel of your fence will be built level, then stepped down at the post locations to follow the general contour of the ground. This method ensures that all your horizontal boards remain perfectly level, making construction much simpler and ensuring the fence looks consistent. The “step” or height difference between panels occurs at each post. Carefully measure the elevation change between posts and adjust the height of the subsequent panel accordingly, ensuring a smooth transition.
4. Attaching the Horizontal Boards and Proper Measurement for Pickets
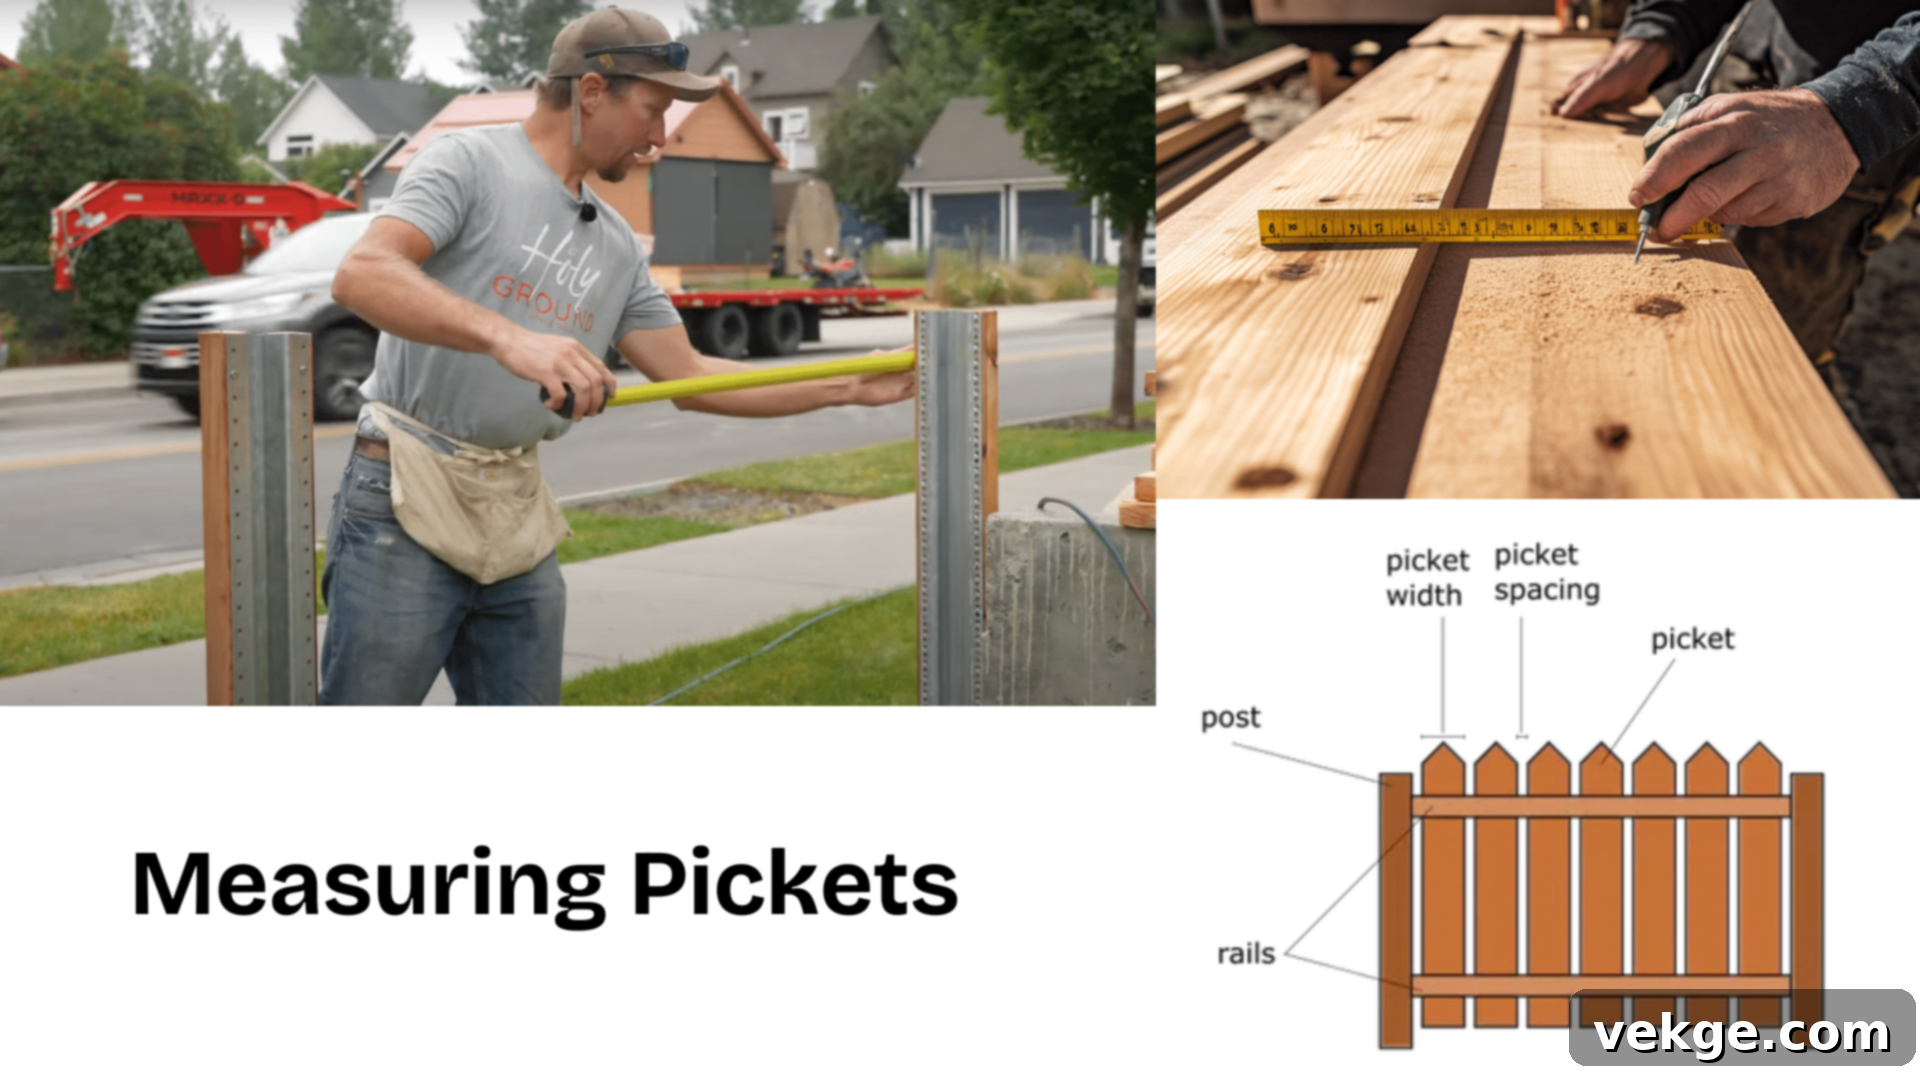
Once your posts are set and cured, begin attaching your horizontal fence boards (often referred to as pickets in this context, even though they are horizontal). Start from the bottom or top of each panel, depending on your preference. For each board, measure twice and cut once to ensure accuracy. When attaching, it’s essential to maintain a consistent gap between boards, typically around a half-inch. These gaps are crucial for water drainage, allowing the wood to breathe, and accommodating the natural expansion and contraction of wood due to temperature and humidity changes.
Use pre-cut spacers (small blocks of scrap wood, e.g., 1/2-inch thick) to ensure these gaps remain uniform along the entire length and height of your fence. Pre-drill pilot holes in your boards before driving screws to prevent splitting, especially with cedar or redwood. Securely fasten each board to the posts (or to stringers between posts if your design includes them) with at least two exterior-grade screws per connection point.
5. Custom Angled Cuts for the Bottom Picket
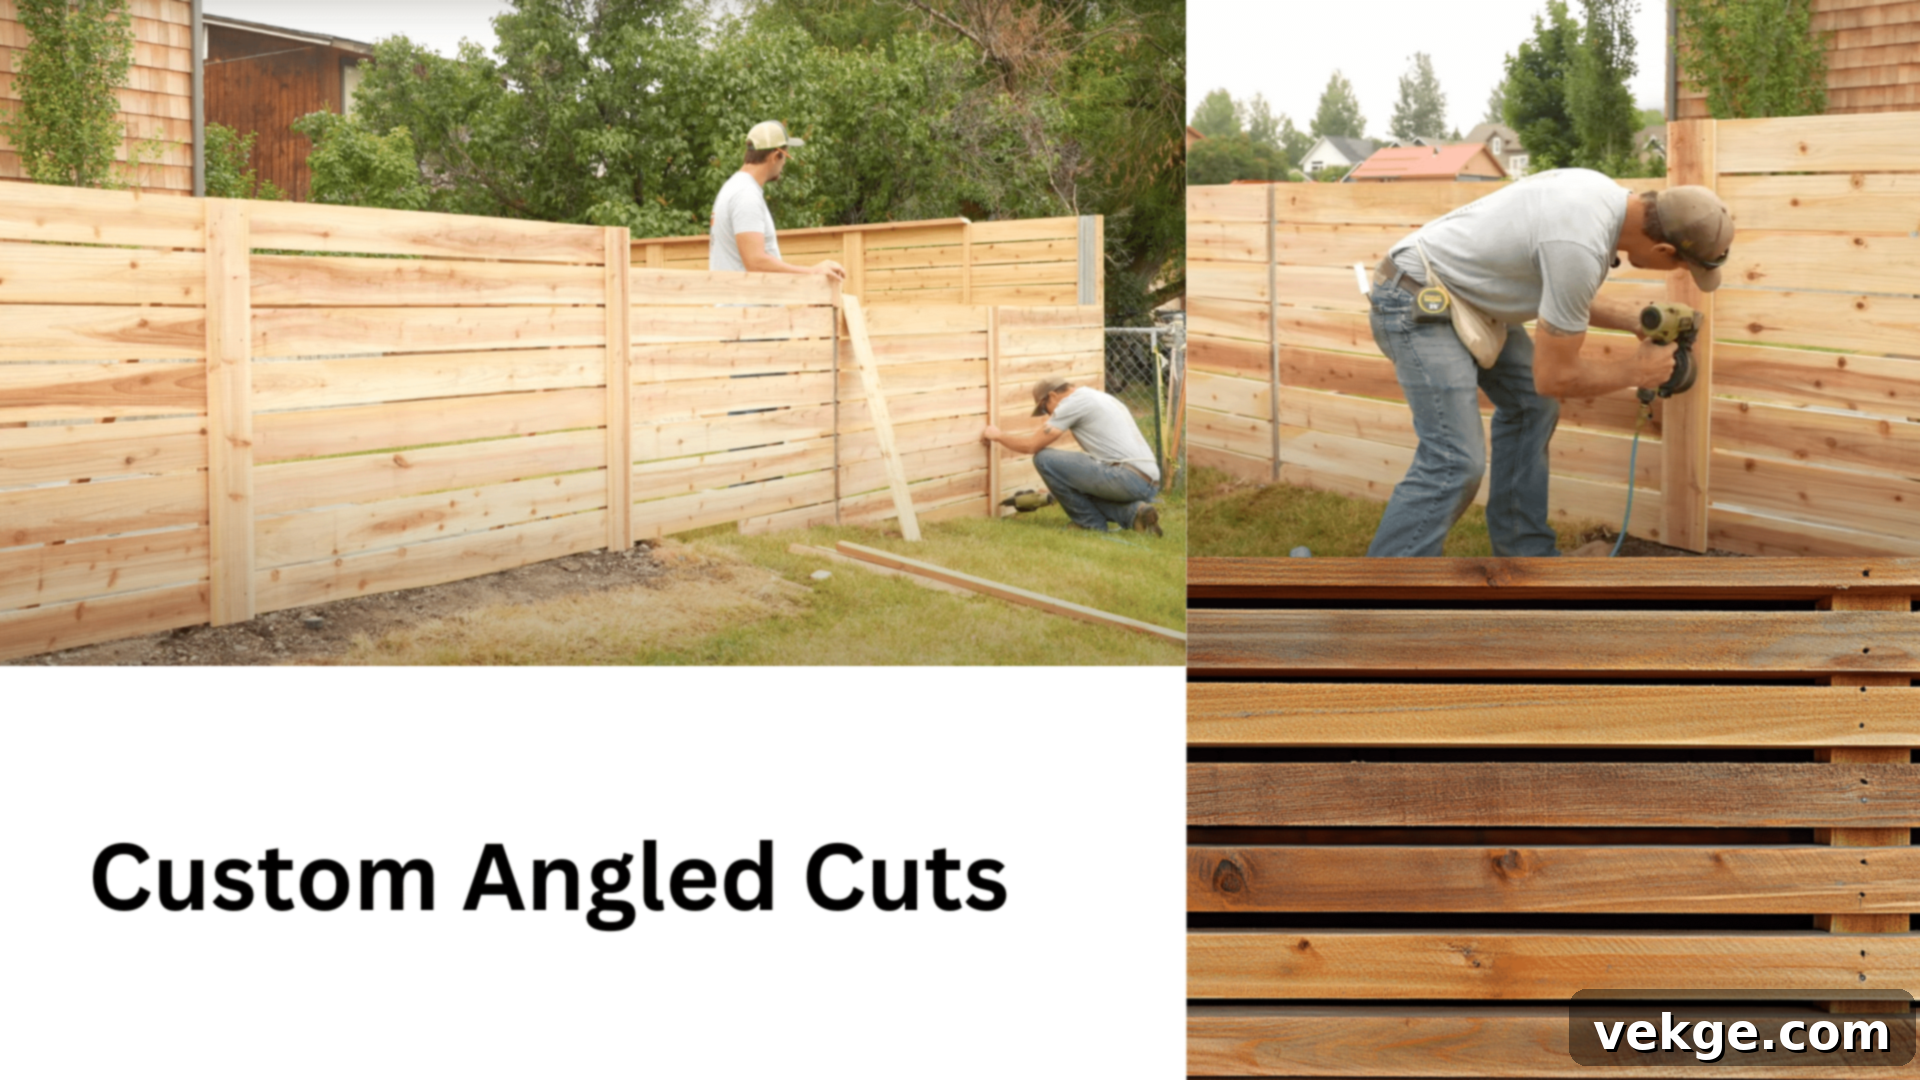
On uneven or sloped ground, the bottom-most horizontal board of each fence panel often requires a custom angled cut to minimize gaps between the fence and the ground. This is especially true if you are striving for a neat, enclosed look that prevents small animals from crawling underneath. To achieve this, after the rest of the panel is installed, hold the bottom board in place. Use a simple scribing tool: a pencil attached to a small block of wood. Rest the block on the highest point of the ground beneath that section of the fence and slide it along the ground, marking the contour onto the bottom edge of the board.
Carefully cut along this marked line using a jigsaw or circular saw. This custom cut ensures that the bottom of your fence hugs the ground’s natural undulations, creating a cleaner finish and enhancing security. Take your time with these cuts, as they significantly impact the overall appearance and functionality of the fence’s base.
6. Add a Top Cap for a Finished Look and Protection
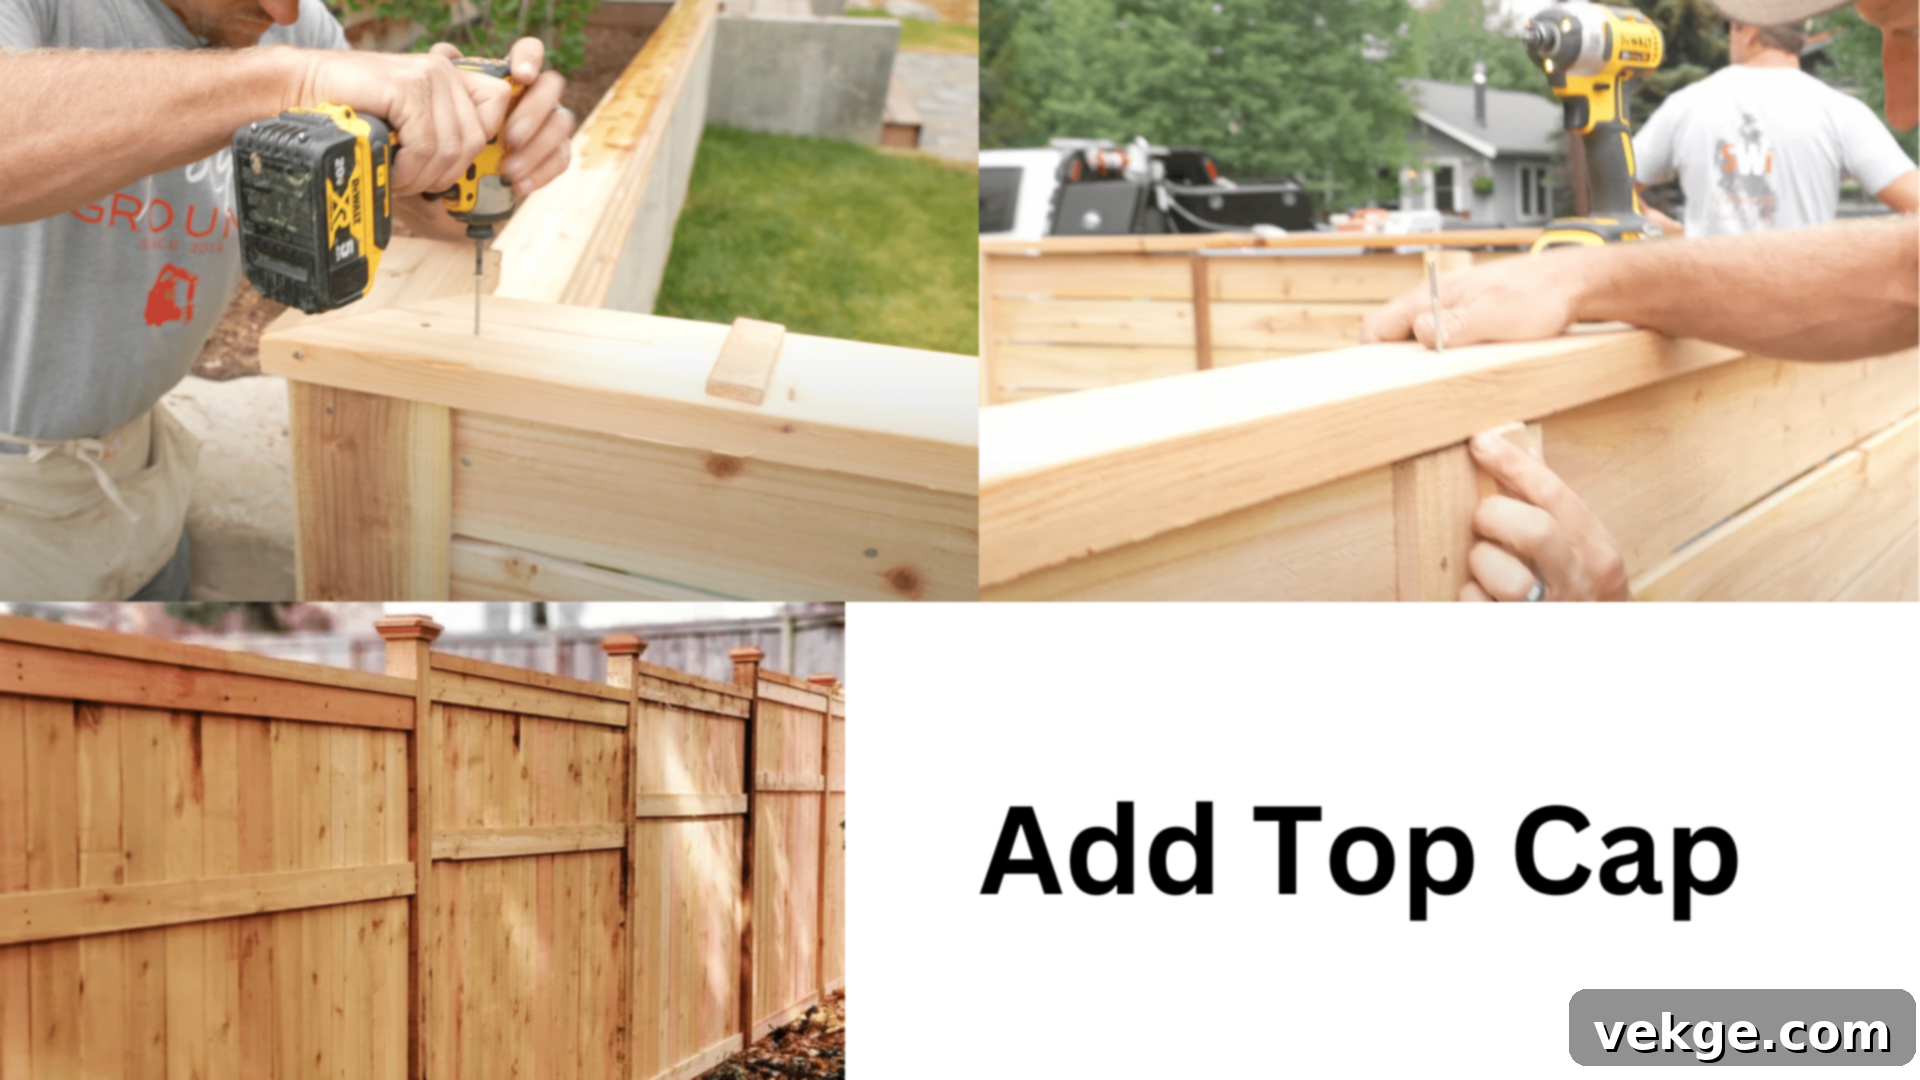
Adding a flat cedar or complementary wood board as a top cap is a simple yet impactful way to elevate the aesthetic and durability of your horizontal fence. This cap board sits horizontally on top of the fence posts and the uppermost horizontal boards. Besides providing a visually appealing, finished look from both sides of the fence, the top cap serves a crucial protective function. It shields the vulnerable end grain of your fence pickets and posts from direct exposure to rain, snow, and UV rays, which are primary causes of water damage, rot, and weathering.
When installing the top cap, cut the ends at 45-degree angles where they meet at corners or transitions to create neat, professional-looking mitered joints. Secure the top cap to the posts and the topmost horizontal board using exterior-grade screws, ensuring they are countersunk for a smooth finish. This detail significantly extends the lifespan of your fence while adding a touch of craftsmanship.
Visual Appeal Considerations for Your Horizontal Fence
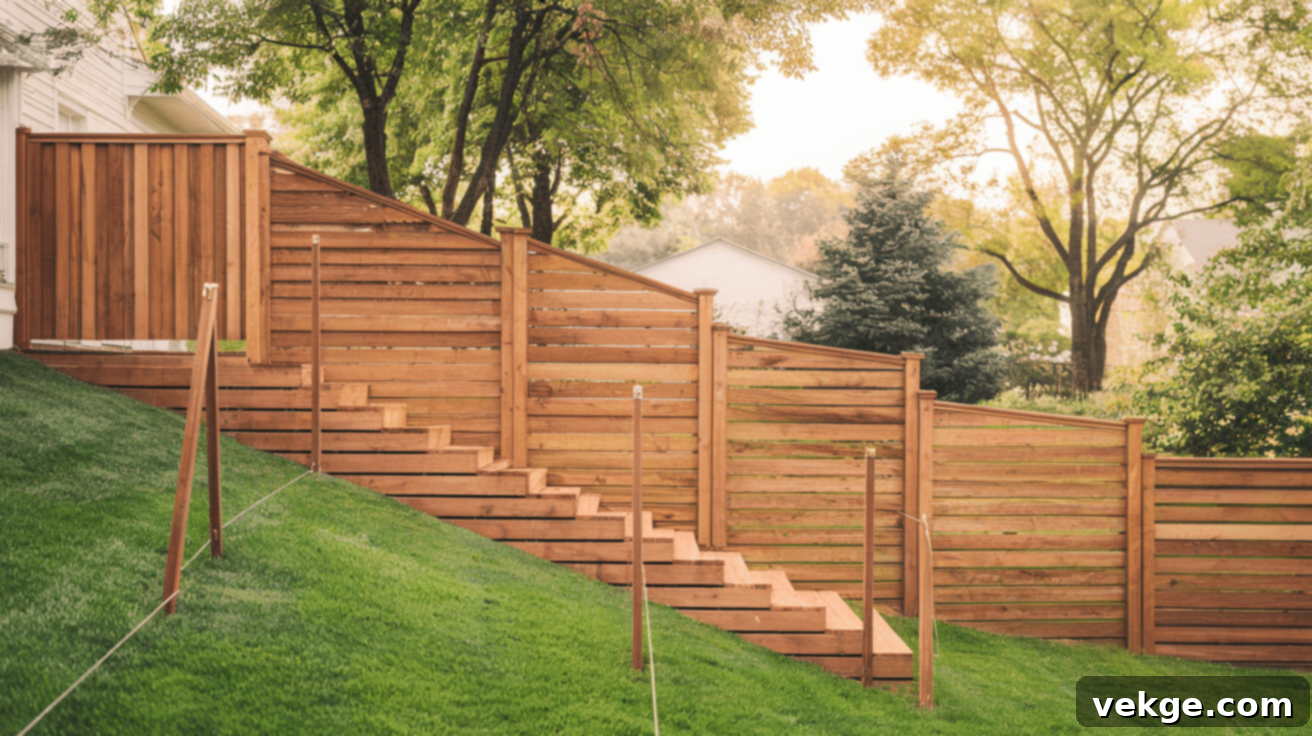
The visual impact of your horizontal fence extends beyond its construction; how it integrates with your existing landscape and home design is paramount. Thoughtful design elements can transform a functional barrier into a stunning architectural feature.
Ensure that any height changes, especially at gates or corners, are executed with smooth, deliberate transitions. Abrupt changes can disrupt the fluid lines of a horizontal fence. Consider staining or painting your fence to complement your home’s siding, trim, or other exterior features. A unified color palette creates a cohesive and well-planned look that enhances your entire property’s curb appeal. For instance, a dark stain can make the fence recede visually, while a lighter tone can brighten the space.
Integrate modern landscaping features around the base of your fence. Small, strategically placed rocks, low-maintenance plants, or decorative gravel can soften the fence line and blend it with the natural environment. Outdoor lighting, such as subtle uplights or string lights, can dramatically enhance your fence’s appearance after dusk, highlighting its texture and creating an inviting ambiance. These small, thoughtful touches can significantly elevate the overall aesthetic of your horizontal fence, making it a true asset to your outdoor living space.
Common Mistakes to Avoid When Building on a Slope
Even with careful planning, it’s easy to overlook crucial details that can compromise your fence’s integrity and appearance. Being aware of these common mistakes can save you time, effort, and money:
- Failing to Accurately Check the Slope of Your Yard: Guessing the slope rather than accurately measuring it with a level or laser can lead to an uneven, crooked, or poorly fitting fence. This impacts both structural stability and visual appeal. Always measure meticulously.
- Skipping Permit Requirements and HOA Approvals: Ignoring local building codes or HOA regulations can result in significant fines, legal disputes with neighbors, or the costly demand to tear down and rebuild your fence. Always obtain necessary permits and approvals upfront.
- Spacing Posts Too Far Apart: Exceeding recommended post spacing (typically 6-8 feet for most horizontal fences) can cause horizontal boards to sag and warp over time due to gravity, moisture, and the weight of the wood. Closer spacing ensures better support and longevity.
- Choosing Wood That Isn’t Suitable for Your Local Climate: Using wood that isn’t naturally rot-resistant (like untreated pine in a wet climate) or not properly treated can lead to faster deterioration, pest infestation, and costly repairs down the line. Select materials known for durability in your specific environment.
- Using Regular Nails Instead of Rust-Resistant Screws: Nails can loosen over time, especially with wood movement, and common steel nails will rust, staining your fence. Exterior-grade, rust-resistant screws (galvanized or stainless steel) provide a stronger, more reliable, and longer-lasting hold.
- Not Accounting for Wood Expansion and Contraction: Wood is a natural material that will expand and contract with changes in humidity and temperature. Failing to leave small gaps between horizontal boards can lead to warping, buckling, or splitting of the wood.
- Inadequate Post Depth or Concrete Mixing: Posts that are not buried deep enough or set in improperly mixed concrete will lack stability, making the fence vulnerable to wind, impact, and shifting ground. Ensure post holes are deep enough and concrete is mixed correctly and allowed to cure.
- Ignoring Drainage at Post Bases: Not adding gravel at the bottom of post holes can cause water to collect around the post, accelerating rot and weakening the fence’s foundation over time. Good drainage is essential for post longevity.
- Neglecting Proper Wood Treatment or Sealing: Leaving raw wood exposed to the elements will shorten its lifespan. Applying a quality sealant or stain protects the wood from UV damage, moisture, and pests, preserving its appearance and structural integrity for years.
- Poor Communication with Neighbors: Especially when building along property lines, failing to discuss your fence plans with neighbors can lead to disputes. Open communication helps maintain good relationships and can sometimes avoid unforeseen issues.
Wrapping Up Your Horizontal Fence Project on a Slope
Building a horizontal fence on a slope, while requiring careful attention to detail and a strategic approach, is a highly rewarding DIY project that significantly enhances your home’s aesthetics and functionality. By embracing the unique challenges of uneven ground, you can create a privacy fence that is not only robust and secure but also a modern architectural statement.
The journey begins with meticulous planning. Understanding your yard’s specific terrain, carefully selecting the most appropriate design style—whether it’s the natural flow of a sloped bottom, the clean lines of a level top, or the practical elegance of a stair-step approach—is crucial for success. Diligently checking local building codes and HOA regulations from the outset will safeguard your project against costly revisions and legal complications. Equipping yourself with the right materials and tools, from durable wood and rust-resistant screws to precise measuring and cutting implements, ensures quality craftsmanship.
By diligently following each step of the construction process, from setting plumb posts and executing custom angled cuts to adding a protective top cap, you build a fence designed for longevity and visual appeal. A well-constructed fence not only provides essential safety and privacy but also elevates the overall look and value of your entire property. Take pride in your creation and enjoy the lasting benefits of a horizontal fence perfectly tailored to your sloped landscape.
We encourage readers to share photos of their finished horizontal fence projects on a slope in the comments section below! Feel free to ask any questions about your fence plans or construction challenges; our community is here to help and inspire.
