Build Your Dream Pantry: The Ultimate DIY Plywood Cabinet Guide
Is your kitchen struggling with insufficient storage? Do you envision a perfectly tailored pantry cabinet that seamlessly fills that often-overlooked, awkward nook? The dream of a beautifully organized and highly functional kitchen is within reach, and it starts with a custom storage solution.
While the idea of crafting your own pantry cabinet might initially seem daunting, it’s actually a surprisingly straightforward and rewarding DIY project. With just a single sheet of cabinet-grade plywood and a few essential tools, you can construct a robust and aesthetically pleasing storage unit that integrates flawlessly with your existing kitchen decor and maximizes every inch of available space.
This comprehensive guide will meticulously walk you through every critical step of the process, from the initial planning and design considerations to the final touches of painting and installation. You’ll gain practical skills in measuring precisely, making accurate cuts, assembling sturdy components, and securely installing your brand-new pantry. By following these detailed instructions, you’ll not only enhance your woodworking abilities but also create a storage solution perfectly tailored to your unique needs.
Upon completion, you will proudly possess a professional-looking cabinet that not only complements your kitchen’s style but also provides abundant, easily accessible space for all your dry goods, small appliances, and pantry staples. Say goodbye to cluttered countertops and overflowing cupboards, and embrace the efficiency of a well-designed custom pantry.
Are you ready to revolutionize your kitchen’s functionality and organization while significantly boosting your DIY expertise? Let’s embark on this exciting journey to build your very own custom plywood pantry cabinet project!
Why Choose to Build a Custom Pantry?
The modern kitchen comes in countless configurations and sizes, meaning off-the-shelf, mass-produced cabinets rarely offer a perfect fit. This often leaves homeowners with wasted space or less-than-ideal storage arrangements. Building a custom pantry cabinet, however, provides unparalleled advantages, allowing you to utilize every single inch of available space efficiently. It’s a strategic and smart way to introduce much-needed storage exactly where you need it most, turning awkward corners or narrow walls into highly functional areas.
Beyond simply filling a void, a custom-built pantry offers several compelling benefits:
- Optimized Space Utilization: Unlike standard cabinets, a custom pantry can be designed to precise dimensions, fitting snugly into unique alcoves or narrow gaps that store-bought units simply can’t accommodate. This means no more wasted vertical or horizontal space.
- Tailored Functionality: You dictate the interior layout, including the number of shelves, their spacing, and even the type of pull-outs or drawers. This ensures your pantry perfectly suits your specific storage needs, whether for tall cereal boxes, small spice jars, or large appliance overflow.
- Seamless Aesthetic Integration: You have complete control over the design, materials, and finish. This allows you to match the new pantry’s style, color, and hardware exactly to your existing kitchen cabinetry, creating a cohesive and built-in look that enhances your kitchen’s overall appeal.
- Cost-Effective Storage: While the initial investment in materials is required, building it yourself can often be more economical than purchasing a custom-made unit or attempting to modify a standard cabinet. The savings add up, especially if you have the tools and willingness to DIY.
- Enhanced Home Value: A well-designed, custom-built pantry not only improves your daily living but also adds significant functional and aesthetic value to your home, which can be a strong selling point in the future.
- Personalized Touch: There’s immense satisfaction in knowing you built something functional and beautiful with your own hands. Your pantry will be a unique reflection of your style and effort.
This section underscores why investing your time and effort into a custom DIY pantry cabinet is not just a good idea, but an intelligent solution to conquer your kitchen storage challenges once and for all.
Planning Your Pantry: Essential Design Tips and Tricks
Before you even pick up a saw, meticulous planning is paramount. A well-thought-out design ensures your pantry not only fits perfectly but also functions optimally. Keep the following critical points in mind to guarantee a successful and satisfying construction project:
- 1. Cabinet Height Alignment: For a cohesive and integrated appearance, always strive to match the height of your new pantry cabinet with existing cabinets or architectural features in your kitchen. This creates clean sightlines and makes the custom unit look like an original part of the kitchen, rather than an afterthought. Measure the height from the floor to the top of your existing upper cabinets, or consider a floor-to-ceiling design for maximum storage impact.
- 2. Door Style Consistency: The pantry doors play a crucial role in its visual integration. Select a door style that harmonizes with your current kitchen cabinetry – whether that’s Shaker, slab, raised panel, or something else. Consistency in door design, including panel style and rail/stile widths, will make the new cabinet blend seamlessly with your kitchen’s overall aesthetic.
- 3. Opening Direction Strategy: Carefully consider the direction your pantry doors will open. Ensure they won’t obstruct walkways, hit adjacent appliances (like the refrigerator or oven door), or collide with other cabinet doors when fully open. Visualize the daily flow of your kitchen and choose hinges and door swings that enhance accessibility and safety. Outswinging doors are common, but bifold or pocket doors can be excellent space-saving alternatives in tight areas.
- 4. Handle Placement and Clearance: Plan for adequate space for door handles or pulls. Ensure they won’t interfere with adjacent cabinets, walls, or other elements when the doors are closed or opened. Think about ergonomic placement for comfortable gripping and consider the style of hardware that matches your existing kitchen handles.
- 5. Shelf Spacing and Depth: Map out the internal shelving based on what you intend to store. Do you need tall spaces for cereal boxes, adjustable shelves for flexibility, or shallower shelves for spices? A common depth for pantry cabinets is 12-18 inches, providing ample space without making items get lost in the back. Adjustable shelves are always a smart choice for future flexibility.
- 6. Material Considerations: While this guide focuses on plywood, consider the specific grade. Cabinet-grade plywood offers a smooth finish suitable for painting or staining. Think about the thickness (3/4 inch is standard for cabinet boxes) and ensure it provides enough structural integrity for your stored items.
- 7. Ventilation (Optional): For certain types of food storage or if the pantry is in a warmer area, you might consider incorporating subtle ventilation grilles, especially if storing root vegetables or fresh produce. This is less common for standard dry good pantries but can be a thoughtful addition.
Tools of the Trade: What You Need for This Project
Success in any DIY project hinges on having the right tools. For building your custom plywood pantry cabinet, a combination of power tools and hand tools will ensure precision, efficiency, and safety. Here’s an expanded list of what you’ll need and why each item is crucial:
- One sheet of 3/4 inch Cabinet-Grade Plywood: This is the fundamental building block of your pantry. Cabinet-grade plywood is chosen for its strength, stability, and smooth, defect-free surface, making it ideal for painting or finishing. Using 3/4 inch thickness provides the necessary rigidity for shelves and cabinet sides, preventing sagging under the weight of stored goods.
- Pocket Hole Jig and Screws: A pocket hole jig is a woodworking game-changer. It allows you to drill angled holes into one piece of wood, which then connects to another piece with special self-tapping screws. This creates incredibly strong joints without visible fasteners on the exterior, resulting in a cleaner, more professional finish, especially important for cabinet construction.
- Drill/Driver: An essential power tool for almost any project. You’ll use your drill to create pilot holes, drive pocket screws, and attach various hardware components like hinges and cabinet screws. A cordless drill offers greater flexibility and convenience.
- Sander and Sandpaper: Proper sanding is key to a professional finish. A random orbital sander will quickly smooth out rough edges, clean up surfaces, and prepare the plywood for paint or stain. Start with a coarser grit (e.g., 100-120) for initial smoothing and finish with a finer grit (e.g., 180-220) for a silky-smooth surface ready for primer.
- Edge Banding and Trimmer: Plywood edges, when cut, reveal layers of wood veneer that can look unfinished. Edge banding is a thin strip of wood veneer or PVC that, when applied, covers these raw edges, giving the cabinet a clean, solid wood appearance. An edge banding trimmer neatly cuts the excess banding, ensuring a flush and professional edge.
- Iron: A standard household iron is often used to apply iron-on edge banding. The heat from the iron activates the adhesive on the back of the banding, allowing it to adhere firmly to the plywood edge.
- Square (Speed Square or Framing Square): Crucial for ensuring all your cuts and assemblies are perfectly square (90 degrees). Without accurate square corners, your cabinet will be crooked, and doors won’t fit correctly.
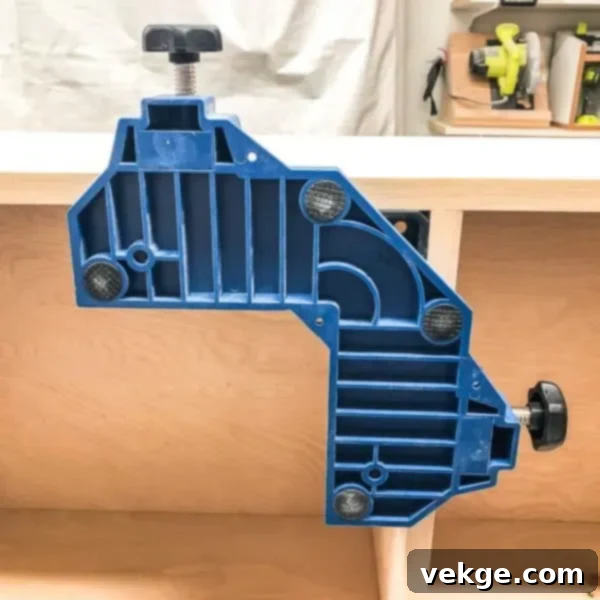
- Corner Clamps: These specialized clamps hold two pieces of wood firmly at a 90-degree angle, making assembly much easier and more precise. They are invaluable for ensuring your cabinet box is square as you drive screws.
- Custom Cabinet Doors: While you could build these, purchasing custom-sized doors can save significant time and effort, especially if you want a specific style or finish. These are the aesthetic face of your pantry, so choose wisely to match your kitchen.
- Hinges: Essential for attaching the doors to the cabinet frame. Concealed (Euro-style) hinges are popular for a sleek look and offer adjustability, allowing you to fine-tune door alignment.
- Paint or Stain, Primer, and Sealer: This is where your pantry gets its final, finished look. A good quality primer is vital for plywood, preventing wood grain from showing through and ensuring better adhesion for your chosen paint. Paint or stain will provide color and protection, while a topcoat sealer can add durability, especially in a high-traffic area like a kitchen.
- Cabinet Screws (e.g., #8 or #10 x 2.5-3 inch wood screws): Strong, reliable screws specifically designed for attaching cabinets securely to wall studs. These are longer and more robust than typical wood screws to ensure a stable installation.
- Level (Spirit Level or Laser Level): Absolutely critical for ensuring your cabinet is installed perfectly straight and plumb. An unlevel cabinet will look unprofessional and can cause doors to sag or not close properly.
- Shims: Thin wedges, typically made of wood or plastic, used to fill small gaps between the cabinet and an uneven floor or wall. Shims are indispensable for leveling and plumbing your cabinet during installation.
- Stud Finder: This electronic tool locates the wooden studs behind your drywall, allowing you to securely anchor your pantry cabinet directly into the structural framework of your home, ensuring maximum stability and safety.
- Measuring Tape: For all your precise measurements.
- Safety Glasses and Hearing Protection: Always wear appropriate personal protective equipment (PPE) when working with power tools to protect your eyes and ears.
Steps to Build Your Custom Plywood Pantry Cabinet
Now that you understand the myriad benefits of a custom pantry and have gathered all your essential tools and materials, it’s time to roll up your sleeves and get building! This section will provide a detailed, step-by-step guide to constructing your pantry cabinet. We’ll cover every stage, from making initial cuts in the plywood to attaching the finished doors. By meticulously following these instructions, you’ll be well on your way to enjoying a beautiful and highly functional new pantry in your kitchen.
1. Cut the Plywood with Precision
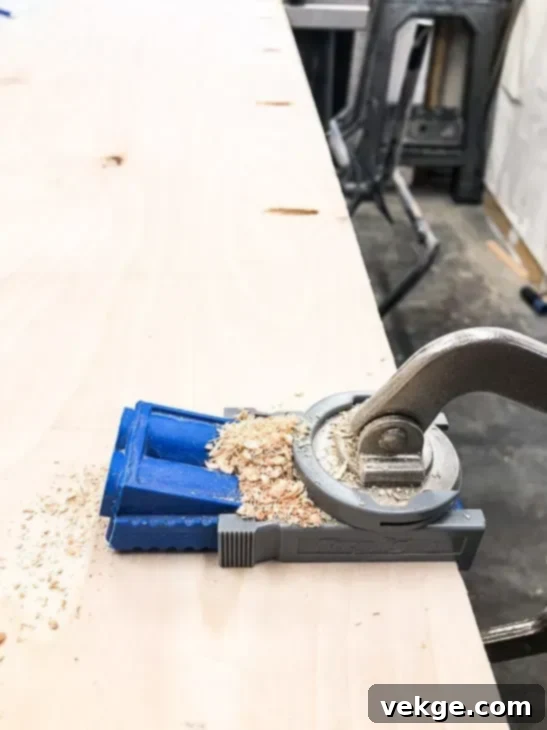
Accuracy in cutting is fundamental to a cabinet that fits together snugly and looks professional. Begin by creating a detailed cut list based on your pantry’s design dimensions. Measure twice, cut once! For large, unwieldy pieces (like the main sides or back), consider having your local home improvement store make the initial cuts. They often have panel saws that deliver perfectly straight and square cuts, saving you time and ensuring greater accuracy for the biggest pieces. For smaller, more intricate cuts (like shelves or internal dividers), you can comfortably handle these at home with a circular saw (guided by a straight edge or track saw) or a table saw. Always ensure your saw blade is sharp for clean cuts and use appropriate safety gear, including safety glasses and hearing protection.
2. Prepare the Plywood Pieces for Assembly
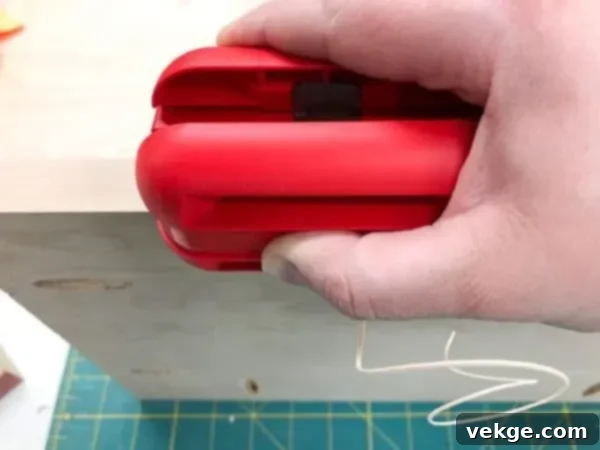
Preparation is crucial for a strong and beautiful finish. This stage ensures all components are ready for joining and finishing:
- Drill Pocket Holes: Using your pocket hole jig, drill pocket holes into the designated edges of your back panel and all shelf pieces. These holes should be strategically placed where these pieces will connect to the side panels and other structural elements. Follow the jig’s instructions for proper depth and spacing to create strong, hidden joints.
- Sand All Pieces Smooth: Before assembly, thoroughly sand all surfaces and edges of your plywood pieces. Start with a medium-grit sandpaper (e.g., 120-grit) to smooth out any imperfections or rough edges from cutting. Finish with a finer grit (e.g., 180 or 220-grit) for a silky-smooth surface, which is essential for a professional paint or stain finish. Pay extra attention to the visible edges and faces.
- Apply Edge Banding: To cover the unsightly raw edges of the plywood, apply edge banding to the front edges of the side panels and all shelf pieces that will be visible. Cut the banding slightly longer than the edge. Use an iron to heat the adhesive backing of the banding, pressing it firmly onto the plywood. Once cooled, use an edge banding trimmer or a sharp utility knife to carefully trim any excess flush with the plywood surface, then lightly sand the banded edge for a smooth transition.
3. Assemble the Cabinet Box
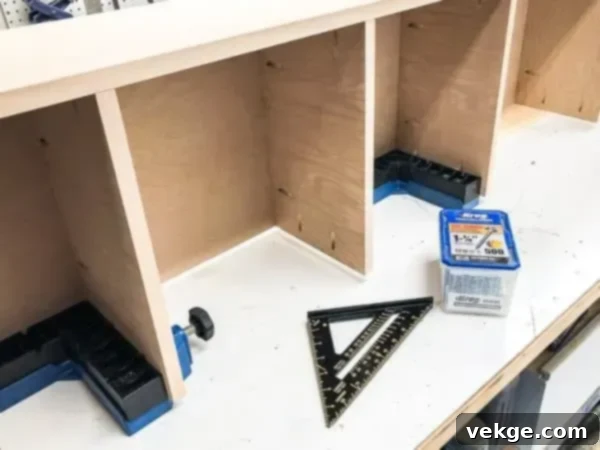
Now, watch your pantry take shape as you assemble the prepared pieces. Work on a flat, stable surface to ensure squareness:
- Attach Top and Bottom Shelves to the Back: Begin by attaching the top and bottom shelves to the back panel using your pocket hole screws. Use corner clamps to hold the pieces at perfect 90-degree angles while you drive the screws. Ensure these initial connections are square, as they form the foundation of your cabinet box.
- Install Middle Shelves: Next, attach any fixed middle shelves. If your design includes multiple doors or a divider, these shelves are particularly important where the cabinet doors will meet, providing structural support and defining separate compartments. Again, use pocket holes and screws, ensuring each shelf is level and square.
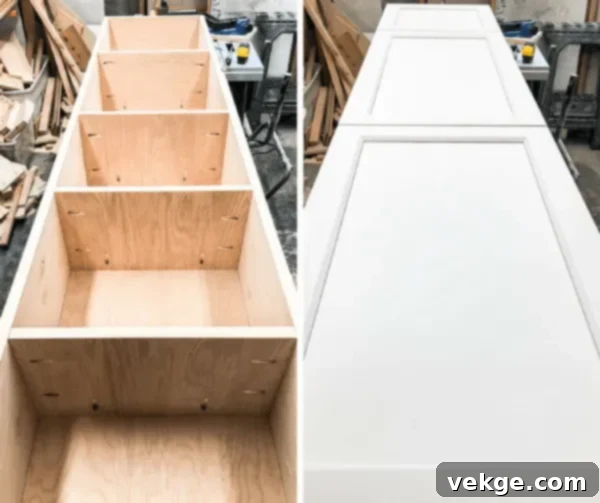
- Attach Side Panels: Once the back and shelves are securely in place, attach the two side panels. Use pocket hole screws along the edges of the top, bottom, and middle shelves to fasten them to the side panels. This step effectively creates the main box structure of your pantry. Continually check for squareness as you assemble, using your square and clamps as needed to maintain accuracy.
- Test Fit Cabinet Doors: Before proceeding to finishing, it’s a good practice to temporarily hold your custom cabinet doors in place (without hinges) to confirm they fit the opening precisely. This allows you to catch any sizing issues early.
4. Prime and Paint the Cabinet
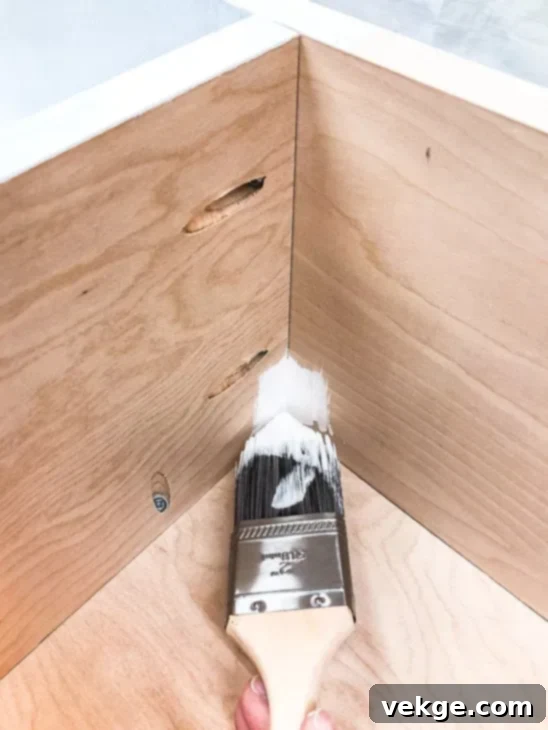
Achieving a durable and attractive finish is a multi-step process:
- Apply Primer: Start by applying a high-quality primer specifically designed for wood or plywood. Primer creates an even surface, seals the wood, prevents tannin bleed-through (especially important for plywood), and promotes excellent adhesion for your topcoat paint. Apply one to two thin, even coats, allowing sufficient drying time between coats according to the manufacturer’s instructions. Lightly sand with fine-grit sandpaper (220-grit) after the primer dries for an extra smooth finish.
- Paint to Match Your Kitchen: Once primed and sanded, apply your chosen paint. Select a durable, washable paint suitable for kitchen environments (e.g., semi-gloss or satin enamel). Use an angled brush for cutting into corners and tight spaces, and a small roller for larger flat surfaces to achieve a smooth, even finish with minimal brush marks. Apply two to three thin coats, allowing each coat to dry completely before applying the next. This layering technique builds depth and durability.
- Paint Cabinet Doors Separately: For the best finish, paint your custom cabinet doors separately, laying them flat. This prevents drips and allows for full coverage on all edges.
5. Install the Cabinet Securely
Installing the cabinet correctly ensures it’s stable, safe, and looks professionally built:
- Remove Baseboards (If Necessary): If your pantry is designed to sit flush against the wall and extend to the floor, you may need to carefully remove any existing baseboards in the installation area. This allows the cabinet to sit directly against the wall, creating a clean, built-in appearance.
- Locate and Mark Wall Studs: Using a stud finder, carefully locate and mark the positions of the wall studs behind where your pantry will be installed. These studs are the structural framework of your wall and are essential for securely anchoring the cabinet. Mark the center of each stud for precise screw placement.
- Level the Cabinet with Shims: Carefully position the cabinet in its intended location. Use your level to check if the cabinet is perfectly plumb and level, both front-to-back and side-to-side. If the floor or wall is uneven, insert shims underneath the cabinet or behind it until it is perfectly level. This crucial step prevents doors from sagging and ensures proper operation.
- Screw Cabinet to Wall Studs: Once the cabinet is perfectly level and plumb, use long cabinet screws (typically 2.5 to 3 inches) to securely fasten the cabinet through its back panel directly into the marked wall studs. Use at least two screws per stud, one near the top and one near the bottom, to ensure maximum stability. Drive the screws slowly to avoid splitting the plywood.
6. Attach and Adjust the Doors
The doors are the finishing touch, transforming your cabinet into a complete pantry:
- Install Hinges on Doors and Cabinet: Follow the manufacturer’s instructions for your chosen hinges (e.g., concealed European hinges). Typically, you’ll install the hinge cups into pre-drilled holes on the back of the doors and then attach the hinge mounting plates to the interior frame of the cabinet. Use a template or careful measurements to ensure consistent placement.
- Attach Doors and Adjust for Perfect Fit: Mount the doors onto the cabinet using the installed hinges. Once attached, most modern hinges offer three-way adjustability (in/out, up/down, side-to-side). Take your time to meticulously adjust each door until they are perfectly aligned with each other and the cabinet frame, with even gaps all around. This attention to detail will give your DIY pantry a truly professional look.
- Install Door Hardware: Finally, install your chosen door handles or pulls. Measure carefully to ensure they are centered and consistently placed on all doors.
Organizing Your New Pantry: Maximizing Every Inch
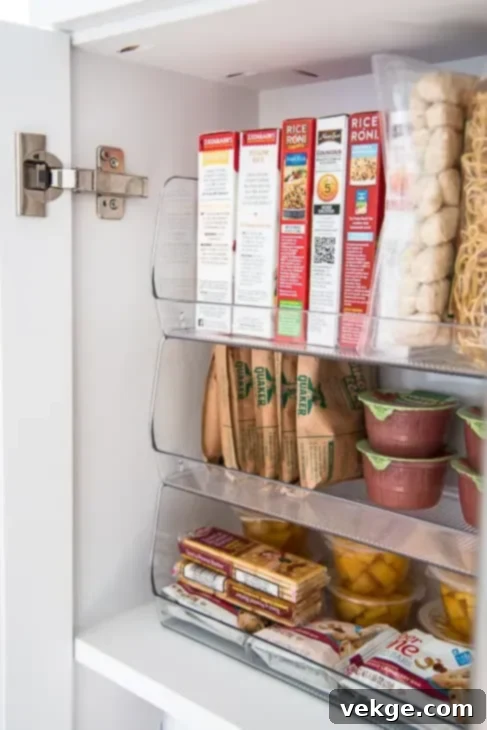
Congratulations! You’ve successfully built your custom pantry cabinet; now it’s time to truly unlock its potential through intelligent organization. A well-organized pantry doesn’t just look good; it saves time, reduces food waste, and makes meal preparation a breeze. Good organization makes all the difference in a functional kitchen. In this final section, we’ll share practical, effective tips and strategies on arranging your new space to make the most of every square inch, transforming it into an efficient command center for your culinary adventures.
- Use Clear, Airtight Containers for Staples: For baking essentials like sugar, flour, oats, pasta, rice, and baking soda, invest in clear, airtight containers. These are invaluable for several reasons: they keep ingredients fresh, protect them from pests, and allow you to quickly see when supplies are running low. Opt for square or rectangular containers, as they utilize shelf space more efficiently than round ones. Always label each container clearly with its contents and expiration date for quick identification and proper stock rotation.
- Invest in Large Bins with Tight-Fitting Lids for Bulk Items: For larger quantities of rice, pasta, grains, or even pet food, consider sturdy, large bins with secure, tight-fitting lids. These bins are essential for protecting bulk items from moisture, air, and unwanted pests. Choose sizes that align with your purchasing habits – larger bins for items you buy in bulk, and smaller ones for less-frequently used grains or specialty items. Place these on lower shelves or in easily accessible areas due to their weight.
- Stackable Bins for Snacks and Packaged Goods: Keep snacks, breakfast bars, individual packets, and other small packaged items neatly organized with stackable bins or baskets. These come in a variety of materials and sizes (clear plastic, wire, wicker) and can be arranged to perfectly fit your shelf space. Using shorter, wider stacks allows for easy access to items at the back, preventing forgotten or expired goods. Clear bins are particularly useful as they allow you to view contents at a glance without having to pull them out.
- Create Zones for Different Categories: Organize your pantry by creating designated zones for similar items. For example:
- Baking Zone: Flours, sugars, leavening agents, extracts.
- Breakfast Zone: Cereal, oatmeal, granola, spreads.
- Snack Zone: Chips, crackers, dried fruit, granola bars.
- Canned Goods Zone: Soups, vegetables, beans.
- Pasta/Grain Zone: Various pastas, rice, quinoa.
- Spice Zone: Racks or tiered organizers for easy access.
This system ensures everything has a home, making items easy to find and put away.
- Utilize Vertical Space with Shelf Risers or Tiered Organizers: Don’t let tall shelf gaps go to waste. Shelf risers double your storage capacity for shorter items like cans, jars, or spices. Tiered spice racks are excellent for visibility, allowing you to see all your spices at a glance without having to rummage.
- Door Organizers: If your pantry doors are solid, consider adding slim racks or hooks to the inside for extra storage of frequently used items like spices, small jars, foil, or plastic wrap.
- First-In, First-Out (FIFO) System: When stocking, place newer items at the back and older items at the front. This simple practice helps ensure you use food before it expires, reducing waste.
By implementing these smart organization strategies, your custom DIY pantry will become a highly efficient and joyful space, making your kitchen more functional than ever before.
Before and After: Witness the Transformation of a DIY Pantry
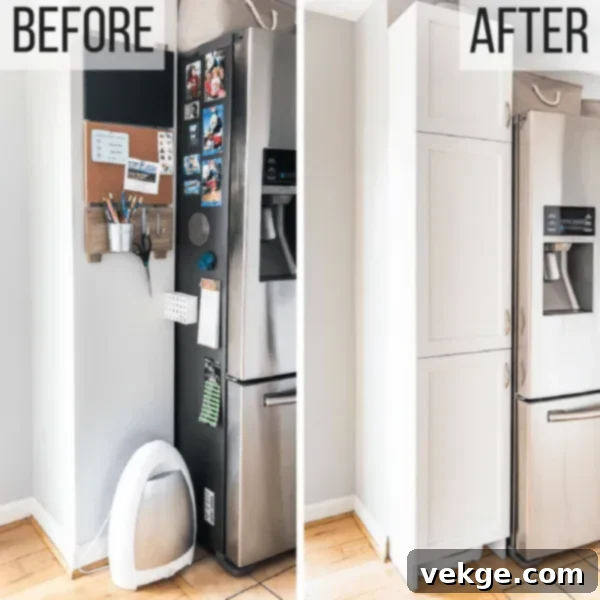
Let’s take a moment to truly appreciate the profound transformation and immense difference a custom DIY pantry cabinet can make in your home. Before this project, many kitchens often feature a problematic corner or a narrow, underutilized wall section. Picture that “before” scenario: a messy corner that gathered clutter, served little functional purpose, and effectively became wasted space, making the entire kitchen feel smaller and less inviting.
Now, with the thoughtful design and careful construction of our new custom pantry, the narrative completely changes. The cabinet is not just an addition; it’s a seamless integration. Imagine this: the custom unit fits perfectly, even in that challenging 9-inch wide space that was once deemed unusable. This precise fit instantly adds a tremendous amount of valuable storage for food, kitchen tools, small appliances, and pantry essentials that previously had no designated home. The most remarkable aspect? The strategic placement and design of the new pantry actually make the entire kitchen appear larger and more open.
The new pantry is meticulously aligned with the existing cabinetry, creating an unbroken line that tricks the eye into perceiving the kitchen as longer and more expansive. Its clean lines, matching finish, and consistent hardware create a polished, “built-in” look that elevates the entire room’s aesthetic. That once-awkward, inefficient corner has been brilliantly transformed into a highly useful, aesthetically pleasing, and integral feature of the kitchen.
This powerful “before and after” contrast vividly demonstrates how a seemingly small DIY project can yield a dramatically positive impact on your home’s functionality, organization, and visual appeal. Your custom DIY pantry isn’t merely a storage solution; it’s a testament to smart design and personal effort, turning a problem spot into a valuable, handy, and beautiful feature that you’ll appreciate every single day.
Maintenance Tips: Keeping Your New Pantry in Top Shape
Building your DIY pantry cabinet is an investment of time and effort, and with proper care, it will continue to look fantastic and function efficiently for many years to come. Here are some simple yet effective maintenance tips to ensure your new pantry remains in pristine condition:
- Clean Spills Immediately: Accidents happen, especially in a kitchen environment. Promptly wipe up any food or liquid spills on shelves or cabinet surfaces. This prevents stains from setting in, eliminates stickiness, and protects the wood or paint finish from moisture damage.
- Dust Shelves Weekly with a Soft Cloth: Regular dusting prevents dust and grime buildup. Use a dry, soft microfiber cloth to gently wipe down all shelves and interior surfaces. This quick task keeps your pantry looking fresh and hygienic.
- Inspect and Tighten Hinges Periodically: Over time, with frequent use, cabinet door hinges can sometimes loosen. Every few months, check all hinges for any wobbling or play. If you find any loose screws, gently tighten them with a screwdriver. This prevents door misalignment and premature wear on the hinges.
- Touch Up Paint Chips Promptly: Minor bumps and scrapes can sometimes lead to small paint chips. Keep a small amount of your pantry’s paint on hand for touch-ups. Addressing these chips quickly prevents moisture from penetrating the exposed wood, which can lead to swelling or damage.
- Utilize Shelf Liners: To protect the surface of your shelves from scratches, spills, and general wear and tear, consider using washable shelf liners. These provide a protective barrier and make cleaning easier – simply remove and wash the liners.
- Maintain a Dry Environment: Wood and plywood are susceptible to moisture. Ensure your pantry remains dry to prevent warping, swelling, or mold growth. Address any potential leaks in surrounding plumbing or from condensation sources quickly.
- Clean Door Handles Regularly: Door handles and pulls are frequently touched and can accumulate grime, grease, and fingerprints. Wipe them down often with a damp cloth and mild soap (if compatible with the hardware material) to keep them clean and looking new.
- Adjust Shelves as Needed: If your shelves are adjustable, periodically check them for any signs of sagging, especially if heavily loaded. Rearrange items to distribute weight evenly, or adjust shelf pins to prevent long-term deformation.
- Wipe Down the Exterior with a Damp Cloth: Every now and then, give the entire exterior of your pantry cabinet a gentle wipe-down with a slightly damp, soft cloth. For painted surfaces, a mild, non-abrasive cleaner can be used if needed, followed by drying with a clean cloth.
- Regularly Check for Pests: As a food storage area, your pantry can be attractive to common kitchen pests. Regularly inspect for any signs of insects or rodents, especially around corners and behind containers. Address any issues promptly to protect your food supply and cabinet integrity.
By diligently following these simple yet effective maintenance steps, your custom DIY pantry cabinet will not only maintain its beautiful appearance but also continue to provide reliable and efficient storage for many years to come, truly becoming a lasting asset in your home.
Final Words on Your DIY Pantry Cabinet Project
Building your own DIY plywood pantry cabinet is a truly rewarding home improvement project that goes far beyond simply adding storage. It’s a strategic solution that ingeniously tackles common kitchen storage dilemmas while simultaneously enhancing the overall aesthetic and value of your home. This custom-built solution is particularly effective at utilizing space efficiently, transforming even the most challenging or narrow areas into highly functional storage zones.
As you reflect on your accomplishment, remember the key principles that guided this project: the importance of meticulous planning, ensuring your new pantry’s height and door style flawlessly match your existing kitchen for a harmonious, built-in look. To truly maximize every precious inch of your newly created space, embrace smart organization techniques using clear, airtight containers, durable lidded bins, and versatile stackable storage solutions. These choices not only keep your pantry tidy but also make ingredients easy to find and manage.
Your custom DIY pantry cabinet is more than just a place to store food; it represents a significant upgrade to your kitchen’s functionality and a tangible increase in your home’s appeal and value. Moreover, the practical skills you’ve gained through this woodworking endeavor are incredibly versatile. You can confidently apply this newfound expertise to other areas of your home, whether creating bespoke storage for bathrooms, optimizing craft areas, or even building custom furniture.
With just one sheet of plywood, some fundamental tools, and a commitment to following detailed steps, you have successfully created a professional-looking, highly functional cabinet perfectly tailored to your unique needs and space requirements. Take immense pride in your newly organized kitchen and relish the profound satisfaction of a job exceptionally well done. Enjoy the convenience, beauty, and efficiency that your custom DIY pantry brings to your daily life!
