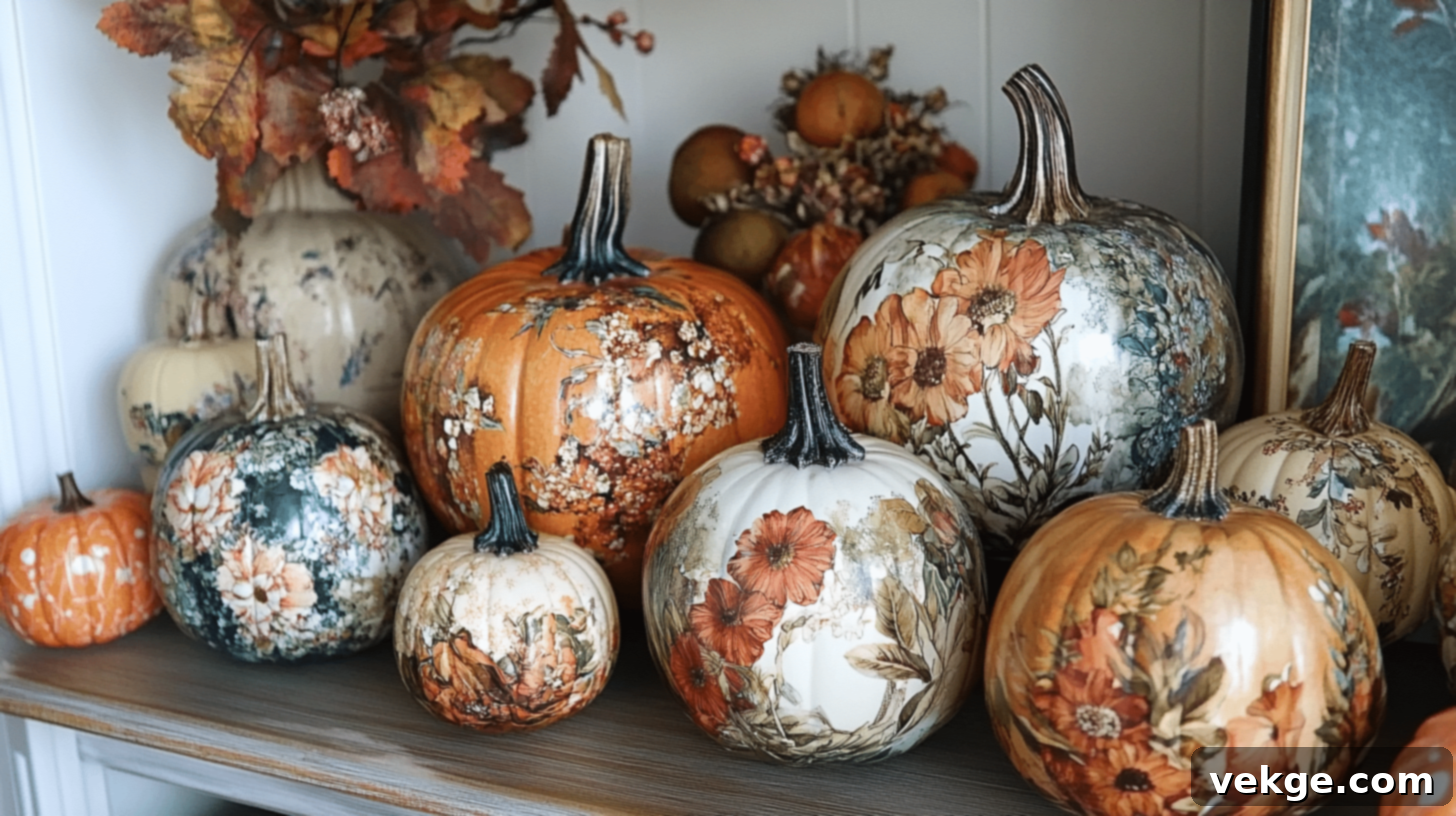
Elevate Your Fall Decor: A Complete Guide to Stunning DIY Decoupage Pumpkins
As the crisp air rolls in and leaves begin their vibrant transformation, there’s no better way to usher in the autumn season than by infusing your home with charming, handmade decor. Decoupaging pumpkins is an absolute must-try if you’re seeking an easy, creative, and budget-friendly way to enhance your fall aesthetic! This delightful DIY project effortlessly transforms plain, ordinary pumpkins into beautiful, customized pieces using nothing more than decorative napkins and a bit of versatile Mod Podge.
Whether your personal style leans towards a rustic farmhouse charm, a sophisticated elegant vibe, or something whimsically unique, this craft offers an unparalleled opportunity to add a truly personal touch to your seasonal decorations. Imagine a collection of pumpkins, each reflecting a part of your personality, gracing your mantelpiece or welcoming guests at your entryway.
This comprehensive guide will walk you through every step of the decoupage pumpkin process, from carefully gathering your materials to applying the final embellishments that make your creations truly pop. Beyond the crafting, you’ll also discover invaluable tips on styling your finished decoupage pumpkins, ensuring they integrate perfectly and become the envy of your autumn home decor.
Here’s a detailed look at what we’ll cover in this guide:
- Understanding Decoupage: What this versatile craft entails.
- Why You’ll Adore This Craft: The numerous benefits and joys of creating decoupage pumpkins.
- Step-by-Step Instructions: A clear, easy-to-follow guide for decoupaging your pumpkins.
- Creative Styling Tips: Innovative ideas for displaying your finished pumpkins.
- Expert Crafting Tips: Essential advice for achieving flawless results and enjoying the process.
Let’s dive into the enchanting world of decoupage and begin crafting your autumn masterpieces!
What is Decoupage? A Journey into Paper Artistry
Decoupage is an art form that has charmed crafters for centuries, originating in France and gaining immense popularity in the 17th and 18th centuries. At its heart, decoupage is a fun and incredibly creative method to transform ordinary objects into extraordinary works of art. The technique involves meticulously cutting out designs from paper or fabric, adhering them to an object, and then covering them with multiple coats of varnish or a special sealant, like Mod Podge. This process creates a neat, textured, and durable finish that gives the illusion of a painted design, making the finished piece both eye-catching and uniquely artisanal.
When you apply this captivating technique to pumpkins, you take a simple, iconic fall item and elevate it into something truly spectacular. The beauty of decoupaging pumpkins lies in its versatility. You can use an incredible variety of paper materials – from delicate floral napkins, vintage comic book pages, old sheet music, maps, or even custom-printed designs – to cover your pumpkin. Each material choice opens up a world of stylistic possibilities. Then, with just a few coats of Mod Podge, you seal the design, creating a smooth, protective layer that makes your pumpkin a personal statement piece, entirely unique to you and your home.
It’s a craft that truly anyone can do, regardless of prior artistic experience. Whether you’re a seasoned crafter or a complete beginner, the forgiving nature of decoupage makes it accessible and enjoyable. And perhaps the most appealing aspect? You have complete creative freedom to make your decoupage pumpkins look any way you desire. They can be elegantly sophisticated, playfully whimsical, delightfully spooky, or charmingly cute – the design is limited only by your imagination. It’s an opportunity to let your creativity shine and bring your autumn vision to life!
Why You’ll Absolutely Love Crafting Decoupage Pumpkins
Decoupage pumpkins offer a fantastic and personalized way to infuse your home with the spirit of fall. It’s an enjoyable, rewarding, and remarkably affordable craft. Here’s why this particular DIY project is likely to become your new favorite autumn tradition:
- Effortlessly Easy for Everyone: You absolutely do not need to be a seasoned artist or a crafting expert to create stunning decoupage pumpkins. The process is incredibly straightforward: if you can wield a pair of scissors and brush on some glue, you possess all the fundamental skills needed! It’s a forgiving craft, meaning small imperfections often add to its handmade charm, rather than detracting from it.
- Remarkably Budget-Friendly: Crafting beautiful decorations doesn’t have to break the bank. You only require a handful of materials for these pumpkins, and most are quite inexpensive and readily available. In fact, you might already have some of the essentials lying around your home, like paintbrushes or scissors. Even the pumpkins themselves can be faux varieties, reused year after year, making this an economical choice for sustainable decor.
- Perfectly Aligned with Your Personal Style: This craft offers boundless opportunities for personalization. Your choice of paper is your artistic palette. Dreaming of a fancy, sophisticated pumpkin? Opt for exquisite floral patterns or elegant damask designs. Prefer something fun and quirky? Embrace vintage comic book pages or playful polka dots. The design possibilities are truly endless, allowing your unique taste to shine through in every creation.
- Surprisingly Quick to Complete: In today’s fast-paced world, finding time for creative projects can be a challenge. Thankfully, you can typically complete a decoupage pumpkin project in just a few hours (allowing for drying time between coats). This makes it an ideal craft for when you want to create something beautiful and impactful without committing to a multi-day endeavor. Perfect for a cozy afternoon activity!
- A Delightful Group Activity: Looking for a fun way to spend time with loved ones? Decoupaging pumpkins is an excellent activity to share with friends, family, or even as a seasonal party idea. Everyone can gather, chat, and create their own unique pumpkins, sharing ideas and showing off their individual styles. It’s a wonderful way to create lasting memories along with beautiful decor.
Decoupage pumpkins are truly a fantastic way to make your fall decorations stand out and reflect your personal flair. They’re immensely fun to make, look absolutely charming, and beautifully showcase your creativity. So, why not gather your supplies and give it a try? You might be pleasantly surprised by how much joy and satisfaction this simple craft brings!
Step-by-Step Guide: Crafting Your Own Decoupage Pumpkins
Ready to transform ordinary into extraordinary? Let’s walk through the straightforward process of making your very own decoupage pumpkins. You’ll find it’s much easier and more enjoyable than you might imagine!
Step 1: Gather Your Essential Materials
Before embarking on your crafting adventure, ensure you have all your necessary tools and materials neatly organized. Having everything at hand makes the process smoother and more enjoyable:
- Faux Pumpkins: Select pumpkins made from foam, plastic, or paper-mâché in various sizes to create an interesting display. Faux pumpkins are reusable and provide a smooth, consistent surface.
- Decorative Napkins: These are the stars of your project! Choose napkins with beautiful designs, patterns, or motifs that match your desired aesthetic. Paper tissues can also work.
- Mod Podge: This is your all-in-one adhesive, sealant, and finish. Opt for a matte or gloss finish depending on your preference. There are also outdoor versions if you plan to display them outside.
- Paintbrush: A medium-sized, soft-bristled brush is ideal for applying Mod Podge smoothly and gently.
- Sharp Scissors: Essential for precisely cutting your napkin designs.
- Real Pumpkin Stems (Optional but Recommended): For an authentic touch, real dried pumpkin stems can be collected from harvested pumpkins or purchased from craft stores.
- Acrylic Paint (Optional): Useful for priming your pumpkin if its original color might show through thin napkin designs, or for touching up areas where the napkin doesn’t fully cover.
- Hot Glue Gun and Glue Sticks: Perfect for securely attaching real stems or other embellishments.
- Dried Leaves or Faux Stems/Berries (Optional): These add a lovely, natural finish around the base of the stem.
- Finger Protectors (Optional but Highly Recommended): Silicone finger caps are excellent for protecting your fingertips from hot glue burns.
- Wax Paper or Craft Mat: To protect your work surface from sticky Mod Podge.
Step 2: Prepare Your Pumpkin for Its Transformation
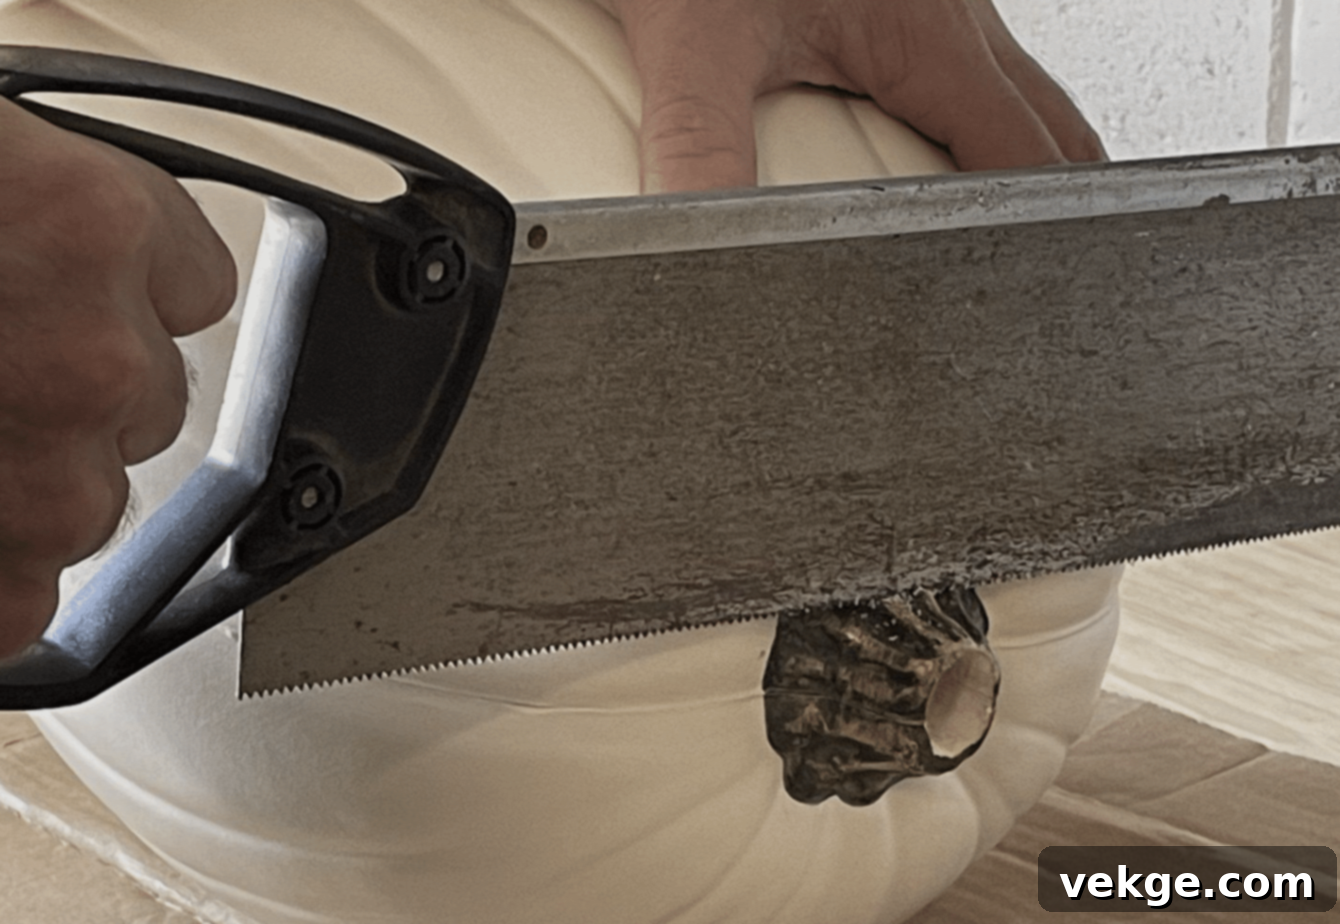
A good foundation is key to a beautiful finish. Here’s how to get your pumpkin ready:
- Remove the Faux Stem: Most faux pumpkins come with a plastic stem. Carefully twist or pry it off if you plan to replace it with a real stem for a more natural look.
- Clean the Surface: Wipe down your pumpkin with a damp cloth to remove any dust or debris, ensuring optimal adhesion for the Mod Podge. Allow it to dry completely.
- Consider a Base Coat of Paint: If you’ve removed the stem, or if your pumpkin’s original color is vibrant and might clash with or show through your chosen napkin design (especially with lighter napkins), consider painting the pumpkin with a neutral color like white or cream. This provides a clean canvas and helps your napkin designs truly pop. Allow the paint to dry thoroughly.
Step 3: Prepare Your Decorative Napkin Designs
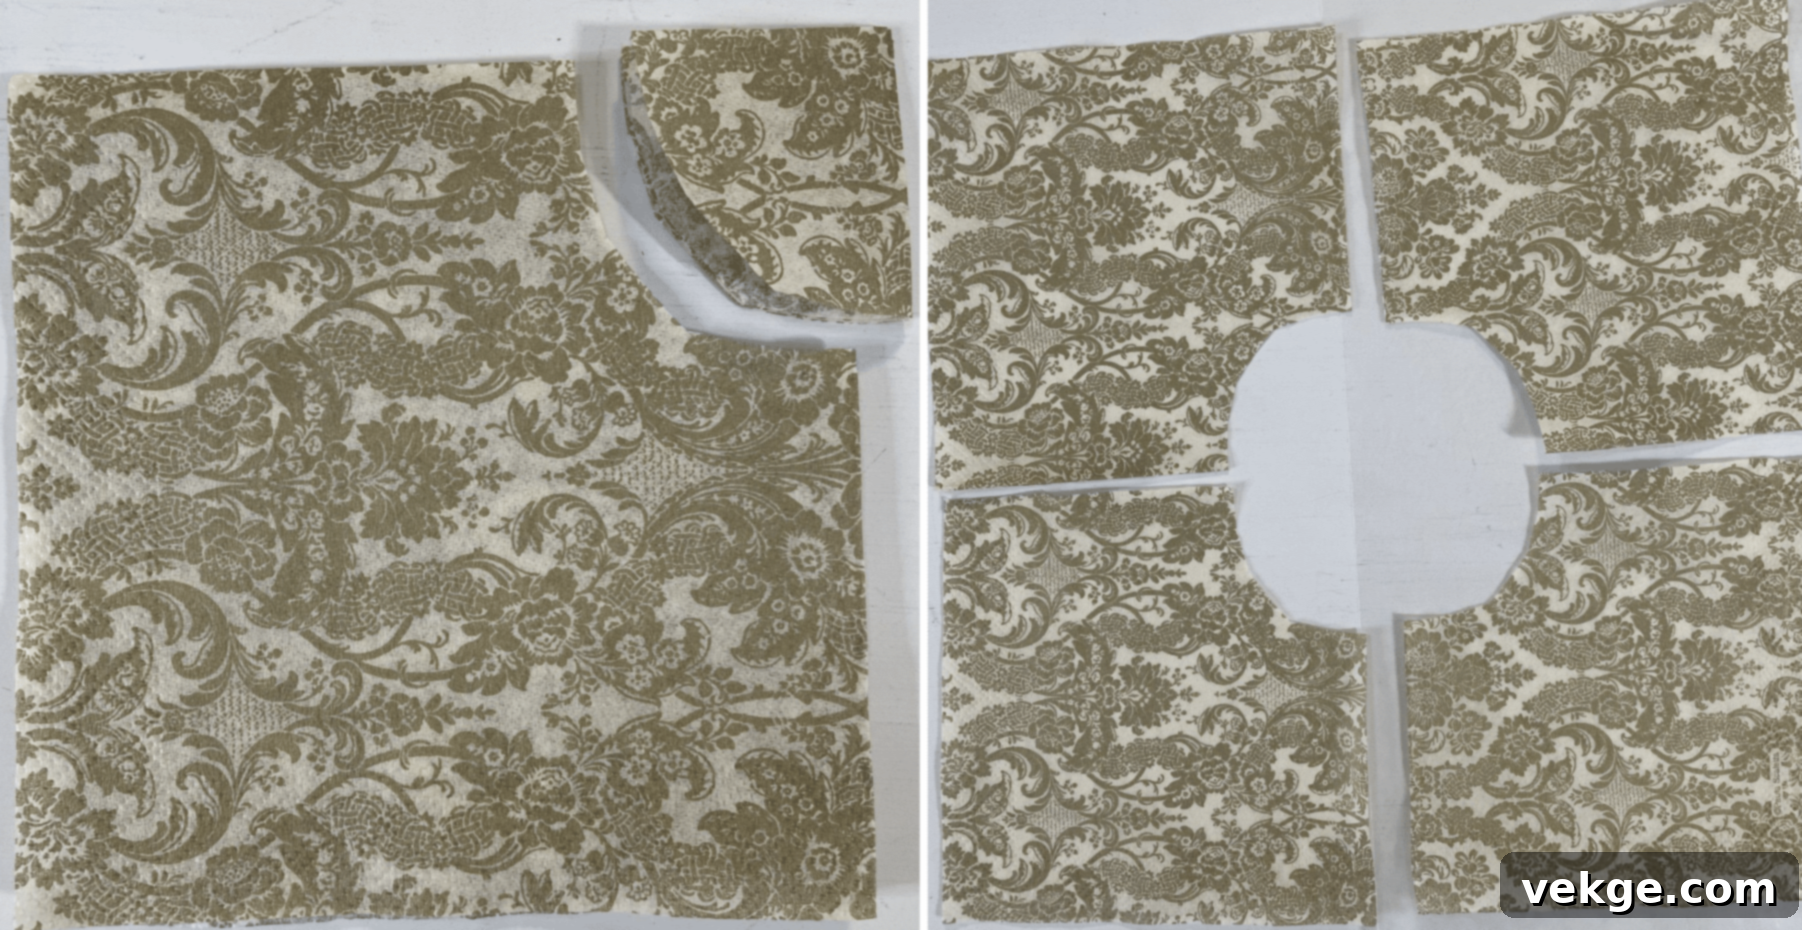
The magic begins with preparing your napkin. Precision here helps achieve a smooth, professional look:
- Separate the Layers: Most decorative napkins have multiple plies (usually 2 or 3). You only want the very top, printed layer for decoupaging. Gently peel back the layers until you have just the thin, patterned sheet. This is crucial for seamless application and avoiding bulkiness.
- Cut for the Stem Area: If you’re adding a real stem, cut a small circle or starburst shape from a plain or subtly patterned part of your napkin. This piece will go around the top where the stem will be, creating a clean finish.
- Section the Napkin: For the main body of the pumpkin, cut the rest of your chosen napkin into manageable pieces. Depending on the size of your pumpkin and the design, you might cut it into quarters, eighths, or irregular shapes. For a smoother application on a rounded surface, try cutting strips or even tearing the napkin carefully to create softer, less defined edges.
Step 4: Apply the Mod Podge and Napkin
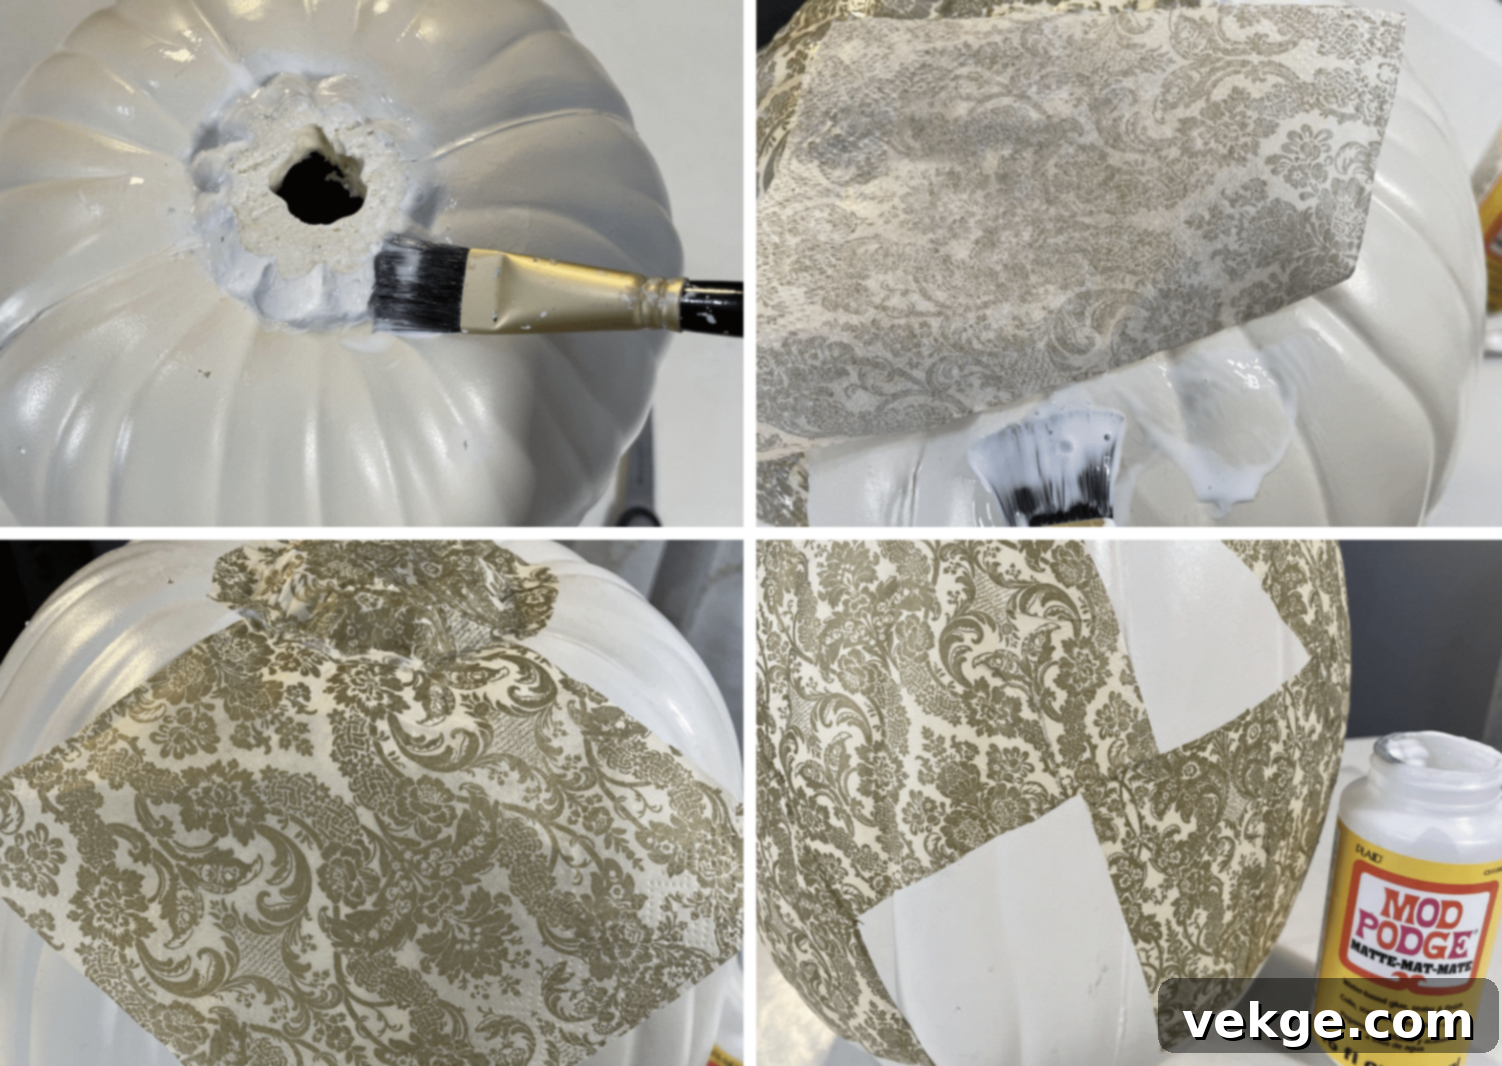
This is where your pumpkin truly comes to life. Work systematically and gently:
- Apply Mod Podge to a Section: Using your paintbrush, apply a thin, even layer of Mod Podge to a small section of your pumpkin. Don’t cover too large an area at once, as Mod Podge dries relatively quickly.
- Carefully Place the Napkin: Gently lay one of your prepared napkin pieces onto the wet Mod Podge. The key is to be delicate, as the single ply is very fragile and can tear. Start from the center of the napkin piece and gently smooth it outwards with your fingers or a clean, dry paintbrush to remove any air bubbles or wrinkles.
- Seal with Another Layer: Once the napkin piece is positioned, apply another thin layer of Mod Podge directly over the napkin. This seals the paper, protects the design, and helps to smooth it further onto the pumpkin’s surface. Allow each section to dry slightly before moving on.
- Address Imperfections: If you encounter small bumps, wrinkles, or folds, try to gently smooth them out with your brush or fingertips. Don’t worry if it’s not perfectly smooth; a handmade look is part of the charm! For larger folds, you might carefully snip them with small scissors and overlap the edges, sealing with more Mod Podge.
- Continue Covering: Repeat this process, applying Mod Podge, placing napkin pieces, and sealing, until your entire pumpkin is covered with your desired design. Allow adequate drying time between coats (at least 15-20 minutes, or longer if specified on your Mod Podge bottle). For durability, consider applying two or three thin top coats of Mod Podge over the entire pumpkin once the initial napkin layer is dry.
Step 5: Add a Realistic Stem and Embellishments
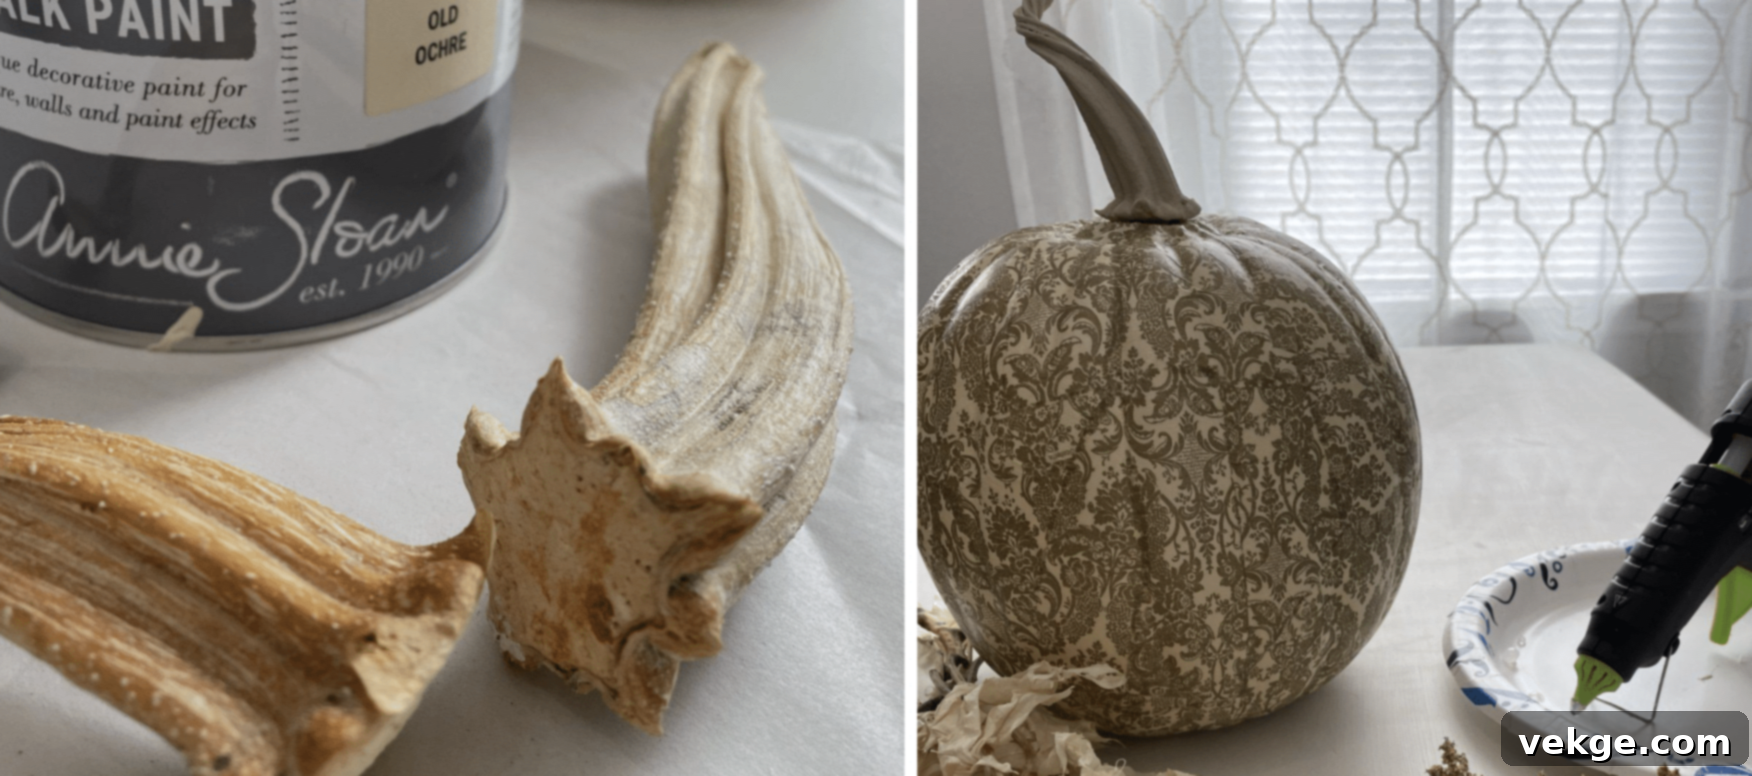
This optional step can significantly elevate the finished look of your decoupage pumpkin, adding a touch of authentic charm:
- Attach the Real Stem: Once your Mod Podged pumpkin is completely dry, use a hot glue gun to firmly attach a real pumpkin stem to the top center. Hold it in place for a few seconds until the glue sets. The natural texture and color of a real stem provide a beautiful contrast to the decoupaged body.
- Customize the Stem (Optional): If you wish, you can paint your real stem with acrylic paint to match or complement your napkin design. A little bit of brown, green, or even metallic paint can create a unique effect.
- Add Botanical Flair: To further enhance the natural appeal, add some dried leaves, small faux berries, or tiny faux vine stems around the base of the pumpkin stem using your hot glue gun. This creates a fuller, more finished look, mimicking how a pumpkin grows in nature.
Step 6: Display Your Beautiful Creation
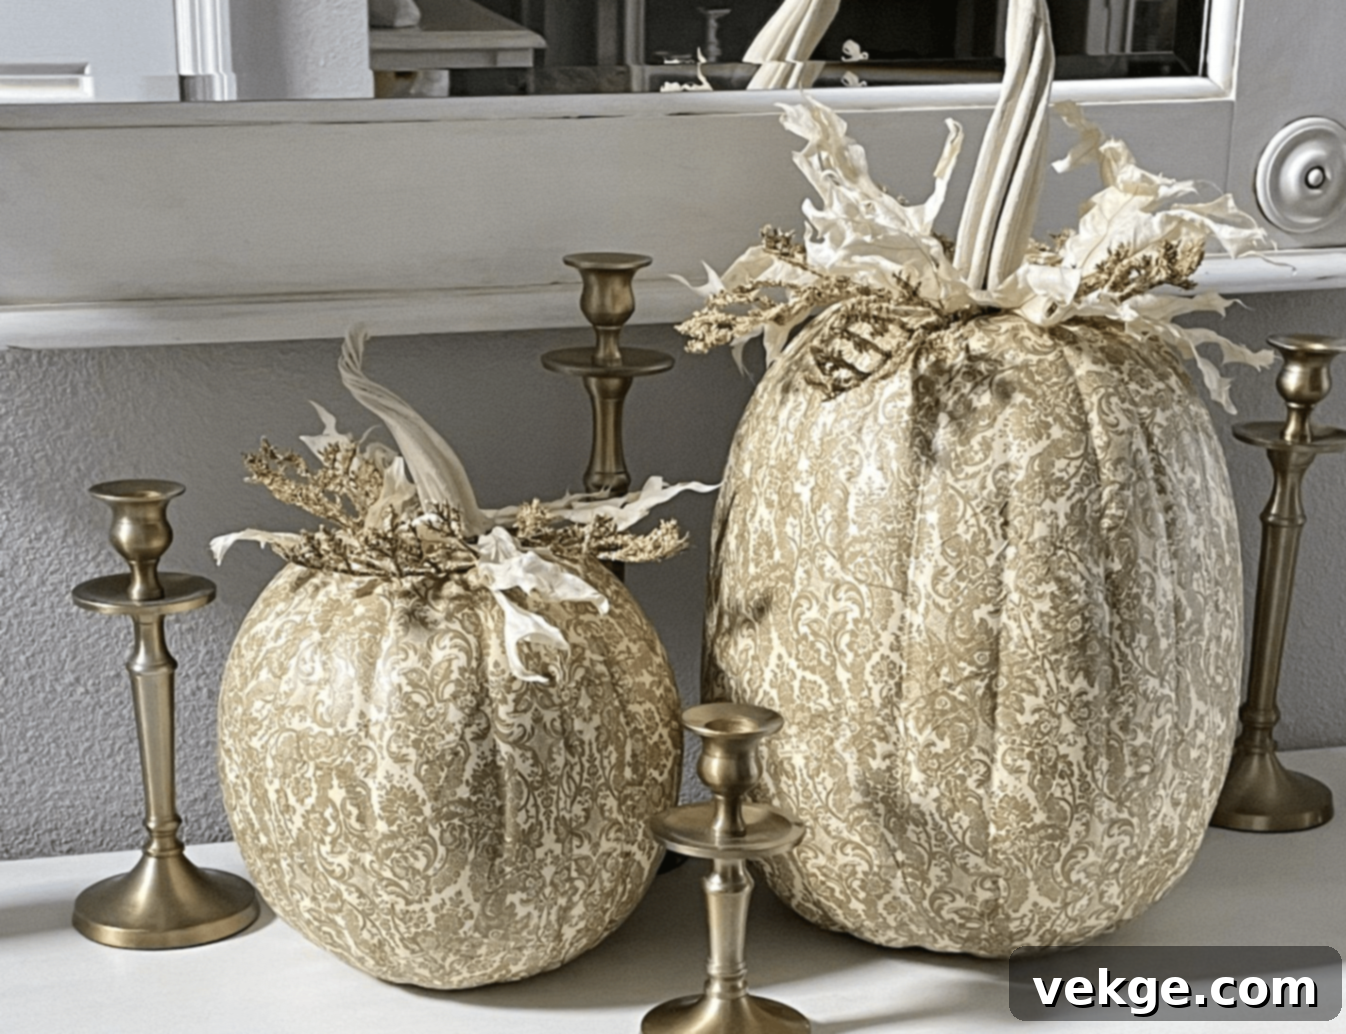
Congratulations, your decoupage pumpkin is complete! Now it’s time to enjoy the fruits of your labor and proudly display your unique creation:
- Strategic Placement: Place your stunning decoupage pumpkins where they can be admired by everyone. They look absolutely fantastic on bookshelves, console tables, fireplace mantels, or as the focal point of a larger fall display.
- Combine and Contrast: Group different sizes and patterns of your decoupaged pumpkins for a dynamic arrangement. Mix them with other fall elements like natural gourds, pinecones, candles, or plaid fabrics to create a rich, inviting autumn vignette.
- Enjoy the Uniqueness: Remember, the charm of making decoupage pumpkins lies in the fun and creativity. Don’t strive for absolute perfection; the slight irregularities and unique characteristics are what make your handmade pumpkins truly special and one-of-a-kind!
Styling Tips for Your Decoupage Pumpkins: Elevate Your Fall Decor
Now that you’ve poured your creativity into crafting beautiful decoupage pumpkins, it’s time to showcase them in ways that truly highlight their charm and elevate your overall fall decor. Here are some inspiring ideas to make your autumn displays shine and bring a cozy, inviting atmosphere to your home:
Create a Captivating Centerpiece
Looking to impress your dinner guests or simply add a focal point to your dining area? A centerpiece featuring your decoupage pumpkins is an exquisite choice:
- Gather Your Gourds: Arrange a collection of your decoupage pumpkins, varying in size and design, along the center of your dining table or coffee table.
- Ambient Glow: Surround them with flickering candles (real or LED for safety) in varying heights, or incorporate elegant lanterns for a warm, inviting glow.
- Natural Accents: Weave in additional fall elements such as faux autumn leaves, sprigs of berries, small pinecones, or even a length of rustic burlap or soft plaid fabric as a runner. This layering creates depth and texture, making your centerpiece truly memorable and perfect for family meals or festive gatherings.
Embrace Nature’s Harmony
For a truly cozy, organic, and effortlessly autumnal feel, integrate your decoupaged pumpkins with elements straight from the outdoors:
- Earthy Companions: Position your pumpkins alongside natural treasures like freshly gathered pinecones, slender twigs, bundles of cinnamon sticks, or smooth river stones.
- Botanical Beauty: Incorporate dried flowers, preserved autumn leaves, sprigs of eucalyptus, or bundles of wheat.
- Textural Contrast: The smooth, often patterned surface of your decoupage pumpkins will beautifully contrast with the rough, varied textures of natural items, creating a display that feels authentic, grounded, and deeply “fall.” This blend adds richness and visual interest to any vignette.
Build an Eye-Catching Pumpkin Tower
Want to create a dramatic statement that immediately draws the eye? A stacked pumpkin tower is a playful yet sophisticated way to display your creations:
- Stack with Stability: Carefully stack decoupage pumpkins of different sizes, placing the largest at the bottom and progressively smaller ones on top. Ensure each pumpkin is stable on the one below. For added security, you can use a small amount of museum putty or even hot glue (if you don’t plan to separate them) between layers.
- Strategic Placement: This layered look works wonderfully near your front door as a welcoming display, on a spacious fireplace hearth, or as a corner accent.
- Accessorize the Base: Enhance the tower’s foundation with other fall accents like small hay bales, vintage wooden crates, cozy throws, or even a string of subtle fairy lights for a magical evening glow. This vertical arrangement is sure to get compliments and adds a dynamic element to your decor.
Mix and Match Diverse Patterns
Don’t shy away from variety! Mixing different napkin designs on your pumpkins can create a dynamic and visually stimulating display:
- Eclectic Charm: Dare to combine different patterns! Pair delicate florals with bold geometrics, classic polka dots with intricate stripes, or whimsical woodland scenes with abstract designs.
- Cohesive Palette: To ensure your mixed patterns look curated rather than chaotic, try to stick to a consistent color palette or a few harmonious colors. For instance, combine various patterns that all feature shades of rust, cream, olive green, and gold.
- Layering Interest: Having a range of patterns makes your display incredibly interesting and provides a rich tapestry for the eye to explore. This approach shows off your creativity and makes each pumpkin a unique piece within a larger, cohesive collection.
Integrate Soft, Inviting Textures
To infuse your fall decor with warmth, comfort, and an undeniable sense of hygge, pair your decoupage pumpkins with soft, tactile elements:
- Cozy Textiles: Arrange your pumpkins alongside plush elements like chunky knitted blankets draped over a sofa, soft plaid throw pillows, faux fur rugs, or velvet cushions.
- Sensory Contrast: The smooth, finished surface of your decoupage pumpkins will offer a delightful contrast to the softness of the fabrics, creating an inviting and layered look.
- Create a Nook: This combination of smooth pumpkins and soft textiles instantly makes any space feel more warm, homey, and utterly perfect for snuggling up on a chilly autumn evening. Create a cozy reading nook or a welcoming entryway display with this method.
Remember, there’s truly no “wrong” way to display your decoupage pumpkins. The absolute best part about creating them yourself is the freedom to place them wherever and however you desire, allowing them to perfectly complement your unique space and reflect your personal style. Have fun experimenting, and let your home resonate with the beautiful, handcrafted spirit of fall!
Helpful Tips for Crafting Decoupage Pumpkins Like a Pro
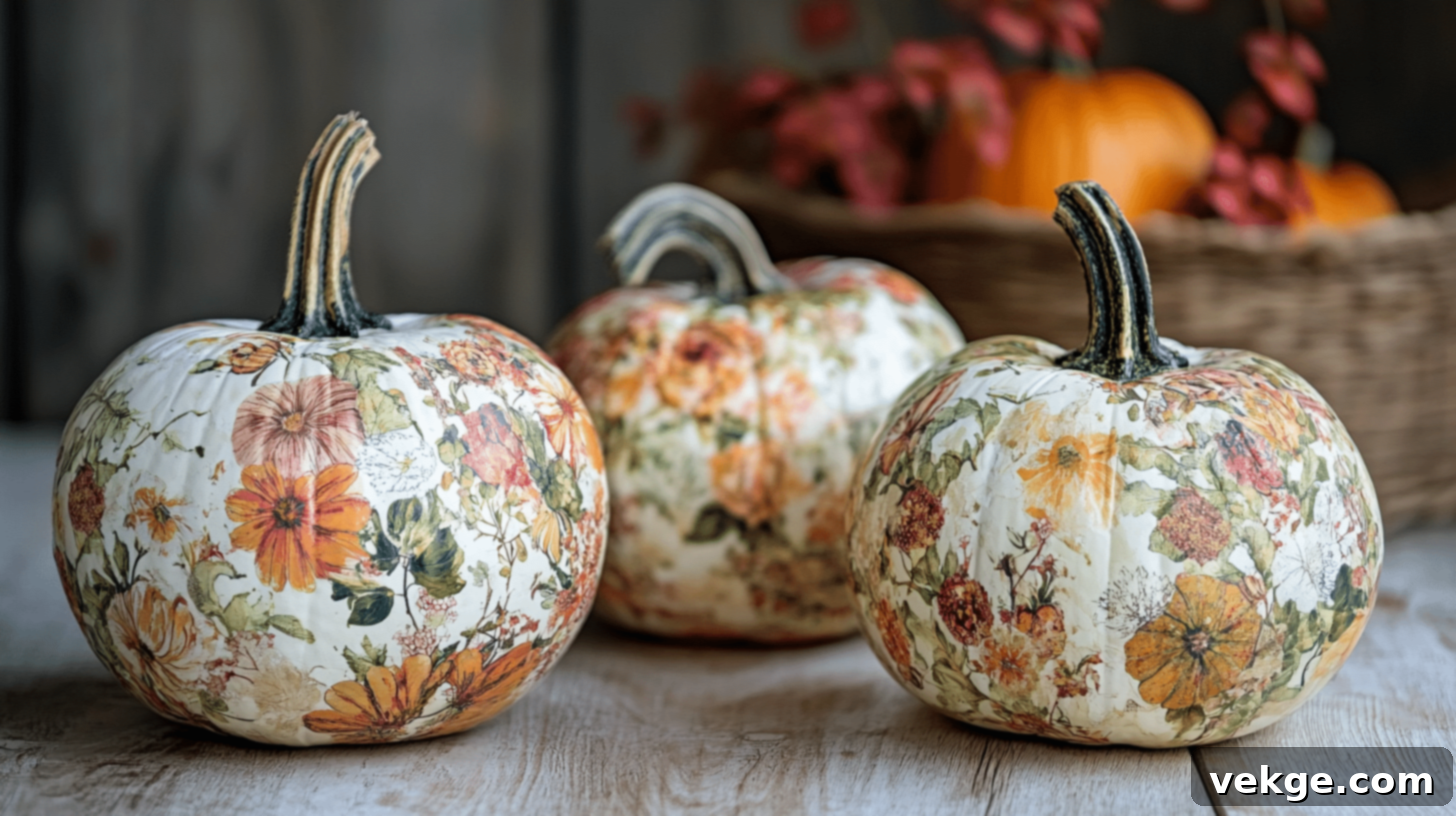
While decoupaging pumpkins is an accessible craft, a few insider tips can make the process even smoother, more enjoyable, and ensure your finished pieces look absolutely fantastic. Here are some expert tricks to help you along your creative journey:
Handle Delicate Napkins with Utmost Care
Those beautiful, patterned napkins are incredibly thin once separated into single plies, and they can tear quite easily. Precision and a gentle touch are your best allies:
- Feather-Light Application: When placing the napkin onto the wet Mod Podge, use a very light hand. Start by gently laying the center down, then use a soft brush or your fingertips to smooth outwards. Avoid harsh scrubbing or pressing, which can easily tear the delicate paper.
- Gentle Adjustments: If you need to reposition a napkin piece, lift it slowly and carefully. It’s often easier to lift a small section rather than trying to peel the entire piece off. A touch more Mod Podge can help re-adhere it smoothly.
- Embrace Minor Imperfections: Don’t fret over tiny tears or wrinkles. These often blend in beautifully once dry and sealed, adding to the authentic, handmade character of your pumpkin. Small mistakes can often be covered with another carefully placed piece of napkin or a dab of Mod Podge.
Maintain a Clean and Organized Workspace
Mod Podge is wonderfully effective, but it can also be quite sticky! Keeping your work area tidy will make the crafting process more pleasant and cleanup a breeze:
- Protect Your Surface: Always lay down wax paper, old newspapers, a craft mat, or even a plastic tablecloth before you begin. This shields your table from glue drips and makes post-crafting cleanup significantly easier.
- Keep Tools Handy (and Clean): Have a damp cloth or paper towels nearby. This allows you to quickly wipe excess Mod Podge off your hands, brush handles, or the edges of your pumpkin as you work, preventing sticky residue buildup.
- Organize Materials: Keep your Mod Podge jar closed when not actively pouring, and arrange your napkin pieces, scissors, and brushes neatly. An organized space reduces the chances of accidental spills or knocking things over.
- Ventilation: Work in a well-ventilated area, especially if you’re sensitive to odors, as Mod Podge can have a distinct smell.
Prioritize Safety, Especially with Hot Tools
If your design includes attaching real stems or other embellishments with a hot glue gun, safety is paramount:
- Silicone Finger Covers: These inexpensive tools are a crafter’s best friend! Silicone finger covers provide excellent protection for your fingertips from hot glue burns, allowing you to press down glued items safely and firmly.
- Work with Deliberation: There’s no need to rush when using a hot glue gun. Take your time, apply glue precisely, and ensure your fingers are clear of the hot nozzle and freshly applied glue.
- Alternative Protection: If you don’t have silicone covers, a thick pair of gardening gloves, heavy-duty fabric gloves, or even using a craft stick to press items down can offer some protection. Always be cautious.
Embrace Patience: Good Things Take Time
Making decoupage pumpkins is an art form that benefits from a relaxed pace. It’s an opportunity to unwind, not a race to the finish line:
- Adequate Drying Time: Allow each layer of Mod Podge to dry thoroughly before applying the next coat or adding further embellishments. Rushing this step can lead to smudges, bubbles, or an uneven finish. Refer to the Mod Podge instructions for recommended drying times, but generally, 15-20 minutes between thin coats is a good starting point, and several hours for a final cure.
- Step Back and Re-evaluate: If you’re feeling frustrated with a particular section, or if something isn’t looking quite right, step away for a little while. Come back with fresh eyes, and you might find a simple solution or realize it looks better than you initially thought.
- Multi-Day Projects: Don’t feel pressured to finish a pumpkin in one sitting. Breaking the project into stages (e.g., napkin application one day, sealing and embellishments the next) can make it more manageable and enjoyable.
Most Importantly: Have Fun and Unleash Your Creativity!
Remember, the primary goal of any craft project is enjoyment and self-expression. Don’t let perfectionism overshadow the process:
- Embrace the Imperfect: Handmade items inherently possess unique characteristics and slight imperfections. These are not flaws; they are part of the charm and narrative of your creation, making it truly one-of-a-kind.
- Experiment with Techniques: Don’t be afraid to try different cutting methods for your napkins (tearing versus straight cuts), mixing different patterns, or experimenting with various embellishments. Discover what works best for your style and preferences.
- Enjoy the Creative Journey: Savor the process of transforming a plain object into something beautiful and personalized. The satisfaction of creating something with your own hands is immensely rewarding. Put on some music, grab a warm drink, and immerse yourself in the joy of crafting!
By keeping these helpful tips in mind, you’ll find the process of making your decoupage pumpkins smoother, more successful, and incredibly enjoyable. And remember, like any skill, practice makes perfect. The more pumpkins you make, the more confident and adept you’ll become, leading to even more stunning results!
Conclusion: Crafting Autumn Memories, One Pumpkin at a Time
As we wrap up our comprehensive guide to crafting delightful decoupage pumpkins, let’s reflect on what makes this activity so special. It’s truly more than just a simple decorating project; it’s a wonderful opportunity to express your unique creativity, create cherished lasting memories, and infuse your fall decor with a deeply personal touch that store-bought items simply cannot replicate.
These handcrafted pumpkins aren’t merely seasonal ornaments; they become captivating conversation starters and unique pieces of art that beautifully reflect your personal style and the warmth of your home. Whether you’re embarking on this creative journey solo, enjoying a peaceful afternoon of crafting, or sharing laughter and glue sticks with friends and family, the process itself is as profoundly rewarding as the stunning results you achieve.
So, gather your favorite decorative napkins, select your Mod Podge, and allow your imagination to flow freely. Embrace the satisfaction that comes from transforming humble, plain pumpkins into magnificent centerpieces and charming accents that tell your autumn story. As the leaves outside continue their mesmerizing dance and the air grows crisp with the promise of colder days, your handcrafted decoupage pumpkins will undoubtedly bring an abundance of warmth, character, and an undeniable charm to your home, making this autumn season truly special and uniquely yours.
