Unleash Your Creativity: The Ultimate Guide to Painting Terracotta Pots for Lasting Beauty
Painting terracotta pots is an incredibly rewarding and straightforward DIY project that breathes new life into your home and garden. It’s a fantastic way to infuse vibrant colors and express your unique personality into every corner of your living space, whether indoors or out. Terracotta pots, with their natural warmth and earthy texture, serve as perfect canvases for a myriad of designs, transforming them from simple containers into bespoke pieces of art.
This comprehensive guide will walk you through every essential step of the journey, from meticulous preparation and the painting process itself, to the crucial stages of sealing and ongoing maintenance. We’ll delve into various techniques, creative design ideas, and practical tips to ensure your painted pots not only look stunning but also withstand the test of time and the elements. With these simple steps and a dash of creative inspiration, you can effortlessly craft beautiful, durable pots that will enhance your indoor and outdoor décor for many years to come.
Step-by-Step DIY Guide: Preparing and Painting Terracotta Pots
Embarking on a terracotta pot painting project is a delightful way to add a personal touch to your plant collection. Follow these detailed steps to ensure a smooth process and a beautiful, long-lasting finish.
Essential Materials You’ll Need
Having the right tools and materials on hand is the first step to a successful painting project. Here’s a list of what you’ll need and why each item is important:
- Terracotta Pots (various sizes): Choose new or used pots. Ensure they are clean and in good condition. New pots are ideal as they haven’t absorbed any plant nutrients or minerals yet.
- Folk Art All-Purpose Sealer (or any non-toxic, clear sealer for porous surfaces): This is crucial for both new and old pots. It prevents the terracotta from absorbing too much paint and stops moisture from seeping through, which can cause paint to peel later.
- Acrylic Paints (various colors): Acrylic paints are water-based, versatile, quick-drying, and come in a vast array of colors. They adhere well to sealed terracotta and are generally easy to clean up.
- Paint Markers or Thin Paintbrushes: Essential for adding fine details, intricate patterns, lettering, or outlining your designs. A good set of small brushes offers precision and control.
- Foam Brushes (optional, but highly recommended for smoother base coats): These brushes help apply an even, streak-free base coat, especially on the pot’s curved surface. They are also great for stenciling.
- Q-tips and Skewers (for specific designs): Q-tips can be used to create polka dots or textured dabs, while skewers are excellent for delicate lines, small dots, or signature details like flower stems.
- Wax Paper or Cardboard (for drying without sticking): Provides a non-stick surface for your freshly painted pots to dry on, preventing them from adhering to your work surface.
- Spray or Brush-on Acrylic Sealer (for finishing and protection): This final topcoat protects your artwork from UV rays, moisture, and general wear and tear, ensuring its vibrancy and longevity.
Step 1: Clean and Thoroughly Prepare the Pots
Proper preparation is the cornerstone of any successful painting project, especially with porous terracotta. Skipping this step can lead to peeling paint and a shorter lifespan for your beautiful creations.
- Clean the Pot: Begin by meticulously cleaning your terracotta pots. For new pots, a simple wipe-down with a damp paper towel or cloth is usually sufficient to remove any dust, dirt, or manufacturing residue. For used pots, ensure they are empty of soil and plants. Scrub them thoroughly with a stiff brush and warm, soapy water to remove any old soil, mineral deposits, or plant matter. Rinse them completely and allow them to air dry fully in the sun for at least 24-48 hours. Any lingering moisture will prevent the sealer and paint from adhering properly.
- Seal the Pot – The Crucial First Layer: Terracotta is highly porous, meaning it readily absorbs moisture. To prevent this from affecting your paint job, a good quality sealer is indispensable. For pots that will hold plants (especially those intended for outdoor use), apply two generous coats of an all-purpose or masonry sealer. Focus on sealing the entire outside, the inside (especially the bottom half where soil sits), and the rim. This creates a barrier that prevents moisture from seeping through the clay and damaging your paint. Allow each coat of sealer to dry completely according to the manufacturer’s instructions before applying the next. This step is vital for paint adhesion and durability, acting as a primer and protective layer in one.
Step 2: Apply a Smooth Base Coat
A solid base coat provides an even canvas for your designs, making your colors pop and ensuring consistent coverage.
- Use Titanium White or a Light Neutral Paint: While titanium white is a popular choice for its ability to make subsequent colors appear truer and more vibrant, you can also opt for a light neutral color that complements your intended design. Apply 2-3 thin coats for a solid, opaque base. Thin coats are preferable to one thick coat, as they dry more evenly and are less prone to cracking or peeling.
- Let Each Coat Dry Completely: Patience is key here. Ensure each layer of paint is fully dry to the touch before applying the next. This prevents smudging, ensures smooth coverage, and allows the paint to cure properly, leading to a more durable finish. Foam brushes or smooth synthetic brushes are excellent for achieving a professional, streak-free base coat.
Step 3: Dive into Creative Painting Ideas
Now for the fun part – bringing your pots to life with color and design! Here are some inspiring ideas, complete with tips for execution:
1. Charming Lavender Stems and Flowers
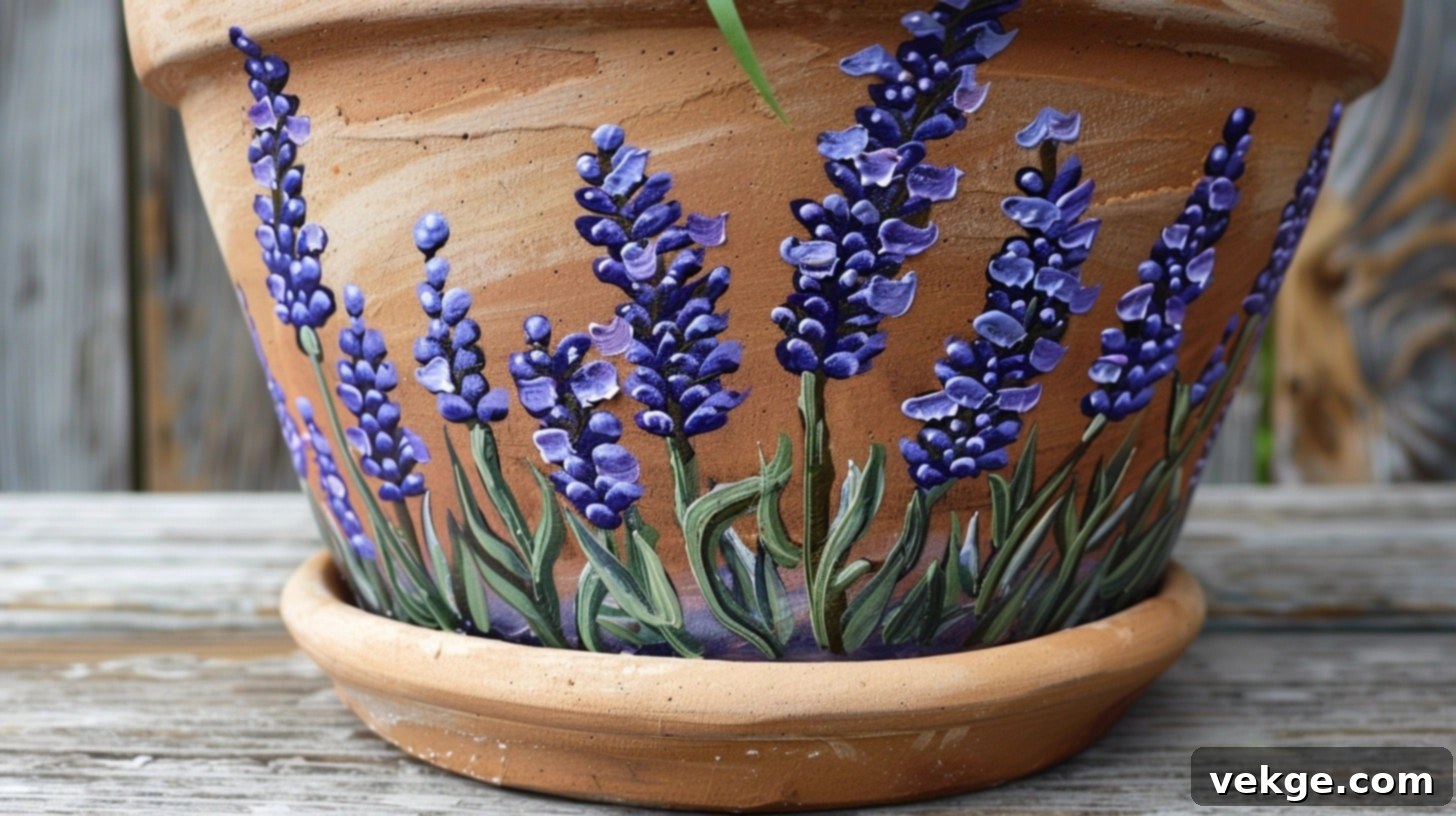
- Paint the Stems: Using a fine-tipped skewer or a thin paintbrush, dip it into a vibrant green acrylic paint. Carefully create slender, delicate stems at various angles around the pot. Vary the height and slight curvature of the stems to add a natural, organic feel. Let them dry completely before adding the flowers.
- Add Lavender Flowers: Once the green stems are dry, dip a clean Q-tip into a beautiful lavender or light purple paint. Gently dab small clusters of “flowers” at the top and along the upper portions of each stem. You can create different densities of clusters to mimic the natural growth of lavender, creating a soft, elegant floral motif.
2. Whimsical Ice Cream Cone Design
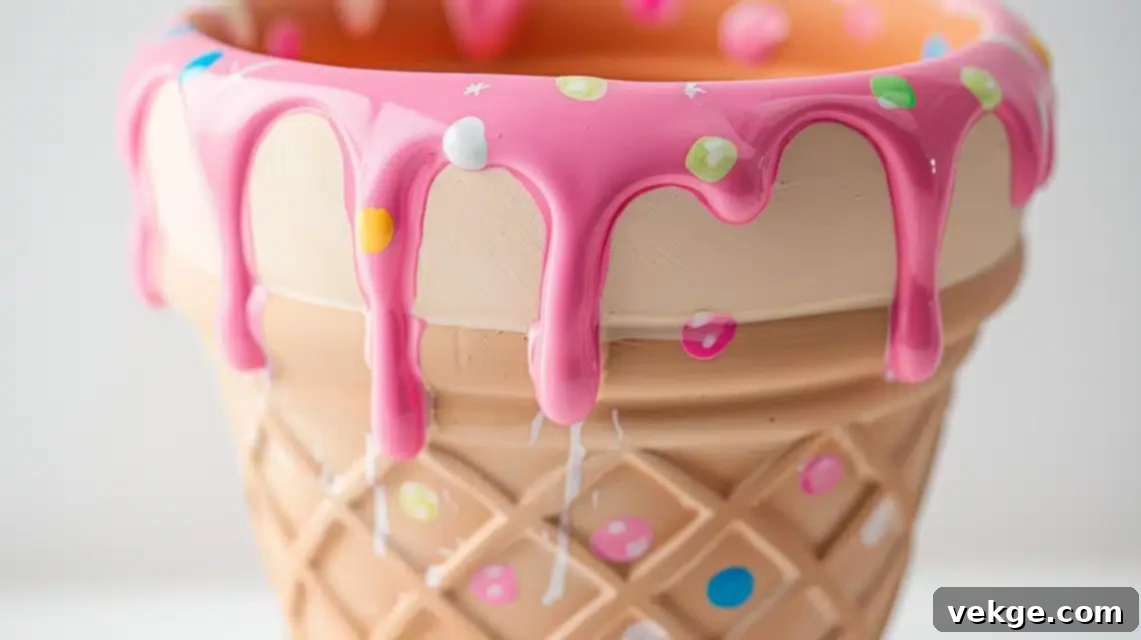
- Create “Drip Marks”: Choose a light pink, chocolate brown, or mint green paint to represent melting ice cream. Starting from the pot’s rim, use a small paintbrush to create playful, irregular “drip marks” that extend downwards. Allow these to dry.
- Paint the Cone Pattern: Once the “drips” are dry, paint the lower half of the pot with a beige or light brown color, mimicking a waffle cone. After this layer dries, use a dark brown paint marker or a very thin brush to carefully add a crisscross waffle pattern over the beige area.
- Add Colorful Sprinkles: Finally, use various colors of paint markers or the fine tips of skewers to add cheerful “sprinkles” onto the pink “ice cream” area. Vary the sizes and colors of the sprinkles for an extra whimsical touch.
3. Adorable Cute Face Design
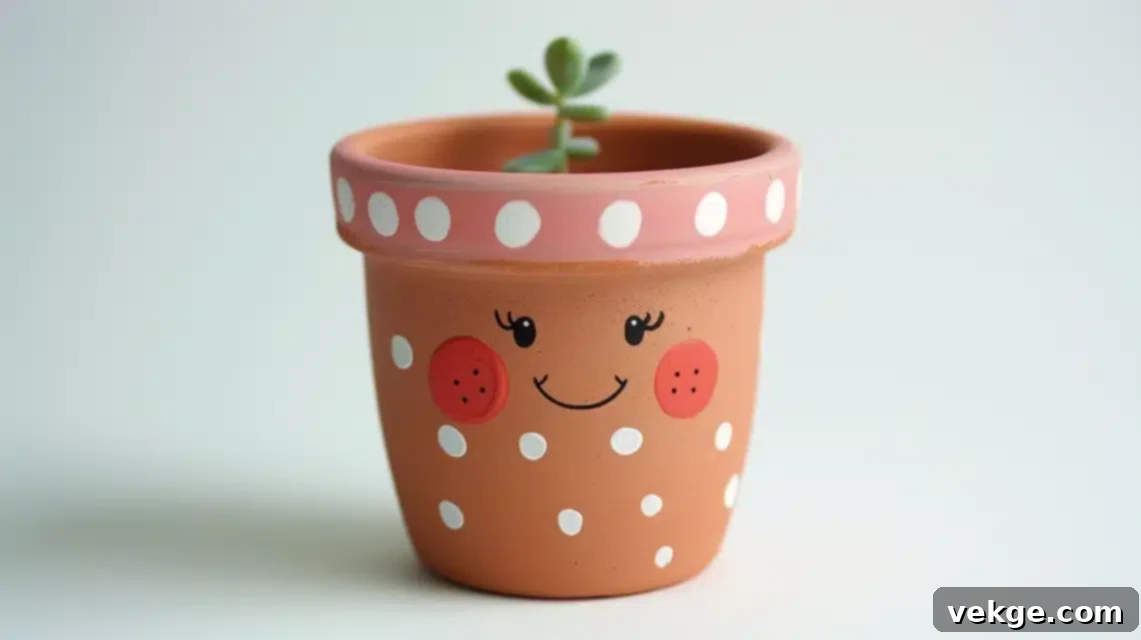
- Sketch with Pencil First: Before applying any paint, use a light pencil to gently sketch simple eyes (dots or closed eyes with lashes), a sweet smile, and two small circles for rosy cheeks onto the pot. This helps in achieving symmetry and getting the proportions right.
- Paint the Features and Details: Go over your pencil sketch using a black paint marker or a very fine brush with black paint to define the eyes and smile. Then, use a small brush and light pink paint to fill in the rosy cheeks. For an added touch of charm, consider painting a cheerful polka-dotted border or a contrasting solid band around the rim of the pot.
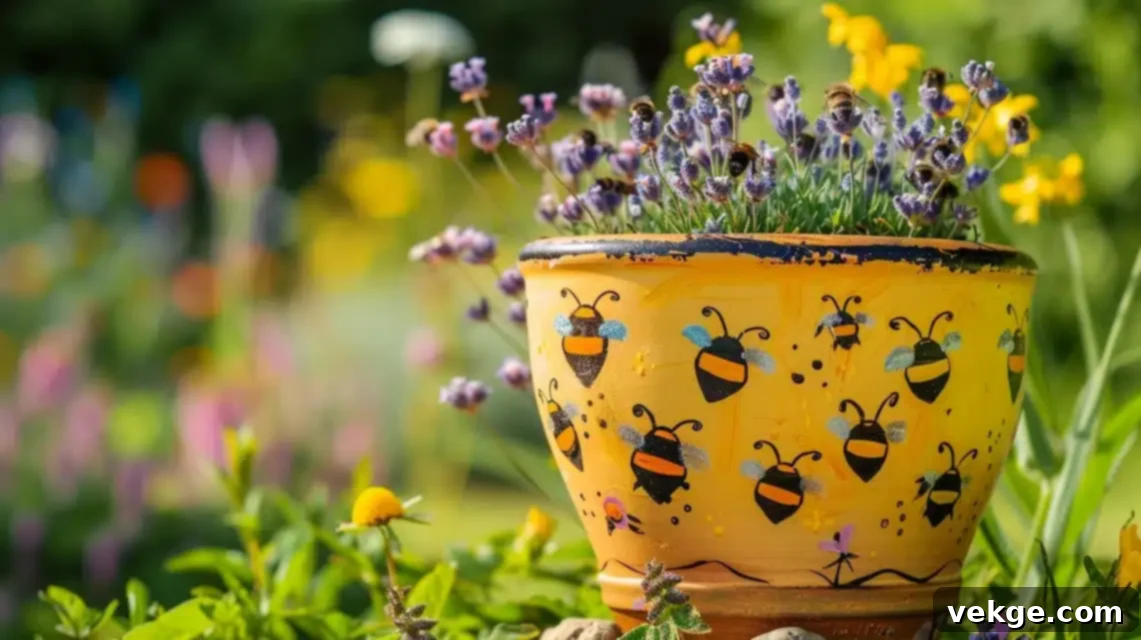
4. Playful Buzzy Bees
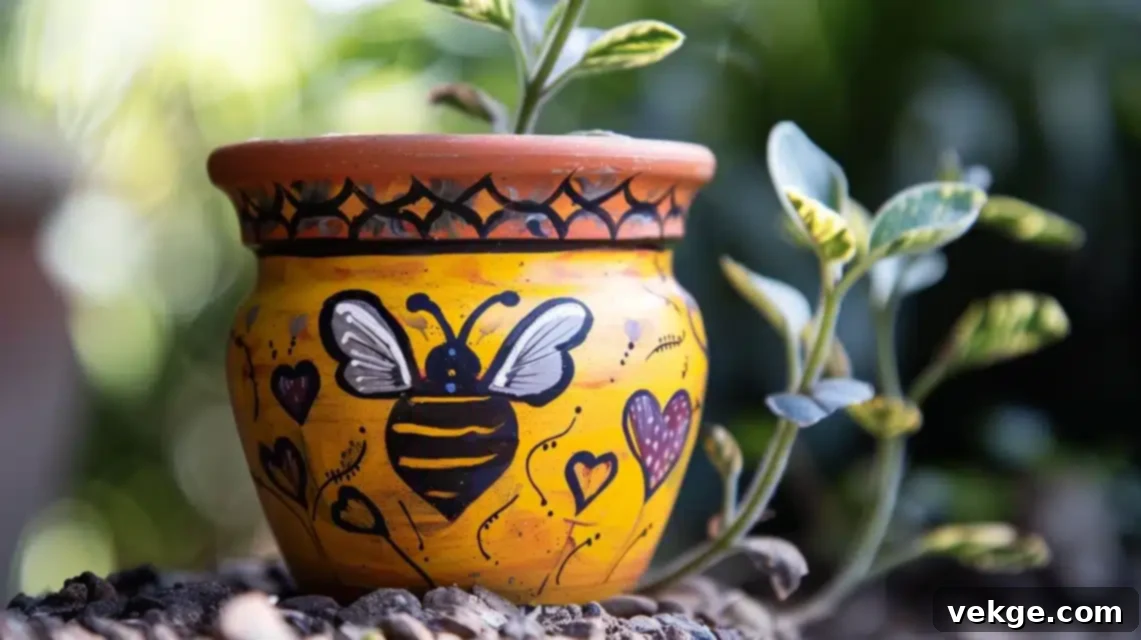
- Create the Bee Shapes: Using yellow acrylic paint, create several oval-shaped bodies around the pot. Once dry, use black paint to add distinctive stripes across each yellow body. For their delicate wings, paint small, translucent heart shapes or simple oval wings with white or light blue paint. You can even add tiny black dots for eyes.
- Add Whimsical Buzzy Lines: To give the impression of movement and a truly whimsical effect, use a thin paintbrush or black paint marker to draw dotted lines or swirling trails around each bee. This adds a dynamic element to your design, making it feel lively and enchanting.
5. Bold Graffiti Hearts
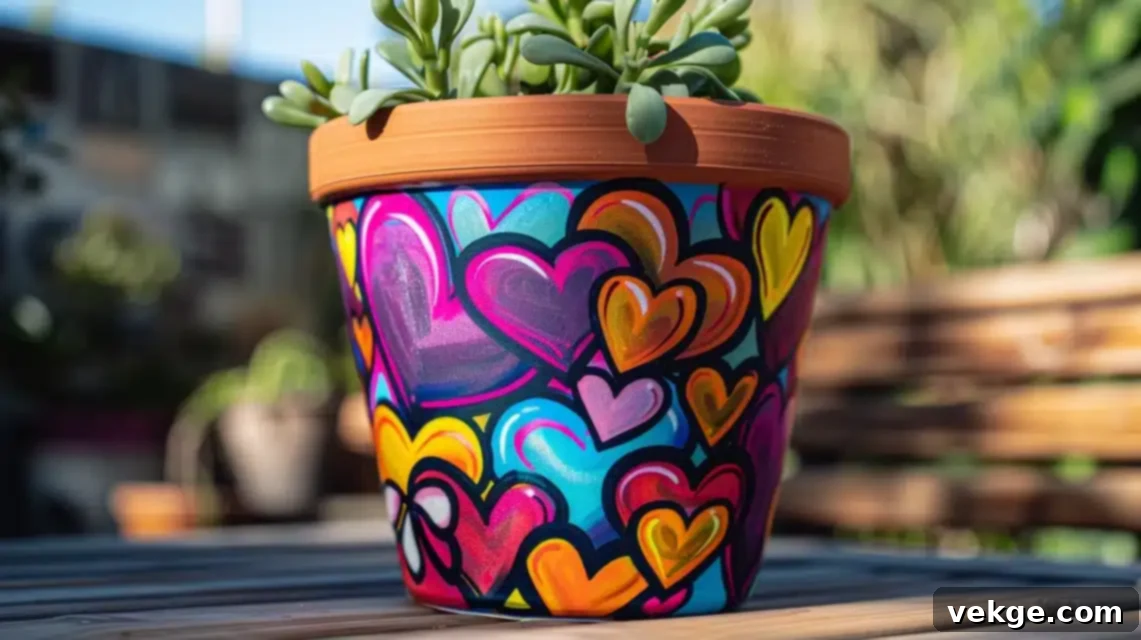
- Layered Hearts with Paint Markers: This design thrives on vibrant colors and an urban, layered look. Using various colors of paint markers (or small brushes), start by drawing larger hearts. Then, overlap them with smaller hearts, outlining some, filling others, and adding different patterns within them. The key is to create a dynamic, overlapping composition that mimics the energetic feel of street art. Experiment with different shades of the same color for depth, or go wild with a rainbow of hues.
6. Elegant Painterly Roses and Leaves
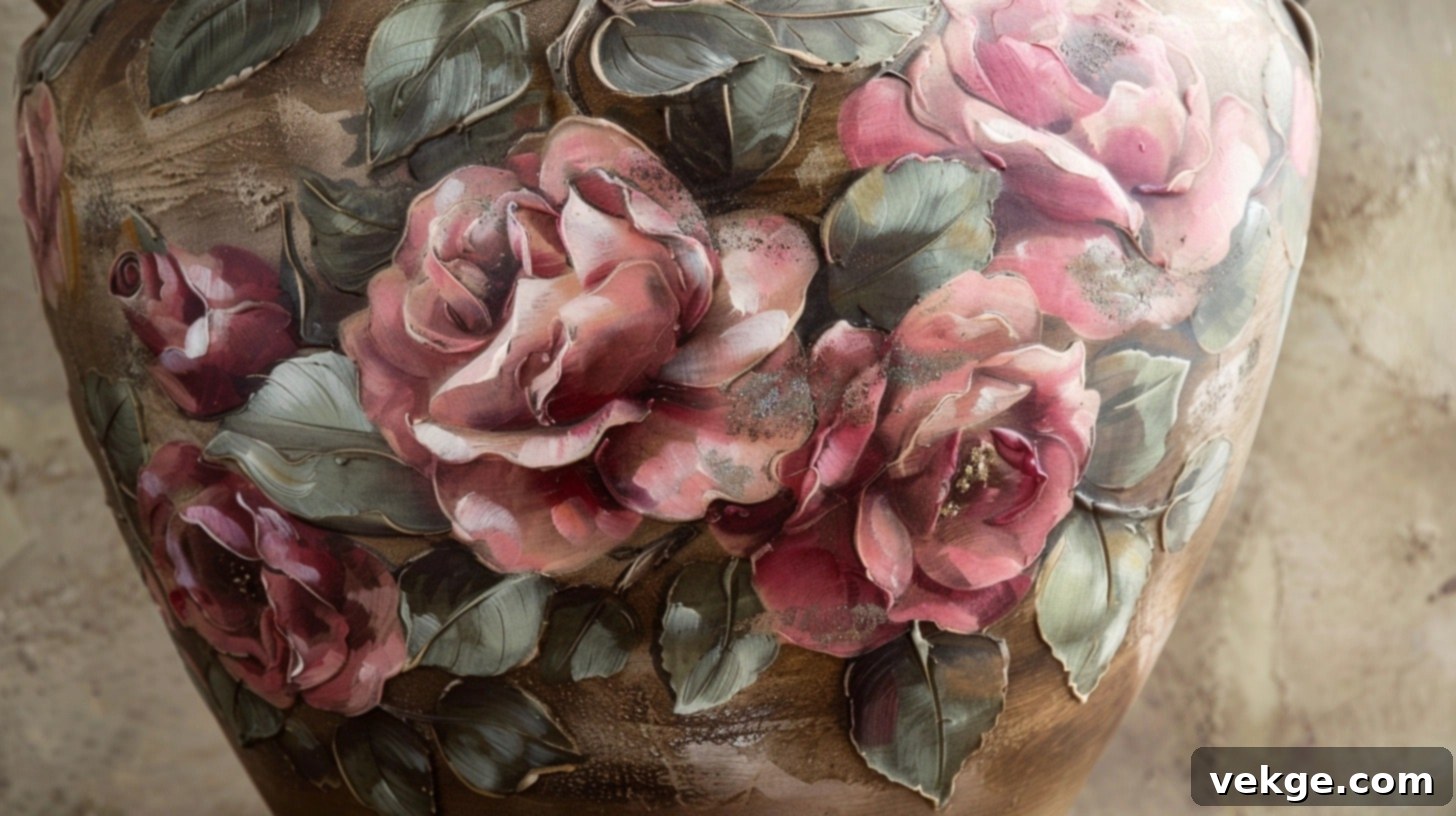
- Crafting the Roses: Choose a primary color for your roses, such as a classic red, a soft pink, or a rich burgundy. Using a small, rounded brush, create a central spiral or a few overlapping C-strokes to form the core of the rose. While the paint is still wet, add touches of white or a lighter shade of your primary color to the petals, blending softly to create depth and dimension, mimicking the delicate folds of a rose.
- Adding Lush Leaves: Once the roses are dry, mix various shades of green paint. Use a flat or pointed brush to add simple leaf shapes around and between the roses. Vary the sizes and angles of the leaves for a more natural and dynamic arrangement. You can add a subtle vein detail with a darker green once the initial leaf color dries.
Step 4: Sealing Your Artwork for Protection
Once your designs are complete and fully dry, the final and most critical step is to seal your artwork. This protects your handiwork from environmental factors and ensures its longevity.
- Choose the Right Sealer: Select an acrylic spray sealer or a brush-on topcoat. Spray sealers offer a smooth, even finish and are excellent for complex designs, while brush-on sealers provide a thicker, more durable layer. You can also choose between matte, satin, or gloss finishes to achieve your desired look.
- Apply Evenly and Thoroughly: Apply two to three thin, even coats of your chosen sealer. For spray sealers, hold the can about 8-12 inches from the pot and use sweeping motions. For brush-on sealers, use a clean, soft brush to apply a smooth layer. Ensure you cover all painted areas. Allow each layer to dry completely according to the product instructions before applying the next. This multi-layer approach builds up a strong protective barrier.
- Ensure Proper Ventilation: Always use spray sealers outdoors or in a very well-ventilated area to avoid inhaling fumes. If using a brush-on sealer, ensure good air circulation.
Advanced Tips for Beautiful Terracotta Pots
- Customize with Colors That Reflect Your Style: Don’t be afraid to experiment! Choose a color palette that perfectly matches your home décor, garden theme, or personal aesthetic. From bold and vibrant to soft and pastel, the options are endless.
- Experiment with a Variety of Tools for Unique Effects: Beyond traditional brushes, explore Q-tips for perfect polka dots, skewers for fine lines, sponges for textured dabs, and even stencils for crisp, repeating patterns. Each tool opens up a new world of design possibilities.
- Layering Colors for Depth: Apply lighter colors first, then gradually add darker shades or details on top to create depth and visual interest in your designs.
- Embrace Imperfections: Handmade items often have charming irregularities. Don’t strive for absolute perfection; let your unique touch shine through!
- Share Your Creation and Enjoy!: Once your masterpiece is complete, display it proudly! Whether housing your favorite plants or serving as decorative accents, your new, colorful terracotta pots will surely bring joy and personality to any space.
Mastering Painting Techniques: A Guide for Terracotta
Beyond the basic steps, understanding different painting techniques can elevate your terracotta pot projects, offering a diverse range of finishes and styles.
1. Basic Brush Painting (Acrylics)
- Achieving Solid, Even Colors: For a professional-looking finish, always apply multiple thin coats of paint rather than one thick, heavy layer. Thick coats tend to dry unevenly, leave brush marks, and are more prone to cracking or peeling over time. Allow each thin layer to dry completely before applying the next to ensure smooth, opaque coverage. Use high-quality synthetic brushes for acrylics, which hold paint well and provide an even stroke.
- Brush Stroke Direction: For an even finish, try to apply paint in one consistent direction, or use cross-hatch strokes for initial coverage, then smooth out with long, even strokes in one direction.
2. Spray Painting for Efficiency and Smoothness
- Safety Precautions are Paramount: When working with spray paint, always prioritize safety. Work exclusively in a well-ventilated area, ideally outdoors on a calm day to prevent overspray from drifting. Wear a suitable respirator mask to avoid inhaling harmful fumes and gloves to protect your skin from chemicals. Protect your surrounding area with drop cloths or cardboard.
- Tips for a Flawless, Smooth Finish: Shake the spray can vigorously for at least a minute before and periodically during use to ensure proper mixing of pigments. Maintain an even distance (typically 8-12 inches) from the pot surface and apply light, even coats with continuous, sweeping motions. Avoid the temptation to overspray in one spot, as this will lead to drips, runs, and an uneven finish. Several thin coats are far superior to one thick coat for durability and appearance. Allow adequate drying time between coats.
3. Acrylic Painting: Blending and Layering
- Blending and Layering Techniques: Acrylic paints are excellent for blending. To create smooth color transitions, use a damp (not wet) brush to mix colors directly on the pot surface while the paint is still wet. For layering, which adds depth and dimension, ensure each coat of paint is completely dry before applying the next. This prevents colors from muddying and allows intricate details to stand out. Experiment with dry brushing or glazing for different effects.
4. Chalk Painting for a Rustic Aesthetic
- Creating Texture and Distressed Effects: Chalk paint is renowned for its matte finish, excellent adhesion, and slightly thicker texture, making it perfect for achieving vintage or rustic looks. To create a distressed effect, first apply a base coat, then a contrasting top coat of chalk paint. Once dry, use fine-grit sandpaper or a damp cloth to gently sand down certain areas (like edges or raised details) to reveal the base color beneath, simulating natural wear. After achieving your desired distressed look, always seal chalk paint with a clear wax finish or a matte sealer for durability and protection against moisture.
5. Diverse Design and Decoration Methods
- Stenciling: For crisp, repeatable patterns, stenciling is ideal. Secure your stencil firmly to the pot with painter’s tape to prevent movement. Apply paint by dabbing gently with a sponge or a dedicated stencil brush, using minimal paint and pressure. This technique significantly reduces the risk of paint bleeding under the stencil. Carefully lift the stencil once the paint is dry enough to prevent smudging.
- Freehand Painting: Unleash your artistic flair with freehand painting. Start with simple shapes, lines, or patterns, using a small, fine-tipped brush for maximum control. Practice your design on paper first to get comfortable with the brush strokes and to refine your ideas. Don’t be afraid to sketch your design lightly with a pencil on the pot before painting.
- Tape Designs: Achieve sharp, geometric patterns by using painter’s tape. Apply the tape to create your desired lines, stripes, or blocks. Paint within the taped areas, ensuring the paint doesn’t seep under the tape. Once the paint is completely dry, carefully and slowly peel off the tape at a 45-degree angle to reveal crisp, clean lines.
- Decoupage: This technique involves gluing paper cutouts onto your pot. Cut out images from magazines, specialized decoupage paper, or even fabric. Brush a layer of Mod Podge (or a similar decoupage medium) onto the pot surface, gently press your image down, and smooth out any air bubbles with your fingers or a soft roller. Once dry, seal with additional layers of Mod Podge for protection and a unified finish.
- Textured Effects: Add tactile interest to your pots by creating textured effects. Mix texture paste, fine sand, or even coffee grounds directly into your paint before applying. Use a palette knife or a stiff brush to apply the mixture, building up layers for extra depth and dimension in your designs. This can mimic stone, stucco, or other natural surfaces.
Troubleshooting Common Issues with Painted Terracotta Pots
Even with careful preparation, you might encounter issues. Knowing how to prevent and resolve them ensures your pots remain beautiful.
1. Paint Peeling or Chipping
- Primary Causes: Paint peeling or chipping is typically a result of poor adhesion. This can be caused by insufficient cleaning and preparation of the pot surface, the terracotta absorbing too much moisture (especially if unsealed), extreme temperature fluctuations, or using low-quality, non-flexible paints.
- Effective Preventative Measures: The most critical step is proper sealing. Always apply a high-quality, non-toxic sealer to the inside and outside of terracotta pots before painting. This barrier prevents moisture from seeping through the porous clay, which is a major cause of paint failure. Use premium, weather-resistant acrylic paints that are designed to adhere well to porous surfaces. For pots holding plants, consider using a plastic liner inside the painted pot to create an additional barrier, further minimizing direct contact between wet soil and the painted surface.
2. Fading Colors
- Causes: Prolonged exposure to direct sunlight, especially UV rays, is the primary culprit behind faded colors on outdoor painted pots. Not all paints are UV-resistant, and even those that are can degrade over time without proper protection.
- Solutions and Prevention: For pots intended for outdoor display, specifically choose UV-resistant acrylic paints and always apply a final clear coat of UV-protective sealer. These sealers contain agents that block or filter harmful UV radiation. Additionally, positioning outdoor pots in shaded or partially shaded areas can significantly reduce their sun exposure and help preserve color vibrancy. Reapplying a UV-protective clear coat annually or every two years, depending on sun intensity, will provide ongoing protection.
3. Moisture-Related Problems (Efflorescence, Mold)
- The Nature of Terracotta: Unsealed terracotta is exceptionally porous. This characteristic allows moisture from the soil to readily seep through the pot walls. As this water evaporates, it leaves behind mineral salts, leading to a white, powdery residue known as efflorescence on the paint surface, or worse, causing mold growth and paint blistering.
- Combatting Moisture: It is absolutely essential to seal pots intended for plants with a waterproof sealer, especially coating the inside thoroughly. This forms a barrier against water absorption. Furthermore, ensuring adequate drainage is crucial. All plant pots should have drainage holes to prevent water buildup at the bottom, which not only harms plant roots but also exacerbates moisture issues that can lead to paint peeling, bubbling, and the aforementioned efflorescence. Consider elevating pots slightly off the ground to improve air circulation and drainage.
Maintenance and Care for Painted Terracotta Pots
Proper care and maintenance will extend the life and beauty of your painted terracotta pots, allowing them to be cherished for years.
1. Indoor vs. Outdoor Use Considerations
- Indoor Care: Pots kept indoors generally require less intensive maintenance as they are protected from harsh weather. Regularly dust your indoor pots with a soft, dry cloth to prevent dust buildup. Avoid placing them in areas of extremely high humidity, which can still affect paint integrity over very long periods. Protect surfaces beneath your pots with saucers to catch any condensation or minor leaks.
- Outdoor Care: Outdoor pots face significantly more challenges. It is paramount to choose UV-resistant paints and sealants specifically designed for outdoor use to prevent fading and protect against rain, frost, and sun damage. Whenever possible, position your outdoor pots in shaded or partially covered areas to shield them from the most intense sun and extreme weather conditions. During winter in colder climates, it’s advisable to bring outdoor pots indoors or store them in a protected area (like a shed or garage) to prevent cracking due to freezing and thawing cycles. Reapply a good quality exterior sealant every 1-2 years, or as needed, to maintain their protective barrier and keep them looking fresh.
2. Gentle Cleaning of Painted Pots
- Cleaning Method: To clean painted pots, always use a soft cloth or sponge dampened with mild soap and lukewarm water. Gently wipe the surface to remove dirt, dust, or minor stains.
- What to Avoid: Steer clear of abrasive scrubbers, harsh chemical cleaners, or strong detergents, as these can easily scratch, dull, or even strip away the paint and protective sealant. After cleaning, rinse the pot gently with clean water and allow it to air dry completely before returning it to its spot.
3. Importance of Re-Sealing
- Wear and Tear: Over time, the protective sealant layer, especially on outdoor pots, will naturally wear down due to exposure to elements, abrasion, and regular cleaning. This compromises the paint’s protection.
- Annual Inspection and Reapplication: Make it a habit to inspect your painted pots annually for any signs of wear on the sealant (e.g., dullness, minor cracks, or increased water absorption). For outdoor pots, reapply a clear acrylic sealer every 1-2 years, or more frequently if they are in very exposed locations. Before applying a new layer of sealant, ensure the pot surface is clean and thoroughly dry. Apply thin, even coats, allowing each layer to dry completely for the best possible protection and a renewed finish.
Summing Up Your Terracotta Pot Painting Adventure
Painting terracotta pots is a truly enjoyable and creative endeavor that allows you to infuse your personal style into your gardening and home décor. The key to creating durable and vibrant painted terracotta pots lies in meticulous preparation, selecting the right materials, and applying proper sealing techniques both before and after painting. This comprehensive approach prevents common issues like paint peeling, fading, and moisture damage, ensuring your artwork stands the test of time.
To specifically waterproof your painted terracotta pots, remember to apply a high-quality waterproof sealer not only before you begin painting but also as a final protective coat once your artwork is complete. Crucially, cover both the inside and outside surfaces of the pot. This creates a robust barrier that prevents moisture from the soil or rain from seeping into the porous clay, which is essential for preserving the paint’s integrity and vibrancy.
Whether you’re decorating for a cozy indoor space or a lively outdoor garden, the tips and techniques outlined in this guide will empower you to create and maintain colorful, personalized pots for any setting. Embrace the process, experiment with different designs, and most importantly, don’t forget to add your unique creative touch to every pot. Enjoy the lasting beauty and satisfaction of your handcrafted terracotta masterpieces!
Frequently Asked Questions About Painting Terracotta Pots
How Long Does Paint Last on Terracotta Pots?
The longevity of paint on terracotta pots largely depends on proper preparation, the quality of materials used, and whether the pot is used indoors or outdoors. With correct sealing both before and after painting, and protection from harsh outdoor elements, painted terracotta pots can easily last for several years, often 3-5 years or more. Indoor pots typically maintain their appearance significantly longer than outdoor ones, as they are not subjected to the same wear from weather and UV exposure.
Do Painted Terracotta Pots Need Drainage Holes?
Absolutely, yes. Drainage holes are fundamentally essential for any pot that will house live plants. They prevent water buildup in the bottom of the pot, which is crucial for preventing root rot and ensuring the health of your plants. From the perspective of your painted pot, proper drainage also helps prevent moisture from constantly saturating the terracotta, which is a leading cause of paint peeling, bubbling, and the development of unsightly efflorescence (white mineral deposits) on the exterior. Always ensure your pots have adequate drainage, even if it means drilling a new hole if one isn’t present.
Can I Use Any Type of Paint on Terracotta Pots?
While you can technically apply various types of paint, acrylic paints are highly recommended for terracotta pots due to their versatility, durability, and ease of use. They are water-based, quick-drying, and adhere well to sealed terracotta. Other options like chalk paint are great for a matte, distressed look, but they require a wax or sealant topcoat. Oil-based paints can be used but take longer to dry and require special clean-up. Latex house paint is also an option, particularly for base coats. The key, regardless of paint type, is always proper preparation and a good quality sealer to ensure adhesion and longevity.
