The Ultimate Guide to ADA Compliant Bathroom Layouts: Designing Accessible & Inclusive Spaces
Designing a bathroom that truly accommodates everyone can feel like a complex endeavor. Many individuals and businesses find themselves wondering where to start when aiming to create a space that is not only safe and welcoming but also fully compliant with critical accessibility standards. Understanding the Americans with Disabilities Act (ADA) guidelines is the most intelligent and essential first step in achieving this goal.
This comprehensive guide will walk you through every critical aspect of ADA bathroom layout, from precise door widths and appropriate sink heights to the strategic placement of grab bars and the necessity of clear floor space. We’ll dive deep into practical advice, highlight common pitfalls to avoid, and empower you to make informed decisions that significantly enhance comfort and usability for all users.
By the time you finish reading, you will possess the knowledge to design a bathroom space that not only meets legal ADA compliance but truly embodies the spirit of universal design and inclusivity. Let’s explore the ADA bathroom layout tips that genuinely make a difference in fostering accessible environments.
Why ADA Bathroom Requirements Are Crucial for Universal Design
ADA bathroom requirements are more than just a set of legal mandates; they are fundamental principles for ensuring that everyone, regardless of their physical abilities, can access and use restrooms safely, comfortably, and with dignity. These regulations play a vital role in protecting individuals who rely on wheelchairs, walkers, crutches, or have other mobility challenges, ensuring they are not discriminated against in public and private spaces.
For businesses, adherence to ADA guidelines extends beyond legal obligation. It translates into avoiding potentially costly lawsuits and, more importantly, cultivating an inviting and welcoming environment for all customers and visitors. A properly designed accessible bathroom benefits not only those with permanent disabilities but also a wider demographic, including elderly individuals, parents navigating with strollers, and people recovering from temporary injuries. By making your facilities accessible, you are actively embracing a larger segment of the population, enhancing their experience, and building customer loyalty.
Ultimately, ADA compliance is a powerful statement about a business’s commitment to social responsibility and respect for human diversity. When you invest in accessible bathroom design, you are actively contributing to a more inclusive community where everyone feels valued and respected. Furthermore, such proactive measures can positively impact your property value and broaden your potential customer base, signaling to the market that your establishment is thoughtfully designed for universal access.
Key ADA Bathroom Layout Guidelines for Optimal Accessibility

Achieving true bathroom accessibility necessitates strict adherence to specific dimensional and functional rules for doorways, toilets, sinks, and showers. These guidelines are meticulously crafted to facilitate safe and comfortable navigation and use for individuals utilizing wheelchairs and other mobility aids.
1. Doorways and Entryways: Ensuring Seamless Access
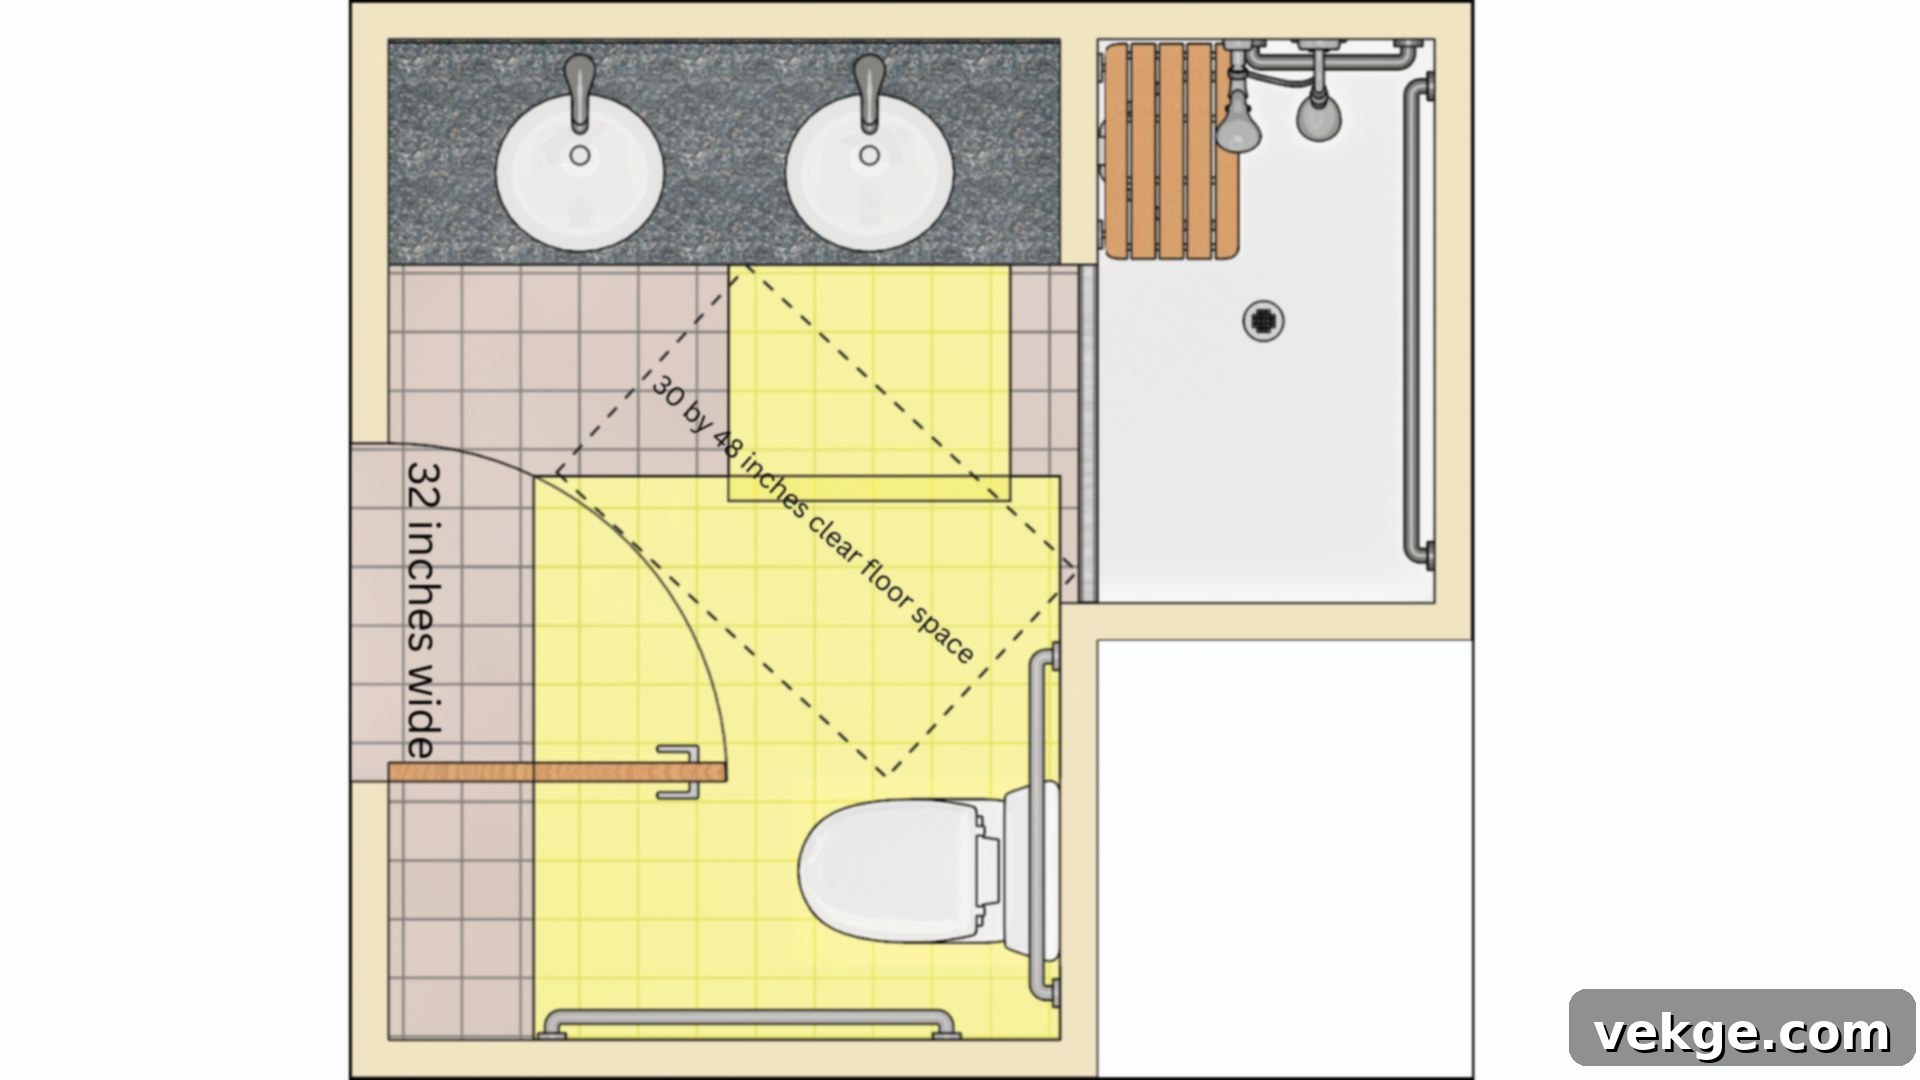
The entryway to an ADA-compliant restroom must be wide enough and effortlessly operable for all users. Adequate clear space around the door is paramount for easy ingress and egress. Specifically, the doorway must provide a minimum clear opening of 32 inches when the door is fully open. This specific width is crucial, allowing standard wheelchairs and mobility devices to pass through comfortably without obstruction.
Furthermore, an essential aspect is the provision of clear floor space: you must ensure a minimum of 30 by 48 inches of unobstructed maneuvering room on both sides of the door. Door hardware, such as handles and pulls, must be designed for single-hand operation, requiring no twisting, pinching, or tight grasping. The maximum force required to open interior doors should not exceed 5 pounds, ensuring ease of use for individuals with limited strength or dexterity.
2. Toilet and Toilet Area Specifications
Toilets within an accessible bathroom must be positioned and designed for easy approach and use by everyone, including those in wheelchairs or using walkers. Ample clear space around the toilet is vital for turning, maneuvering, and safe transfers from a mobility device to the toilet seat. Accessible toilets should have a seat height ranging from 17 to 19 inches from the floor to the top of the seat. This height facilitates easier transfers for wheelchair users.
For toilet stalls, specific dimensions are critical: they should be at least 60 inches wide and 56 inches deep (for wall-mounted toilets) or 59 inches deep (for floor-mounted toilets) to provide sufficient space for wheelchair turning radii and side transfers. These dimensions ensure that an individual in a wheelchair can comfortably position themselves and execute a transfer without feeling confined or encountering obstacles.
3. Sinks and Vanities: Reach and Clearance
An accessible sink is designed to allow a person in a wheelchair to roll underneath comfortably, bringing them close enough to the basin and faucet controls. Both the faucet controls and the mirror must be given careful consideration for optimal accessibility. The top rim of the sink or the counter surface should be no higher than 34 inches above the finished floor, preventing overreaching.
Crucially, there must be a minimum of 27 inches of clear knee clearance underneath the sink, extending at least 8 inches back from the front edge. This space is essential for wheelchairs to fit underneath, allowing users to approach the sink directly. A clear floor space of 30 inches wide by 48 inches deep is also required directly in front of the sink, providing sufficient maneuvering room. Faucets should ideally be lever-operated, push-type, touch-type, or automatic (sensor-controlled) to be easily operated by individuals with limited hand strength or dexterity.
4. Shower and Bathtub Areas: Safety and Maneuverability
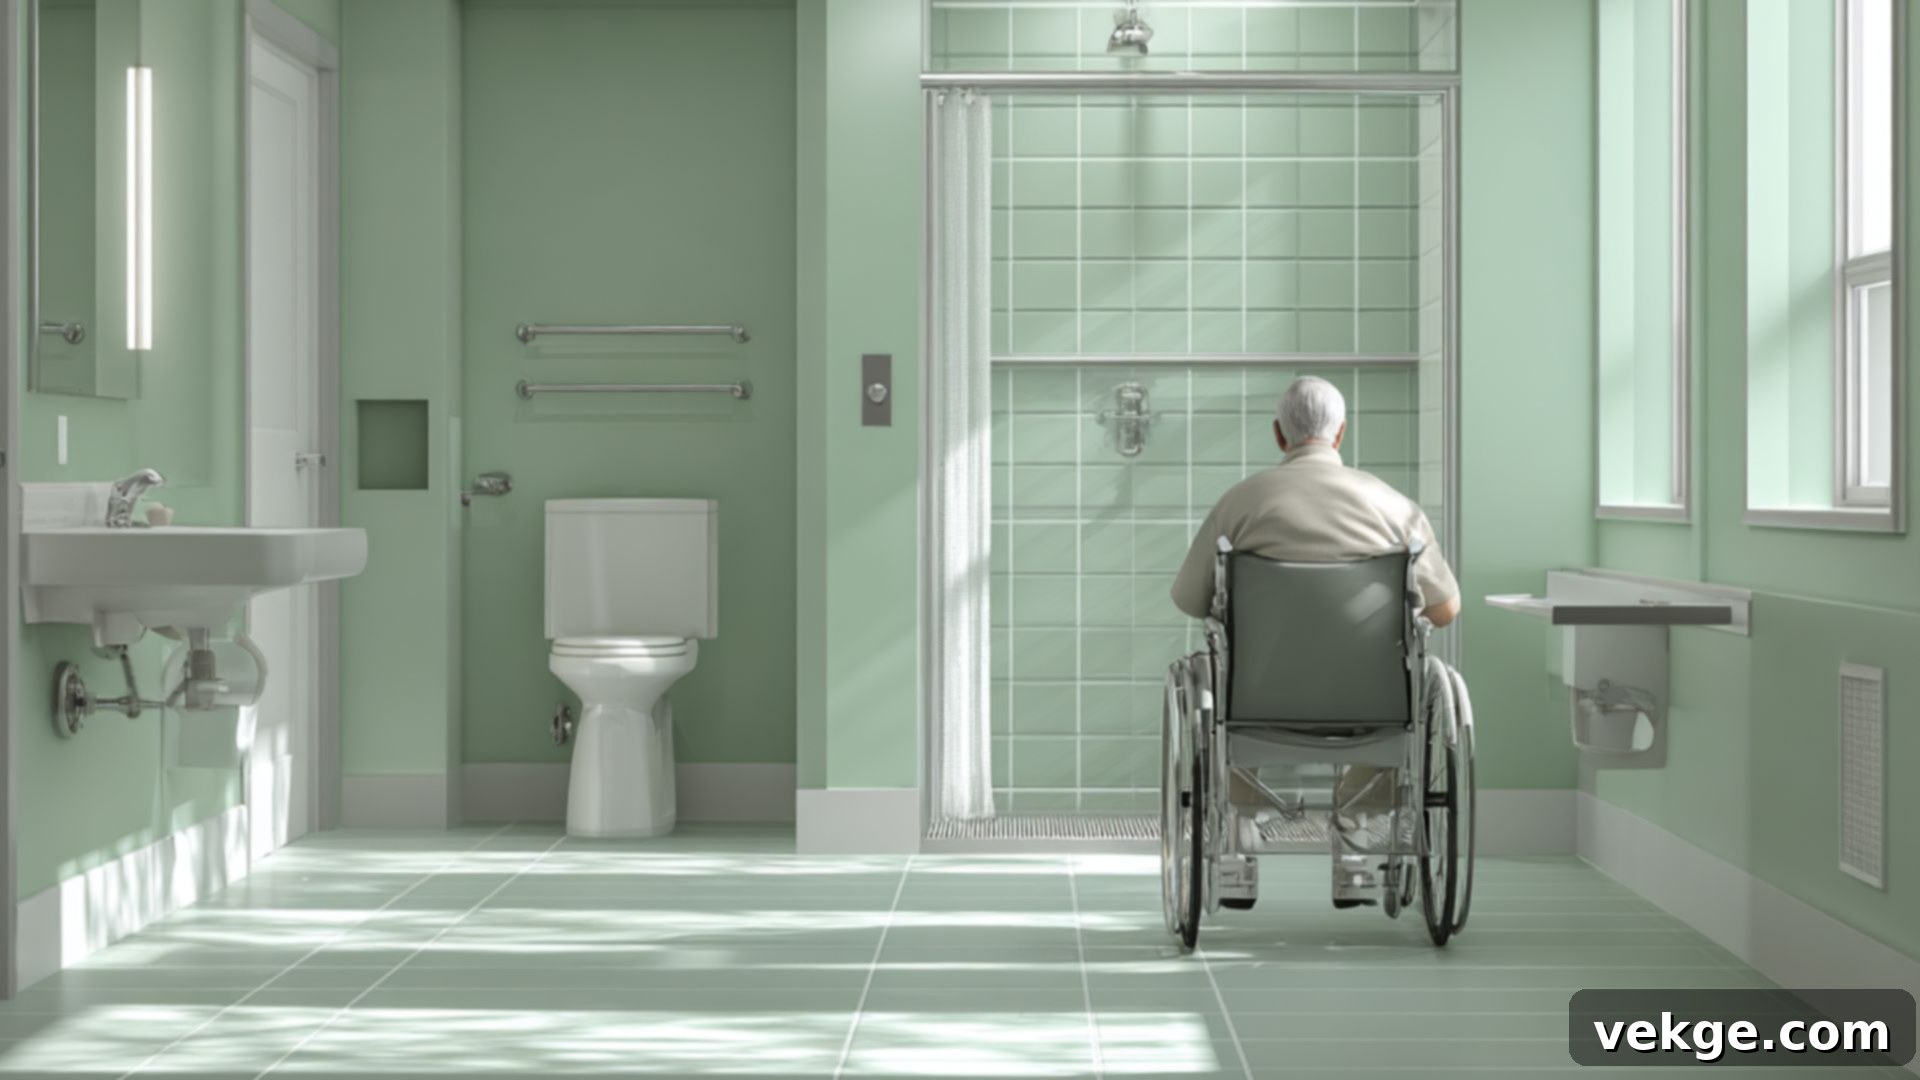
Accessible showers and bathtubs must prioritize spaciousness, ease of entry, and simple-to-reach controls to ensure a safe and comfortable bathing experience. For a roll-in shower, which allows direct wheelchair access, the minimum internal dimensions should be at least 30 by 60 inches. This space is vital for a wheelchair to navigate and position correctly within the shower area.
Grab bars are indispensable safety features and must be securely installed on the walls within the shower or tub area to provide stable support during transfers and showering. If a shower seat is provided, it should be mounted at a height of 17 to 19 inches from the floor, consistent with toilet seat heights, for effortless transfers. All shower controls and the handheld spray unit should be mounted no higher than 48 inches from the floor, making them easily reachable from a seated position.
Additional Features for Enhanced Bathroom Accessibility

Beyond the core fixtures, several additional details contribute significantly to making bathrooms safer, more intuitive, and easier for everyone to use. This includes the strategic placement and specifications for grab bars, mirrors, dispensers, and informative signage.
1. Grab Bars and Support Structures: Essential for Stability
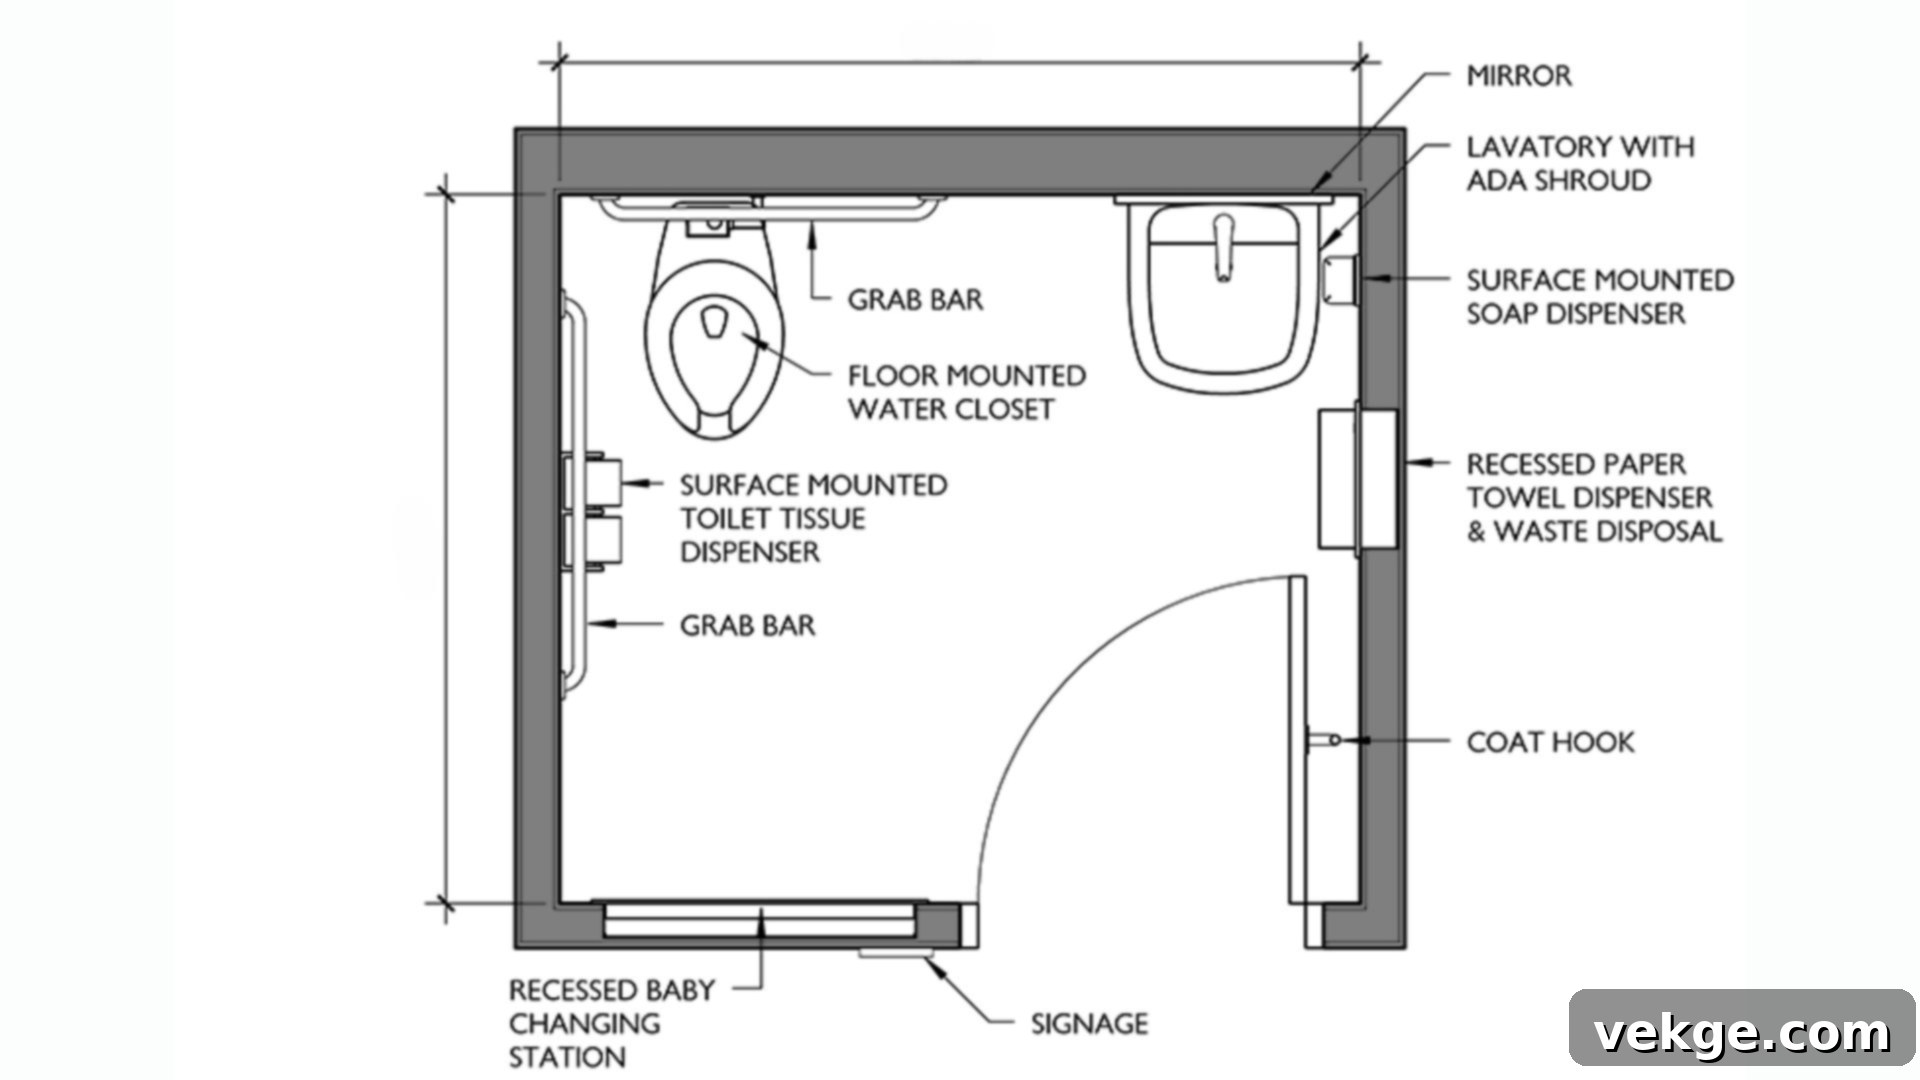
ADA-compliant bathrooms require robust and strategically positioned grab bars that offer critical safety and support. These bars, whether side-mounted, rear-mounted, or fold-down, are fundamental for helping users maintain balance, assist with transfers, and prevent falls. For toilets, grab bars must be mounted horizontally between 33 to 36 inches above the finished floor. A 42-inch grab bar is required on the side wall adjacent to the toilet, extending 54 inches from the rear wall, and a 36-inch grab bar is needed on the rear wall, centered with the toilet.
Each grab bar must be capable of supporting a minimum of 250 pounds of force and have a diameter between 1.25 to 1.5 inches to ensure a secure and comfortable grip. Crucially, adequate clear space must be maintained all around the grab bars, preventing them from being obstructed by other items and ensuring they are always easy to grasp quickly and effectively.
2. Mirrors and Dispensers: Within Easy Reach
Mirrors in accessible bathrooms must be positioned low enough for individuals using wheelchairs to see themselves comfortably and clearly. The bottom reflective edge of any mirror should be no higher than 40 inches above the finished floor. This ensures that a person seated in a wheelchair has a proper line of sight, promoting independence and ease of use.
Similarly, all soap dispensers, paper towel dispensers, and hand dryers must be installed within a comfortable reach range, typically between 15 and 48 inches above the finished floor. Toilet paper dispensers have specific placement requirements: they should be located 7 to 9 inches in front of the toilet bowl and between 15 and 48 inches off the ground. These precise measurements prevent awkward reaching and potential strain for users with varying mobility levels.
3. Accessible Signage: Clear and Informative Navigation
Every accessible bathroom must prominently feature the International Symbol of Accessibility on or adjacent to the door. Beyond this symbol, all permanent room identification signs should be clear, concise, and easy to read for everyone. To cater to individuals who are blind or have low vision, signs must incorporate raised characters (tactile letters) and Braille.
Signage should be mounted on the wall adjacent to the latch side of the door, with the baseline of the lowest character 48 inches from the floor and the baseline of the highest character no more than 60 inches from the floor. These specific rules for sign design and placement are vital in helping all users, regardless of their visual abilities, easily locate and confidently navigate the restroom without confusion or difficulty, contributing to an inclusive environment.
ADA Compliant Bathroom Layouts for Diverse Facilities

Applying ADA guidelines correctly means understanding how they adapt to various contexts, from private residences to bustling public spaces. These regulations are paramount for ensuring people with disabilities can use facilities safely and independently, making them critical for both home remodels and new commercial constructions.
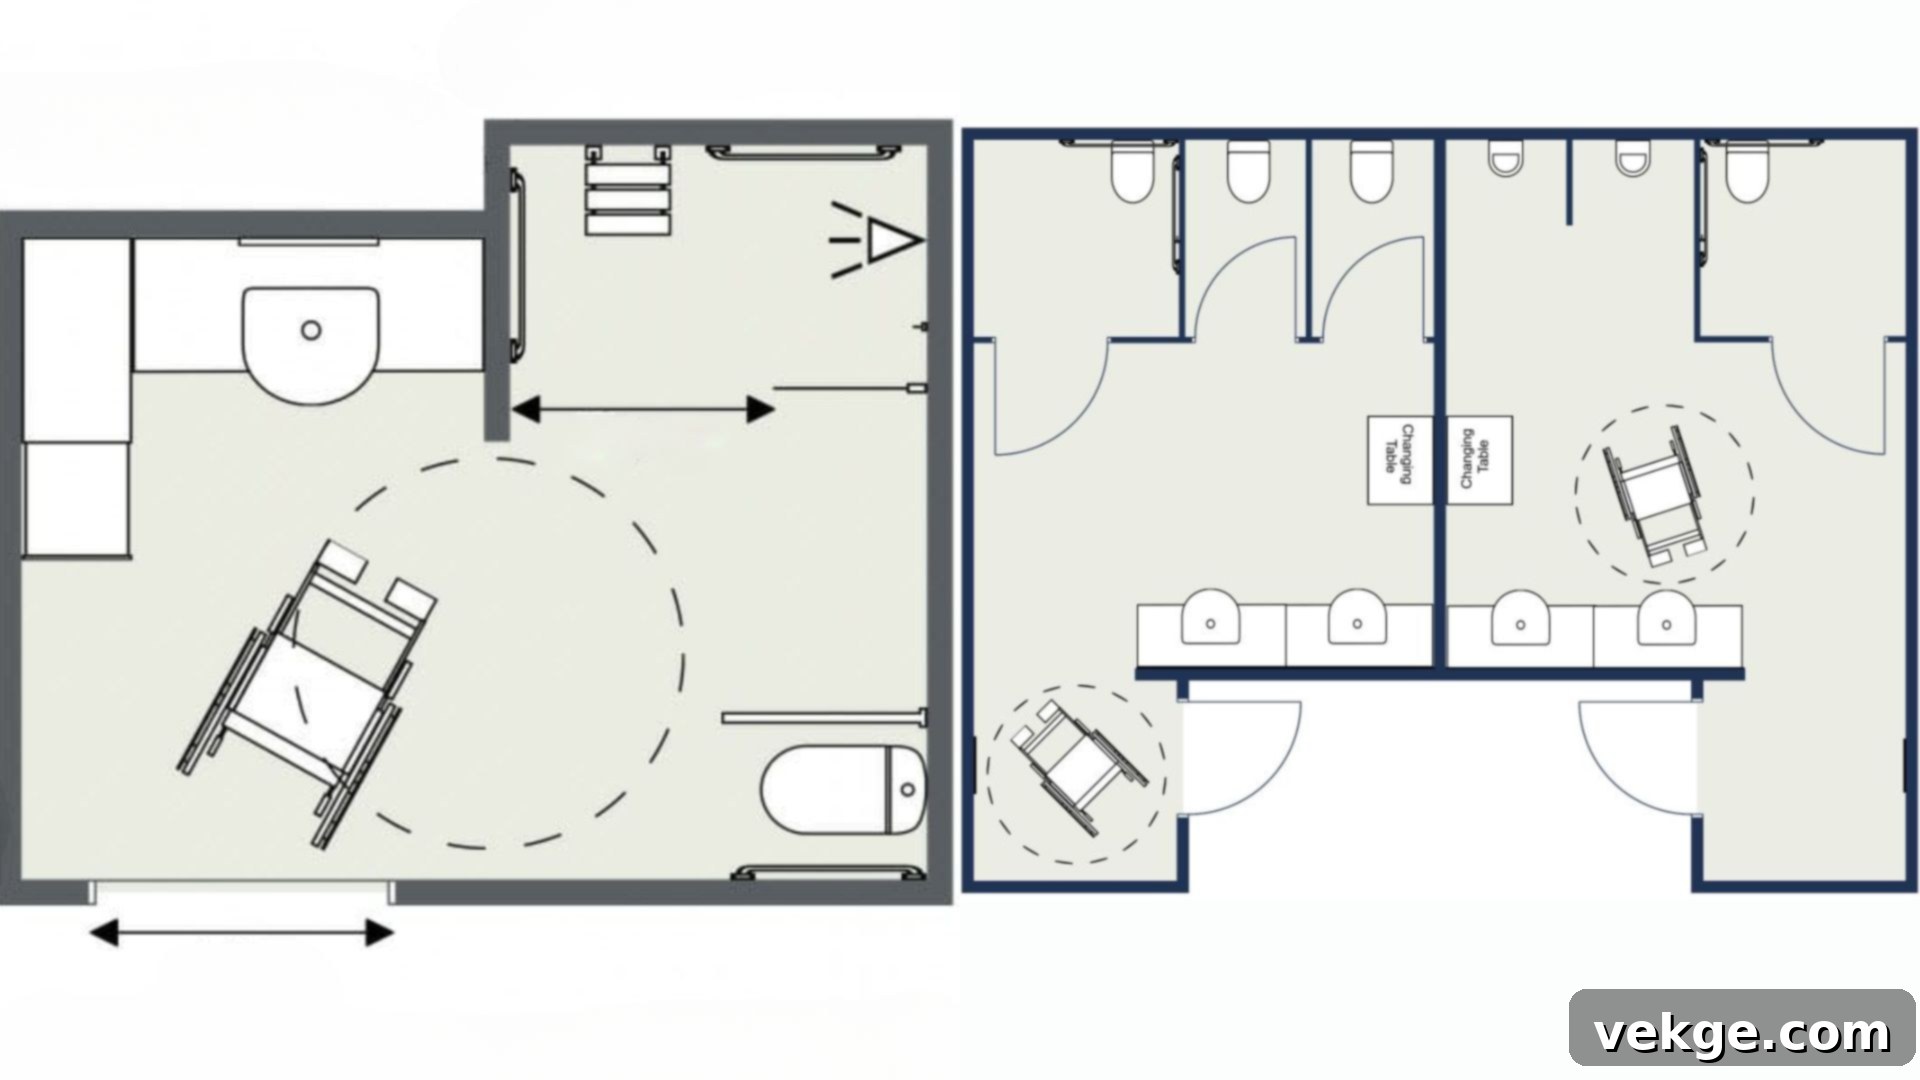
In any accessible bathroom, doorways must maintain a minimum clear opening of 32 inches for easy wheelchair passage. The overall bathroom layout should provide a minimum 60-inch clear turning space, allowing a wheelchair to make a 180-degree turn unimpeded. Strategically placed grab bars near toilets and showers are not just recommendations but essential safety features, offering crucial support during transfers and movement within the space. Sinks must not exceed 34 inches in height, with a minimum of 27 inches of knee space underneath to comfortably accommodate wheelchair users.
For public bathrooms, specific requirements apply to ensure broad accessibility. These facilities must include at least one large accessible stall, typically measuring 60 inches wide and 56-59 inches deep, depending on the toilet type. These stalls are mandatory to include both side and rear grab bars for optimal support. Furthermore, all accessories, including mirrors, soap dispensers, paper towel dispensers, and other fixtures, must be installed at heights and locations that are universally reachable and operable. These fundamental yet simple changes collectively transform bathrooms into universally functional spaces, benefiting a diverse user base.
ADA Bathroom Layout Considerations for Special Cases
Certain situations demand specialized features and adaptations within ADA-compliant bathrooms to cater to specific user groups or unique circumstances. Restrooms designed for families, children, or portable use each have distinct requirements to ensure maximum accessibility and safety.
- Unisex or Single-Use Bathrooms: These facilities, often found in smaller establishments or as family restrooms, must include privacy latches and a single accessible toilet and sink. Crucially, they require sufficient clear floor space, specifically a 60-inch turning radius, to allow wheelchairs to maneuver safely and easily within the confined area.
- Children’s Bathrooms: When designing bathrooms primarily for children, the fixtures’ heights must be adjusted accordingly. Sinks and toilets should be set at lower heights that children can reach and use easily and safely. While specific ADA guidelines for children’s dimensions exist, the core principle is to scale down standard accessible features to suit younger users, ensuring independent access.
- Portable Bathrooms: At public events, construction sites, or temporary venues, accessibility remains a priority. A minimum of 5% of all portable bathrooms provided must be ADA-accessible. These units must be clearly identified with accessible signage and provide ample space for wheelchair access, including a level entry and sufficient interior maneuvering room.
These specialized adaptations ensure that people of all ages and abilities can access and use bathrooms safely and comfortably, irrespective of the facility type or context. Thoughtful design makes everyone feel welcome and respected in any restroom environment.
ADA Bathroom Layout in Renovations and Alterations: Adapting Existing Spaces
When embarking on a renovation or alteration project for an existing bathroom, ADA regulations mandate that any element being changed or newly installed must fully meet current accessibility standards. This principle ensures that any upgrades contribute to, rather than detract from, the overall accessibility of the space. Furthermore, if you are performing significant work in areas frequently used by the public, such as a main lobby leading to a restroom, you are also often required to make the path of travel to that restroom accessible.
There are rare instances where full ADA compliance might not be “technically feasible” – for example, if the building’s structural integrity would be compromised by making required changes, such as removing main support beams. In such cases, while full compliance may be impossible, the law still requires that the bathroom be made as accessible as possible within the existing structural limitations. This often involves implementing “readily achievable” modifications that do not require extensive or costly structural changes.
Common readily achievable fixes during renovations include widening doorways to the minimum 32 inches, installing ADA-compliant grab bars, lowering sinks to the appropriate height, and replacing non-compliant fixtures with accessible alternatives. Reconfiguring internal partitions can also create more necessary clear floor space for wheelchair maneuvering. Always begin any renovation project with thorough measurements and meticulous planning to anticipate potential challenges and avoid costly surprises during construction. The key is to prioritize what can be done within your building’s specific constraints while strictly adhering to safety and accessibility rules.
Common Design Mistakes to Avoid in ADA Compliant Bathrooms
Ensuring an ADA-compliant bathroom is about more than just checking off a list of items; it’s about creating a truly functional and welcoming space. Many designers and contractors inadvertently make simple mistakes that can be easily avoided with proper planning and attention to detail. Recognizing these pitfalls upfront saves time, money, and ensures genuine accessibility.
- Forgetting About Wheelchair Turning Space: One of the most critical errors is failing to provide adequate clear floor space for a wheelchair to make a full 180-degree turn. A minimum 60-inch diameter clear turning circle is essential within the bathroom to allow individuals using wheelchairs to navigate effectively without constantly hitting walls or fixtures. Without this, the bathroom, though seemingly compliant, becomes highly impractical.
- Incorrect Placement of Grab Bars: While installing grab bars is a basic requirement, their precise height, length, and exact locations (side wall, rear wall for toilets; within showers) are often miscalculated. Grab bars must be positioned according to specific building codes, not just for general support, but for assisting in specific transfers and movements. Incorrect placement renders them ineffective or even hazardous.
- Making Doorways Too Narrow: Despite the clear 32-inch clear opening rule, doorways are still frequently constructed too narrow. This can happen due to door stop placements, or by not accounting for the swing radius, making it impossible for wheelchairs or other mobility devices to pass through easily. Always measure the *clear opening* when the door is fully open.
- Installing Sinks and Mirrors Too High: Sinks without sufficient knee clearance or set too high, and mirrors with their bottom edge above 40 inches, are common errors. These mistakes prevent people in wheelchairs from comfortably accessing the sink or seeing their reflection, thereby undermining independence. Ensure proper knee clearance and appropriate mirror height for seated users.
- Choosing Inaccessible Faucet or Door Hardware: Selecting controls that require twisting, pinching, or tight grasping (like traditional knob faucets or round door handles) is a common oversight. Faucets should be lever-operated, push-type, or automatic, and door hardware should be lever-style or similar for easy one-hand operation without fine motor skills.
Paying careful attention to these details can significantly enhance the functionality and usability of any bathroom. Proactive checking and re-checking of these specifications early in the design and construction process will prevent costly rework and ensure a genuinely accessible end product.
Summing It Up: The Impact of Thoughtful ADA Bathroom Layout
Following ADA bathroom layout guidelines is not merely a suggestion or an optional addition to your design; it is an absolutely essential practice for creating truly inclusive, functional, and respectful spaces. By consciously incorporating these standards into your bathroom projects, whether residential or commercial, you achieve multiple critical objectives simultaneously.
Firstly, you effectively safeguard your business from potential lawsuits and legal complications, ensuring operational security. More importantly, you extend a genuine welcome to a broader customer base and visitor demographic who might otherwise face significant barriers in accessing your services or enjoying your facilities. Every individual deserves the ability to use a bathroom with confidence, ease, and comfort, irrespective of their physical abilities.
Beyond compliance, making smart choices in ADA bathroom layout can substantially boost your property’s value and significantly expand your customer base. These thoughtful changes also provide invaluable assistance and comfort to elderly visitors, parents navigating with strollers, and anyone dealing with temporary injuries. You’re not just adhering to legal requirements; you are actively cultivating environments that demonstrate profound respect and appreciation for all users.
Embracing universal design principles and ensuring ADA compliance is a testament to your commitment to accessibility and equity. For more expert tips, practical guides, innovative layout ideas, and inspiring insights on how to make your home or business more inclusive and accessible, be sure to explore our other blogs on universal design and architectural accessibility.
