The Ultimate Guide to Garage Door Maintenance: Ensure Longevity, Safety, and Smooth Operation
Your garage door is more than just an entry point; it’s a critical component of your home’s security, energy efficiency, and overall curb appeal. It tirelessly protects your vehicles, tools, and other stored valuables from the elements and potential intruders. However, like any complex mechanical system, a garage door requires consistent care and attention to function optimally and safely year after year. Neglecting its upkeep can lead to a cascade of problems, ranging from annoying noises and jerky movements to costly repairs, or even a complete and untimely replacement.
Proactive garage door maintenance is an investment that pays dividends in longevity, reliability, and peace of mind. By adhering to a simple yet effective maintenance schedule, you can significantly extend the lifespan of your garage door system, prevent unexpected breakdowns, and avoid the inconvenience and expense of emergency repairs. This comprehensive guide outlines the essential steps you need to take to keep your garage door operating smoothly, safely, and efficiently for many years to come.
Establish a Regular Garage Door Maintenance Routine

Before delving into the specific tasks, the first and most crucial step is to integrate garage door upkeep into your regular home maintenance schedule. Creating a structured garage maintenance planning routine ensures that no critical checks are overlooked. A bi-annual inspection and maintenance session is generally recommended for most homeowners, ideally once in the spring and once in the fall. However, if your garage door experiences heavy daily usage, a quarterly check-up might be more appropriate. Consistency is key; setting reminders in your calendar can help you stay on track and ensure your door receives the attention it deserves.
During these routine checks, you’ll be looking, listening, and feeling for any irregularities. Paying close attention to how your door operates can provide early warnings of potential issues before they escalate. Think of it as a preventative health check for your garage door system, designed to catch minor problems before they become major headaches.
Lubricate All Moving Parts for Smooth Operation
Your garage door is a marvel of engineering, relying on numerous moving components to lift and lower hundreds of pounds of weight effortlessly. For these parts to function in harmony, reducing friction is paramount. Proper lubrication is essential to reduce friction, minimize wear and tear, and ensure quiet, fluid movement. Without it, metal-on-metal contact can lead to grinding noises, increased stress on the opener motor, and premature failure of components.
High-quality lubricants are crucial. For metallic parts such as hinges, rollers (excluding their plastic wheels), and torsion springs, a white lithium grease or a silicone-based spray lubricant specifically designed for garage doors is ideal. Before applying, it’s a good practice to wipe away any old grease or dirt to allow the fresh lubricant to penetrate effectively. Gently apply a thin, even coat to all pivot points, bearings, and spring coils. Remember to avoid over-lubricating, as excessive amounts can attract dust and grime, which can be counterproductive.
A crucial word of caution: Do not use standard WD-40. While it’s a popular multi-purpose product, WD-40 is primarily a solvent and degreaser. Applying it to your garage door components can strip away existing lubrication, dry out parts, and ultimately accelerate wear rather than prevent it. Always opt for a dedicated garage door lubricant to ensure proper maintenance and extend the life of your moving parts.
Tighten All Hardware for Enhanced Stability
The constant vibrations and intense forces exerted during your garage door’s daily operation can gradually loosen nuts, bolts, and screws throughout the system. This loosening can lead to increased noise, decreased stability, and, most critically, compromised safety. A loose component might interfere with the door’s smooth movement, cause misalignment, or even lead to an unexpected component failure, posing a significant safety risk.
- Begin by visually inspecting all visible hardware. Grab a socket wrench and systematically go through all nuts and bolts on the door panels, hinges, and especially the track system. Pay particular attention to the mounting brackets that secure the tracks to the ceiling and walls. These components bear a substantial amount of weight and are prone to loosening over time.
- Carefully tighten any loose hardware. The goal is to make them snug, but be extremely cautious not to overtighten. Overtightening can strip the threads of the bolts, damage the hardware itself, or even deform the metal components, which can be more detrimental than having them slightly loose. A firm hand-tightening followed by a quarter-turn with the wrench is usually sufficient.
- Regularly checking and tightening hardware not only prevents potential accidents but also helps maintain the structural integrity of your entire garage door system, contributing to its quiet and efficient operation.
Test the Balance of Your Garage Door

A properly balanced garage door is fundamental to its efficient and safe operation. When the door is balanced, the torsion or extension springs are correctly tensioned to counterbalance the door’s weight. This allows the door to open and close with minimal effort, whether operated manually or automatically. If the door is unbalanced, the opener motor is forced to work harder to compensate for the imbalance, leading to increased strain, premature wear and tear on the motor, and potentially a shorter lifespan for the entire opener unit.
- To test the balance, first ensure the garage door is fully closed. Then, carefully disconnect the garage door opener by pulling the emergency release cord (usually a red handle hanging from the opener trolley). This will disengage the door from the opener, allowing you to move it manually.
- Manually lift the door approximately halfway up. Once it reaches the halfway point, release your grip and observe its movement. A perfectly balanced door should stay in place without any tendency to fall down or roll upwards. If the door drifts downwards, it indicates that the springs lack sufficient tension. If it shoots upwards, the springs are likely overtensioned. Both scenarios suggest an imbalance that needs addressing.
- Critical Safety Warning: Garage door springs are under immense tension and are extremely dangerous to handle without proper training, specialized tools, and expertise. Attempting to adjust or repair garage door springs yourself can result in severe injury, including broken bones or even death. If your garage door is unbalanced, it is imperative to call a qualified and experienced garage door technician to adjust the springs safely and correctly. Do not under any circumstances attempt this task on your own.
Inspect and Replace Rollers
The rollers are unsung heroes of your garage door system, guiding the door smoothly along its tracks as it opens and closes. They endure significant stress and friction over time, and their condition directly impacts the door’s performance and noise level. Worn, cracked, or damaged rollers can lead to jerky movements, excessive noise, or even cause the door to bind or get stuck in the tracks.
- Make it a habit to visually examine your garage door rollers at least twice a year. Look for signs of wear such as cracks, chips, flat spots on the wheel, or excessive play in the stem. Listen for grinding or squeaking noises that might indicate failing bearings or worn plastic.
- While inspections are frequent, rollers typically have a lifespan of five to seven years, depending on their material (steel or nylon) and usage frequency. Nylon rollers, often reinforced with steel stems, generally offer quieter operation and longer durability compared to basic steel rollers. If you notice significant wear, replace all the rollers at once, rather than just the damaged ones, to ensure consistent performance across the entire door. Replacing rollers can be a DIY task for many homeowners, but always ensure the door is securely supported and the tracks are clear before removing any roller.
Check and Test the Safety Features
Modern garage door openers are equipped with crucial safety features designed to prevent accidents, especially involving children, pets, or objects. These features, mandated by federal regulations, are paramount for safe operation and must be tested regularly to ensure they are fully functional. The two primary safety mechanisms are the auto-reverse mechanism and the photoelectric safety sensors.
- Auto-Reverse Feature Test: This mechanism prevents the door from crushing anything in its path. To test it, place a small, soft object, such as a roll of paper towels or a 2×4 piece of wood laid flat, on the garage floor directly in the door’s path. Activate the door to close. When the door makes contact with the object, it should immediately stop and reverse its direction, moving back to the fully open position. If the door fails to reverse, or struggles to do so, it indicates a serious safety malfunction that requires immediate professional attention.
- Photoelectric Sensors Test: Located typically four to six inches off the ground at the base of the door tracks, these sensors project an invisible infrared beam across the garage door opening. If the beam is broken while the door is closing, the door should automatically reverse. To test, start the door closing and then wave an object, like a broomstick, through the sensor beam. The door should stop its descent and reverse. If it continues to close, or if the sensor lights (usually green and amber) are not illuminated or are flickering, the sensors may be misaligned, obstructed, or faulty. Clean the sensor lenses and check for obstructions. If the problem persists, it’s time to call a technician.
Regularly testing these safety features is not just a recommendation; it’s a necessity to ensure the safety of everyone using or near your garage door.
Clean and Inspect the Tracks
The tracks are the pathways along which your garage door rollers travel. Accumulation of dirt, dust, spiderwebs, and debris within these tracks can impede the rollers’ movement, leading to noisy operation, jerky motion, or even the door getting stuck. Furthermore, misaligned tracks can cause the rollers to bind, creating excessive wear on both the rollers and the track itself.
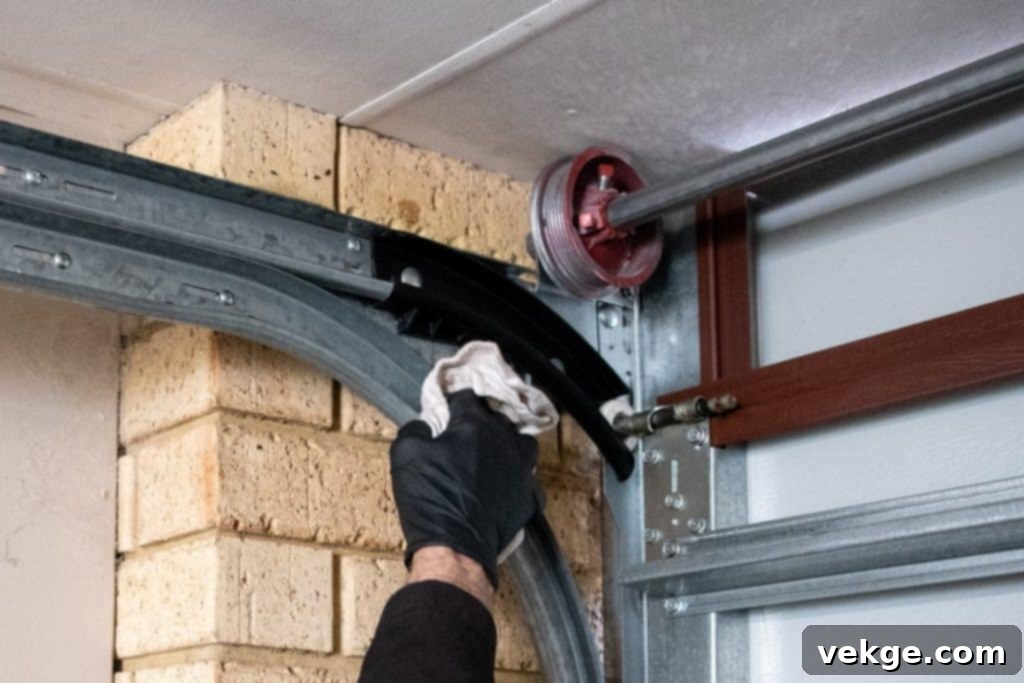
- Start by thoroughly cleaning the tracks. Use a damp cloth to wipe away any visible dirt, grease, or grime from the inside surfaces of the tracks. For stubborn debris, a mild household cleaner can be used, followed by a thorough wipe-down. You can also use a vacuum cleaner with a brush attachment to remove loose dust and spiderwebs.
- Important: Unlike the moving parts like hinges and rollers, you should never apply lubricant to the garage door tracks. Lubricants can attract and trap dust, creating a sticky residue that will actually hinder the door’s movement and exacerbate issues over time. The rollers themselves are designed to glide within clean, dry tracks.
- After cleaning, visually inspect the tracks for any signs of misalignment or damage. Look for bent sections, dents, or gaps between the rollers and the track. The vertical sections of the tracks should be perfectly parallel and plumb, and the horizontal sections should be level and gently sloped towards the back of the garage. Minor misalignments can sometimes be corrected by carefully loosening the track brackets, gently tapping the track back into position with a rubber mallet, and then retightening the brackets. However, for significant bends or persistent misalignment issues, it is always best to consult a professional garage door technician to prevent further damage or safety hazards.
Replace Worn Weatherstripping
The weatherstripping along the bottom edge and sides of your garage door acts as a crucial barrier. It seals the gap between the door and the floor/frame, protecting your garage interior from external elements such as rain, snow, wind, debris, and pests. Over time, exposure to weather, UV rays, and general wear and tear can cause the weatherstripping to become brittle, cracked, torn, or flattened, significantly reducing its effectiveness.
A damaged weather seal can lead to several problems: increased energy bills due to heat loss or gain, water infiltration causing potential damage to your garage floor and stored items, and an open invitation for rodents and insects. Begin by thoroughly inspecting the weatherstripping along the bottom edge of the door and along the perimeter of the door frame. Look for any visible gaps, tears, cracks, or signs of deterioration. If you can see daylight peeking through or feel drafts, it’s time for a replacement.
Replacing weatherstripping is a relatively straightforward DIY task. You’ll need to measure the length and width of the existing seal to purchase the correct replacement type for your garage door model. Most hardware stores and home improvement centers stock various profiles, including “T-style,” “bulb,” or “j-type” seals. Carefully remove the old, worn-out weatherstripping and clean the channel where it sits. Then, slide the new weatherstripping into place, ensuring a snug fit. This simple replacement can dramatically improve your garage’s insulation, keep out pests, and protect your belongings.
Schedule Professional Maintenance and Inspections
While many essential garage door maintenance tasks can be safely performed by a diligent homeowner, there are certain critical components and intricate adjustments that absolutely require the expertise of a trained and certified professional. Complex elements like the high-tension garage door springs (both torsion and extension), the cables, and the opener’s motor and internal mechanisms are not only dangerous to tamper with but also demand specialized knowledge, tools, and experience for proper inspection, adjustment, or repair.
A professional garage door technician brings invaluable expertise to the table. During a routine professional service call, they will conduct a thorough multi-point inspection, which typically includes: detailed examination of springs for signs of fatigue or damage; checking the cables for fraying or wear; inspecting the opener’s motor, circuit board, and drive system; assessing the tracks for precise alignment; and ensuring all safety mechanisms are functioning perfectly. They can make nuanced adjustments to spring tension, track alignment, and opener force settings that are beyond the scope of typical DIY maintenance.
Scheduling annual or bi-annual professional maintenance checks is a wise investment. It serves as an additional layer of preventative care, allowing experts to identify and address potential problems that might go unnoticed during your routine DIY inspections. Catching these issues early can prevent them from escalating into costly major repairs or, worse, dangerous malfunctions. Entrusting the more intricate aspects of garage door maintenance to professionals ensures the continued safe, reliable, and efficient operation of your entire system.
Endnote: The Value of Consistent Garage Door Maintenance
Maintaining your garage door doesn’t have to be a complicated or overwhelming chore. Instead, view it as a series of simple, consistent steps that significantly contribute to the overall health and longevity of one of your home’s most hardworking components. By dedicating a little time each season to inspect, lubricate, tighten, and test, you are actively preventing unnecessary repairs, extending the operational life of your garage door system, and ensuring it functions smoothly and quietly year-round.
From the critical safety checks of auto-reverse sensors to the simple act of lubricating hinges, every maintenance task plays a vital role. This proactive approach not only safeguards your investment but also enhances the safety of your family and valuables. Remember, a little maintenance truly goes a long way in keeping your garage door in optimal condition, providing reliable performance and peace of mind for years to come.
