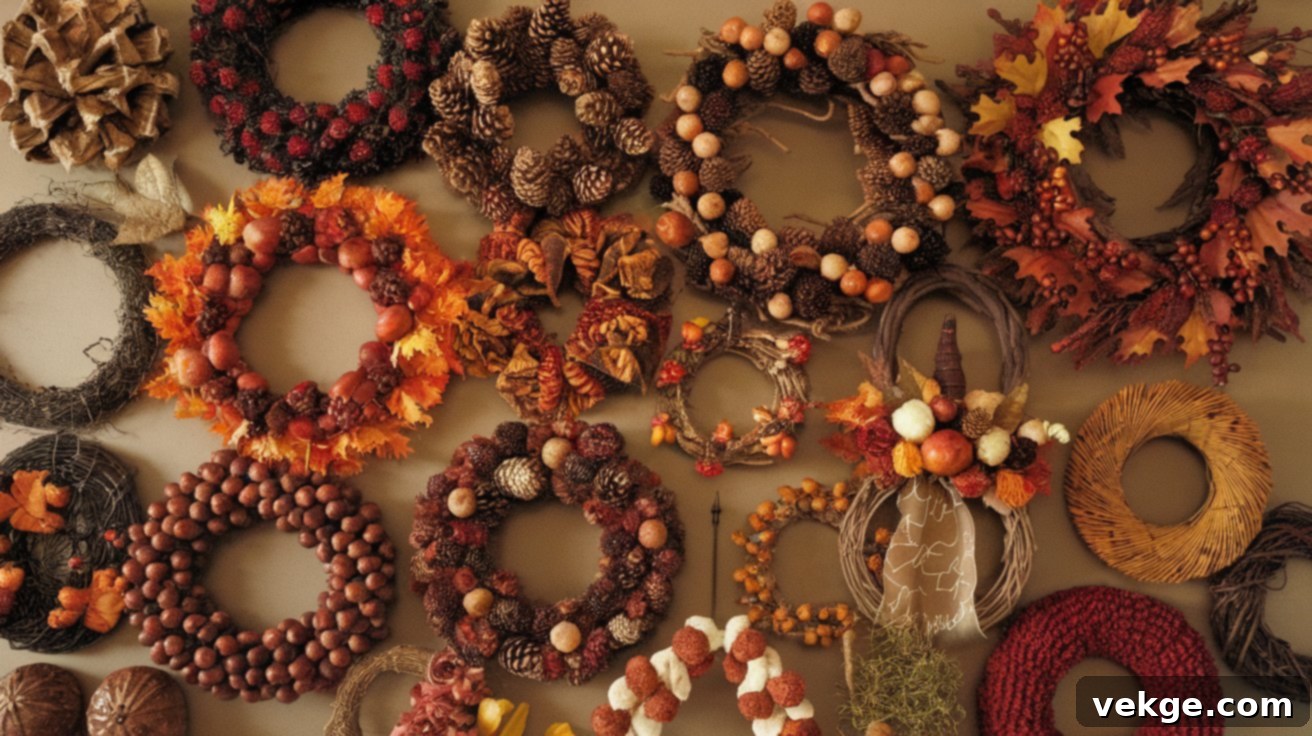
Unlock Autumn Charm: 35+ DIY Fall Wreath Ideas for Every Style & Skill Level
As the crisp autumn air arrives and leaves begin their vibrant transformation, there’s an undeniable urge to infuse our homes with the cozy warmth and rich beauty of the season. What better way to welcome fall than with a stunning, handcrafted wreath gracing your front door?
Forget generic store-bought decorations! This guide invites you to explore a world of unique DIY fall wreath ideas, offering something truly special for every taste and crafting ability. Whether you envision a classic, rustic design or a chic, contemporary statement piece, you’ll find inspiration here to perfectly capture the essence of autumn.
Creating your own fall wreath is more than just a craft; it’s an opportunity to express your personal style, enjoy a relaxing creative process, and add a welcoming touch that store-bought items simply can’t replicate. Imagine the satisfaction of guests admiring a piece you made with your own hands!
From the timeless elegance of magnolia leaves to whimsical gnome creations and minimalist dried grass designs, these projects promise to spark your creativity and transform your entryway. So, roll up your sleeves, gather your materials, and get ready to craft a fall wreath that will make your home the envy of the neighborhood!
Let’s dive into these fun, festive, and truly inspiring autumn wreath ideas!
1. Magnolia Leaf Wreath: A Touch of Southern Charm
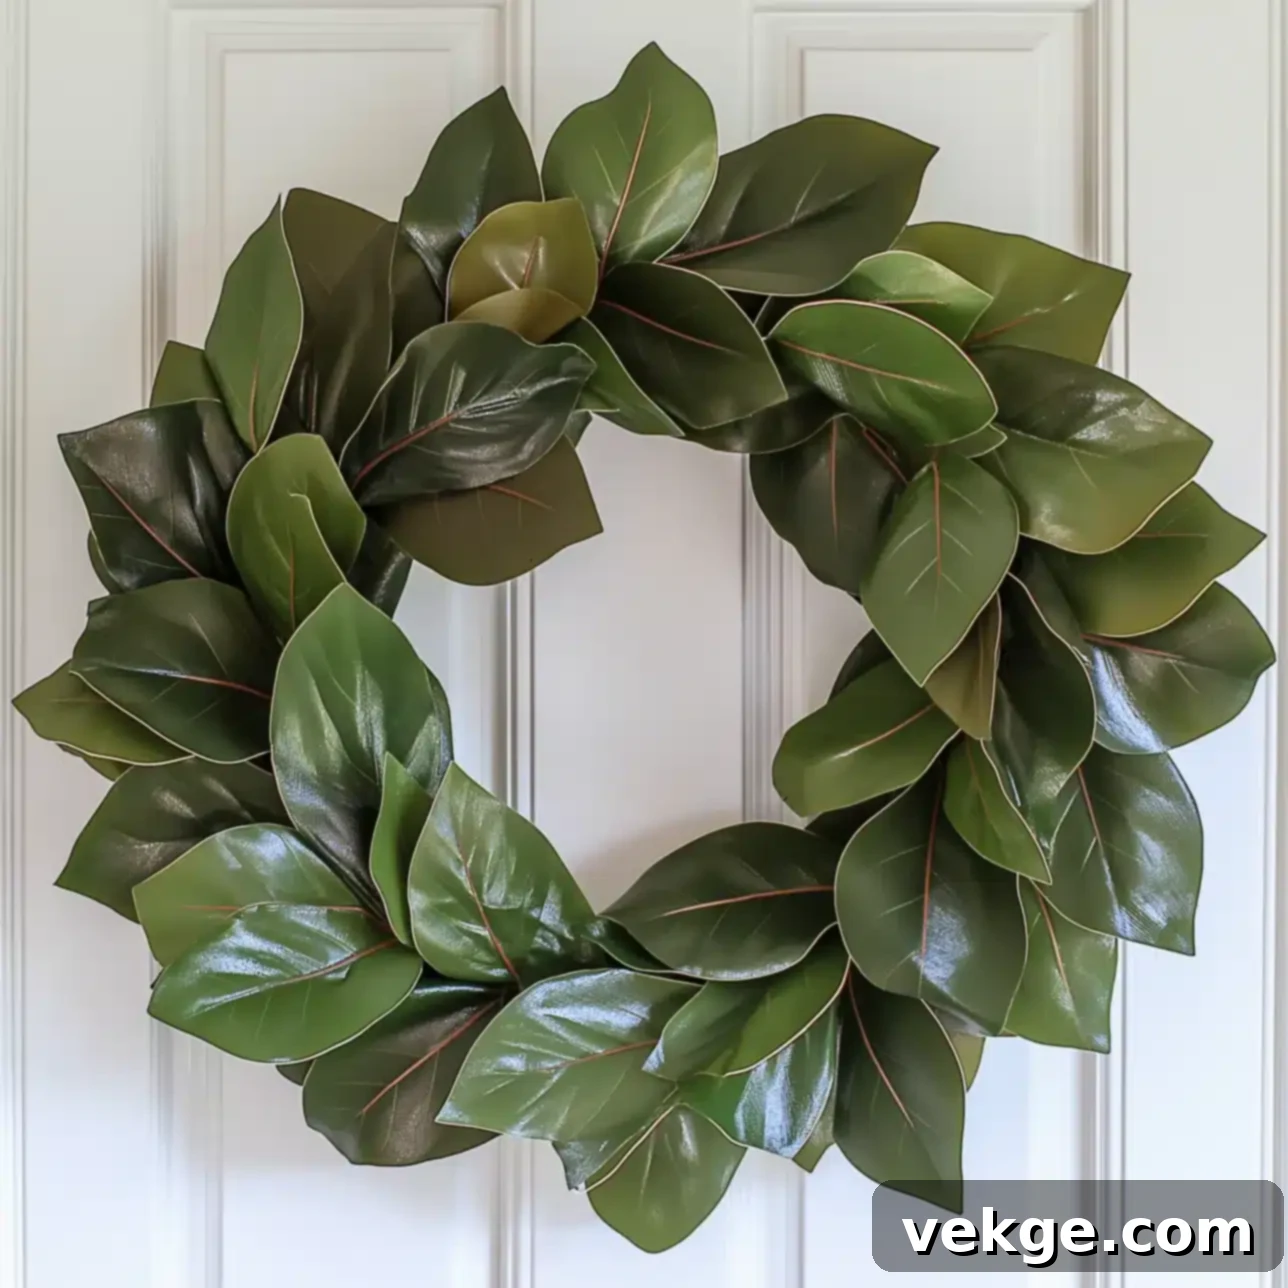
Embrace classic fall elegance with a magnolia leaf wreath, a timeless decoration that exudes Southern grace. The large, glossy leaves in their deep green hues provide a sophisticated backdrop, perfect for any entryway. Whether you choose fresh leaves for a vibrant, natural look or opt for high-quality faux ones for lasting beauty, this wreath adds undeniable sophistication and captures the true essence of autumn’s grandeur.
Basic Materials Needed
- Fresh or faux magnolia leaves
- Wreath form (grapevine or wire)
- Floral wire
- Hot glue gun and glue sticks
- Pruning shears or scissors
Crafting Process
- Attach individual magnolia leaves to your chosen wreath base.
- Overlap leaves slightly to create a full, lush appearance.
- Enhance the wreath with personal touches like small pinecones or seasonal berries.
Full Tutorial:Home Made Lovely
Additional Tips
- Leaf Preservation: If using fresh leaves, spray them with a clear sealant to help them maintain their color and prevent curling for longer display.
- Seasonal Accents: Integrate small faux gourds, gilded acorns, or even a simple burlap bow to enhance its autumnal appeal.
- Display Care: For optimal longevity, particularly with fresh leaves, display your wreath in a sheltered area, out of direct sunlight and extreme weather. Mist fresh leaves occasionally to keep them hydrated.
2. Faux Terracotta Pot Wreath: A Rustic Autumn Delight
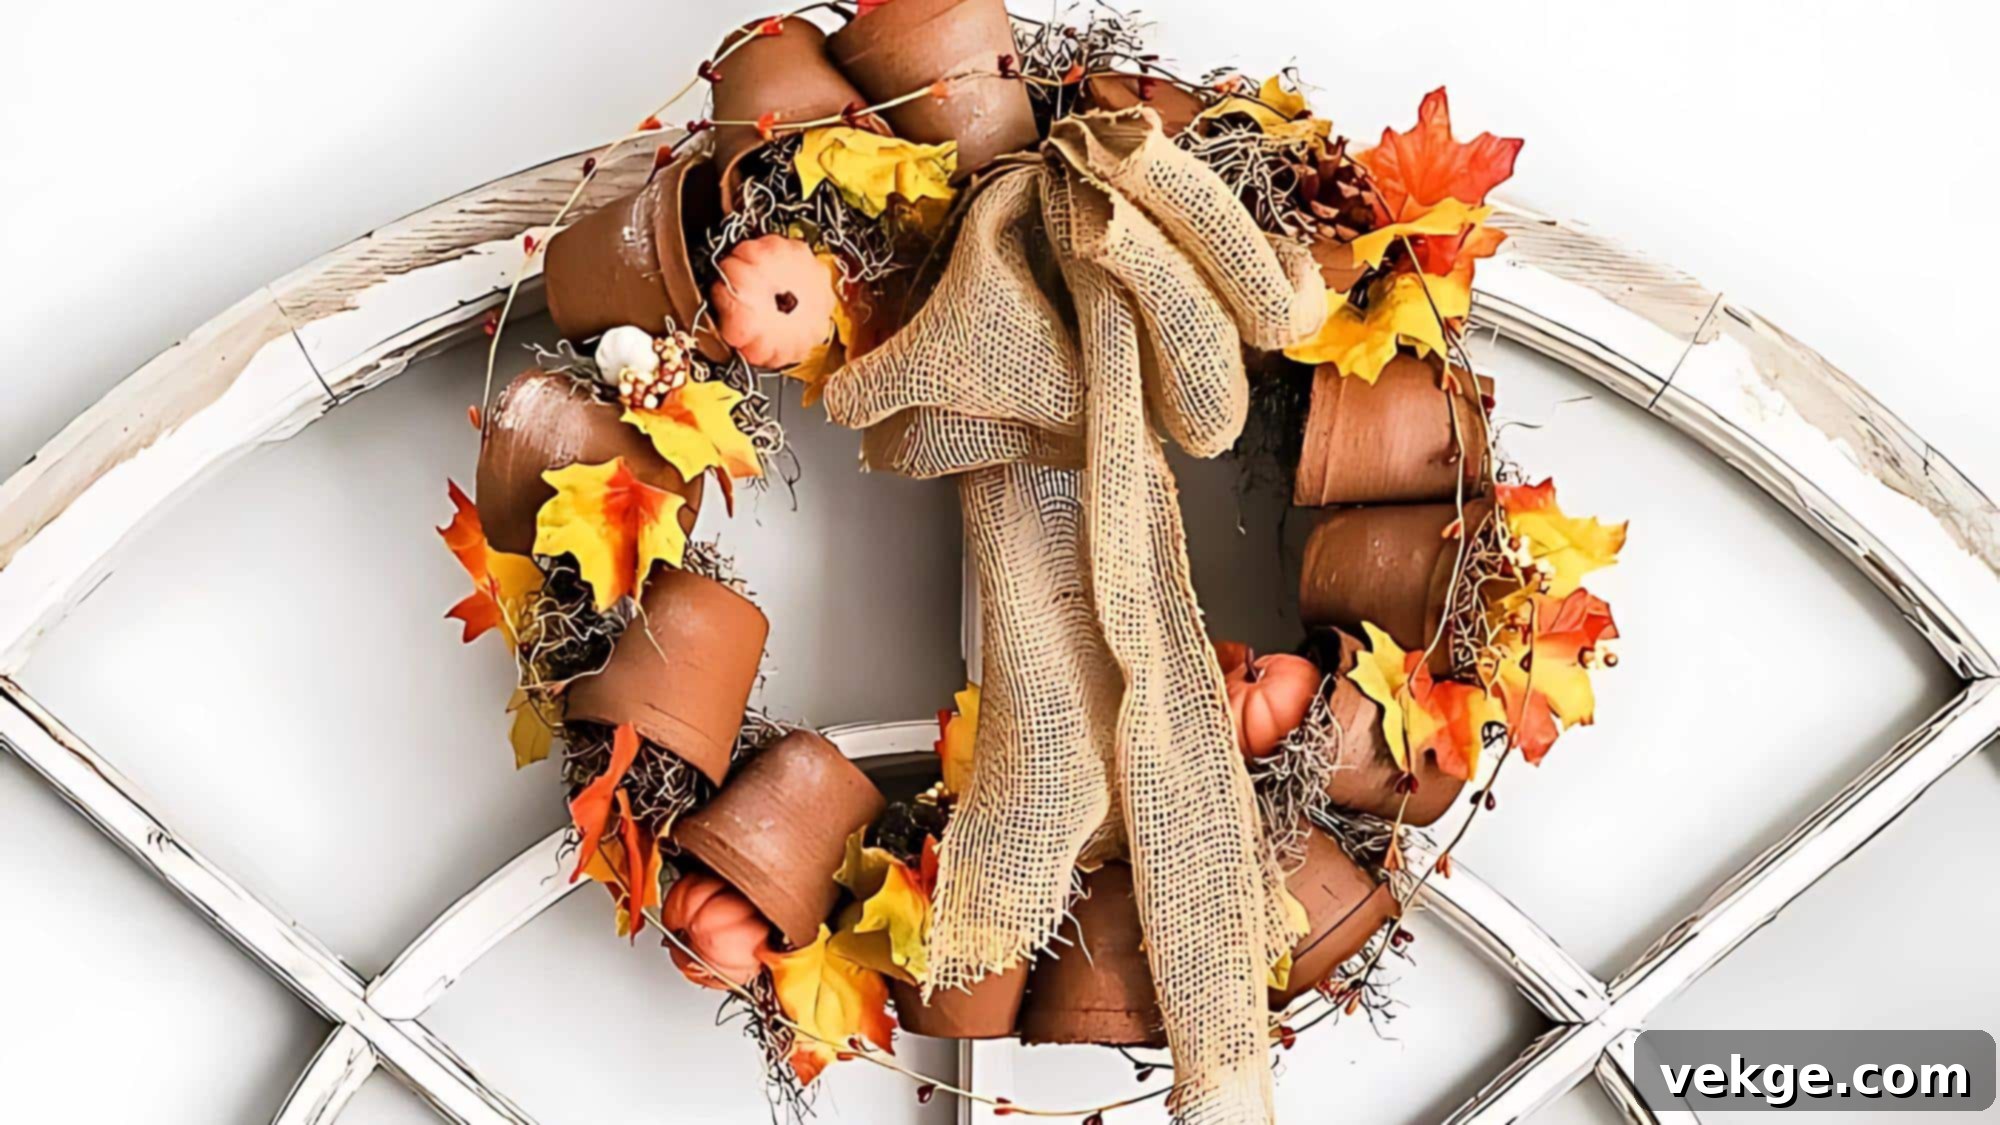
Infuse your fall decor with charming garden inspiration by creating a faux terracotta pot wreath. This wonderfully unique design marries the earthy warmth of miniature clay pots with a cozy autumn aesthetic, resulting in a distinctive piece for your home. The rich, reddish-brown tones of the pots perfectly echo the season’s palette, while their natural texture adds delightful depth and interest to any door or wall.
Basic Materials Needed
- Miniature terracotta pots
- Wreath form (grapevine or wire)
- Floral wire
- Hot glue gun and glue sticks
- Faux foliage and small pumpkins
- Burlap bow (optional)
Crafting Process
- Carefully position the miniature terracotta pots evenly around the wreath form.
- Secure each pot firmly using both floral wire and a dab of hot glue for stability.
- Fill the spaces between the pots with faux autumn foliage and tiny decorative pumpkins.
- Complete the look by attaching a rustic burlap bow for an extra touch of country flair.
Full Tutorial:DIY Beautify
Additional Tips
- Visual Balance: When arranging, ensure pots are spaced uniformly to achieve a harmonious and balanced look.
- Enhanced Security: For long-lasting display, particularly if hanging outdoors, use both floral wire and hot glue to double-secure all elements.
- Creative Customization: Experiment by mixing pots of different sizes or painting some with a distressed finish for added visual intrigue.
- Outdoor Durability: If your wreath will be exposed to the elements, choose weather-resistant faux materials for all foliage and decorations.
3. Wheat Wreath: Capturing the Golden Essence of Fall
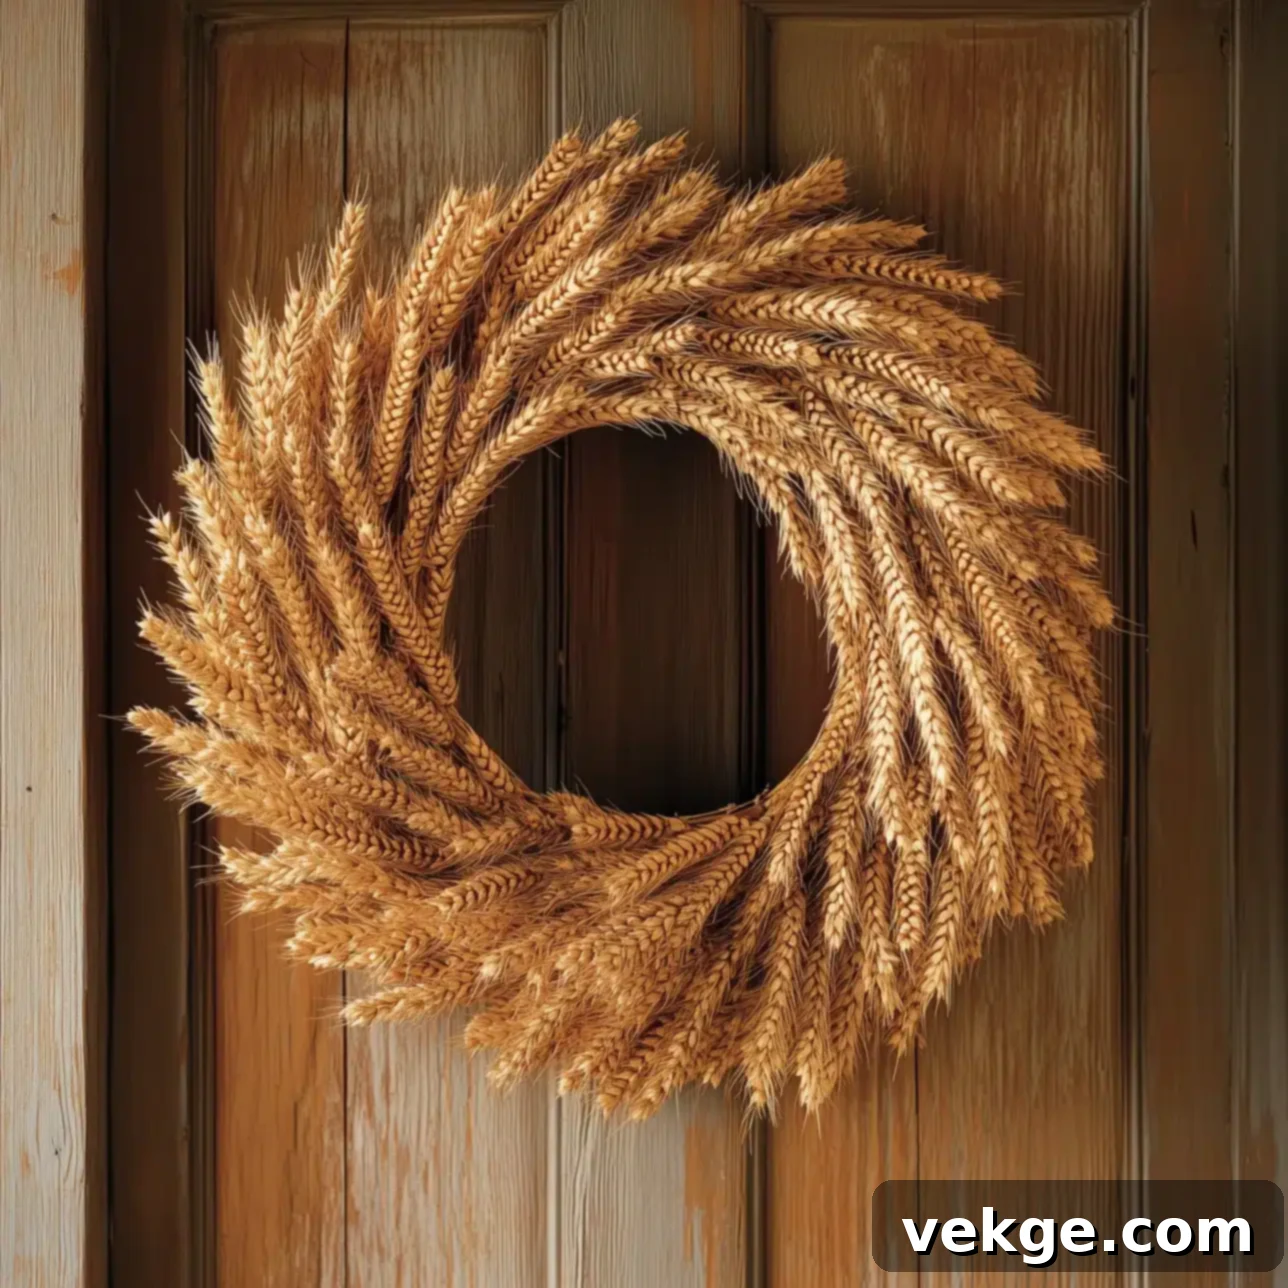
A wheat wreath effortlessly brings the warmth and abundant beauty of the harvest season directly to your door. This natural, rustic decoration beautifully showcases the golden hues synonymous with autumn, crafting a stunning visual display that truly celebrates fall’s bounty. The delicate, textured wheat bundles, thoughtfully arranged in a circular form, offer a simple yet profound nod to the seasonal shift.
Basic Materials Needed
- Wheat bundles (dried)
- Wreath form (foam or grapevine)
- Floral wire
- Hot glue gun and glue sticks
- Ribbon for hanging (optional)
Crafting Process
- Ensure your wheat bundles are thoroughly cleaned and completely dry before beginning.
- Begin attaching small sections of wheat to the wreath form, securing them tightly with floral wire.
- Overlap each successive bundle slightly to create a full, rich, and continuous appearance.
- Trim any excess stems and meticulously arrange the wheat for a neat, polished finish.
- If desired, add a coordinating ribbon at the top for easy hanging and an extra decorative touch.
Full Tutorial:Blooming Homestead.
Additional Tips
- Wheat Selection: Always use dry, clean wheat bundles to prevent mold and ensure the best, long-lasting results.
- Secure Attachment: Wrap floral wire very tightly around the wheat bundles and wreath form to keep everything firmly in place.
- Achieving Fullness: Generously overlap the wheat bundles to build a dense, lush texture that truly stands out.
- Refined Finish: After attaching all wheat, take time to trim any stray pieces and adjust bundles for a perfectly neat and professional appearance.
- Shedding Prevention: A light coat of clear acrylic sealant spray can significantly help reduce shedding and preserve the wheat’s natural beauty.
4. Dyed Coffee Filter Wreath: A Colorful Fall Surprise
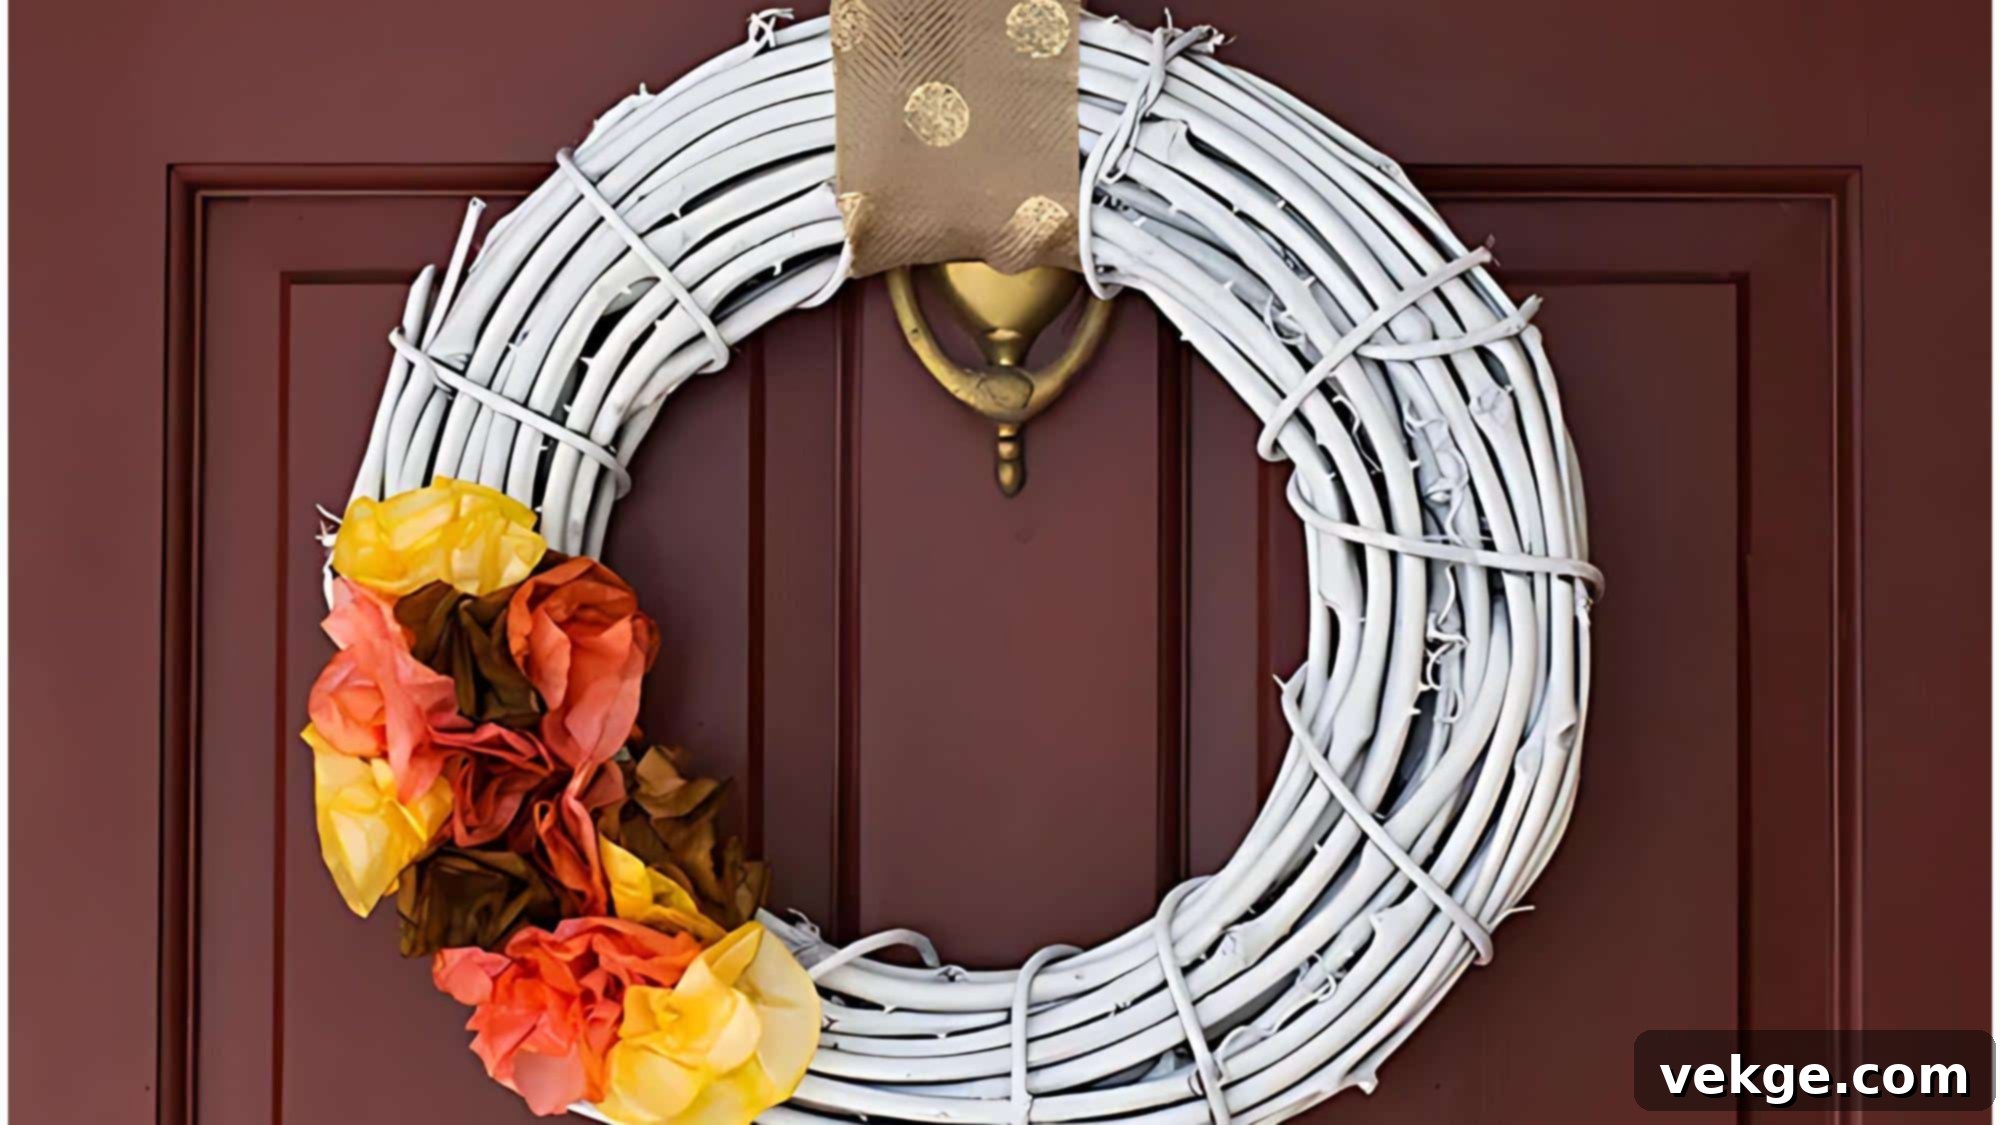
Unleash your creativity and transform ordinary coffee filters into a remarkably vibrant and budget-friendly fall decoration. This innovative project offers a delightful twist on conventional autumn decor, injecting a burst of cheerful color and whimsical texture into your home. The result is an exceptionally eye-catching wreath that celebrates the season in a fresh, unique, and truly creative way.
Materials Required
- White coffee filters
- Food coloring or fabric dye
- Large bowls for dyeing
- Water
- Wreath form (foam or wire)
- Hot glue gun and glue sticks
- Floral wire (optional)
Crafting Process
- Prepare several dye baths using your chosen fall colors (e.g., orange, red, yellow, brown).
- Dip the coffee filters into the dye baths, allowing them to soak briefly, then hang or lay flat to dry completely.
- Once dry, fold and creatively attach the dyed filters to your wreath form, starting from the outside and working inward.
- Layer the filters generously to achieve a wonderfully full, fluffy, and textured appearance.
- Add any desired additional accents, such as small faux leaves or glitter, to personalize your wreath.
Full Tutorial:Sarah Hearts
Additional Tips
- Dynamic Colors: Experiment by mixing different food colorings or dipping filters partially to achieve a beautiful multi-colored or ombre effect.
- Creative Embellishments: Incorporate small faux flowers, dried leaves, or even tiny beads for added texture and visual interest.
- Indoor Display: To protect the dyed filters from moisture and maintain their vibrant appearance, it’s best to display this wreath indoors or in a well-sheltered area.
- Textural Depth: Gently crinkle or fold the filters in various ways before attaching them to create more dimension and a playful, ruffled look.
5. Fall Gnome Wreath: A Whimsical Welcome
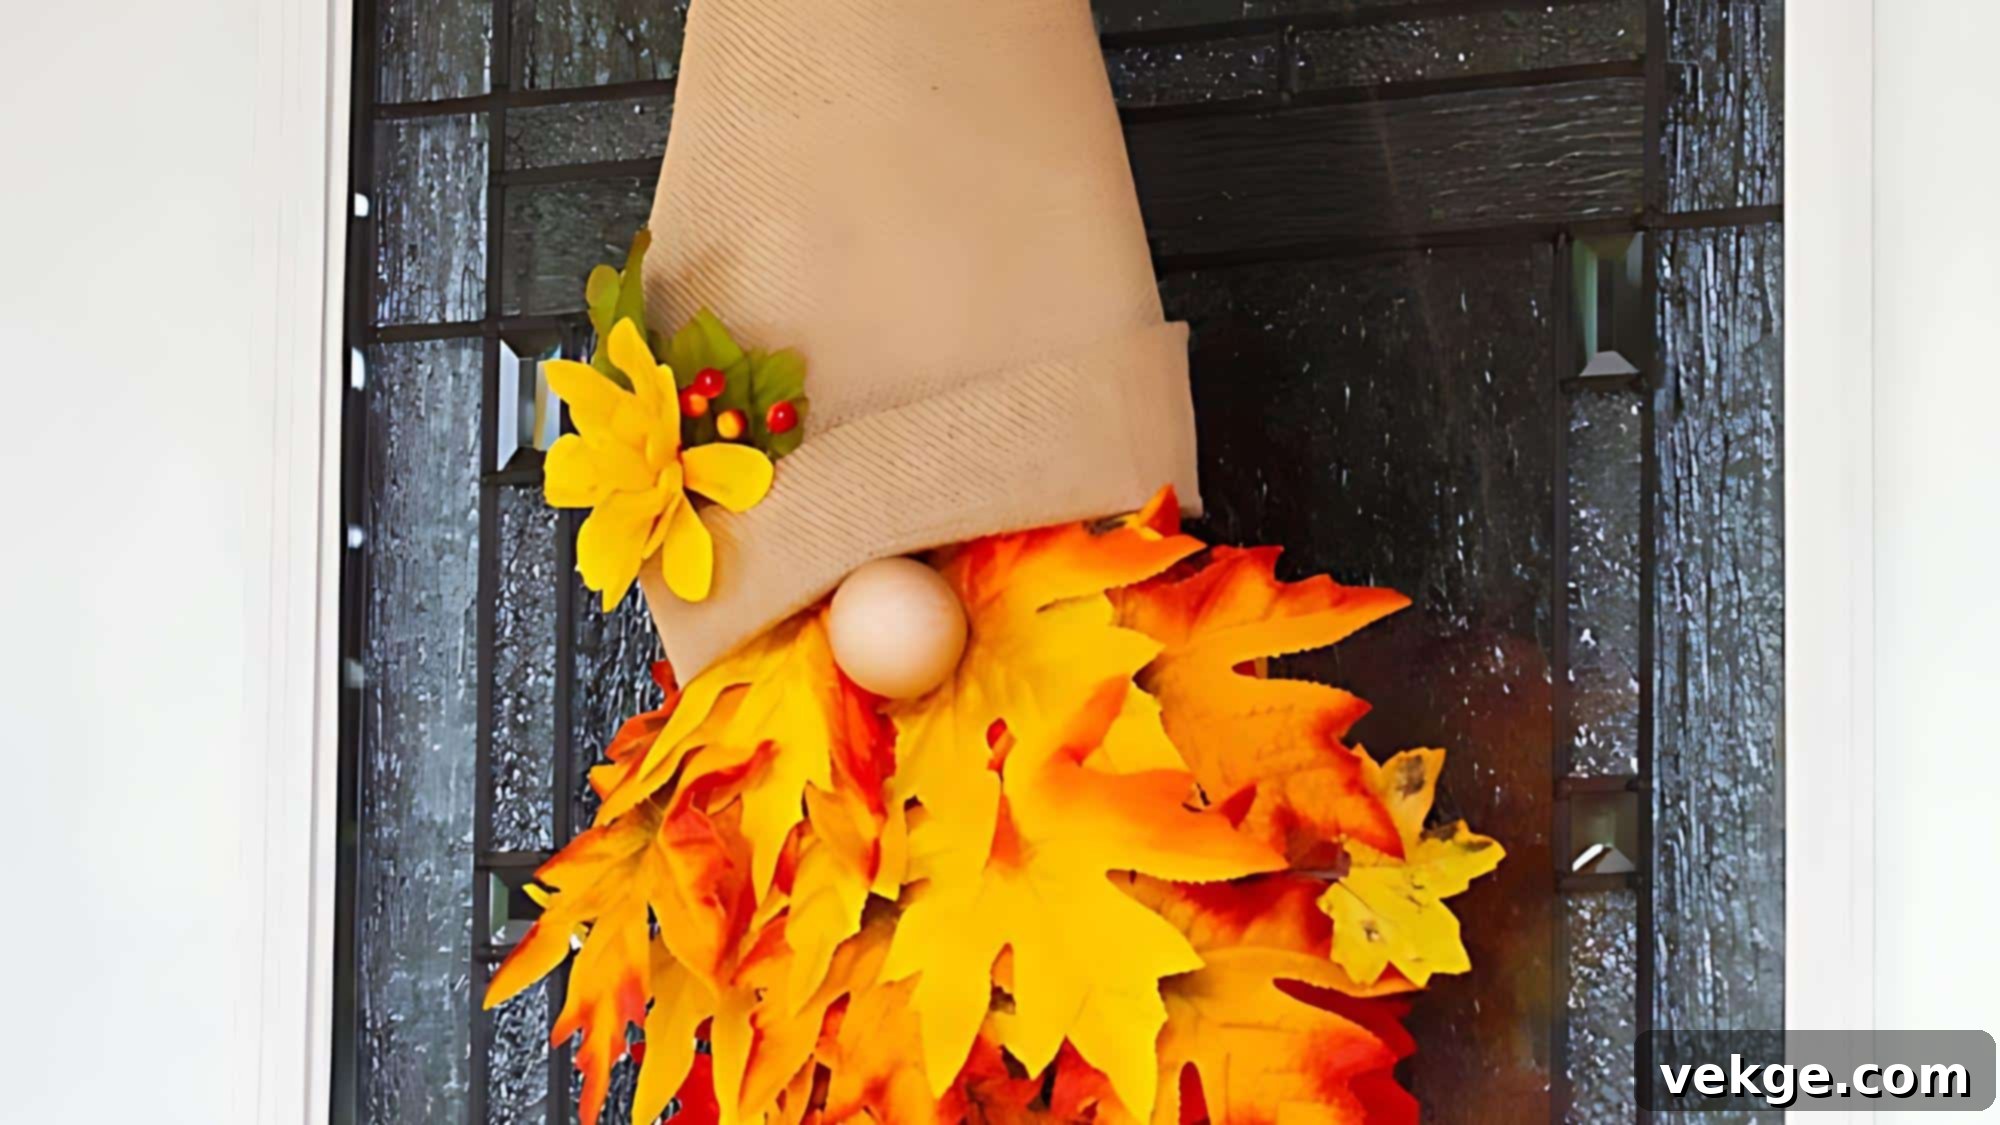
Bring an enchanting touch to your autumn decor with a truly delightful fall gnome wreath. This charming creation skillfully blends the cozy ambiance of autumn with the playful spirit of folklore, resulting in a unique and utterly eye-catching door decoration. The gnome’s characteristic leaf-adorned beard and brightly colored hat beautifully capture the essence of the season, while adding a whimsical, unexpected twist to traditional fall wreaths.
Materials Required
- Faux fall leaves (in various autumn colors)
- Wreath form (foam or grapevine)
- Fabric or felt for the gnome’s hat
- Stuffing (e.g., crumpled newspaper, cotton, or poly-fill)
- Hot glue gun and glue sticks
- Floral wire
- Scissors
Crafting Process
- Start by creating a lush wreath base using an abundance of faux fall leaves, securing them well to the wreath form.
- Craft the gnome’s distinctive pointed hat from your chosen fabric or felt, ensuring it’s appropriately sized for your wreath.
- Form the gnome’s beard by carefully arranging and gluing autumn-colored leaves, giving it a full and flowing appearance.
- Securely attach both the crafted hat and the leaf beard to the top portion of the wreath.
- Add charming finishing touches, such as a small wooden bead for the nose or tiny faux hands peeking out from under the beard.
Full Tutorial: One Little Project
Additional Tips
- Personalized Style: Vary the colors and patterns of the gnome’s hat fabric to perfectly match your home’s unique decor style.
- Robust Attachment: Use floral wire in conjunction with hot glue to ensure all elements, especially the hat and beard, are sturdily attached.
- Enhanced Durability: Double-check that all components are firmly affixed to the wreath form, preventing them from falling off during display.
- Charming Accessories: Incorporate miniature pumpkins, tiny acorns, or small faux mushrooms around the gnome for extra woodland charm and detail.
6. Feather Wreath: Nature’s Hug
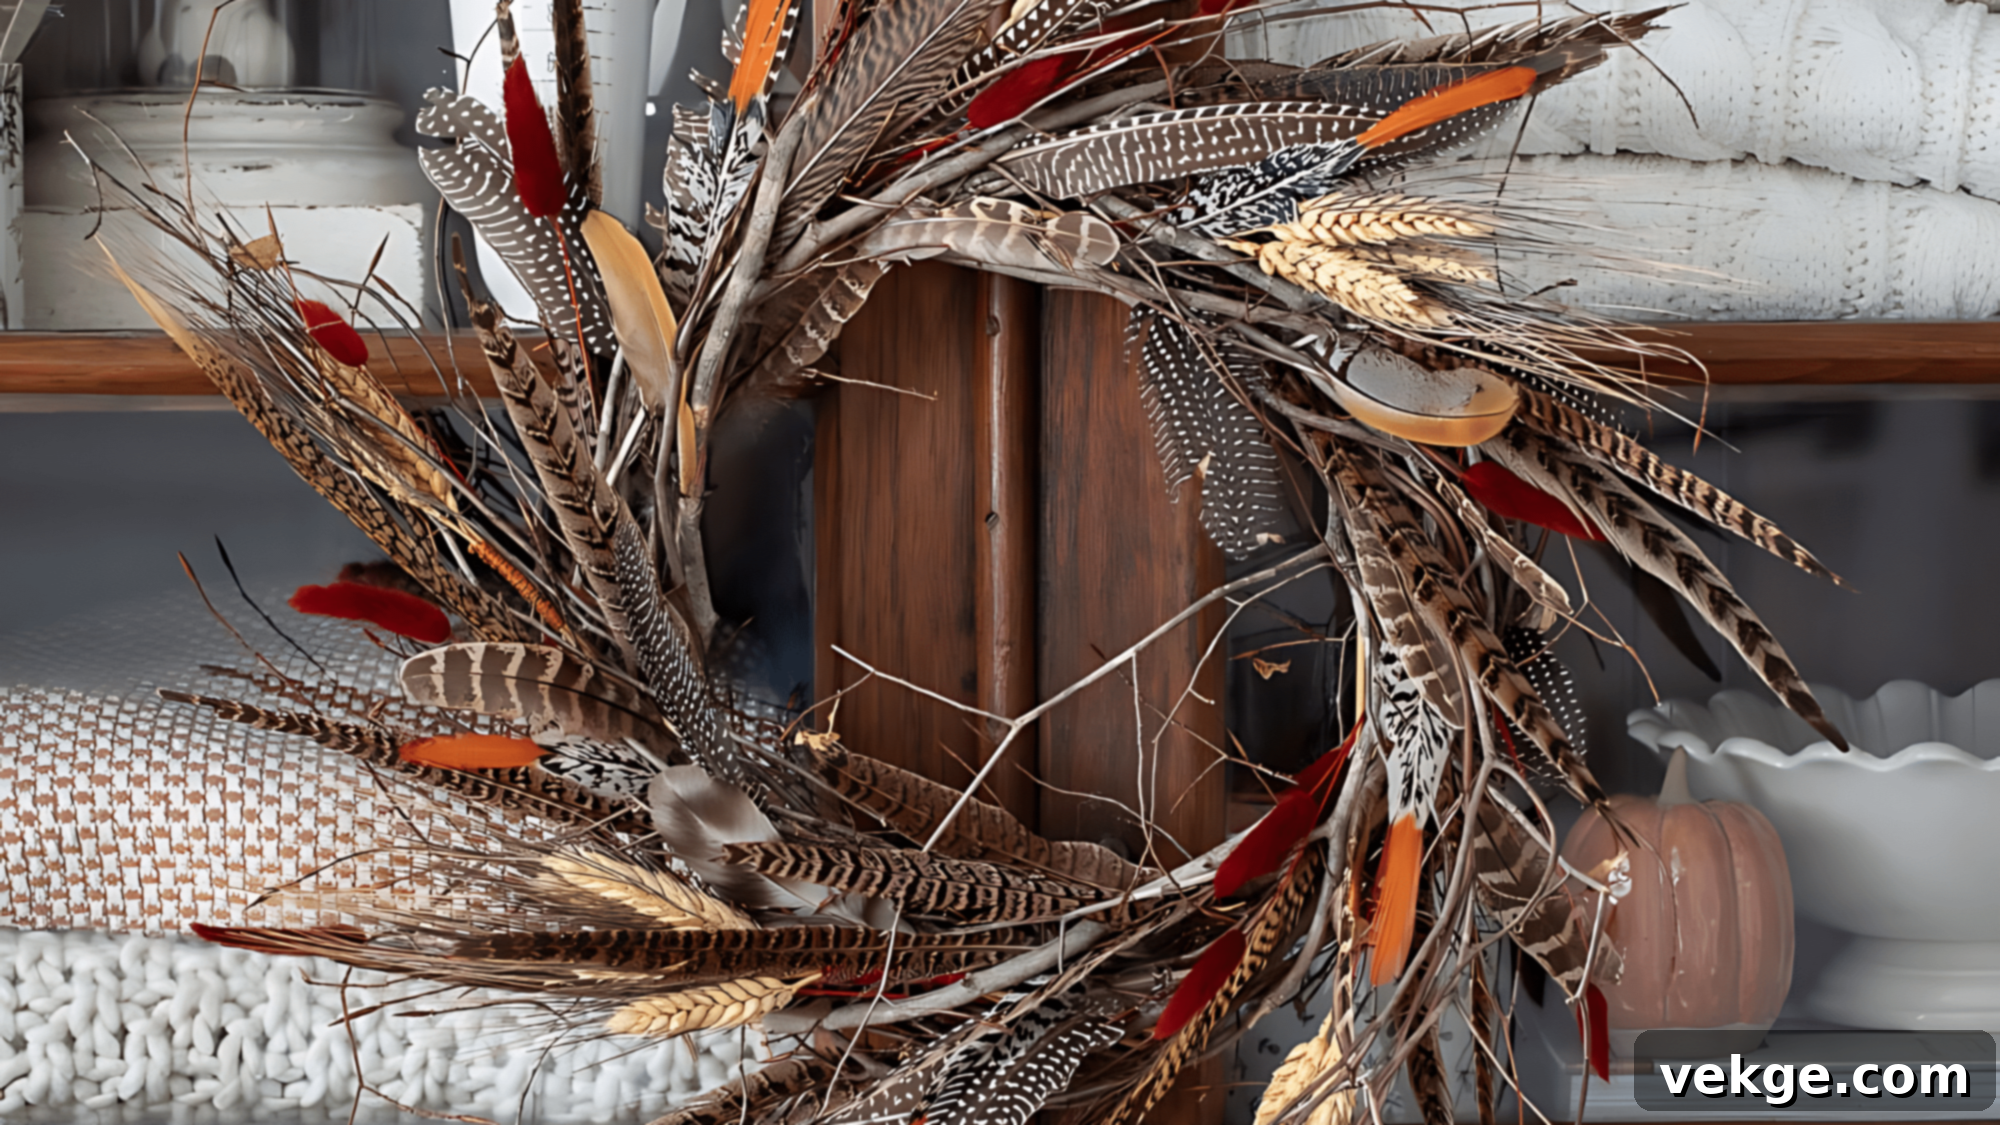
Introduce a touch of sophisticated natural beauty to your autumn decor with a stunning feather wreath. This distinctive creation artfully combines the delicate elegance of feathers with the rustic allure of wheat and twigs, resulting in a wreath that feels wonderfully earthy and inviting. It’s an ideal way to celebrate the arrival of fall, offering a subtle yet profound tribute to changing seasons and the migration of birds.
Materials Required
- Feathers (faux or responsibly sourced real)
- Wheat bundles
- Twigs (small, flexible)
- Wreath form (foam or grapevine)
- Floral wire
- Hot glue gun and glue sticks
- Ribbon for hanging (optional)
Crafting Process
- Begin by attaching small twigs around the wreath form to create a foundational, natural base.
- Layer sections of wheat bundles over the twigs, securing them carefully to build volume and texture.
- Thoughtfully arrange and securely attach the feathers, paying attention to their direction and flow for an organic look.
- Fill any noticeable gaps or bare spots with smaller feathers or additional sprigs of wheat to ensure a full appearance.
- If desired, add a complementary ribbon for hanging, completing the wreath’s elegant presentation.
Full Tutorial:Inspired by Charm
Additional Tips
- Harmonious Arrangement: Strive for a balanced distribution of feathers and wheat, ensuring neither element overpowers the other for a cohesive, natural aesthetic.
- Firm Attachment: Utilize floral wire to secure heavier elements like twig bundles, and hot glue for delicate feathers to ensure durability.
- Textural Variety: Incorporate natural elements such as small pinecones, dried seed pods, or delicate dried flowers to introduce additional layers of texture.
- Autumnal Palette: Select feathers in warm, earthy tones like browns, creams, and deep greens, or subtle metallics, to complement your fall color scheme beautifully.
7. Fall Grapevine Wreath: A Classic Autumn Welcome
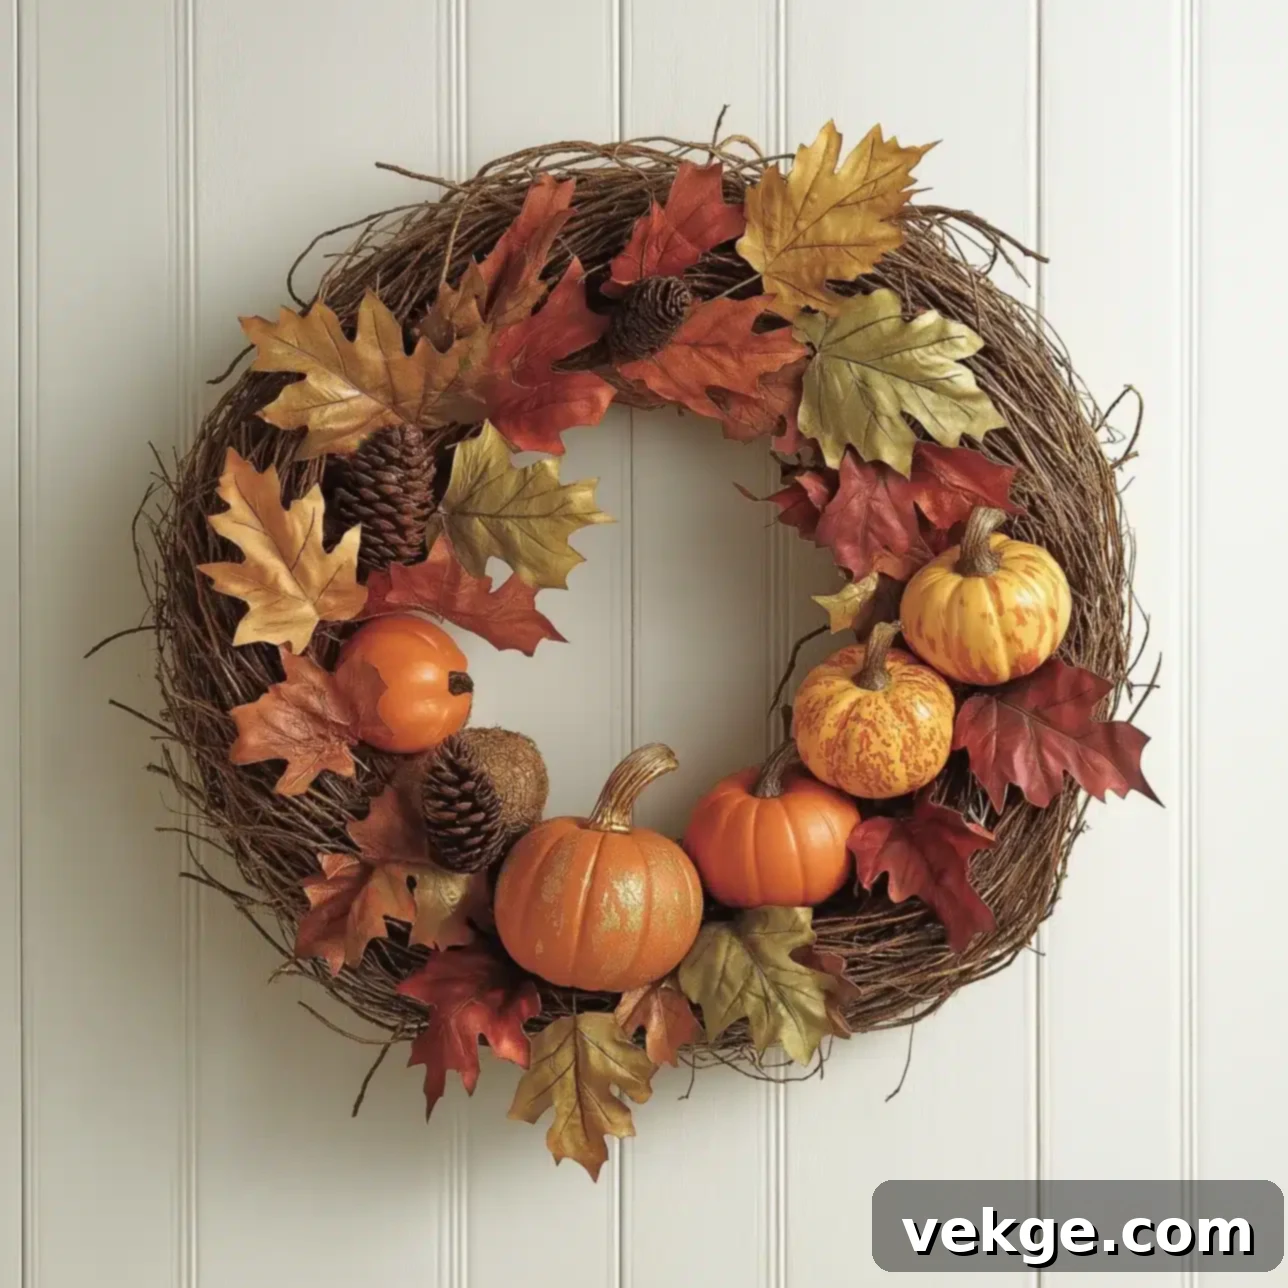
Welcome the heart of autumn with a truly traditional fall grapevine wreath. This timeless decoration seamlessly brings together the finest elements of the season – rustic textures, an array of warm colors, and nature’s generous bounty. The intricate grapevine base offers an ideal foundation for showcasing a variety of fall favorites, from richly colored faux leaves to plump, decorative pumpkins, crafting a wreath that genuinely captures the celebratory spirit of the harvest season.
Materials Required
- Grapevine wreath form
- Faux foliage (e.g., autumn leaves, berries, small branches)
- Pinecones (natural or painted)
- Small faux pumpkins or gourds
- Floral wire
- Hot glue gun and glue sticks
- Ribbon for hanging (optional)
Crafting Process
- Begin by using the grapevine wreath as your sturdy, natural base.
- Attach larger pieces of faux autumn foliage, distributing them evenly around the entire wreath to establish a foundational layer.
- Integrate pinecones and small decorative pumpkins or gourds, tucking them among the foliage for added texture and visual interest.
- Fill in any remaining gaps with smaller leaves, berry sprays, or accent pieces to create a full and cohesive look.
- If desired, securely attach a festive ribbon at the top for easy hanging and a decorative flourish.
Full Tutorial:Crazy Little Projects
Additional Tips
- Thoughtful Layering: Distribute your decorative elements deliberately and evenly around the wreath to achieve a beautifully balanced and harmonious design.
- Reinforced Securing: For heavier items like pumpkins or large gourds, always use floral wire in addition to hot glue to ensure a robust and long-lasting attachment.
- Personalized Touch: Consider adding a decorative monogram letter, a small wooden sign with a seasonal greeting, or unique autumnal charms to the center.
- Cohesive Design: Select faux foliage and accents that feature a mix of warm autumn hues—think deep reds, oranges, yellows, and rich browns—to create a visually appealing and cohesive color scheme.
8. Sunflower Wreath: A Burst of Autumn Sunshine
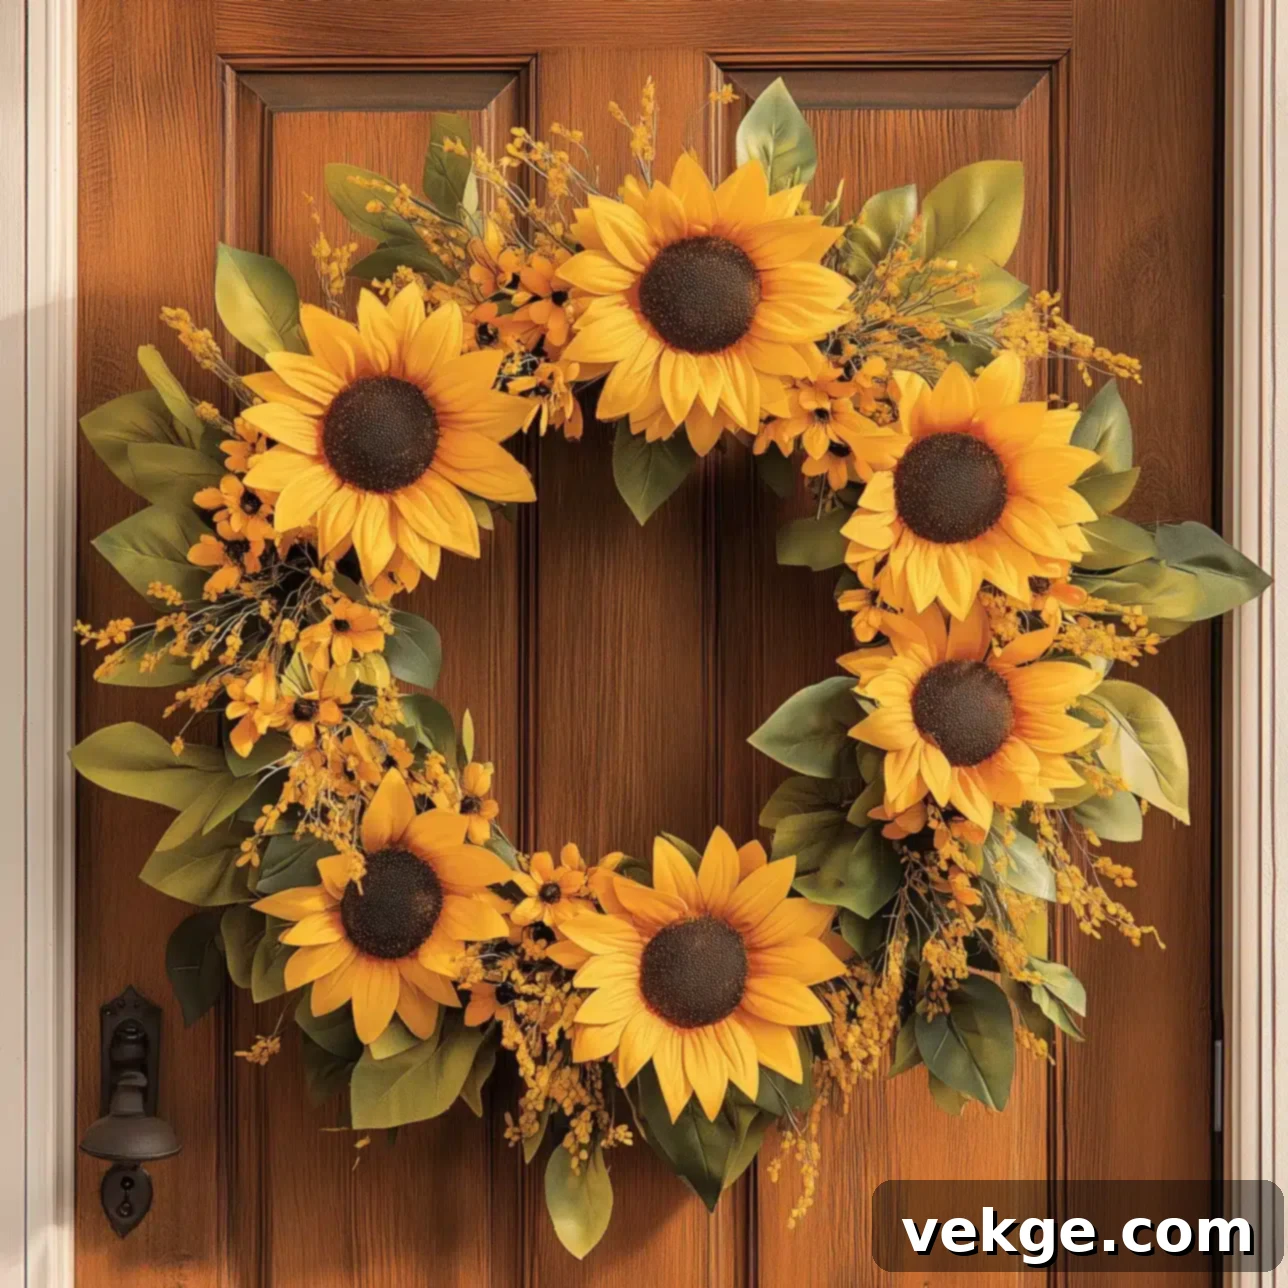
Extend the warmth and cheer of late summer into your fall decor with a truly stunning sunflower wreath. This bright and inviting creation perfectly captures the essence of the harvest season, offering a sunny and joyful welcome to everyone who approaches your home. With its rich, golden hues and inherent simple beauty, a sunflower wreath serves as an ideal way to gracefully transition your seasonal decor from the vibrancy of summer to the welcoming embrace of autumn.
Materials Required
- Faux sunflowers (in yellow, orange, or multi-toned varieties)
- Wreath form (foam or grapevine)
- Floral wire
- Hot glue gun and glue sticks
- Greenery (e.g., faux eucalyptus, assorted leaves, optional)
- Ribbon for hanging (optional)
Crafting Process
- Prepare your chosen wreath form by ensuring it’s clean and ready for attachment.
- Begin arranging the faux sunflowers, distributing them evenly and thoughtfully around the entire form to create a balanced display.
- Secure each sunflower firmly using a combination of floral wire for structural support and hot glue for lasting adhesion.
- If desired, tuck small sprigs of complementary greenery between the sunflowers to add depth, contrast, and a touch of natural freshness.
- Finish by attaching a decorative ribbon at the top, if you plan to hang your wreath.
Full Tutorial:Houseful of Handmade
Additional Tips
- Even Placement: Ensure consistent spacing and orientation of sunflowers for a visually harmonious and balanced overall appearance.
- Dual Securing Method: For maximum durability and to prevent flowers from shifting, always use both floral wire and hot glue for attachment.
- Varied Accents: Mix in smaller accent flowers, such as daisies or cosmos, or incorporate faux autumn leaves to add complexity and interest.
- Color Depth: Consider using a blend of both bright yellow and deeper orange sunflowers to create a more dynamic and visually rich color palette within your wreath.
9. Woodsy Fall Log Wreath: Bringing the Forest to Your Door
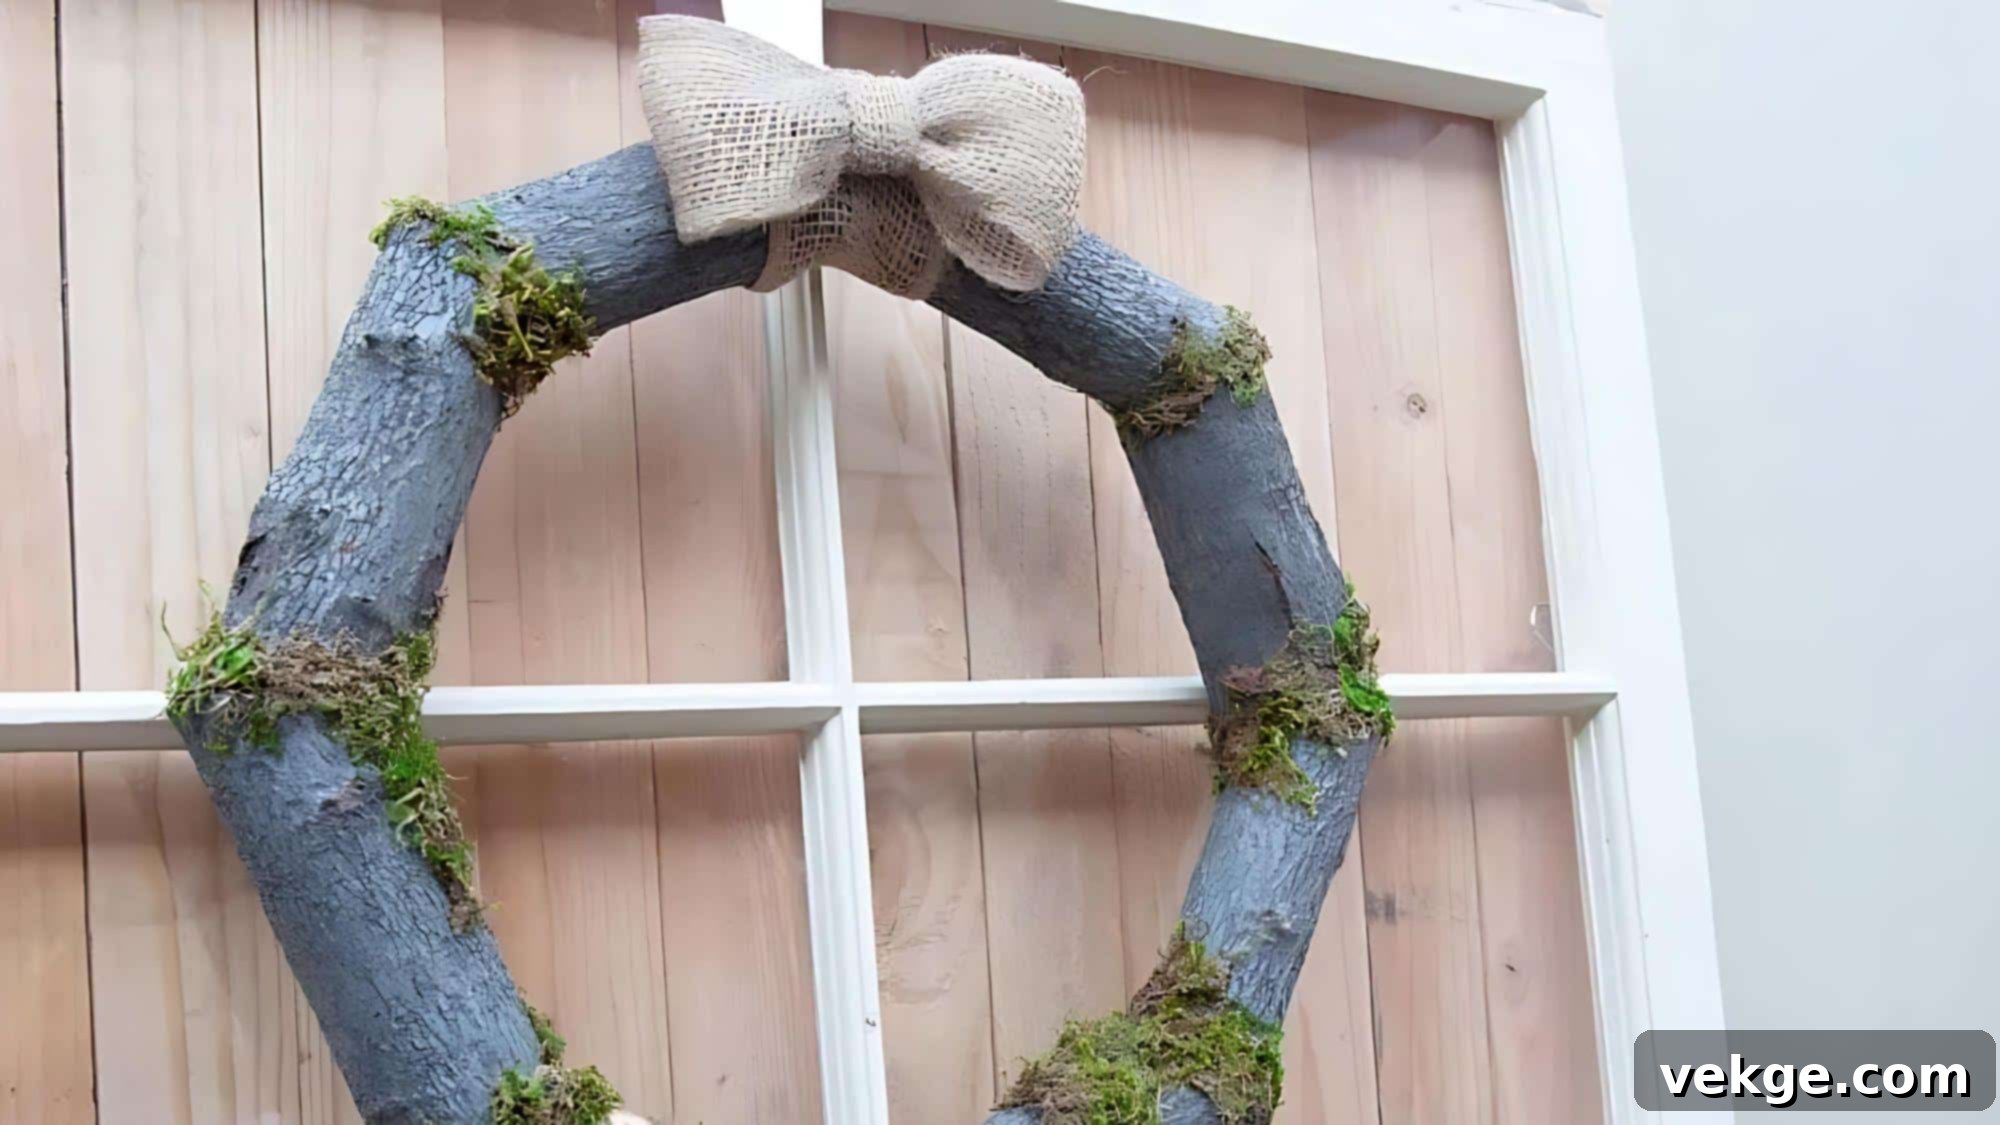
Embrace the rugged charm of autumn with a distinctive woodsy fall log wreath. This truly unique creation transports the natural beauty of the forest directly to your doorstep, offering a rustic and earthy welcome to the season. By utilizing simple, natural materials like tree branches, you can craft a wreath that is not only visually stunning but also profoundly connects your home to the tranquil ambiance of the great outdoors.
Materials Required
- Small tree branches (ideally similar in size and diameter)
- Natural moss (sheet moss or Spanish moss)
- Wreath form (wire or foam)
- Floral wire
- Hot glue gun and glue sticks
- Ribbon for hanging (optional)
Crafting Process
- Gather and select tree branches that are relatively uniform in size for a cohesive look.
- Attach the branches one by one to the wreath form, securing them firmly in place using strong floral wire.
- Fill any visible gaps or spaces between the branches with natural moss, creating a soft, textural contrast.
- Secure the moss in place with small dots of hot glue to prevent it from shifting or falling out.
- If desired, add a robust, rustic ribbon for hanging, completing the woodland aesthetic.
Full Tutorial: Get the step-by-step instructions here.
Additional Tips
- Branch Stability: For sturdy attachment, wrap floral wire tightly around each branch and the wreath form, ensuring it can withstand outdoor conditions.
- Textural Cohesion: Use generous amounts of moss to seamlessly fill gaps, creating a lush, textured, and unified appearance that mimics a forest floor.
- Woodland Flair: Enhance the natural theme by incorporating small pinecones, acorns, dried berries, or even tiny faux mushrooms for extra charm.
- Material Safety: Before using natural branches, clean them thoroughly to remove any dirt, insects, or debris, and ensure they are completely pest-free.
10. Pumpkin Grapevine Wreath: Simplicity for Fall
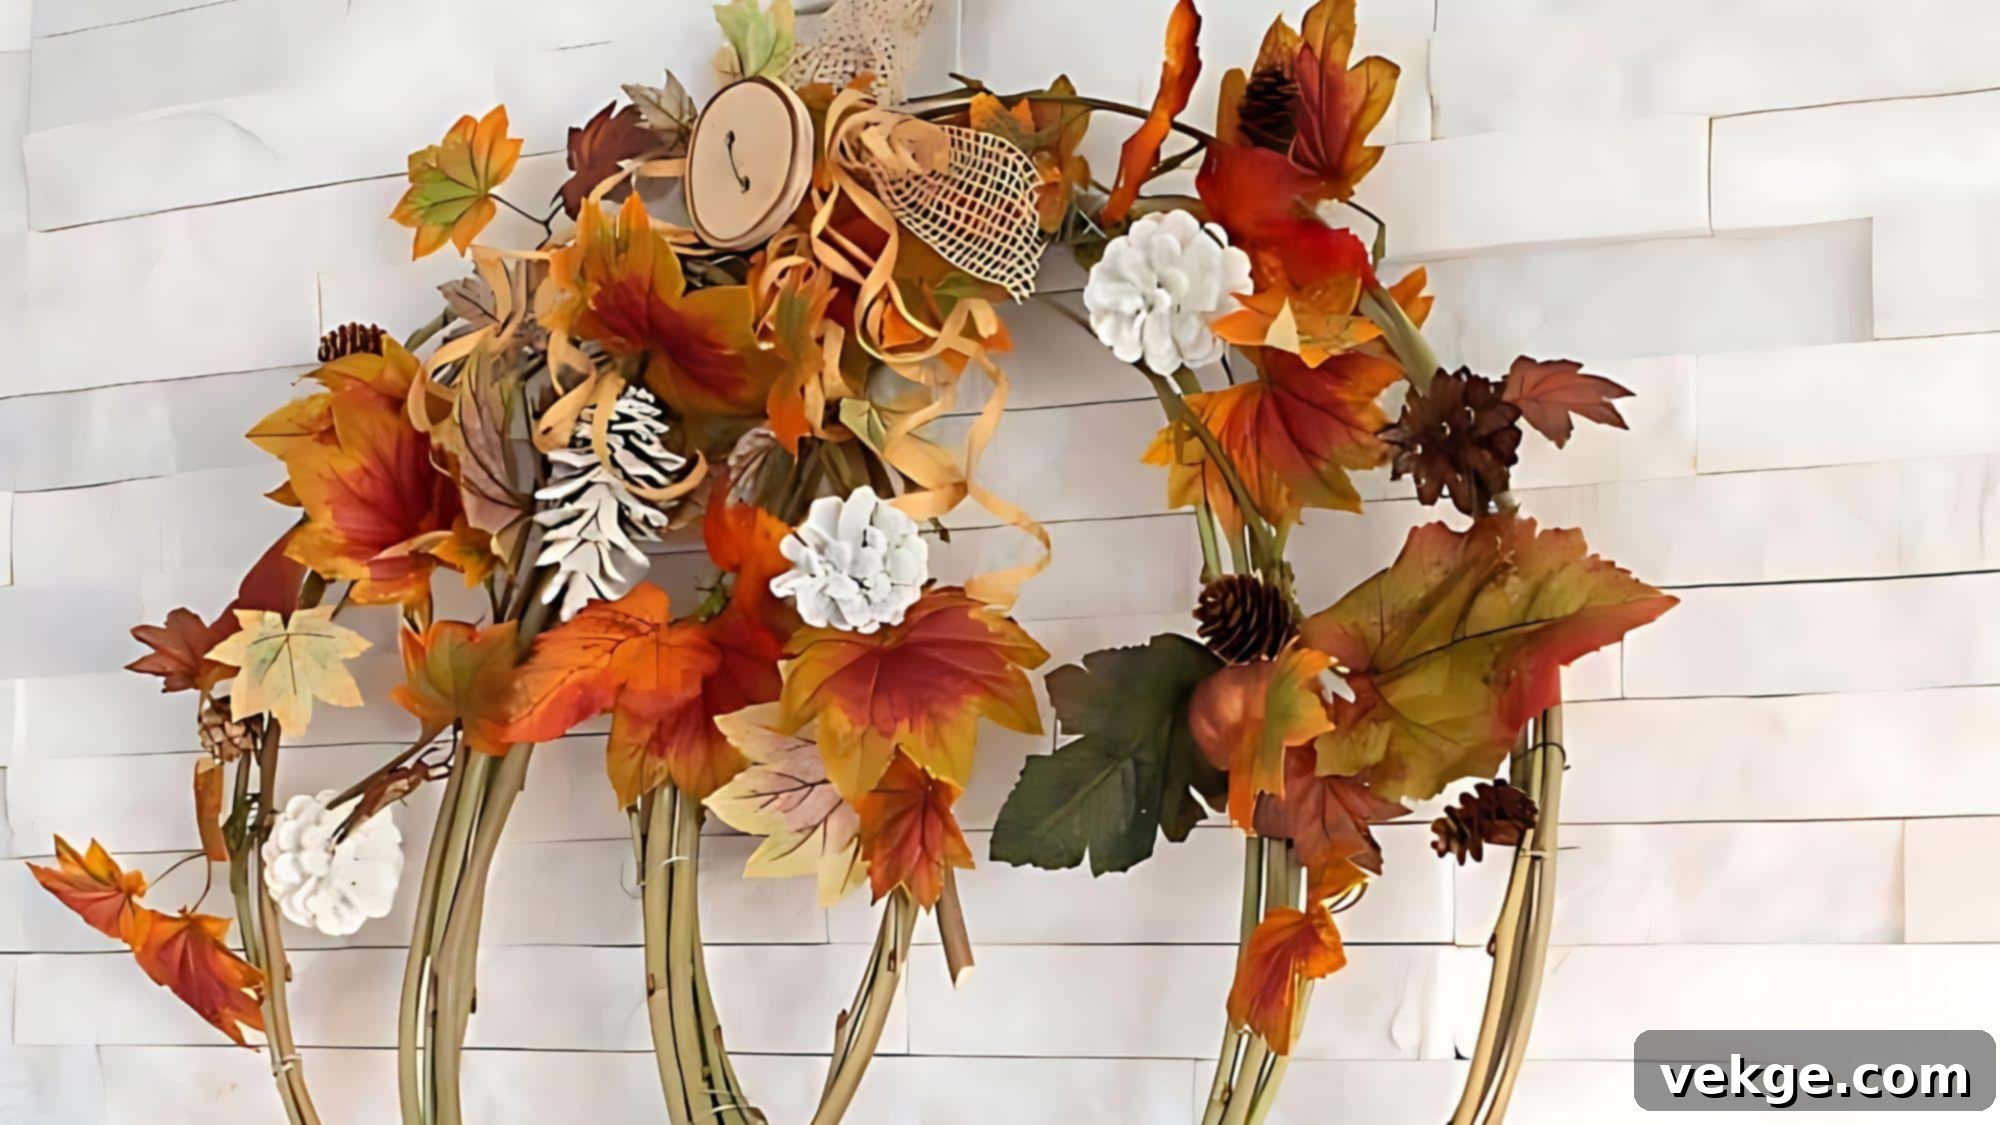
Embrace the quintessential essence of autumn with a pumpkin grapevine wreath that beautifully marries rustic charm with modern simplicity. This elegant wreath design adopts a minimalist approach to fall decor, focusing primarily on the iconic pumpkin shape nestled artfully within the organic twists of natural grapevines. It creates a sophisticated yet warm welcome for your home, truly capturing the inviting spirit of the harvest season with understated grace.
Materials Required
- Small faux pumpkins (or painted real mini pumpkins)
- Grapevine wreath form
- Floral wire
- Hot glue gun and glue sticks
- Greenery or leaves (e.g., faux eucalyptus, autumn leaves, optional)
- Ribbon for hanging (optional)
Crafting Process
- Select a sturdy grapevine wreath form to serve as your natural, rustic base.
- Thoughtfully arrange the faux pumpkins, distributing them evenly around the wreath to create a balanced and pleasing composition.
- Secure each pumpkin firmly to the grapevine form using both floral wire for support and hot glue for lasting adhesion.
- If desired, add small sprigs of complementary greenery or faux autumn leaves to introduce contrast and fill any bare spots.
- Attach a decorative ribbon at the top for hanging, if you choose to display your wreath this way.
Full Tutorial:Crafts by Amanda
Additional Tips
- Strategic Positioning: Ensure your pumpkins are evenly spaced around the wreath, paying attention to visual balance to create a harmonious design.
- Enhanced Security: For long-term display, especially if exposed to outdoor elements, utilize both floral wire and hot glue to firmly attach all pumpkins.
- Personalized Flair: Customize your wreath further by adding a rustic burlap bow, a small wooden tag with a seasonal message, or even a few real dried corn husks.
- Color Harmony: Choose faux pumpkin colors that complement your home’s existing exterior paint or interior decor, whether you opt for traditional oranges or muted pastels.
11. Fall Charger Wreath: Country Chic Charm for Your Door
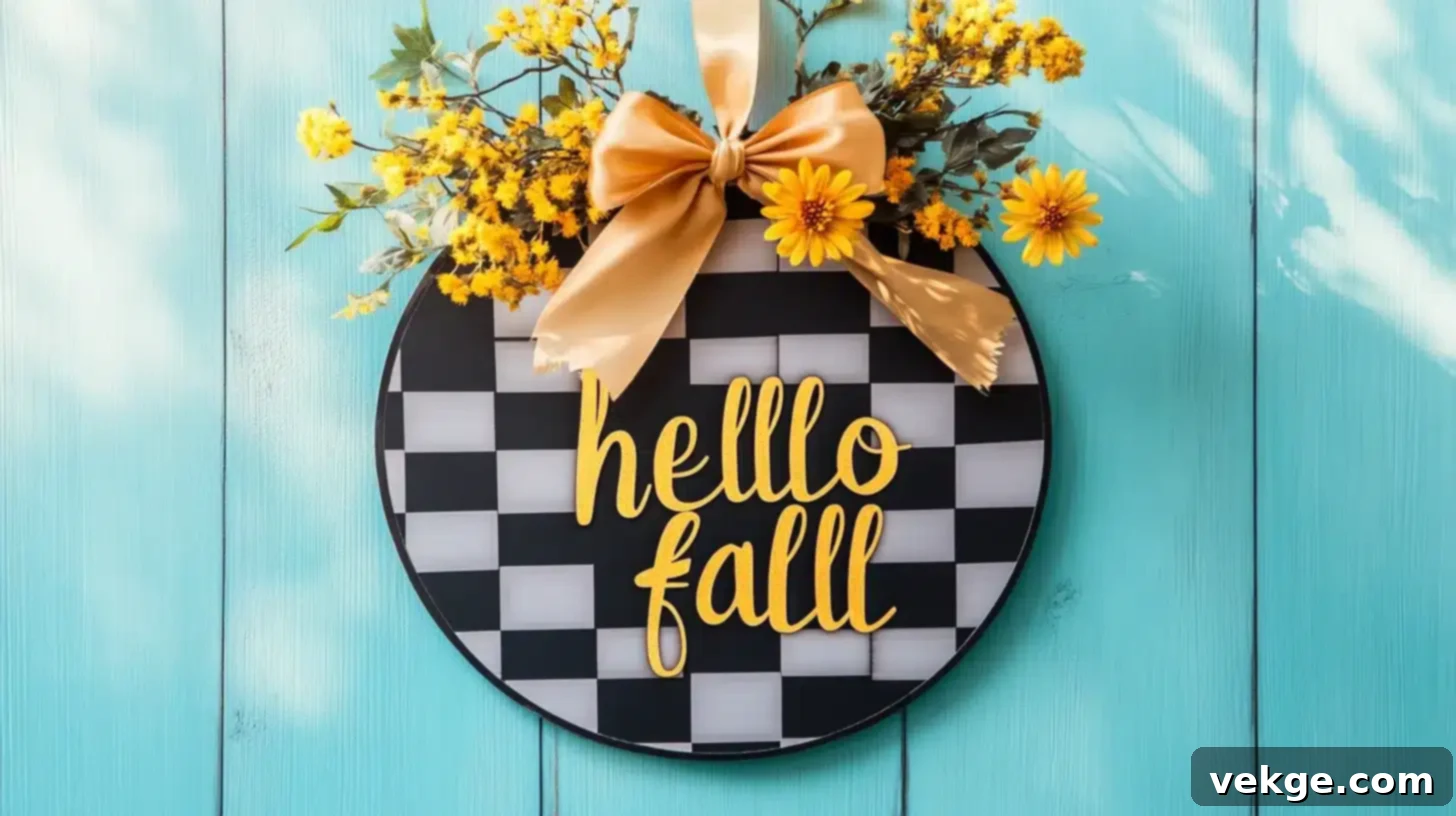
Infuse a delightful touch of farmhouse flair into your autumn decor with a charming fall charger wreath. This ingenious design ingeniously transforms a simple charger plate into a captivating focal point, artfully blending rustic elements with a cozy country aesthetic. It’s a refreshing take on traditional wreaths, guaranteed to add both warmth and a unique personality to your home’s entrance, welcoming all with its country-chic appeal.
Materials Required
- Charger plate (plastic, wood, or metal)
- Faux florals (e.g., autumn leaves, berries, small flowers)
- Wooden words or signs (e.g., “Welcome,” “Gather,” “Fall”)
- Gingham ribbon
- Hot glue gun and glue sticks
- Floral wire (optional, for heavier elements)
Crafting Process
- Begin with the charger plate as your sturdy, circular base.
- Thoughtfully arrange your selection of faux florals around the outer edge of the charger plate.
- Securely attach your chosen wooden words or sign to the center of the charger plate, making it a prominent feature.
- Add loops or bows of gingham ribbon, strategically placed to enhance the country charm.
- Finally, attach a strong loop or wire to the back of the charger for easy and secure hanging.
Full Tutorial:The Craft Patch
Additional Tips
- Reinforced Attachment: For durable display, particularly for outdoor use, employ both hot glue and floral wire (for bulkier items) to ensure all elements are securely fastened.
- Personalized Color Scheme: Choose faux florals, ribbon, and paint colors that perfectly complement your home’s existing exterior or interior fall decor.
- Finishing Flourishes: Create a voluminous gingham bow or add small faux sunflowers or cotton bolls to amplify the country-chic aesthetic.
- Even Distribution: Carefully arrange and distribute all decorative elements around the charger plate to achieve a visually balanced and appealing composition.
12. Brown Paper Bag Wreath: A Rustic Fall Charmer

Transform humble brown paper bags into an unexpectedly stunning autumn wreath that is both eco-friendly and remarkably budget-conscious. This delightful DIY project masterfully combines charming simplicity with an appealing rustic aesthetic, creating a truly unique door decoration that beautifully captures the essence of fall. By pairing artfully crumpled kraft paper with vibrant faux foliage, you can craft an impressive wreath that will surely captivate guests and spark conversation.
Materials Required
- Brown paper bags or sturdy packing paper
- Faux fall foliage (leaves, berries, small branches)
- Wreath form (foam or wire)
- Hot glue gun and glue sticks
- Scissors
- Ribbon for hanging (optional)
Crafting Process
- Cut the brown paper bags into various strips or shapes, then crumple and unfurl them to create an appealing textured effect.
- Begin attaching the crumpled paper pieces to the wreath form, layering them densely and securing each piece firmly with hot glue.
- Integrate pieces of faux fall foliage, strategically placing them among the paper for bursts of color, depth, and seasonal beauty.
- Ensure all paper and foliage elements are thoroughly secured with hot glue for a durable and lasting display.
Full tutorial:Dream A Little Bigger
Additional Tips
- Textural Diversity: Experiment with varying the crumpling technique for different paper pieces to introduce a rich array of textures and visual interest.
- Enhanced Durability: For wreaths intended for outdoor use, ensure all paper elements are thoroughly coated with a clear, weather-resistant sealant after assembly.
- Creative Personalization: Customize your wreath with additional rustic extras like small pinecones, miniature faux pumpkins, or a charming twine bow.
13. Autumn Paper Leaf Wreath: A Festive Fall Favorite
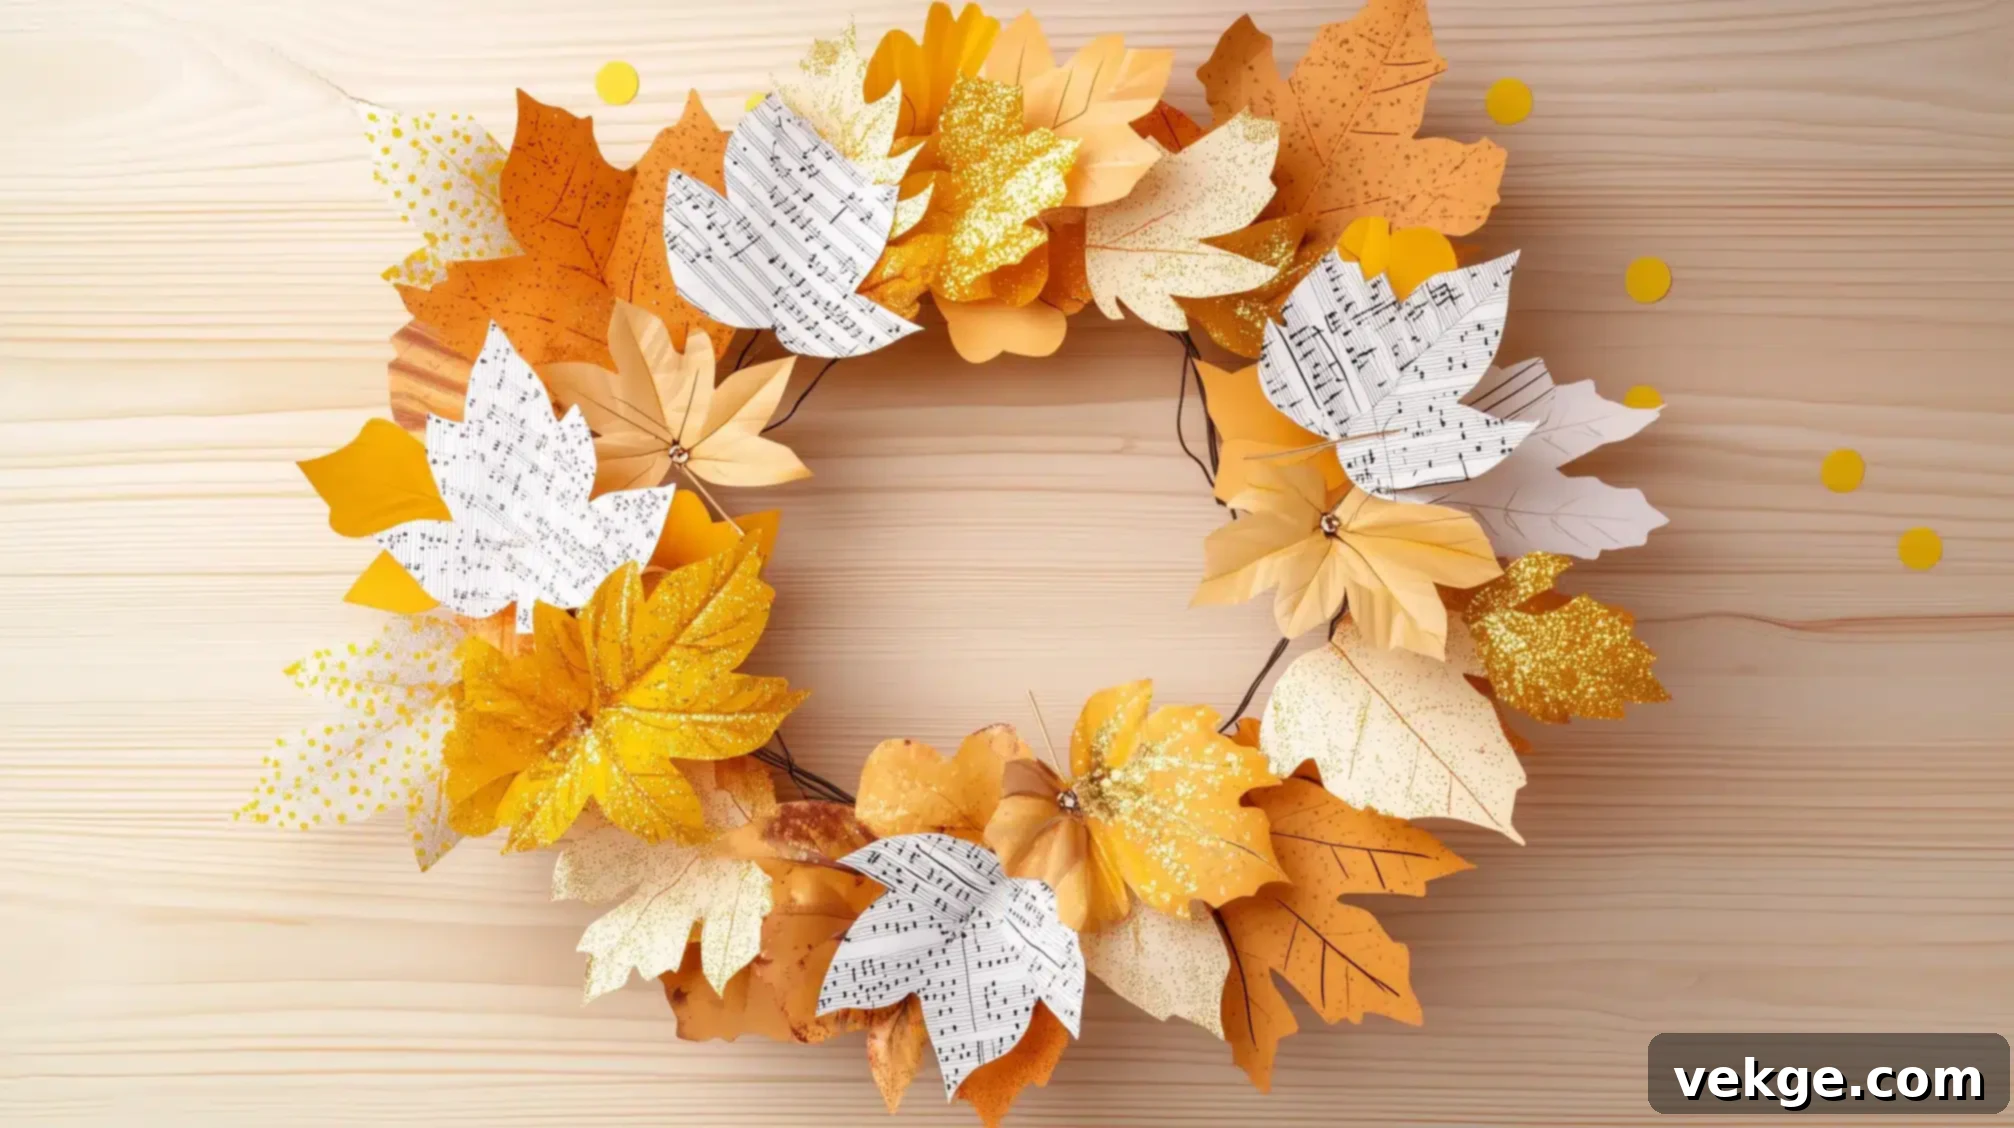
Bring the vibrant, cheerful colors of autumn directly indoors with this utterly charming paper leaf wreath. Meticulously crafted from an assortment of scrapbook paper and dazzling glitter cardstock, this delightful DIY project offers a playful and colorful reimagining of traditional fall decor. The result is an exceptionally eye-catching wreath that perfectly encapsulates the joyful essence of the season, ideal for brightening any room or extending a warm welcome at your door.
Materials Required
- Scrapbook paper in various fall colors (e.g., reds, oranges, yellows, browns)
- Glitter cardstock (for sparkle accents)
- Wreath form (foam or wire)
- Hot glue gun and glue sticks
- Scissors (or a leaf punch for precision)
- Ribbon for hanging (optional)
Crafting Process
- Cut out an assortment of various leaf shapes and sizes from both your scrapbook paper and glitter cardstock.
- Carefully arrange the paper leaves on the wreath form, overlapping them thoughtfully to create a sense of depth and fullness.
- Secure each leaf firmly in place using small dabs of hot glue.
- Strategically intersperse the glitter cardstock leaves throughout the design to add captivating sparkle and striking contrast.
Full tutorial:Polkadot Chair
Additional Tips
- Natural Leaf Variety: For a more organic and realistic appearance, cut out leaves in a diverse range of shapes and sizes, mimicking nature’s imperfections.
- Dimensional Depth: Generously layer the paper leaves, slightly curling some edges before gluing, to create wonderful dimension and engaging visual interest in your wreath.
- Decor Coordination: Select paper colors and patterns that harmoniously complement your existing fall decor, ensuring a cohesive and polished look throughout your home.
14. Silver Tray Wreath: A Customizable Autumn Welcome
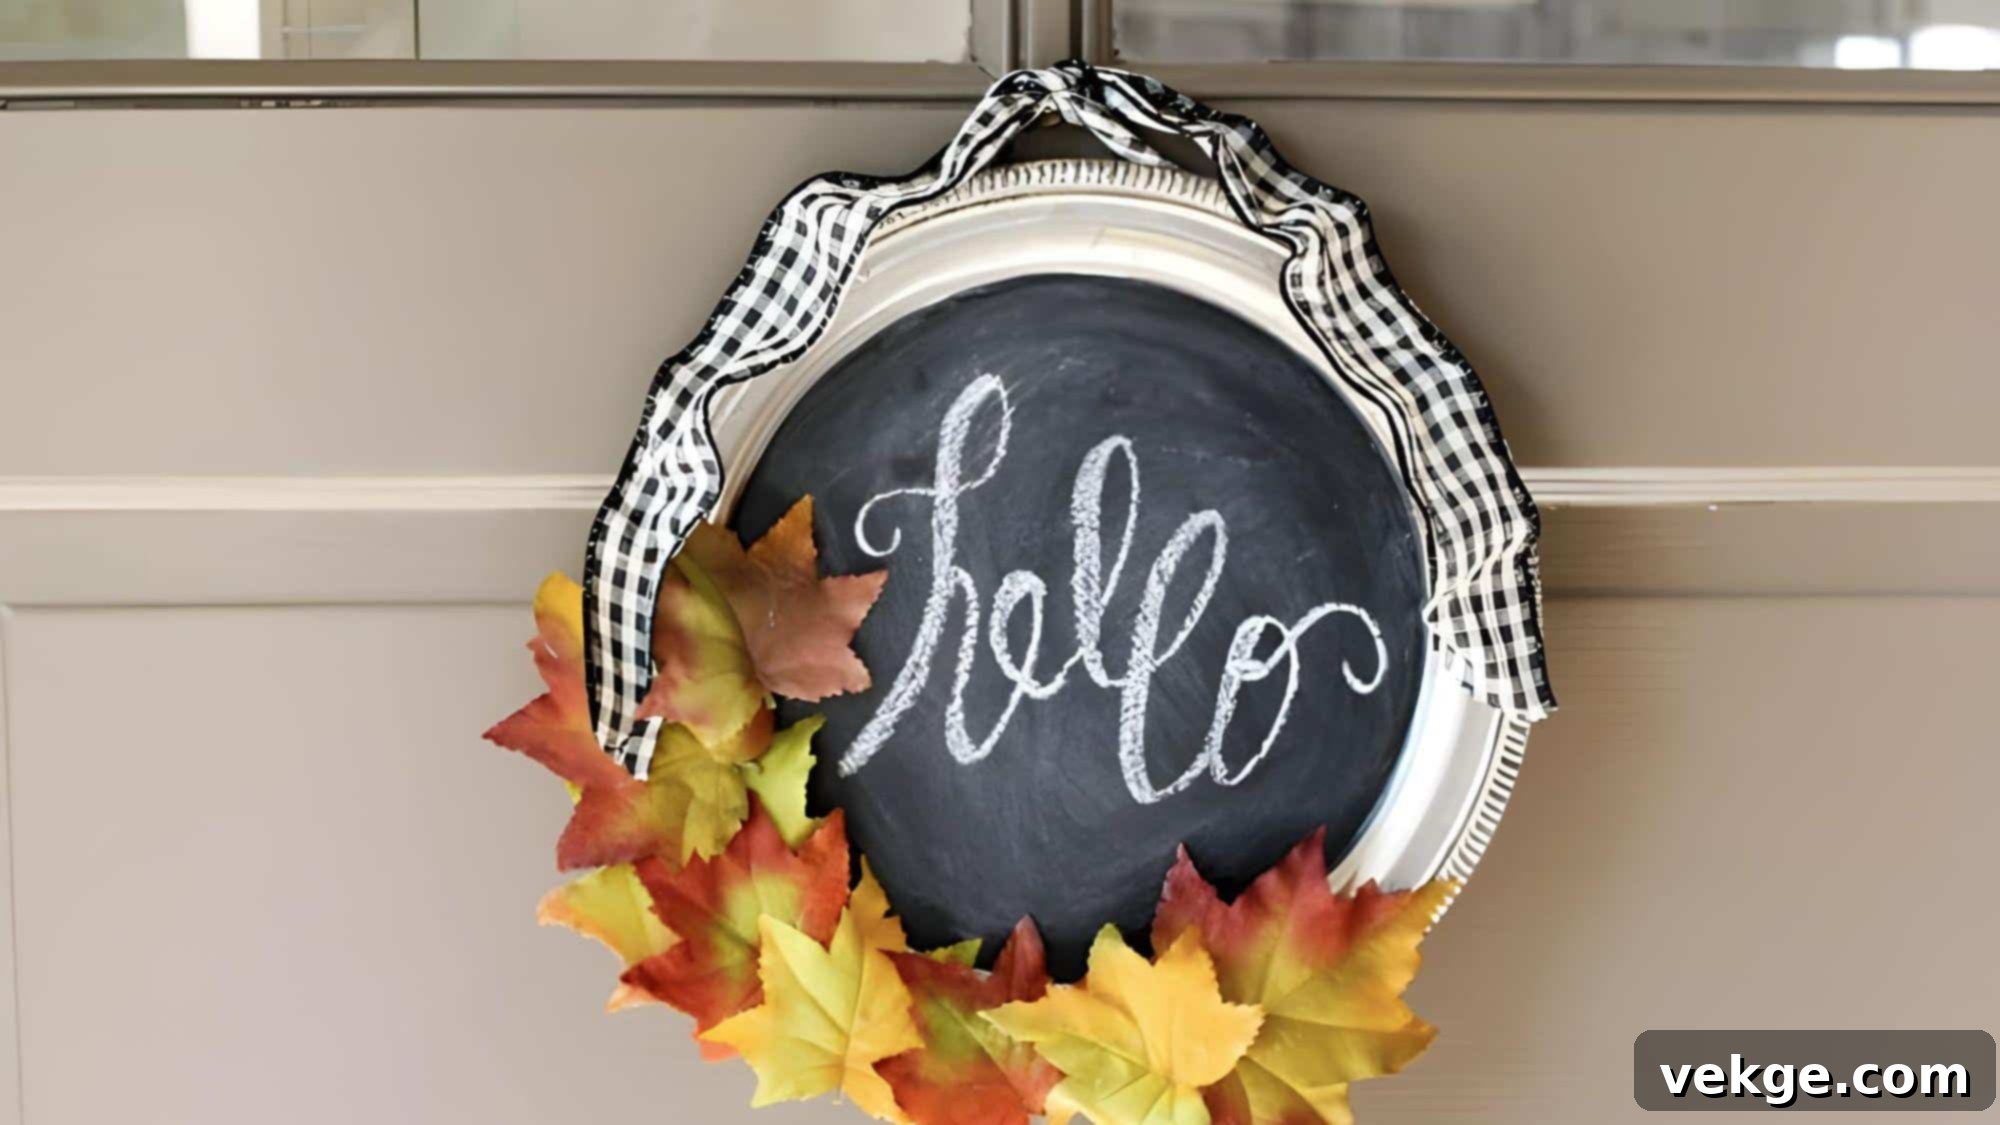
Transform a simple silver tray into a remarkably unique and endlessly versatile wreath, adding an elegant touch to your fall decor. This innovative DIY project skillfully combines the classic charm of a traditional wreath with the practical functionality of a chalkboard, empowering you to personalize your seasonal greetings for every occasion. The gleaming silver tray serves as a striking backdrop for vibrant autumn leaves, creating a wreath that is both eye-catching and incredibly practical for dynamic display.
Materials Required
- Silver tray (round or oval)
- Chalkboard paint
- Faux fall leaves
- Chalk or chalk marker
- Hot glue gun and glue sticks
- Ribbon for hanging (optional)
Crafting Process
- Carefully paint the center of the silver tray with chalkboard paint, creating your writable surface.
- Arrange and securely glue faux fall leaves around the outer edge of the tray, framing the chalkboard.
- Allow the chalkboard paint to dry completely and cure according to manufacturer instructions.
- Once dry, use chalk or a chalk marker to write your personalized message, greeting, or seasonal quote on the chalkboard surface.
- If desired, attach a decorative ribbon to the top for hanging, completing your customizable wreath.
Full tutorial: Average But Inspired
Additional Tips
- Expanded Canvas: For more writing space or a larger message, consider painting the entire surface of the silver tray with chalkboard paint.
- Effortless Seasonal Updates: Easily refresh your decor by simply switching out the faux leaves and updating the chalkboard message to match different holidays or changing seasons.
- Versatile Display: Beyond a front door wreath, this piece can function beautifully as a unique table centerpiece or a striking wall decoration in your entryway or living room.
15. Fresh Cornstalk Wreath: A Harvest-Inspired Masterpiece
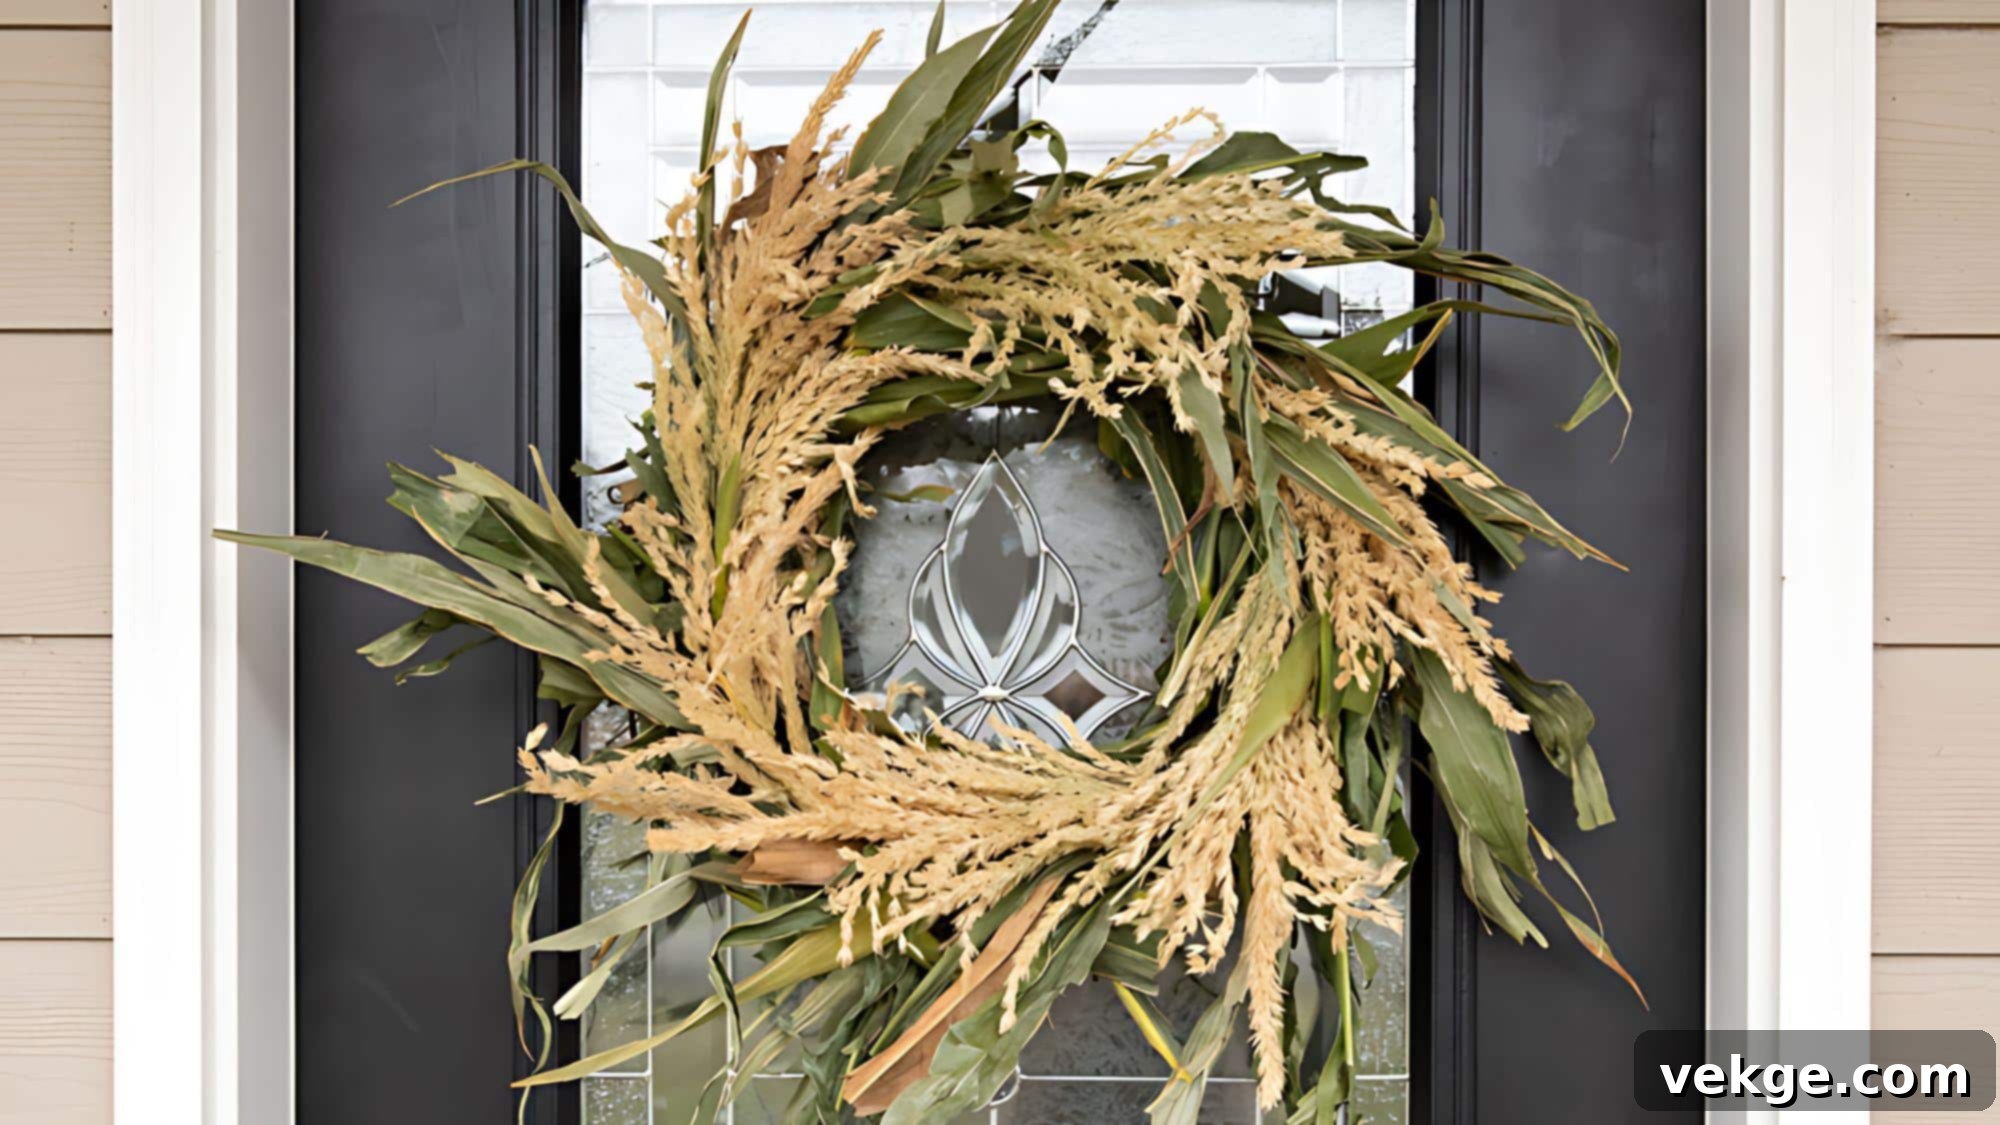
Embrace the bountiful spirit of autumn with a truly stunning wreath crafted from fresh cornstalks. This rustic, natural creation profoundly captures the essence of the harvest season, bringing an authentic touch of farm-inspired charm directly into your home. The wonderfully textured cornstalks, thoughtfully arranged on a sturdy grapevine base, form a wreath that is not only visually striking but also a heartfelt celebration of fall’s rich agricultural heritage.
Materials Required
- Fresh cornstalks (dried for longevity, or fresh for immediate display)
- Grapevine wreath form
- Floral wire (sturdy gauge)
- Hot glue gun and glue sticks
- Ribbon for hanging (optional)
Crafting Process
- Ensure your cornstalks are thoroughly cleaned and completely dry before beginning any work.
- Gather the cornstalks into small, manageable bundles, securing each bundle loosely with twine or floral wire.
- Attach these bundles securely to the grapevine wreath form, using strong floral wire to prevent shifting.
- Arrange the bundles meticulously, ensuring they cover the entire wreath form for a full and continuous look.
- Add any desired decorative elements, such as a rustic burlap ribbon or miniature faux pumpkins, to enhance its harvest appeal.
Full tutorial: Delia Creates
Additional Tips
- Cornstalk Preparation: For a cleaner and more polished appearance, carefully remove any excess leaves or debris from the cornstalks before attaching them to the wreath.
- Maximum Durability: To ensure your wreath lasts through the season, utilize both strong floral wire and a generous amount of hot glue for a secure attachment of all cornstalk bundles.
- Complementary Accents: Incorporate other natural fall elements like dried wheat stalks, colorful Indian corn, or rustic dried flowers to add layers of interest and texture.
16. Cotton Grass and Pumpkin Wreath: A Modern Autumn Touch
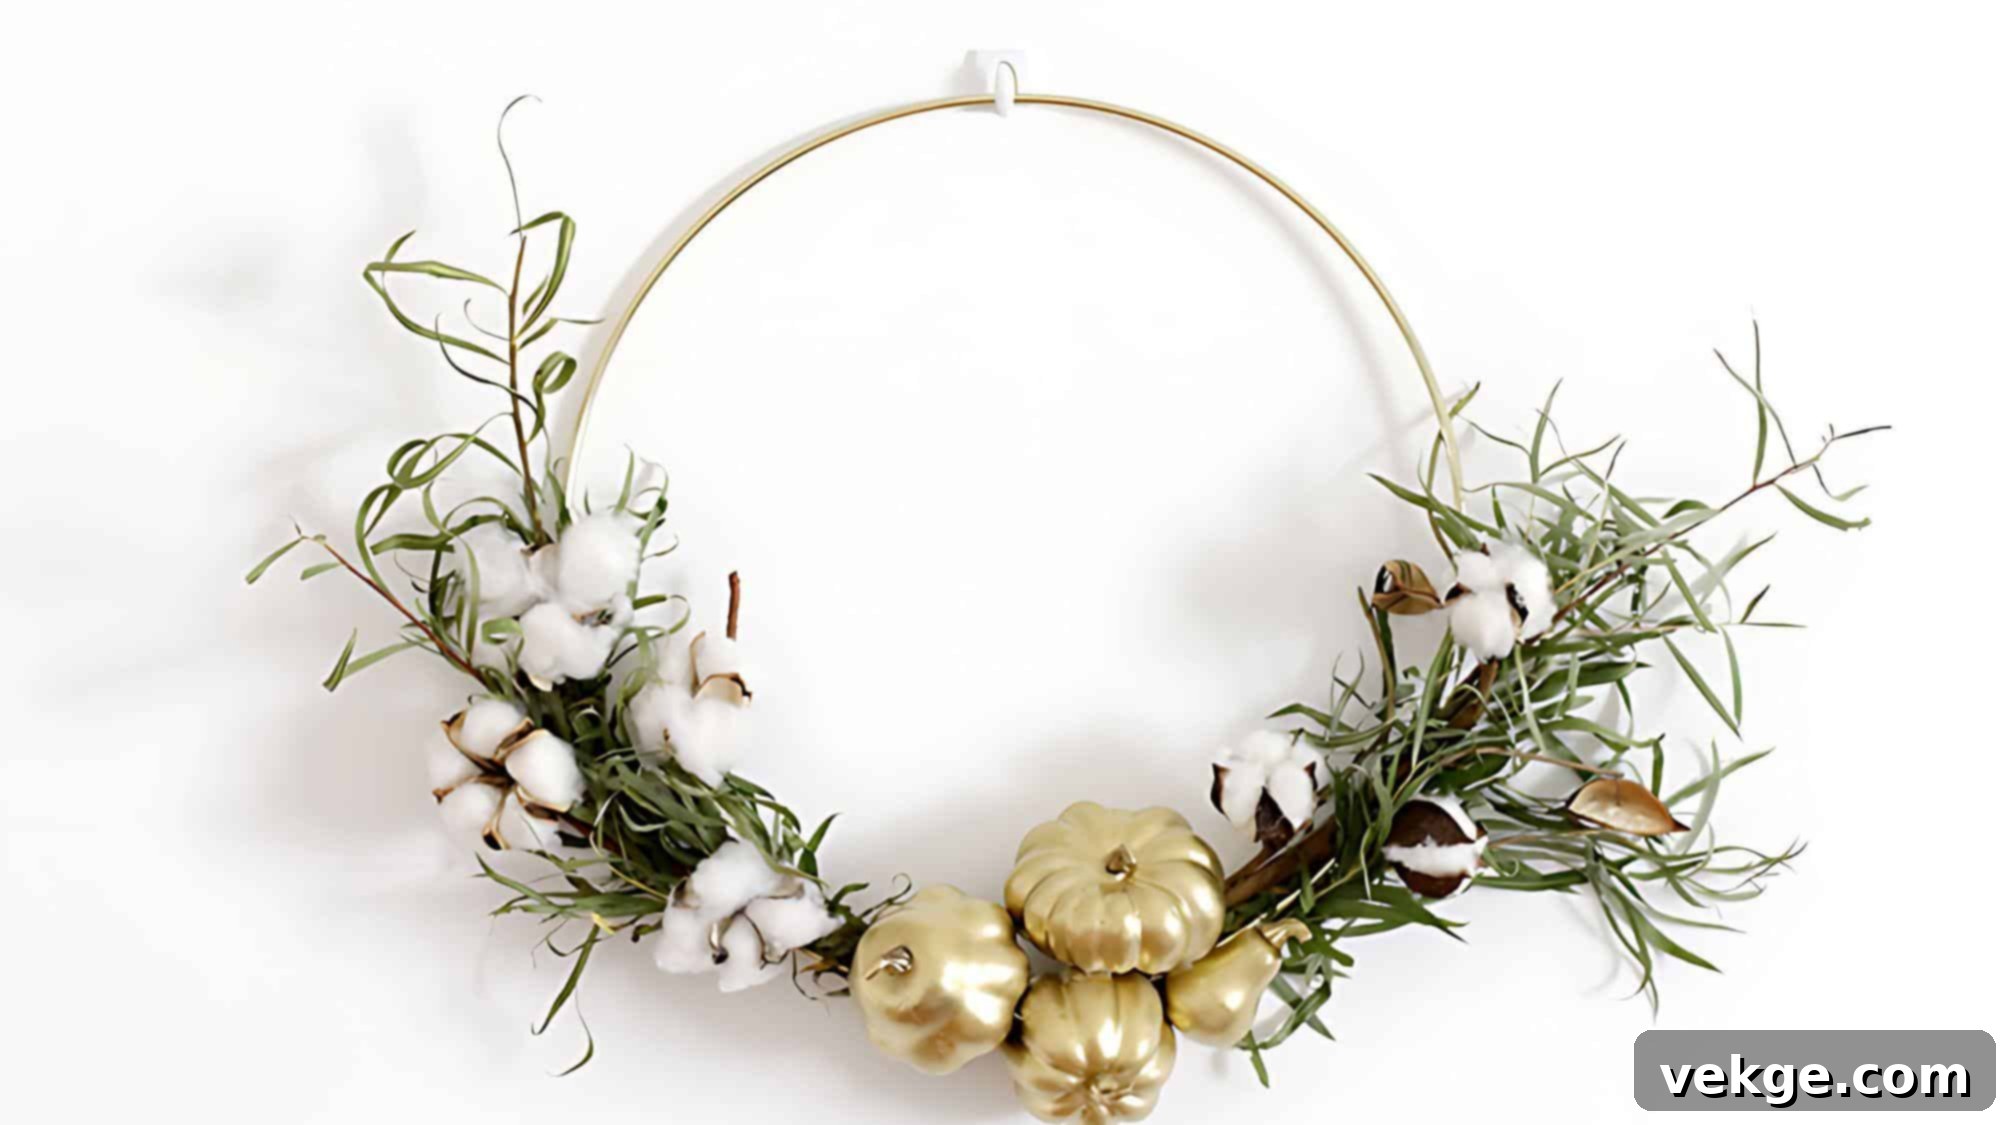
Elevate your fall decor with this chic and distinctly contemporary wreath, harmoniously blending the soft, inviting texture of cotton stems with the glamorous gleam of gold-painted pumpkins. This sophisticated DIY project introduces a fresh, modern twist to traditional autumn wreaths, creating a stunning focal point for your home that effortlessly combines rustic charm with refined elegance. It’s perfect for those seeking an elevated seasonal aesthetic.
Materials Required
- Faux cotton stems (with bolls)
- Small faux pumpkins
- Gold spray paint (or acrylic paint)
- Wreath form (foam or grapevine)
- Floral wire
- Hot glue gun and glue sticks
- Ribbon for hanging (optional)
Crafting Process
- Carefully spray paint the faux pumpkins with gold paint, ensuring even coverage, and allow them to dry completely.
- Begin arranging the faux cotton stems around the wreath form, creating a soft, voluminous base.
- Securely attach the cotton stems to the wreath form using both floral wire for structure and hot glue for stability.
- Thoughtfully add the gold-painted pumpkins, distributing them evenly and artistically throughout the cotton stems.
- If desired, attach a complementary ribbon for hanging, completing your modern autumn masterpiece.
Full tutorial:The Merrythought
Additional Tips
- Flawless Paint Finish: Apply gold spray paint in light, even coats to the pumpkins to achieve a smooth, professional, and unblemished metallic finish.
- Visually Balanced Design: Alternate the placement of cotton stems and gold pumpkins, ensuring a harmonious and aesthetically pleasing arrangement across the entire wreath.
- Enhanced Textural Interest: Incorporate other complementary fall elements, such as delicate dried grasses, small bleached pinecones, or muted faux berries, to add layers of depth and texture.
17. Fall Gourd Wreath: A Quirky Celebration of Autumn
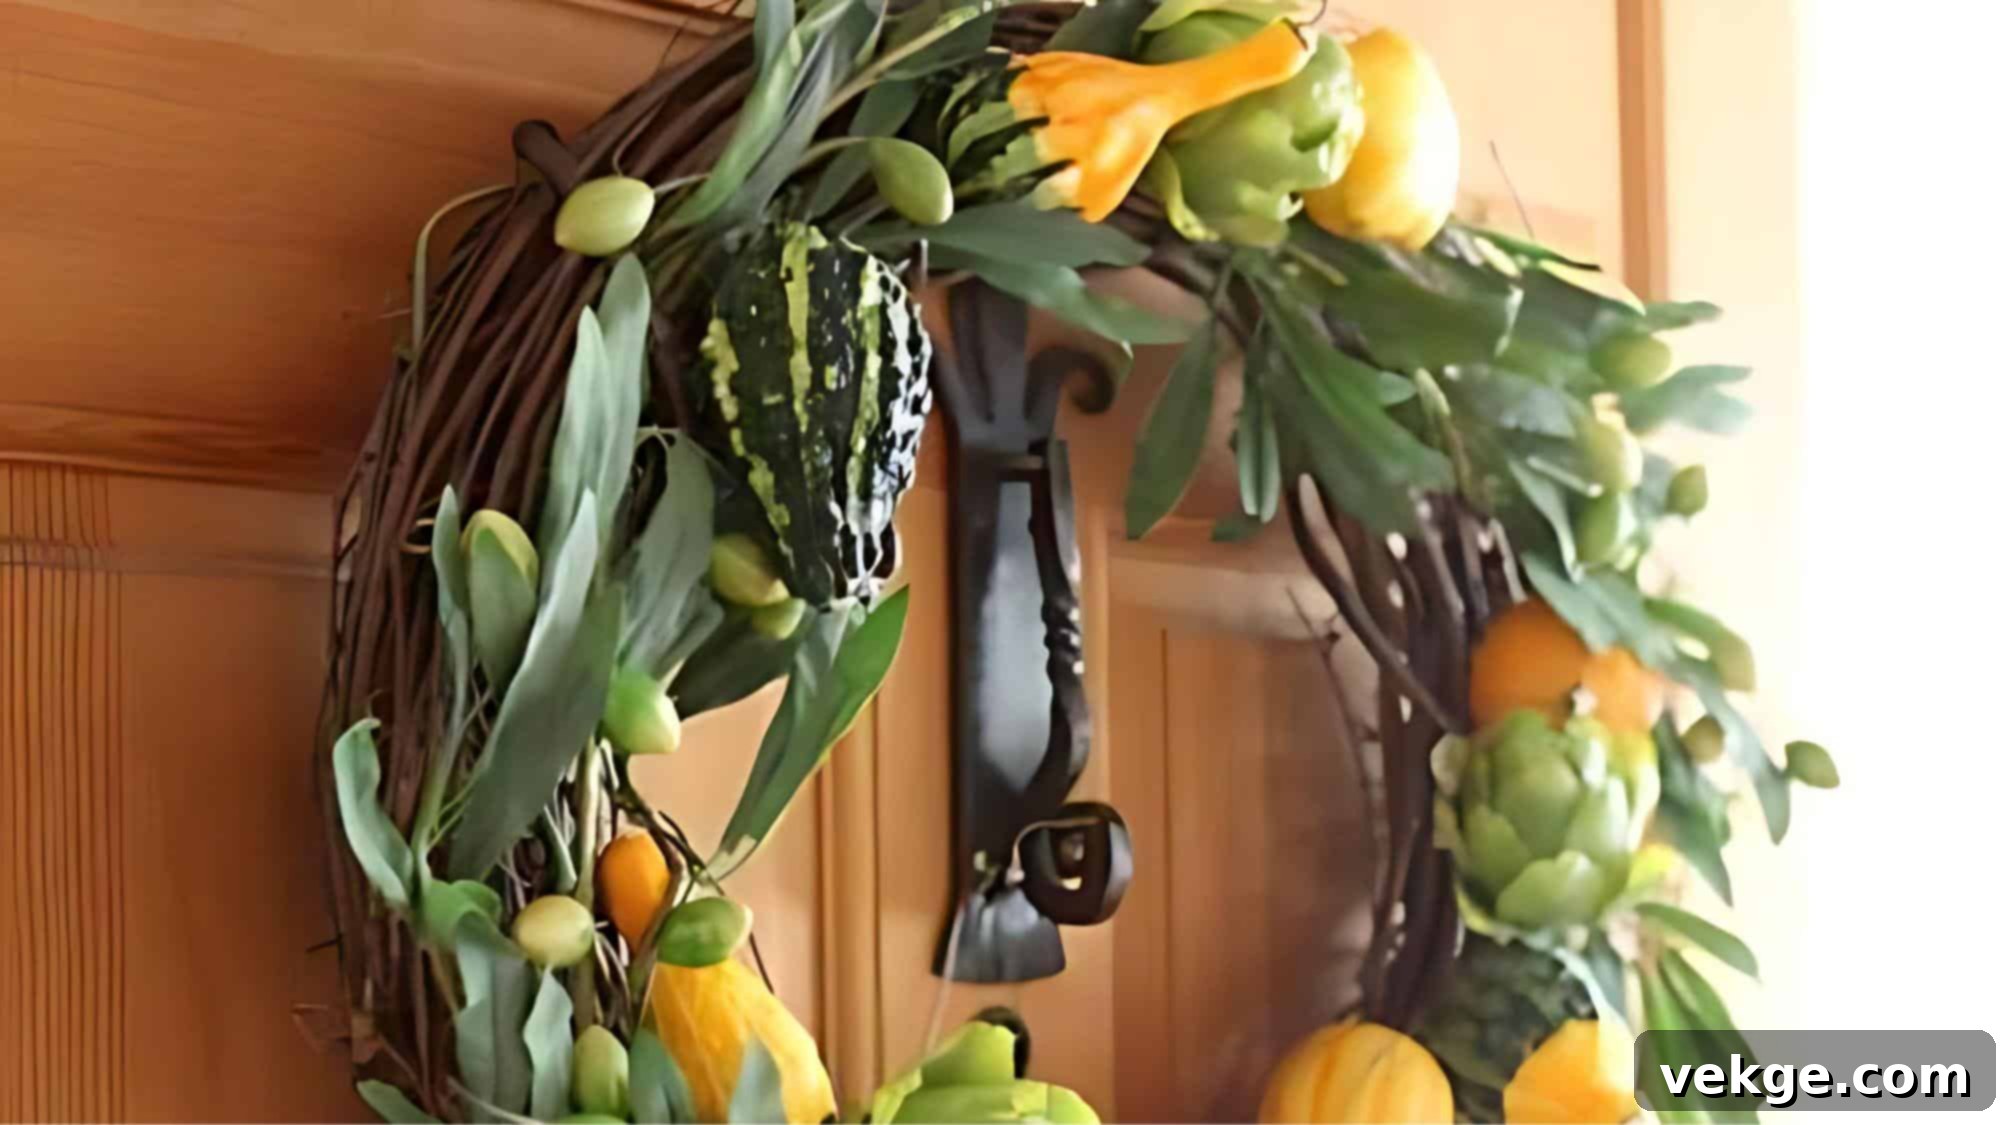
Welcome the delightfully whimsical side of fall with a truly unique wreath that proudly showcases the natural beauty and remarkable diversity of gourds. This eye-catching creation masterfully transforms the humble gourd into an engaging work of art, featuring an enchanting array of shapes, sizes, and colors that perfectly capture the exuberant essence of the harvest season. The result is a charming, distinctive, and conversation-starting wreath that will undoubtedly become a focal point in your autumn decor.
Materials Required
- Small gourds in various natural shapes and colors (real or high-quality faux)
- Wreath form (foam or grapevine)
- Floral wire (flexible but sturdy)
- Hot glue gun and glue sticks
- Greenery (e.g., faux autumn leaves, eucalyptus, optional)
- Ribbon for hanging (optional)
Crafting Process
- Select a diverse assortment of small gourds, considering their unique shapes, sizes, and natural color variations.
- Carefully arrange the gourds on the wreath form, experimenting with different placements to achieve a balanced and visually interesting composition.
- Secure each gourd firmly to the wreath form using both floral wire for structural integrity and hot glue for lasting adhesion.
- Add optional greenery, such as faux autumn leaves or eucalyptus sprigs, to provide contrast and fill any small gaps between the gourds.
- If desired, attach a decorative ribbon for hanging, completing the wreath’s playful autumnal look.
Full tutorial:Garden Therapy
Additional Tips
- Gourd Preparation: If using real gourds, thoroughly clean and dry them before use to prevent any mold or decay, which can extend their display life.
- Dynamic Visual Balance: Mix different gourd shapes (e.g., smooth, bumpy, elongated) and colors (e.g., green, yellow, orange) to create an engaging and varied look that highlights their natural artistry.
- Seasonal Longevity: For a wreath that you can enjoy year after year, opt for high-quality artificial gourds that convincingly mimic the appearance of real ones.
18. Minimalist Dried Grass Wreath: Nature’s Understated Grace
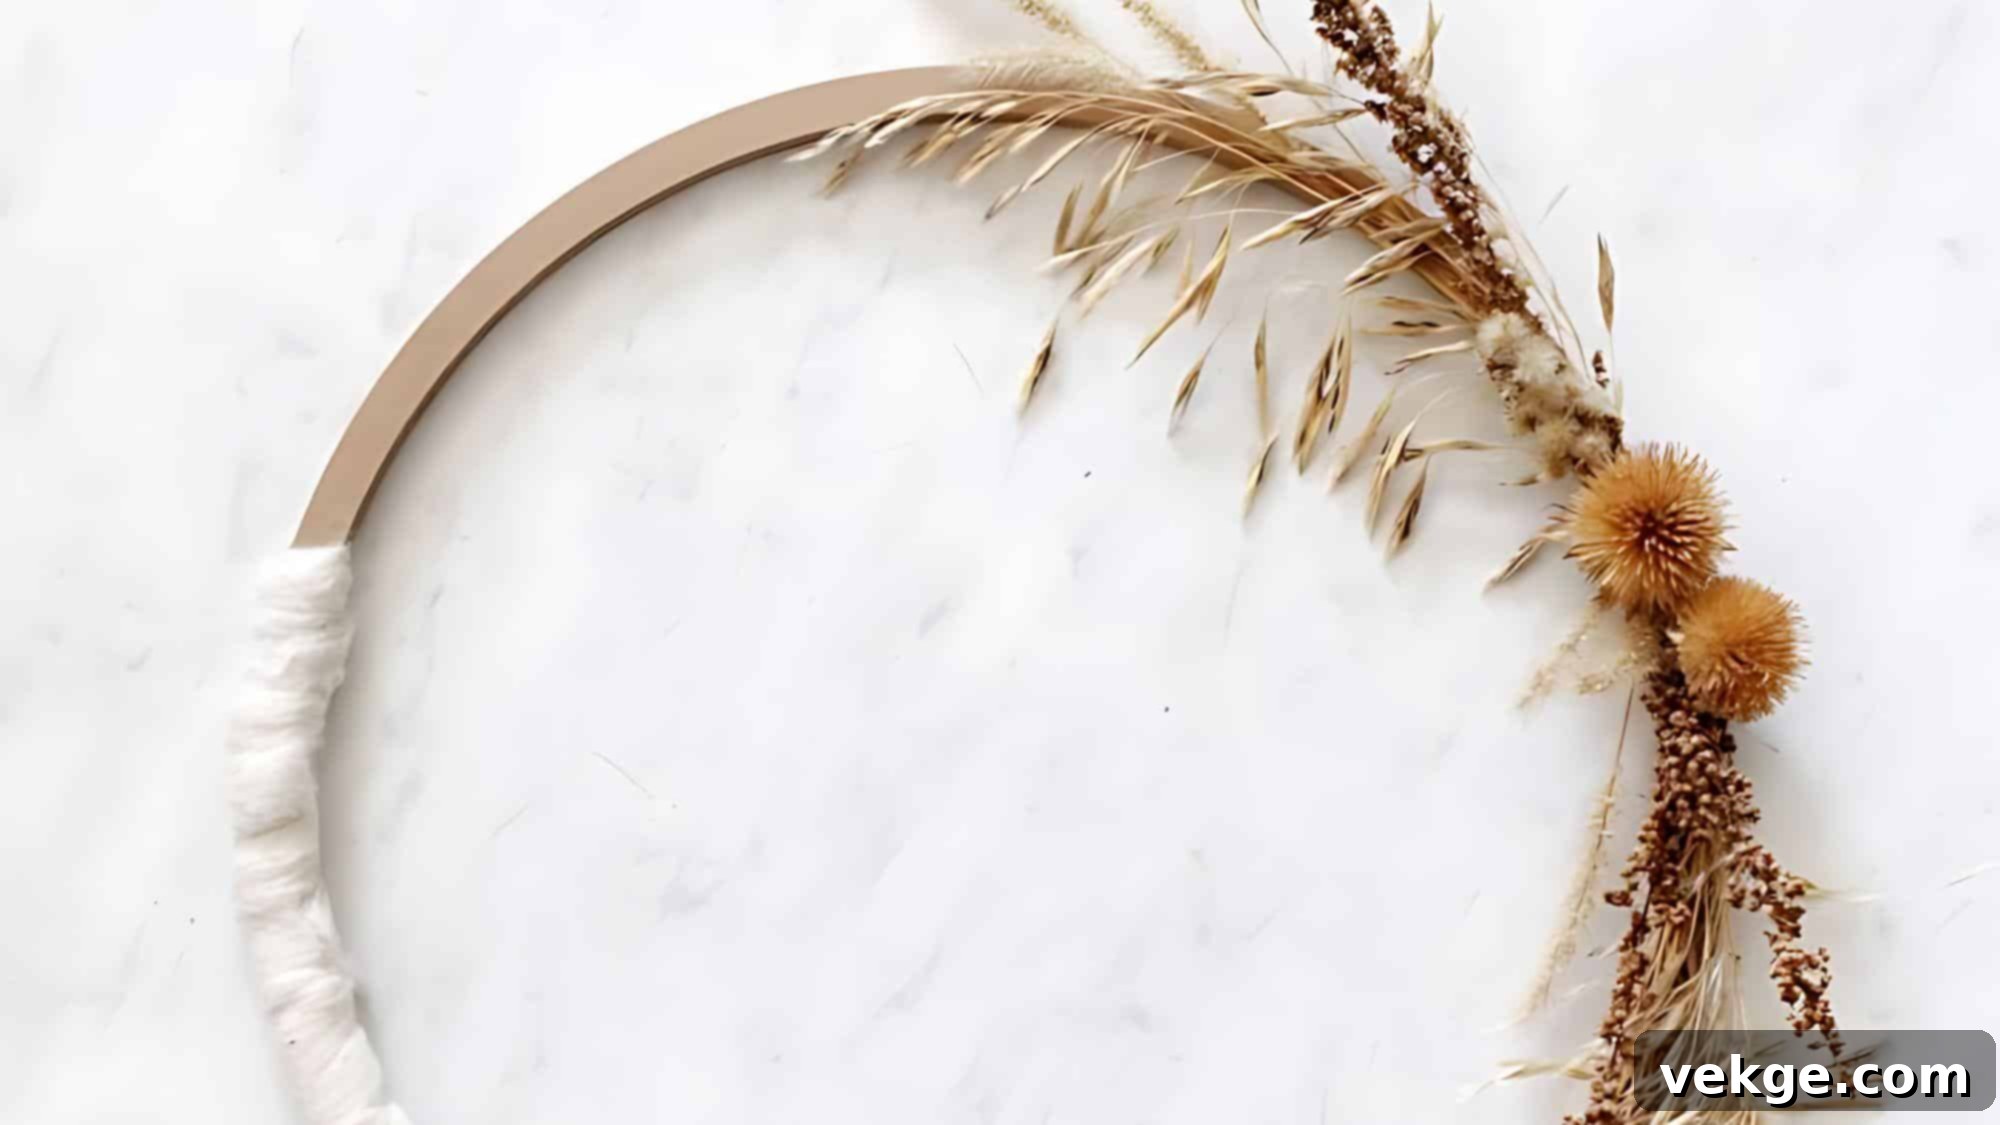
Embrace the serene beauty of simplicity with this wonderfully sophisticated dried grass wreath. Perfect for those who cherish a minimalist aesthetic, this elegant wreath beautifully showcases the subtle textures and muted, natural tones of various dried grasses. The result is a refined and remarkably versatile piece that effortlessly adds a touch of understated natural grace to any fall decor scheme, creating a calm and inviting atmosphere.
Materials Required
- Dried grasses (e.g., pampas grass, wheat, bunny tail grass, or other ornamental dried grasses)
- Wood wreath ring (a simple, plain hoop)
- Floral wire
- Hot glue gun and glue sticks
- Ribbon for hanging (optional, choose a natural fiber)
Crafting Process
- Gather and sort your dried grasses, perhaps categorizing them by length or type for easier arrangement.
- Begin wrapping bundles of grasses around a portion of the wood wreath ring, layering them in overlapping sections to create volume.
- Securely attach the grasses to the ring using floral wire, wrapping it tightly but discreetly. Reinforce with small dabs of hot glue where needed.
- Carefully trim any excess grass stems for a neat and polished appearance, maintaining the desired shape.
- If desired, attach a simple, natural fiber ribbon (like linen or jute) for hanging, allowing the grasses to remain the focal point.
Full tutorial: The Merrythought
Additional Tips
- Enrich Textural Variety: Combine different types of dried grasses, such as feathery pampas with slender wheat stalks, to create a richer and more engaging visual texture.
- Organic Flow: Allow some individual grass sprigs to naturally extend or slightly stick out from the main form; this adds to an organic, effortless, and artistic look.
- Subtle Color Accents: For a delicate pop of color while maintaining a minimalist vibe, consider lightly spray painting a few chosen grass stems with a very subtle, muted autumn shade.
19. Baby’s Breath Wreath: A Whimsical Autumn Wonder
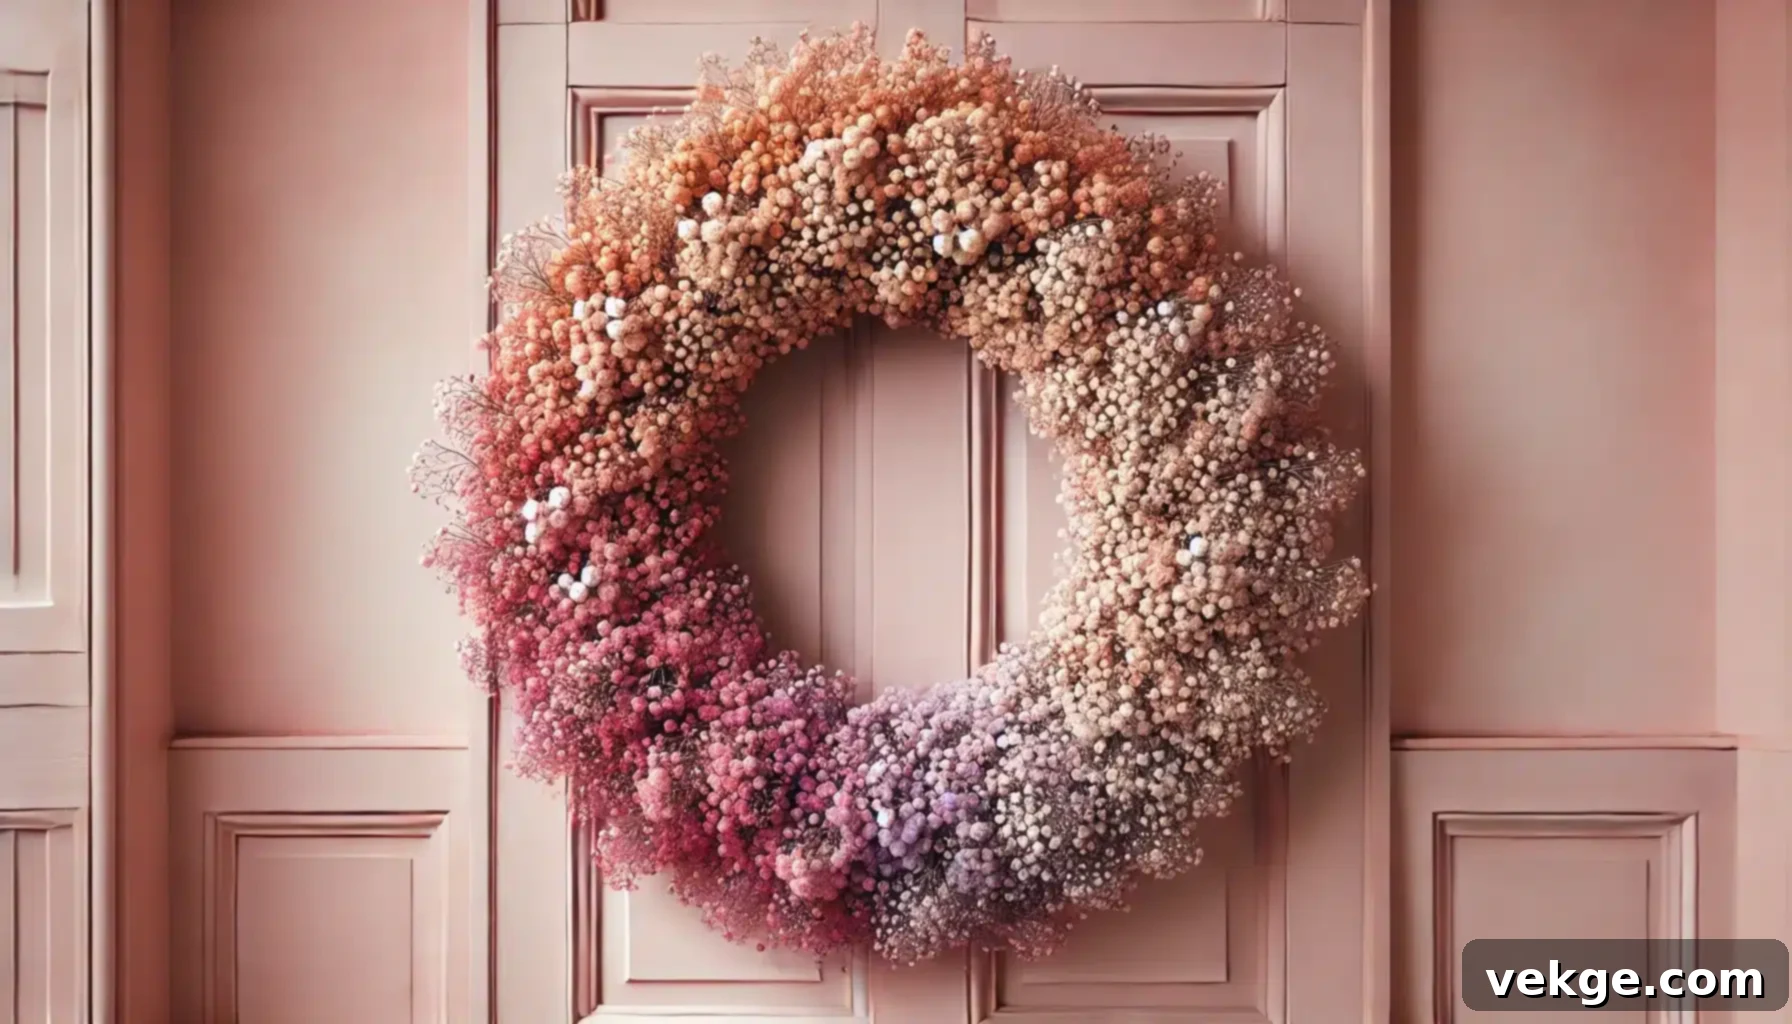
Transform delicate baby’s breath into an utterly stunning and unexpected fall wreath with this creative DIY project. By artfully spray-painting the airy clusters of baby’s breath in traditional seasonal hues like deep red, rust orange, or golden yellow, you’ll create a soft, romantic, and wonderfully whimsical wreath that captures the ethereal essence of autumn while maintaining an airy, dreamlike quality. It’s a truly unique statement piece.
Materials Required
- Fresh or dried baby’s breath bundles
- Spray paint in desired seasonal colors (e.g., orange, red, gold, deep purple)
- Foam wreath form
- Floral wire (thin gauge)
- Hot glue gun and glue sticks
- Ribbon for hanging (optional)
Crafting Process
- Carefully spray paint the baby’s breath bundles in your chosen fall colors, ensuring even coverage and allowing them to dry completely.
- Once thoroughly dry, begin attaching small clusters of the painted baby’s breath to the foam wreath form, securing them firmly with thin floral wire.
- Continue layering and filling in any gaps with additional baby’s breath, ensuring a full, cloud-like, and consistent appearance around the entire wreath.
- Use small dabs of hot glue to secure any loose pieces or to reinforce attachments for a durable finish.
- If desired, attach a soft, complementary ribbon for hanging, completing the whimsical design.
Full tutorial:The House that Lars Built
Additional Tips
- Vibrant Color Blending: Experiment with using multiple spray paint colors in a gradient or alternating fashion for a more dynamic, eye-catching ombre, or multi-toned effect.
- Gentle Handling: Painted baby’s breath can be delicate; handle it with extreme care during attachment to avoid breakage or shedding of the tiny blossoms.
- Complementary Accents: For a richer fall aesthetic, consider sparingly adding small faux berries in deep reds or oranges, or a few miniature dried leaves, without overwhelming the airy quality of the baby’s breath.
20. Neutral Pastel Pumpkin Wreath: A Soft Touch of Autumn
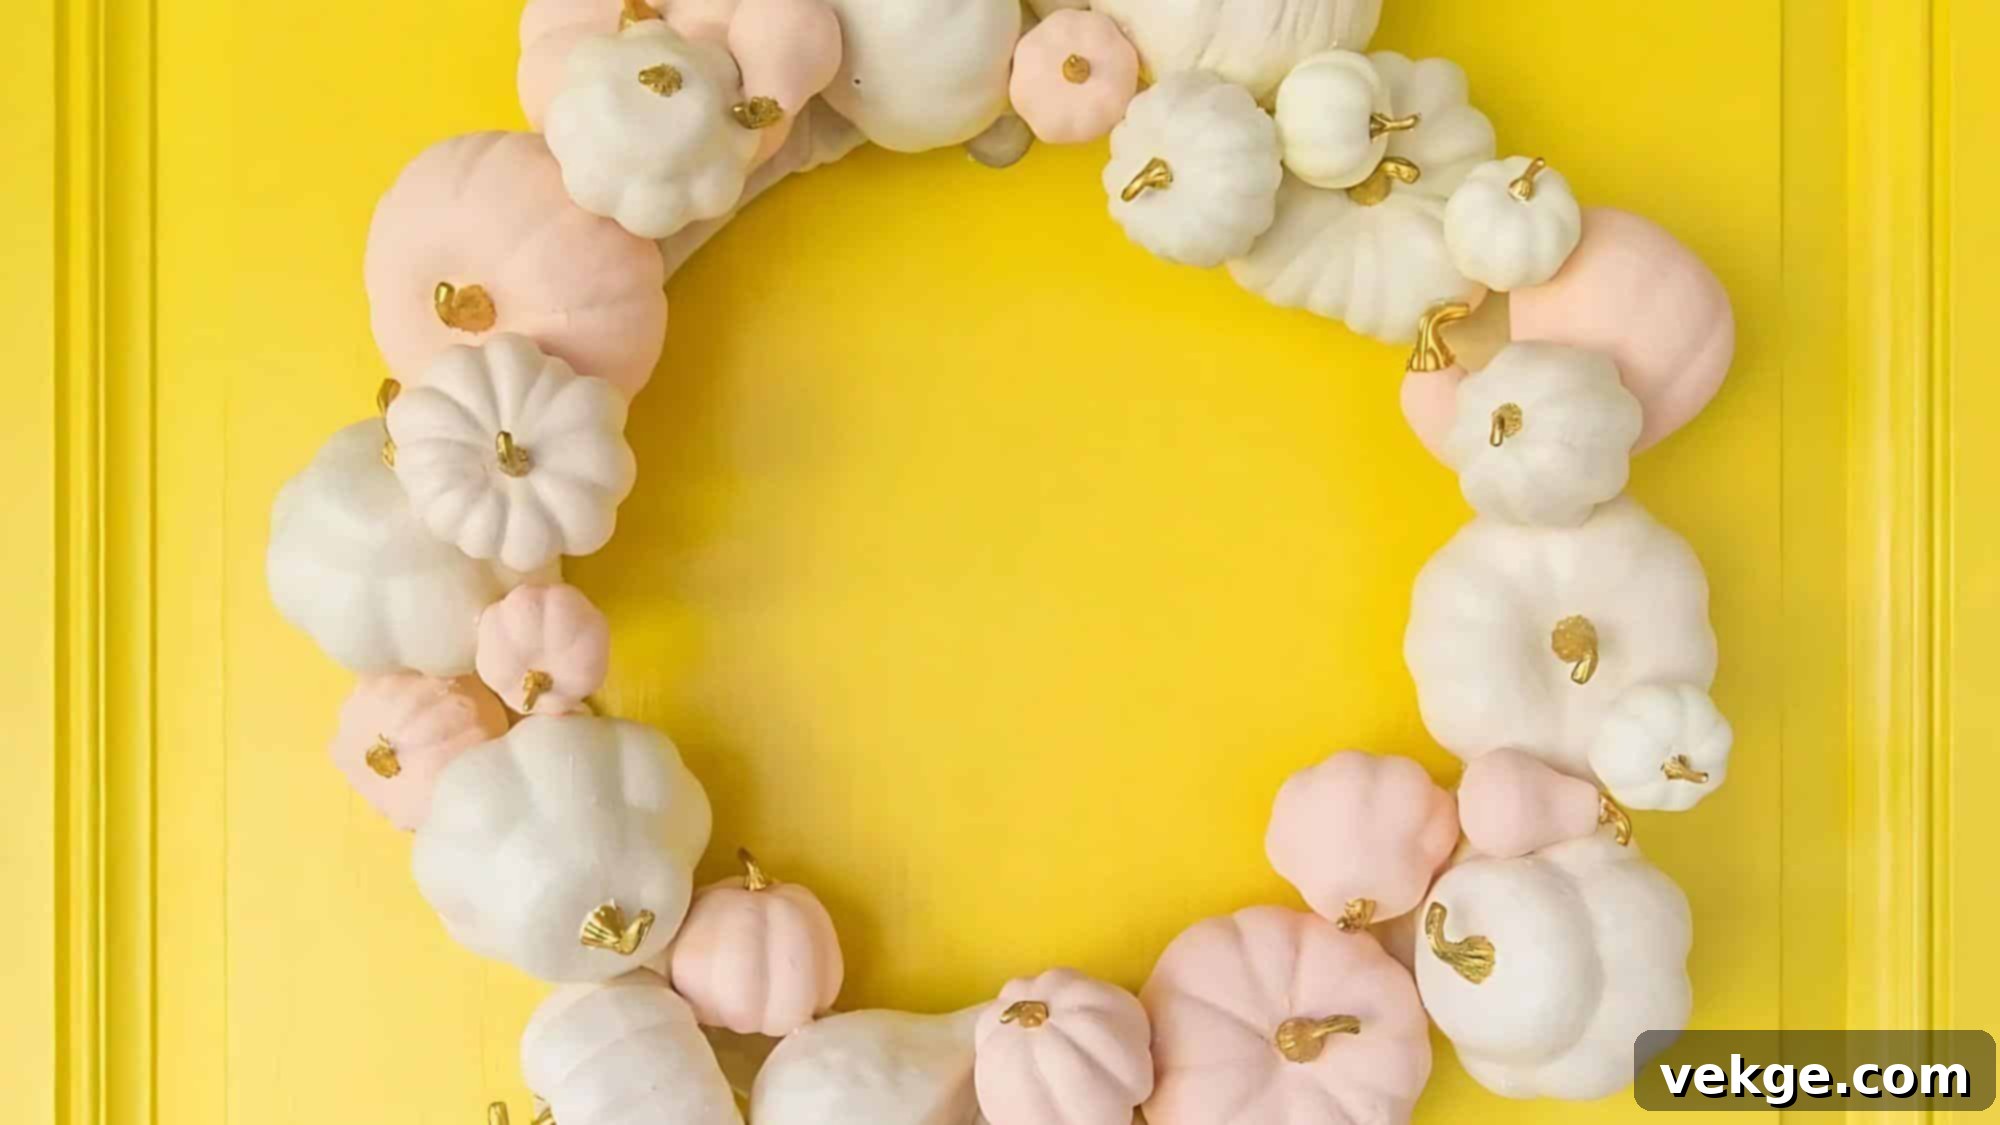
Bring a refreshingly new, contemporary twist to your fall decor with this utterly charming pastel pumpkin wreath. By utilizing a palette of soft, muted colors, this wreath offers a sophisticated and subtle nod to the season, all while maintaining a light, airy, and distinctly modern feel. It’s the perfect choice for those who gravitate towards a more understated, elegant, and contemporary autumn aesthetic, moving beyond traditional vibrant oranges and reds.
Materials Required
- Small faux pumpkins (painted in delicate pastel colors like dusty rose, mint green, light blue, cream, or soft gray)
- Wreath form (foam or grapevine)
- Floral wire
- Hot glue gun and glue sticks
- Greenery or faux florals (e.g., lamb’s ear, eucalyptus, muted berries, optional)
- Ribbon for hanging (optional, in a soft, coordinating hue)
Crafting Process
- Paint your faux pumpkins in your chosen soft pastel shades and allow them to dry completely before handling.
- Thoughtfully arrange the pastel pumpkins on the wreath form, ensuring a balanced composition with even spacing.
- Secure each pumpkin firmly to the wreath form using both floral wire for structural support and hot glue for lasting adhesion.
- Add optional greenery or delicate faux florals, such as muted eucalyptus or lamb’s ear, to introduce subtle texture and fill any gaps.
- If desired, attach a coordinating soft-hued ribbon for hanging, complementing the pastel palette.
Full tutorial:Lovely Indeed
Additional Tips
- Harmonious Color Palette: Select a cohesive range of pastel colors for your pumpkins and accents to ensure a polished, sophisticated, and unified overall look.
- Engaging Textural Contrast: Mix smooth-painted pumpkins with elements that offer a rougher texture, such as natural burlap ribbon or dried bleached grasses, for added visual and tactile interest.
- Dimensional Depth: Use faux pumpkins of varying sizes (small, medium, tiny) to create a sense of depth and dynamic dimension within your wreath design.
21. Harvest Pumpkin Wreath: A Grand Autumn Statement
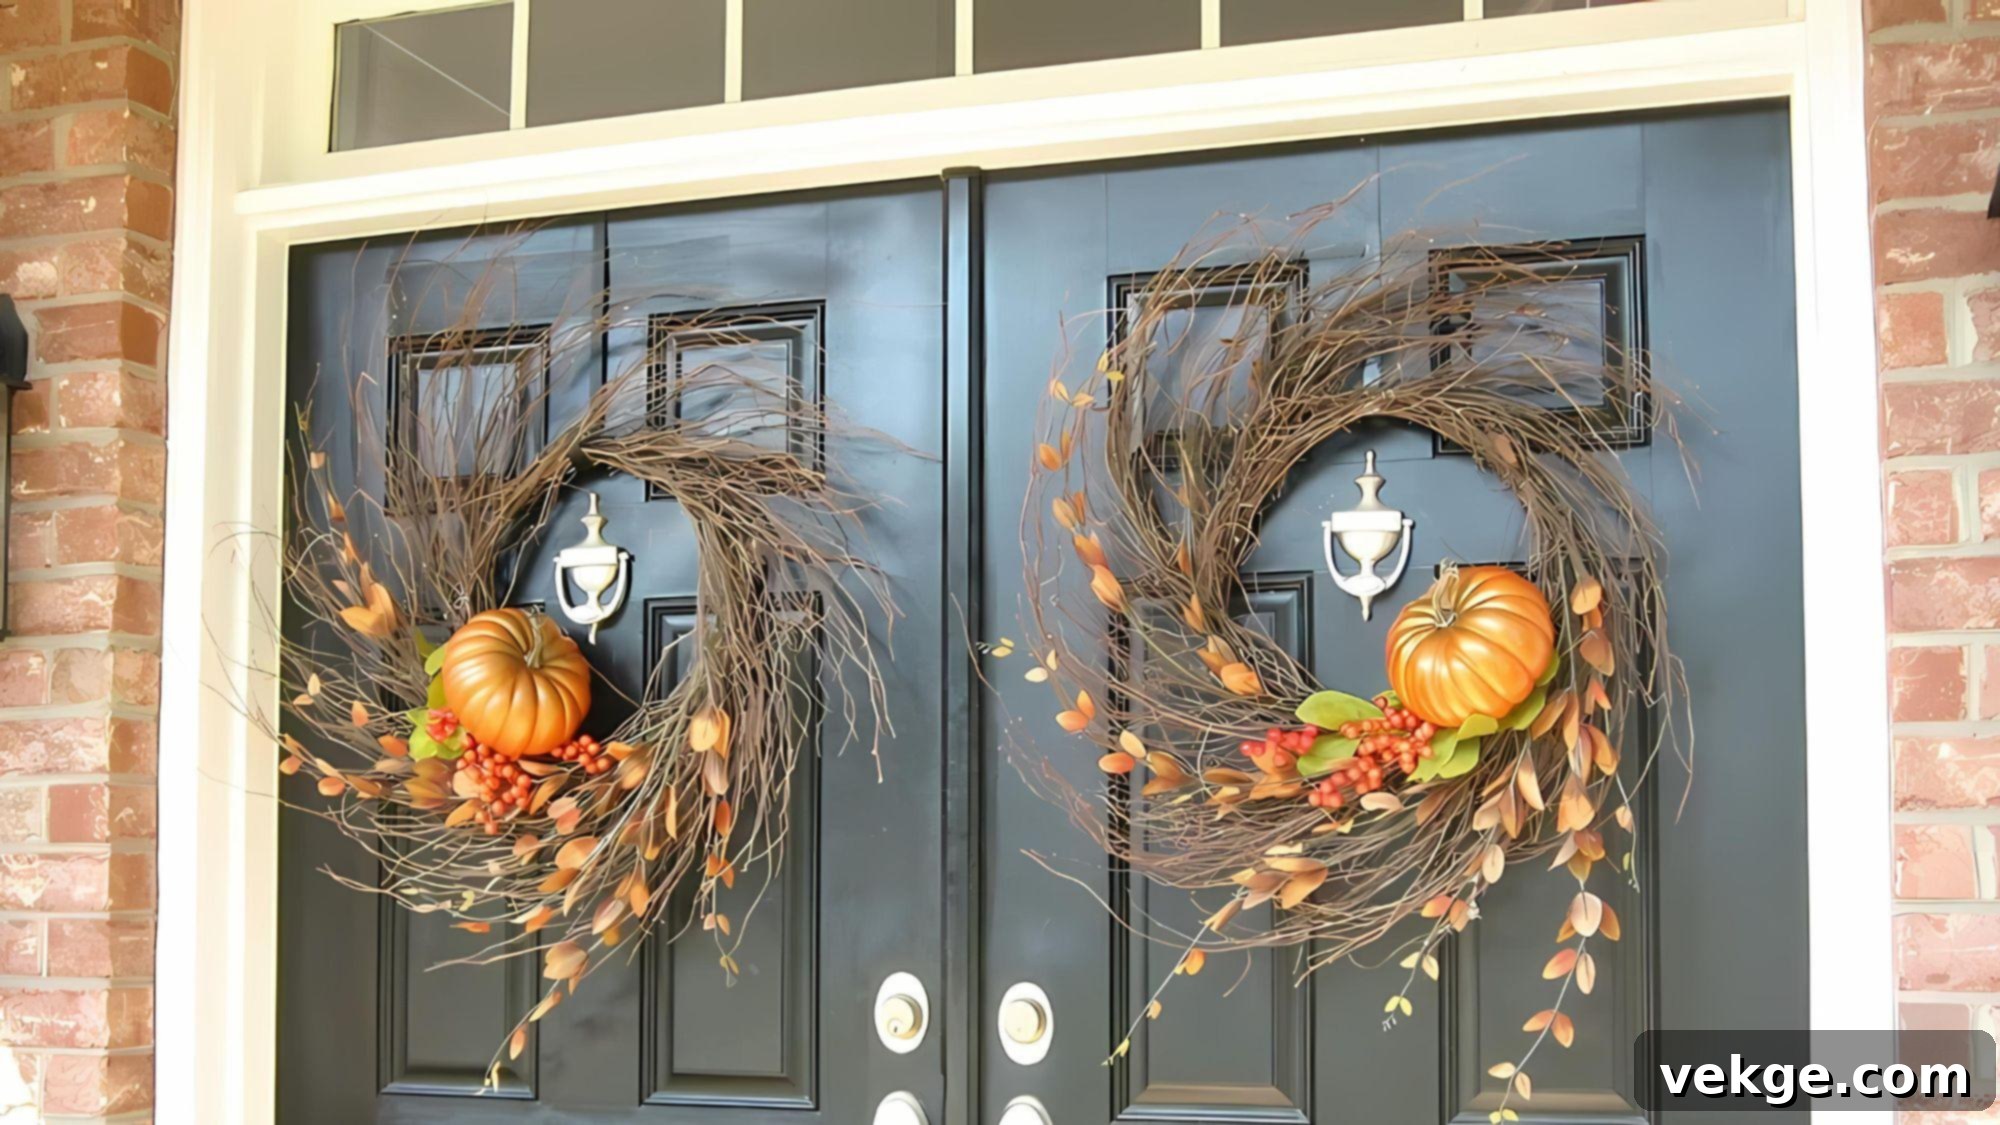
Make an unforgettably bold seasonal statement with this magnificent, oversized harvest pumpkin wreath. Featuring gracefully long, wispy branches and an abundant array of faux pumpkins, this wreath is expertly designed to create a dramatic and utterly eye-catching display. It’s perfectly suited for adorning larger front doors, grand entryways, or spacious wall areas, ensuring a truly impactful welcome to the autumn season.
Materials Required
- Long, flexible faux branches (e.g., willow, curly willow, or long-stemmed fall foliage)
- Small to medium faux pumpkins (in various autumn colors)
- Large grapevine wreath form (for a substantial base)
- Floral wire (heavy gauge for branches)
- Hot glue gun and glue sticks
- Ribbon for hanging (optional, a wide, substantial ribbon works best)
Crafting Process
- Begin by attaching the long, wispy faux branches to the grapevine wreath form, using strong floral wire to create an expansive, organic silhouette.
- Thoughtfully arrange the faux pumpkins, distributing them evenly and prominently around the wreath to form focal points.
- Secure each pumpkin firmly in place with generous amounts of hot glue, ensuring they are stable amidst the branches.
- Add additional autumnal elements as desired, such as large faux fall leaves, berry clusters, or dried natural elements, to enhance the harvest theme.
- If needed, attach a robust ribbon for hanging, ensuring it can support the wreath’s size and weight.
Full tutorial:Made In A Day
Additional Tips
- Dynamic Branch Arrangement: Vary the direction and length of the branches as you attach them to achieve a natural, windswept, and organic, yet grand, look.
- Rich Color Layering: Incorporate faux pumpkins in a diverse range of autumn shades—from creamy white to deep orange and rustic brown—to add significant depth and visual richness to your design.
- Enchanting Evening Glow: For an extra festive touch, consider weaving small, battery-operated LED fairy lights through the branches and around the pumpkins to create a magical evening glow.
22. Apple Wreath: A Crisp Orchard-Inspired Creation
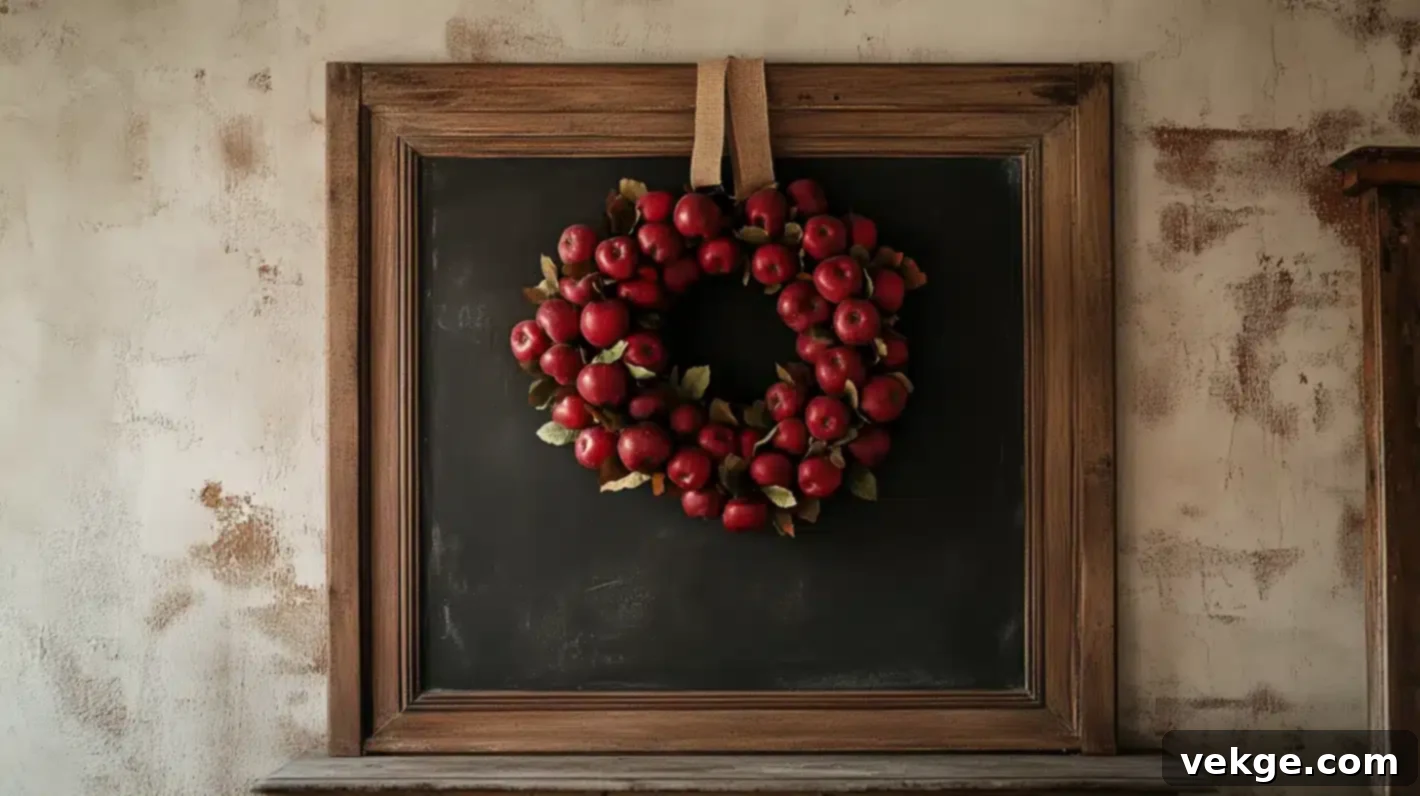
Bring the invigorating freshness of an apple orchard directly to your front door with this utterly delightful apple wreath. Featuring an abundant and artful arrangement of bright faux apples, this wreath instantly adds a vibrant, cheery, and inviting touch to your fall decor. It’s the perfect choice for those who adore a more fruit-forward autumn theme, offering a unique twist on traditional seasonal decorations.
Materials Required
- Faux apples (in various shades of red, green, and yellow)
- Foam wreath form
- Burlap fabric (or wide burlap ribbon)
- Hot glue gun and glue sticks
- Floral wire (for extra security)
- Ribbon for hanging (optional, perhaps a rustic plaid or solid red)
Crafting Process
- Begin by wrapping the entire foam wreath form tightly and neatly with burlap fabric or wide burlap ribbon, securing it with hot glue.
- Thoughtfully arrange the faux apples on the burlap-wrapped wreath form, ensuring a full and appealing distribution.
- Secure each apple firmly to the wreath using both hot glue for adhesion and floral wire for reinforced, lasting stability.
- Add complementary elements such as faux autumn leaves, small berry clusters, or a few cinnamon sticks to enhance the orchard theme.
- If desired, attach a rustic ribbon for hanging, completing the wreath’s crisp, inviting look.
Full tutorial:The Wood Grain Cottage
Additional Tips
- Realistic Apple Variety: For an authentic orchard appearance, mix different types and colors of faux apples, such as bright red Gala, golden Delicious, and crisp green Granny Smith varieties.
- Robust Attachment: Double-check that all apples are firmly attached with both hot glue and floral wire, especially if your wreath will be exposed to outdoor conditions like wind.
- Fragrant Autumn Touch: Enhance the sensory experience by incorporating real cinnamon sticks, star anise pods, or dried orange slices for a delightful and natural autumnal scent.
23. Branch Wreath: A Bold Burst of Autumn Sunshine
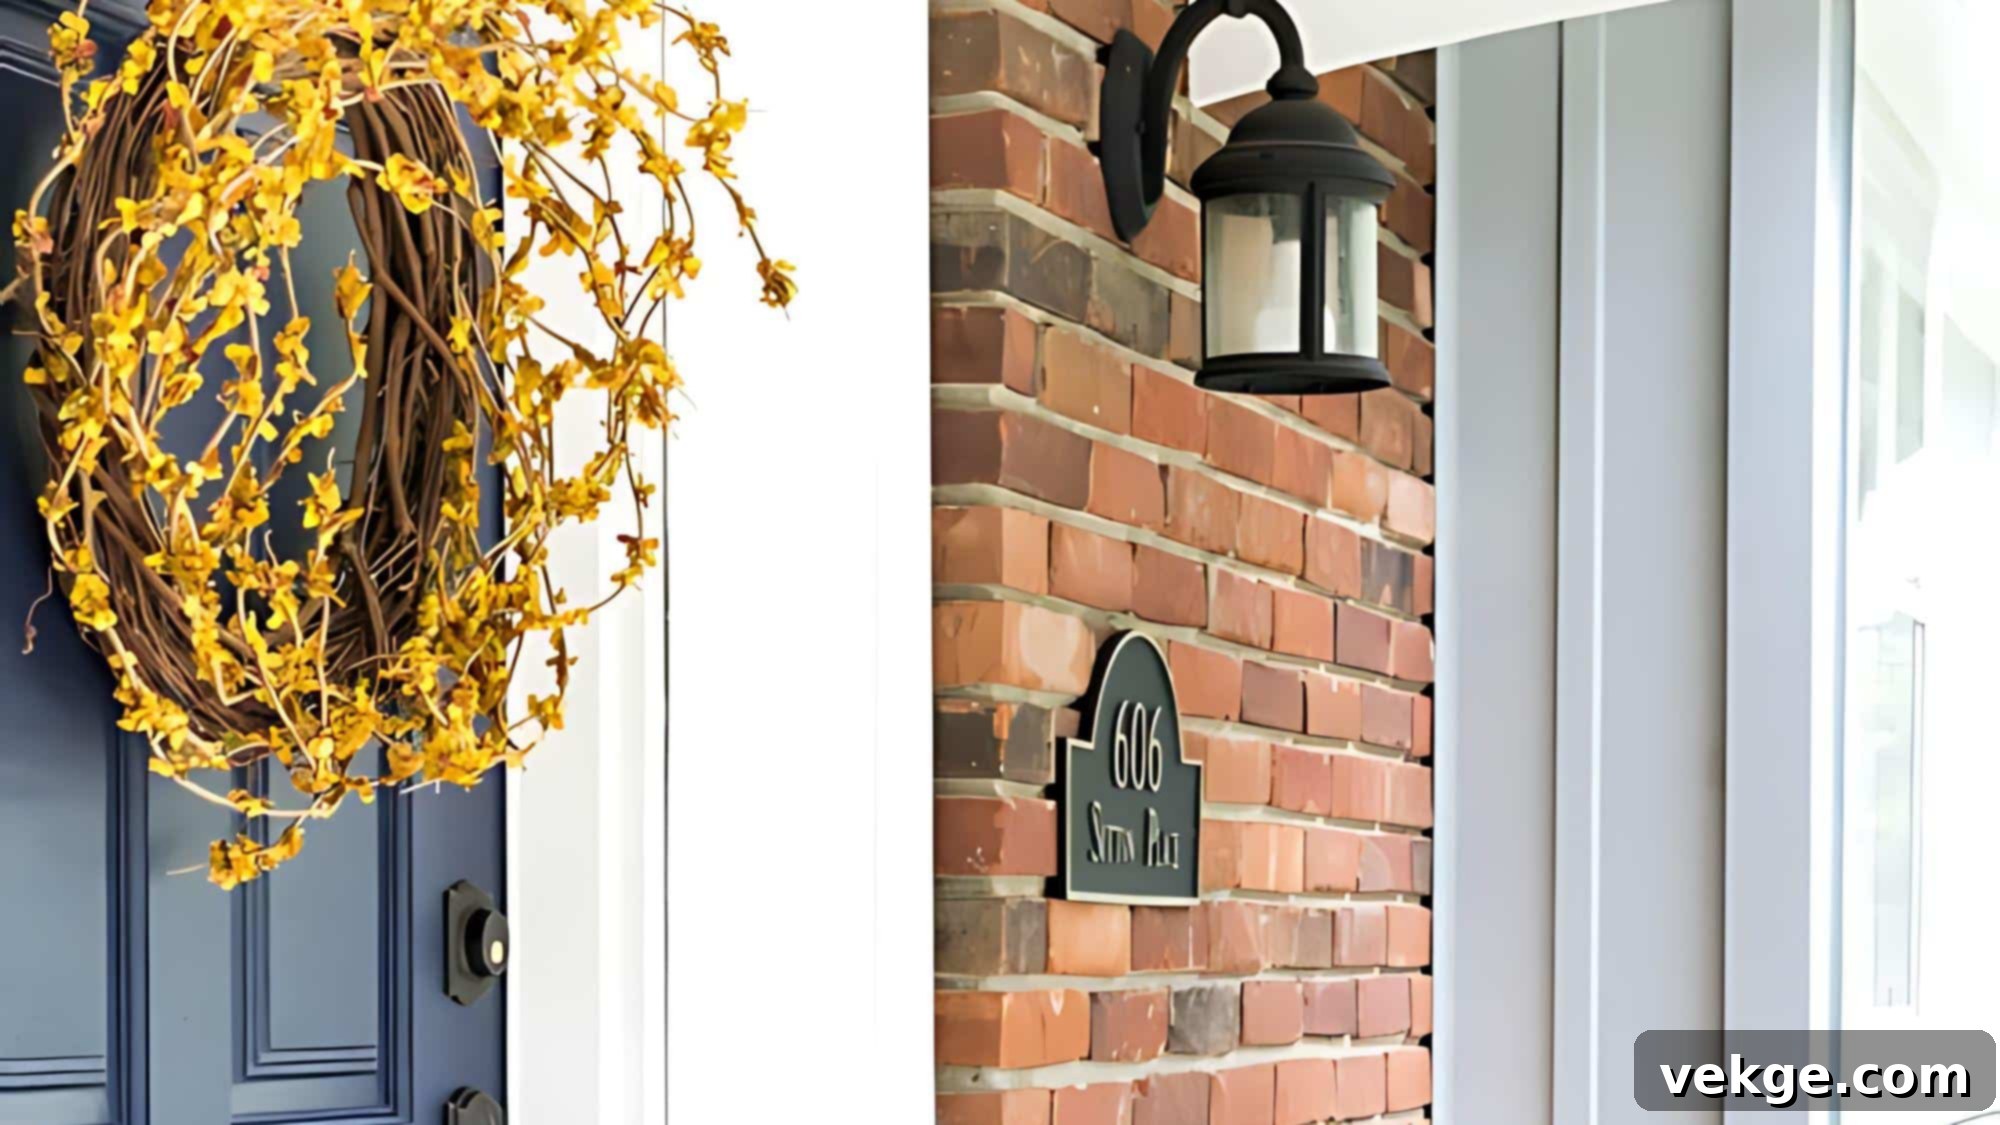
Brighten your fall decor with this truly eye-catching branch wreath, an unconventional choice that promises to make a statement. Featuring vibrantly yellow, gracefully curved branches, this wreath adds a daring, cheerful, and unmistakably modern touch to your home. It’s the perfect way to infuse your space with a bold burst of seasonal energy and sunshine, standing out from more traditional autumn displays.
Materials Required
- Curved yellow branches (natural or painted faux branches)
- Wreath form (foam or wire, a dark color might be best to disappear)
- Floral wire (green or brown to blend)
- Hot glue gun and glue sticks
- Ribbon for hanging (optional, consider a contrasting color like deep navy or black)
Crafting Process
- Carefully arrange the curved yellow branches evenly around the wreath form, paying attention to their natural arc and flow.
- Secure each branch firmly to the wreath form using floral wire, wrapping it discreetly to maintain the clean look.
- Reinforce attachment points with small dabs of hot glue for extra stability and to prevent branches from shifting.
- Add complementary elements if desired, such as a few darker faux berries or minimalist black accents, to create visual contrast.
- If needed, attach a robust ribbon for hanging, ensuring it complements the bold aesthetic.
Full tutorial:On Sutton Place
Additional Tips
- Balanced Branch Spacing: Ensure that the branches are distributed with consistent spacing and orientation around the wreath for a harmonious and visually striking appearance.
- Strategic Color Pop: To enhance the vibrancy of the yellow, consider adding a few small, dark-colored elements—like deep purple faux berries or matte black leaves—for a dramatic and appealing contrast.
- Maintain Shape: Gently manipulate and reshape the branches as you attach them to preserve the desired curved form and overall silhouette of the wreath, creating a dynamic visual flow.
24. Painted Pinecone Wreath: Nature’s Canvas
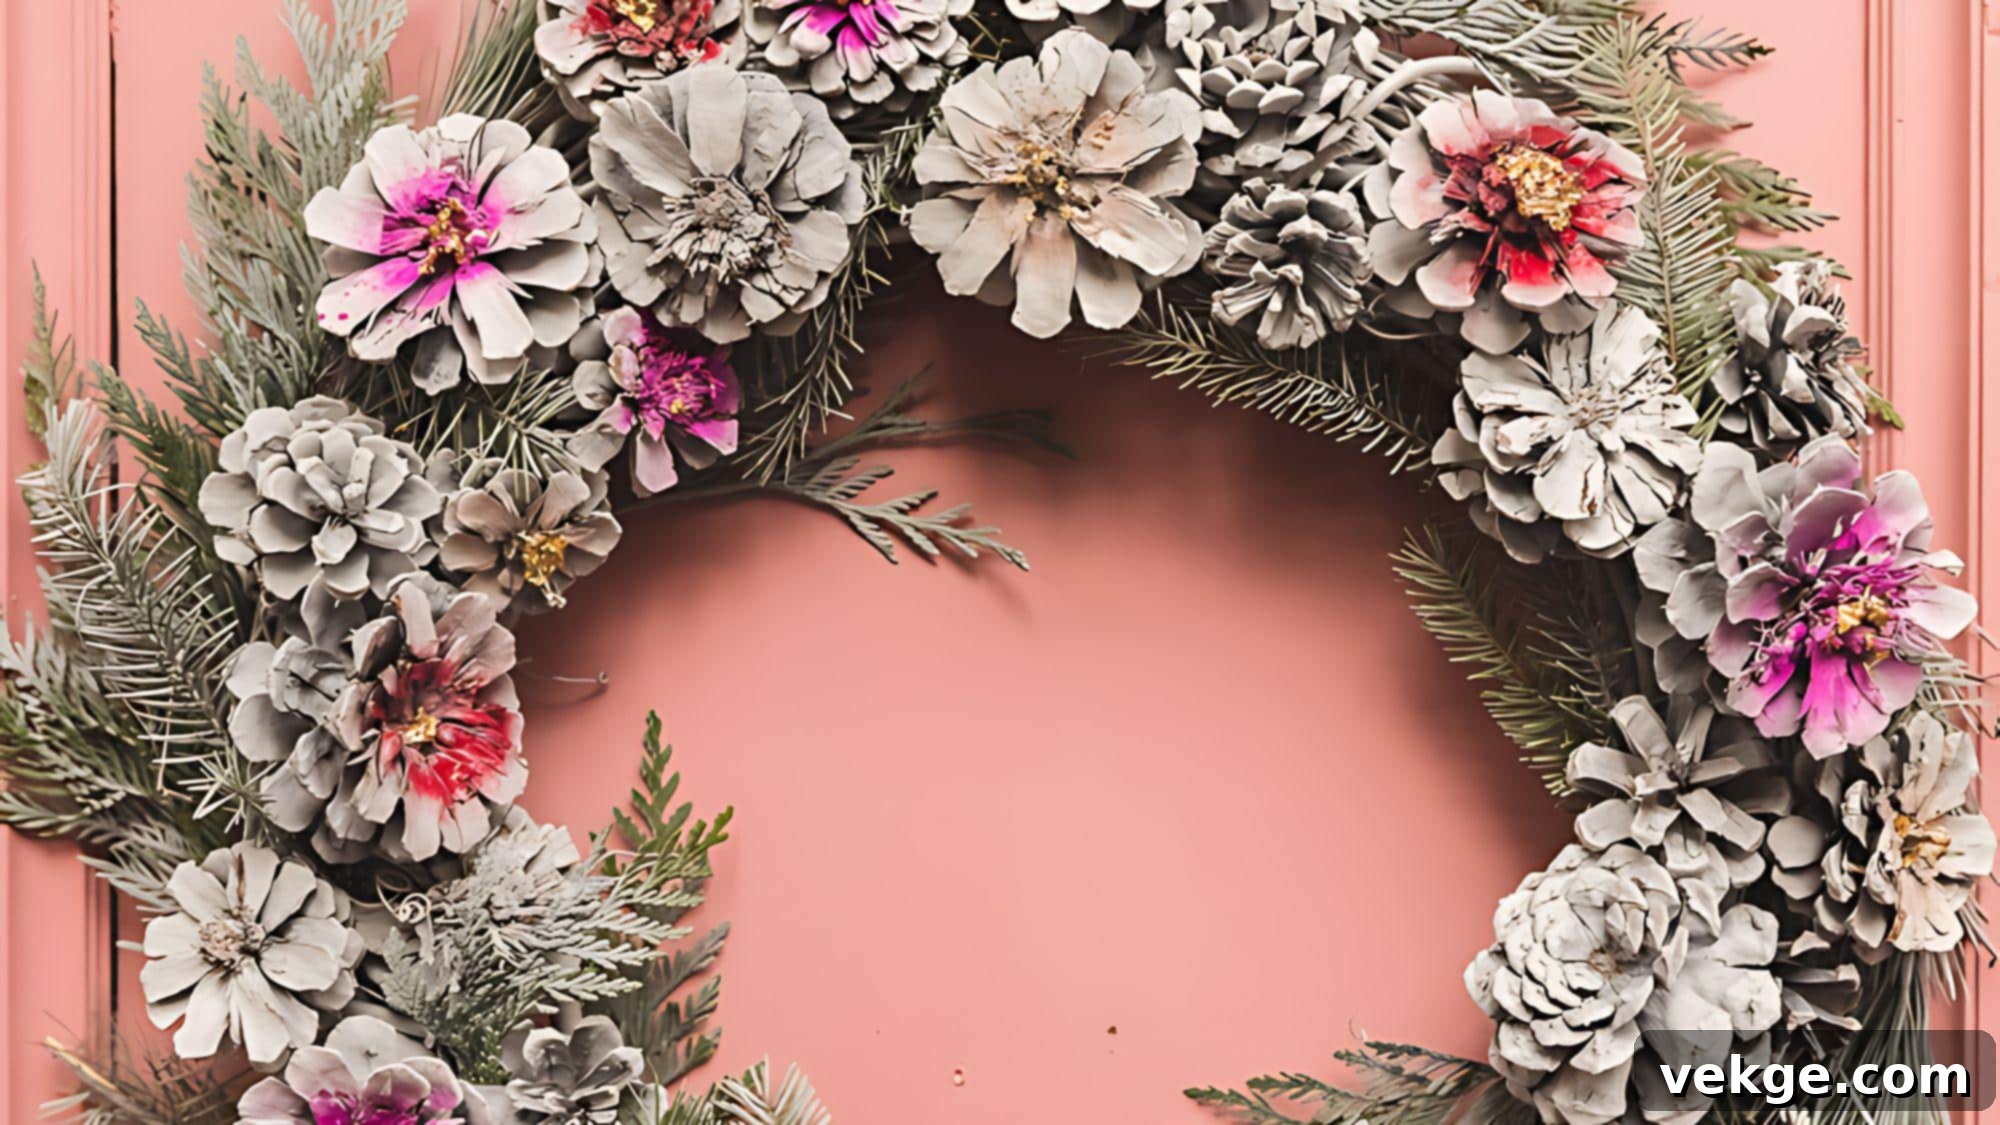
Transform ordinary pinecones into an exquisite work of art with this charming painted pinecone wreath. By utilizing a sophisticated palette of muted tones and soft pinks, you’ll create a unique and subtly vibrant decoration that beautifully combines the rustic texture of natural pinecones with a delicate, artistic color scheme. This wreath offers a fresh, contemporary take on fall decor, perfect for adding an unexpected pop of refined color.
Materials Required
- Assorted pinecones (clean and dry)
- Acrylic or spray paint in muted tones (e.g., dusty rose, blush pink, cream, soft gray, metallic accents)
- Foam wreath form
- Hot glue gun and glue sticks
- Floral wire (for heavier pinecones)
- Ribbon for hanging (optional, consider satin or velvet for elegance)
Crafting Process
- Carefully paint your pinecones in your chosen muted tones and soft pinks, ensuring they are thoroughly dry before assembly.
- Arrange the painted pinecones artfully on the foam wreath form, experimenting with different placements for visual appeal.
- Secure each pinecone firmly to the wreath form using hot glue; for larger or heavier pinecones, reinforce with floral wire.
- Add complementary elements if desired, such as small faux flowers in matching hues, delicate dried leaves, or subtle glitter accents.
- If you choose, attach a luxurious ribbon for hanging, enhancing the wreath’s sophisticated charm.
Full tutorial: The House that Lars Built
Additional Tips
- Preserving Texture: Apply paint in light, thin coats rather than heavy layers to ensure the natural, intricate texture of the pinecones remains visible and prominent.
- Sophisticated Color Gradient: Arrange the painted pinecones on the wreath in a deliberate color gradient, transitioning from lighter to darker shades, for an incredibly sophisticated and artistic look.
- Natural Contrast: For an interesting interplay of textures and colors, consider mixing in a few unpainted or clear-sealed natural pinecones among the painted ones.
25. Basket Wreath: Rustic Charm Meets Floral Grace

Create a charmingly unique and welcoming wreath by repurposing a shallow basket and filling it with lush faux hydrangeas. This remarkably easy-to-make decoration beautifully combines rustic textures with delicate floral grace, resulting in a versatile piece that effortlessly complements a wide array of decor styles. It’s an inviting alternative to traditional round wreaths, perfect for adding a touch of country elegance to your home.
Materials Required
- Shallow basket (e.g., wicker, rattan, or wire basket)
- Faux hydrangea blossoms (in fall colors like burgundy, cream, deep blue, or rust)
- Stencil for a saying (optional, e.g., “Gather,” “Blessed,” “Autumn”)
- Black paint (optional, for stenciling)
- Ribbon for hanging (e.g., burlap, gingham, or wide velvet)
- Hot glue gun and glue sticks
Crafting Process
- Begin by filling the shallow basket evenly and generously with the faux hydrangea blossoms, ensuring a full and abundant display.
- Secure all the flowers firmly within the basket using hot glue, making sure they won’t shift or fall out.
- If desired, carefully stencil a heartfelt saying or seasonal phrase onto the front of the basket using black paint for a personalized touch.
- Attach a sturdy and decorative ribbon to the back of the basket for easy and secure hanging.
- Add any final decorative touches, such as small faux berries peeking out from the hydrangeas or a charming bow on the handle.
Full tutorial: Twelve on Main
Additional Tips
- Voluminous Flower Arrangement: To achieve a richer, more professional look, vary the heights and angles of the hydrangeas as you arrange them, creating natural fullness and dimension.
- Strategic Basket Selection: Choose a basket with an interesting woven texture, unique shape, or appealing weave pattern to add an extra layer of rustic visual appeal to your wreath.
- Effortless Seasonal Updates: The beauty of this design is its versatility; easily switch out the faux flowers to match different seasons or holidays, allowing for year-round decor flexibility.
26. Chalkboard Wreath: A Customizable Autumn Welcome

Combine ingenious creativity with practical functionality using this truly unique chalkboard wreath. Crafted from a substantial wood slice expertly painted with chalkboard paint, this wreath provides a dynamic canvas, allowing you to personalize your seasonal greetings and update them as frequently as your heart desires. It’s an interactive and ever-changing focal point for your autumn decor.
Materials Required
- Large, sturdy wood slice (round or oval)
- Chalkboard paint
- Faux fall leaves (e.g., maple, oak, berry branches)
- Chalk or chalk marker
- Hot glue gun and glue sticks
- Ribbon for hanging (optional, consider a rustic twine or plaid)
Crafting Process
- Carefully paint the entire surface of the wood slice with chalkboard paint, ensuring even coverage, and let it dry and cure thoroughly.
- Artfully attach faux autumn leaves around the perimeter of the wood slice, securing them firmly with hot glue to create a natural frame.
- Once the chalkboard is fully cured, use chalk or a chalk marker to write or draw your chosen design, message, or seasonal quote.
- If desired, add a loop of ribbon for hanging, securing it strongly to the back of the wood slice.
- Further customize with additional small seasonal elements as needed, such as miniature pinecones or tiny faux berries.
Full tutorial:Home Stories A to Z
Additional Tips
- Optimal Surface Preparation: For the smoothest and most durable chalkboard surface, lightly sand and prime the wood slice before applying the chalkboard paint.
- Natural Leaf Arrangement: Overlap the faux leaves slightly and vary their directions to create a fuller, more organic, and visually interesting frame around your chalkboard.
- Creative Chalk Art: Unleash your inner artist! Experiment with different chalk colors, hand-lettering styles, or even simple seasonal drawings (like pumpkins or acorns) for varied and engaging designs.
27. Felt Leaf Wreath: A Cozy Autumn Clutch
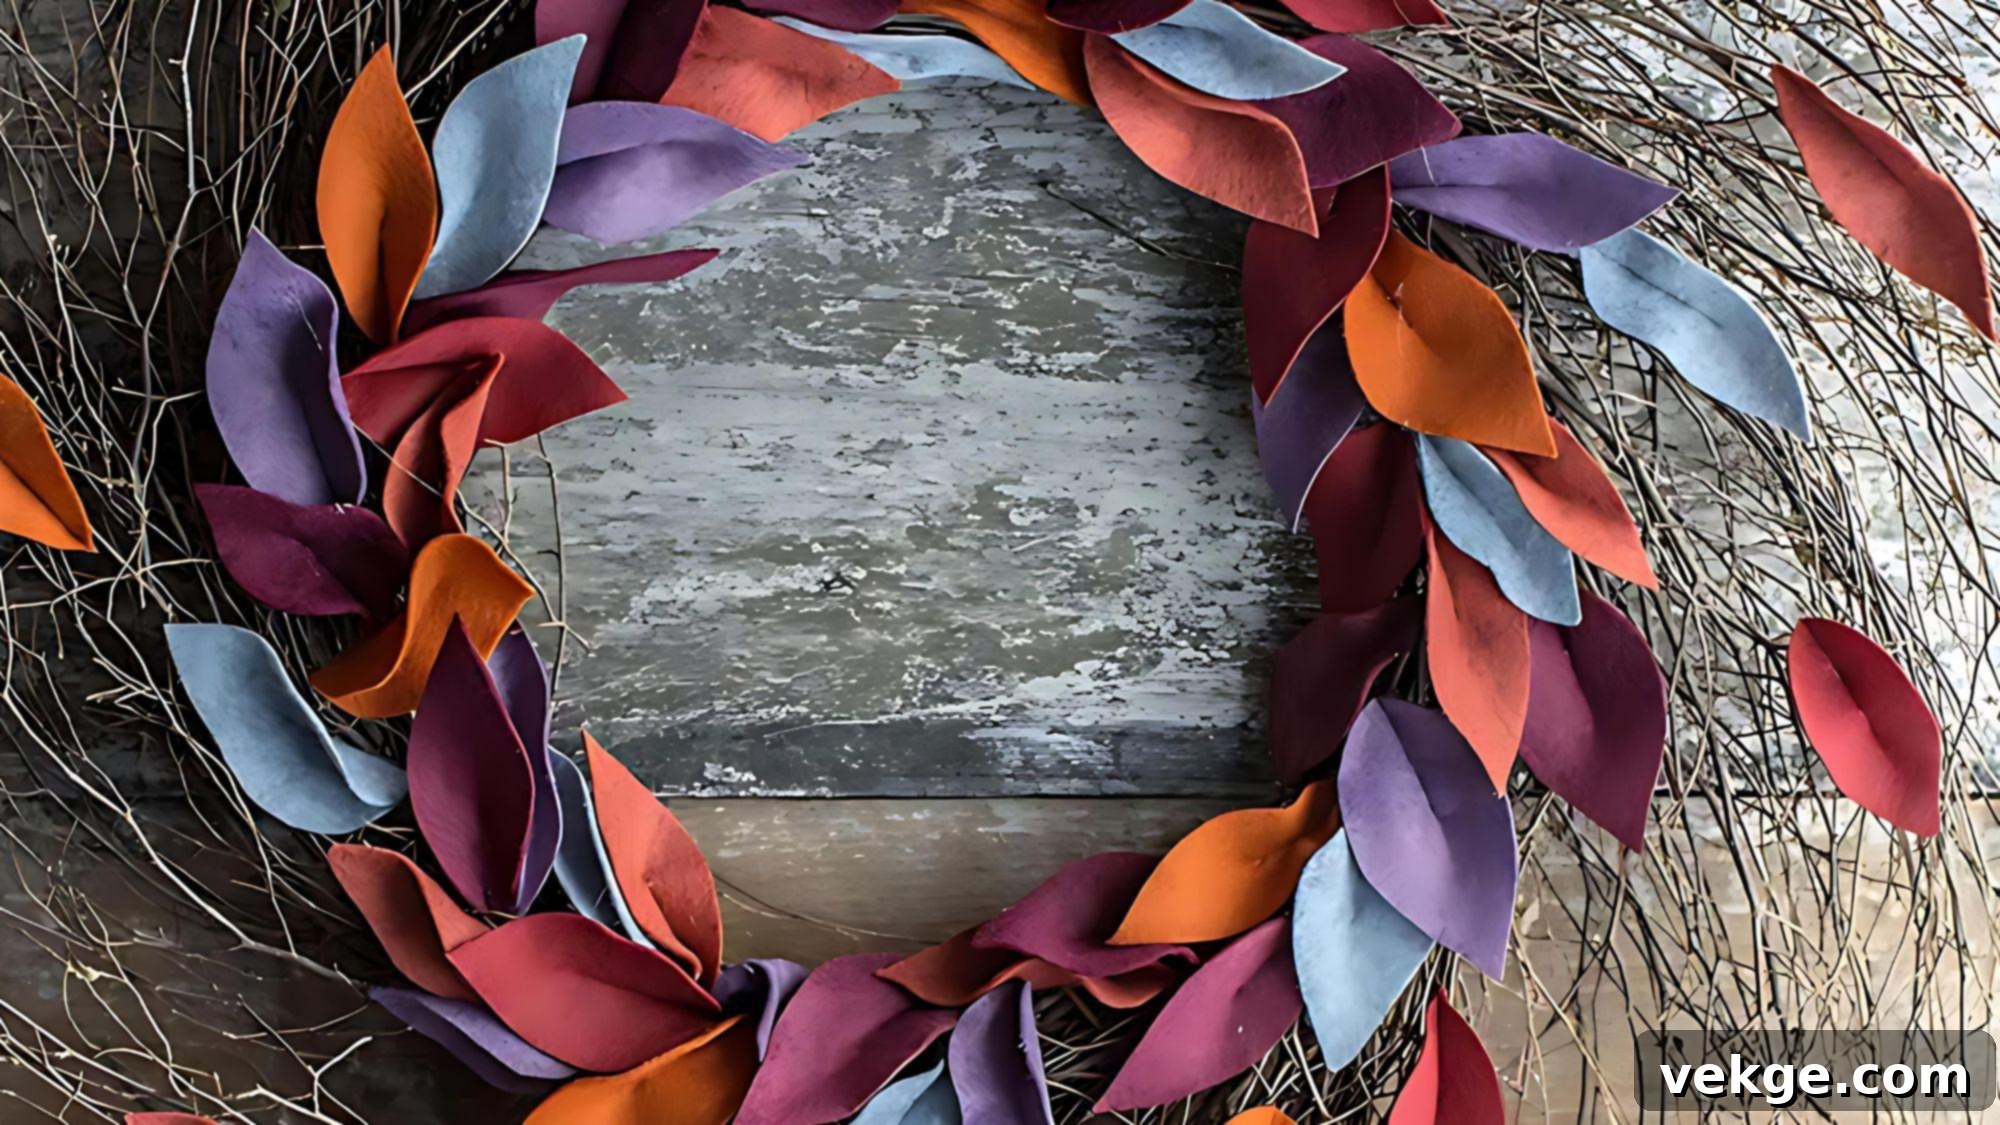
Create a wonderfully warm and inviting fall decoration with this remarkably budget-friendly felt leaf wreath. Featuring an abundance of rich, deep jewel-toned felt leaves, this wreath offers a sophisticated and cozy look that is both visually appealing and incredibly cost-effective. It’s a tactile and charming piece, perfect for adding softness and a touch of handmade artistry to your autumn home.
Materials Required
- Felt sheets in deep jewel tones (e.g., burgundy, emerald green, mustard yellow, sapphire blue, rust orange)
- Wreath form (foam or wire)
- Sharp scissors (or a die-cutting machine for precision)
- Hot glue gun and glue sticks
- Floral wire (optional, for shaping)
- Ribbon for hanging (optional, consider satin or velvet)
Crafting Process
- Cut out a generous quantity of various leaf shapes and sizes from your felt sheets.
- Carefully arrange the felt leaves on the wreath form, overlapping them artistically to create depth and a rich, layered texture.
- Secure each felt leaf firmly in place with small dabs of hot glue, ensuring they are well-adhered.
- If desired, attach a complementary ribbon for hanging, completing the wreath’s cozy aesthetic.
Full tutorial:Lia Griffith.
Additional Tips
- Authentic Leaf Variety: For a more natural and dynamic appearance, create felt leaves in a diverse range of sizes and shapes, mimicking the variety found in nature.
- Rich Color Blending: Mix and blend complementary deep jewel tones of felt to achieve a wonderfully rich, layered, and sophisticated color effect.
- Enhanced Texture: Before gluing, gently curl or fold the edges of some felt leaves to add fantastic dimension and a more realistic, sculptural quality to your wreath.
28. Pampas Grass Wreath: Soft Textures of the Season
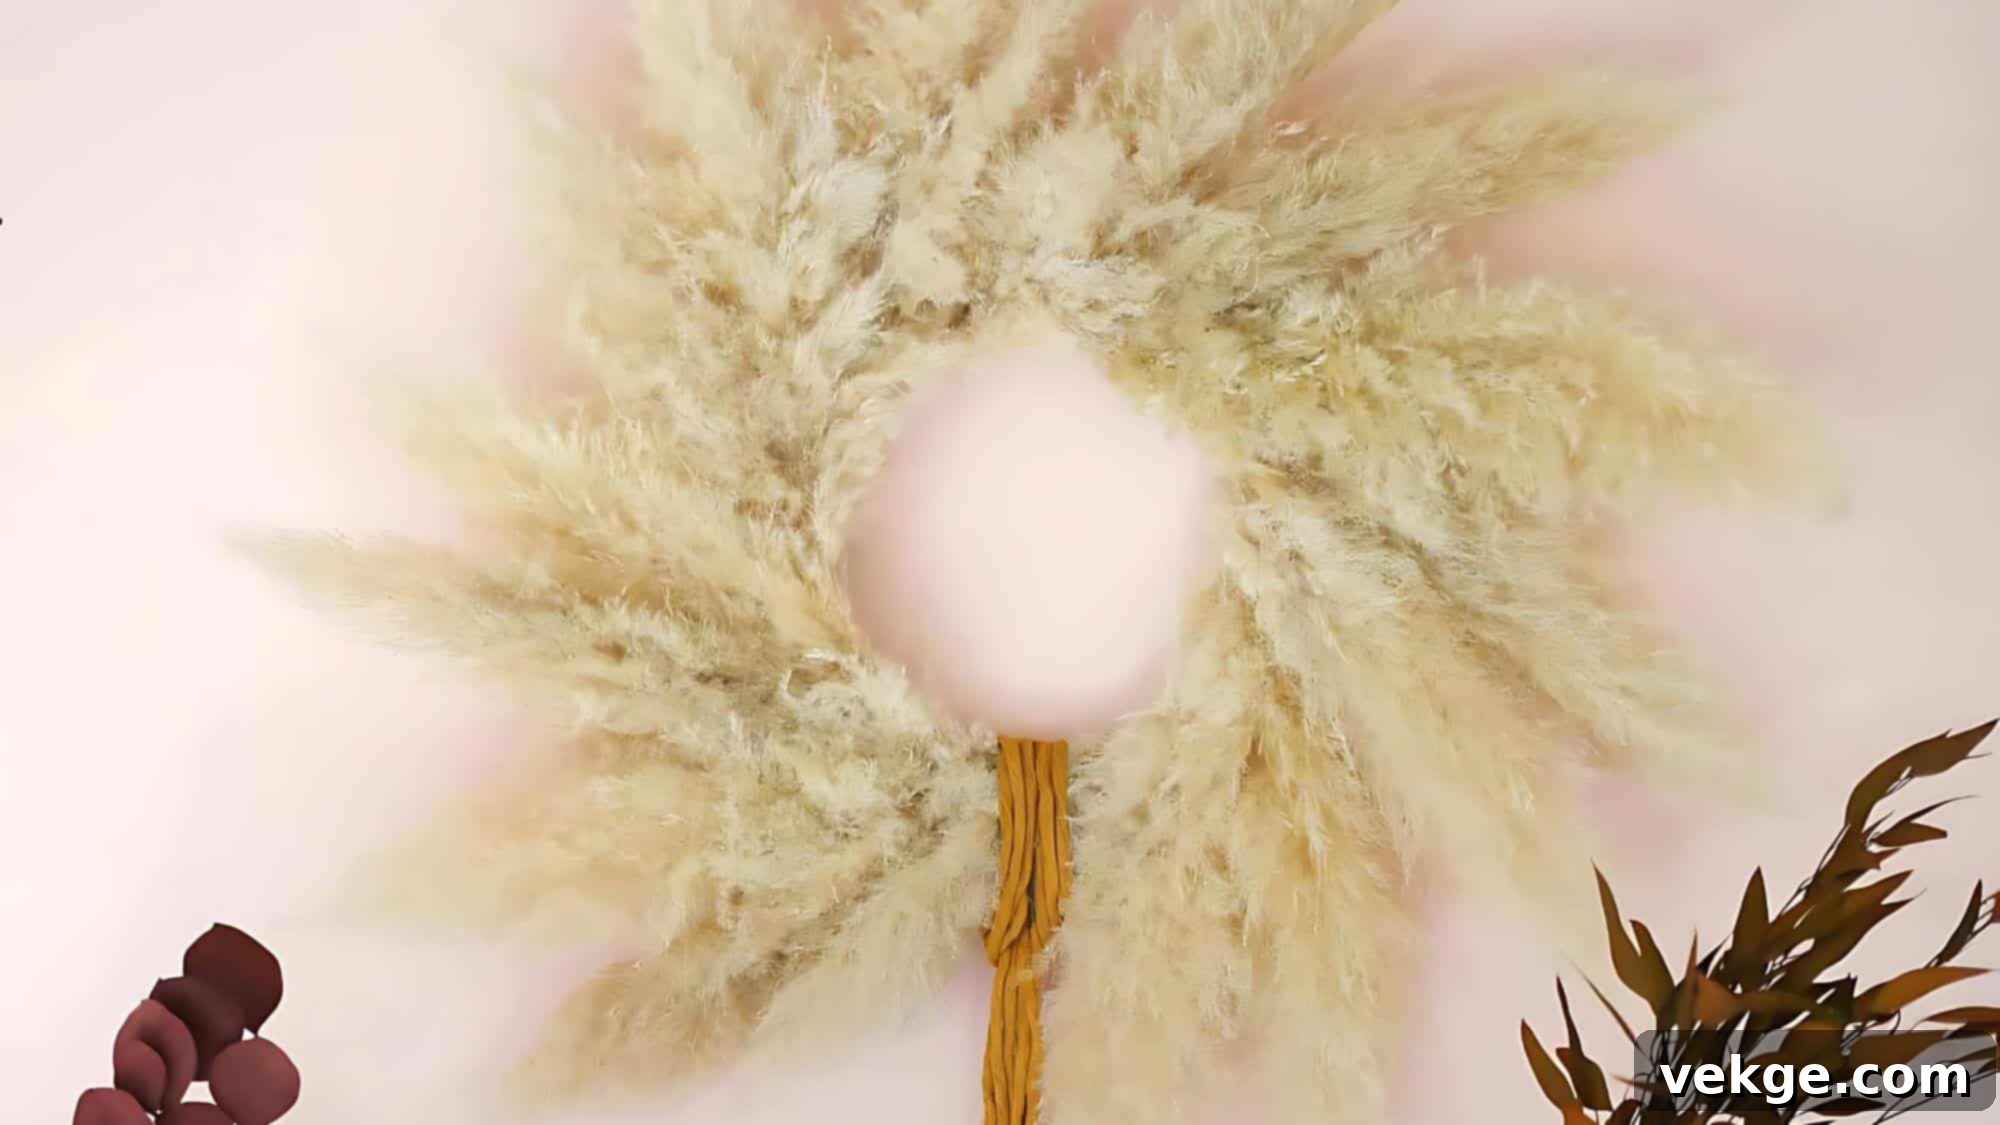
Embrace a contemporary fall aesthetic with this effortlessly stunning pampas grass wreath. The distinct feathery texture and muted, natural tones of pampas grass create a soft, inviting, and wonderfully modern decoration that perfectly captures the subtle, elegant essence of autumn. This wreath adds a touch of bohemian chic and sophisticated texture to any entryway or interior space.
Materials Required
- Dried pampas grass stems (various sizes if possible)
- Wreath form (wire or grapevine)
- Floral wire (thin gauge)
- Hot glue gun and glue sticks
- Ribbon for hanging (optional, consider a natural fiber or velvet)
Crafting Process
- Begin by attaching small bundles or individual stems of pampas grass to the wreath form, securing them with floral wire.
- Layer the pampas grass generously, ensuring a full, luxurious, and wonderfully textured appearance around the entire wreath.
- Secure any loose pieces or straggling plumes with small dabs of hot glue to maintain the wreath’s shape and integrity.
- If desired, add a simple, elegant ribbon for hanging, allowing the pampas grass to remain the primary visual focus.
Full tutorial: A Beautiful Mess
Additional Tips
- Organic Grass Arrangement: Vary the direction and angle of the pampas grass plumes as you attach them to create a natural, windswept, and effortlessly organic flow.
- Subtle Color Accent: For a gentle pop of contrasting color, consider incorporating a few naturally dyed pampas stems (e.g., in terracotta or sage green) among the uncolored ones.
- Fluff and Maintain: Gently fluff the pampas grass periodically, especially after storage, to help maintain its full, feathery appearance and prevent it from looking flattened.
29. Oranges & Eucalyptus Wreath: A Fresh Autumn Aroma
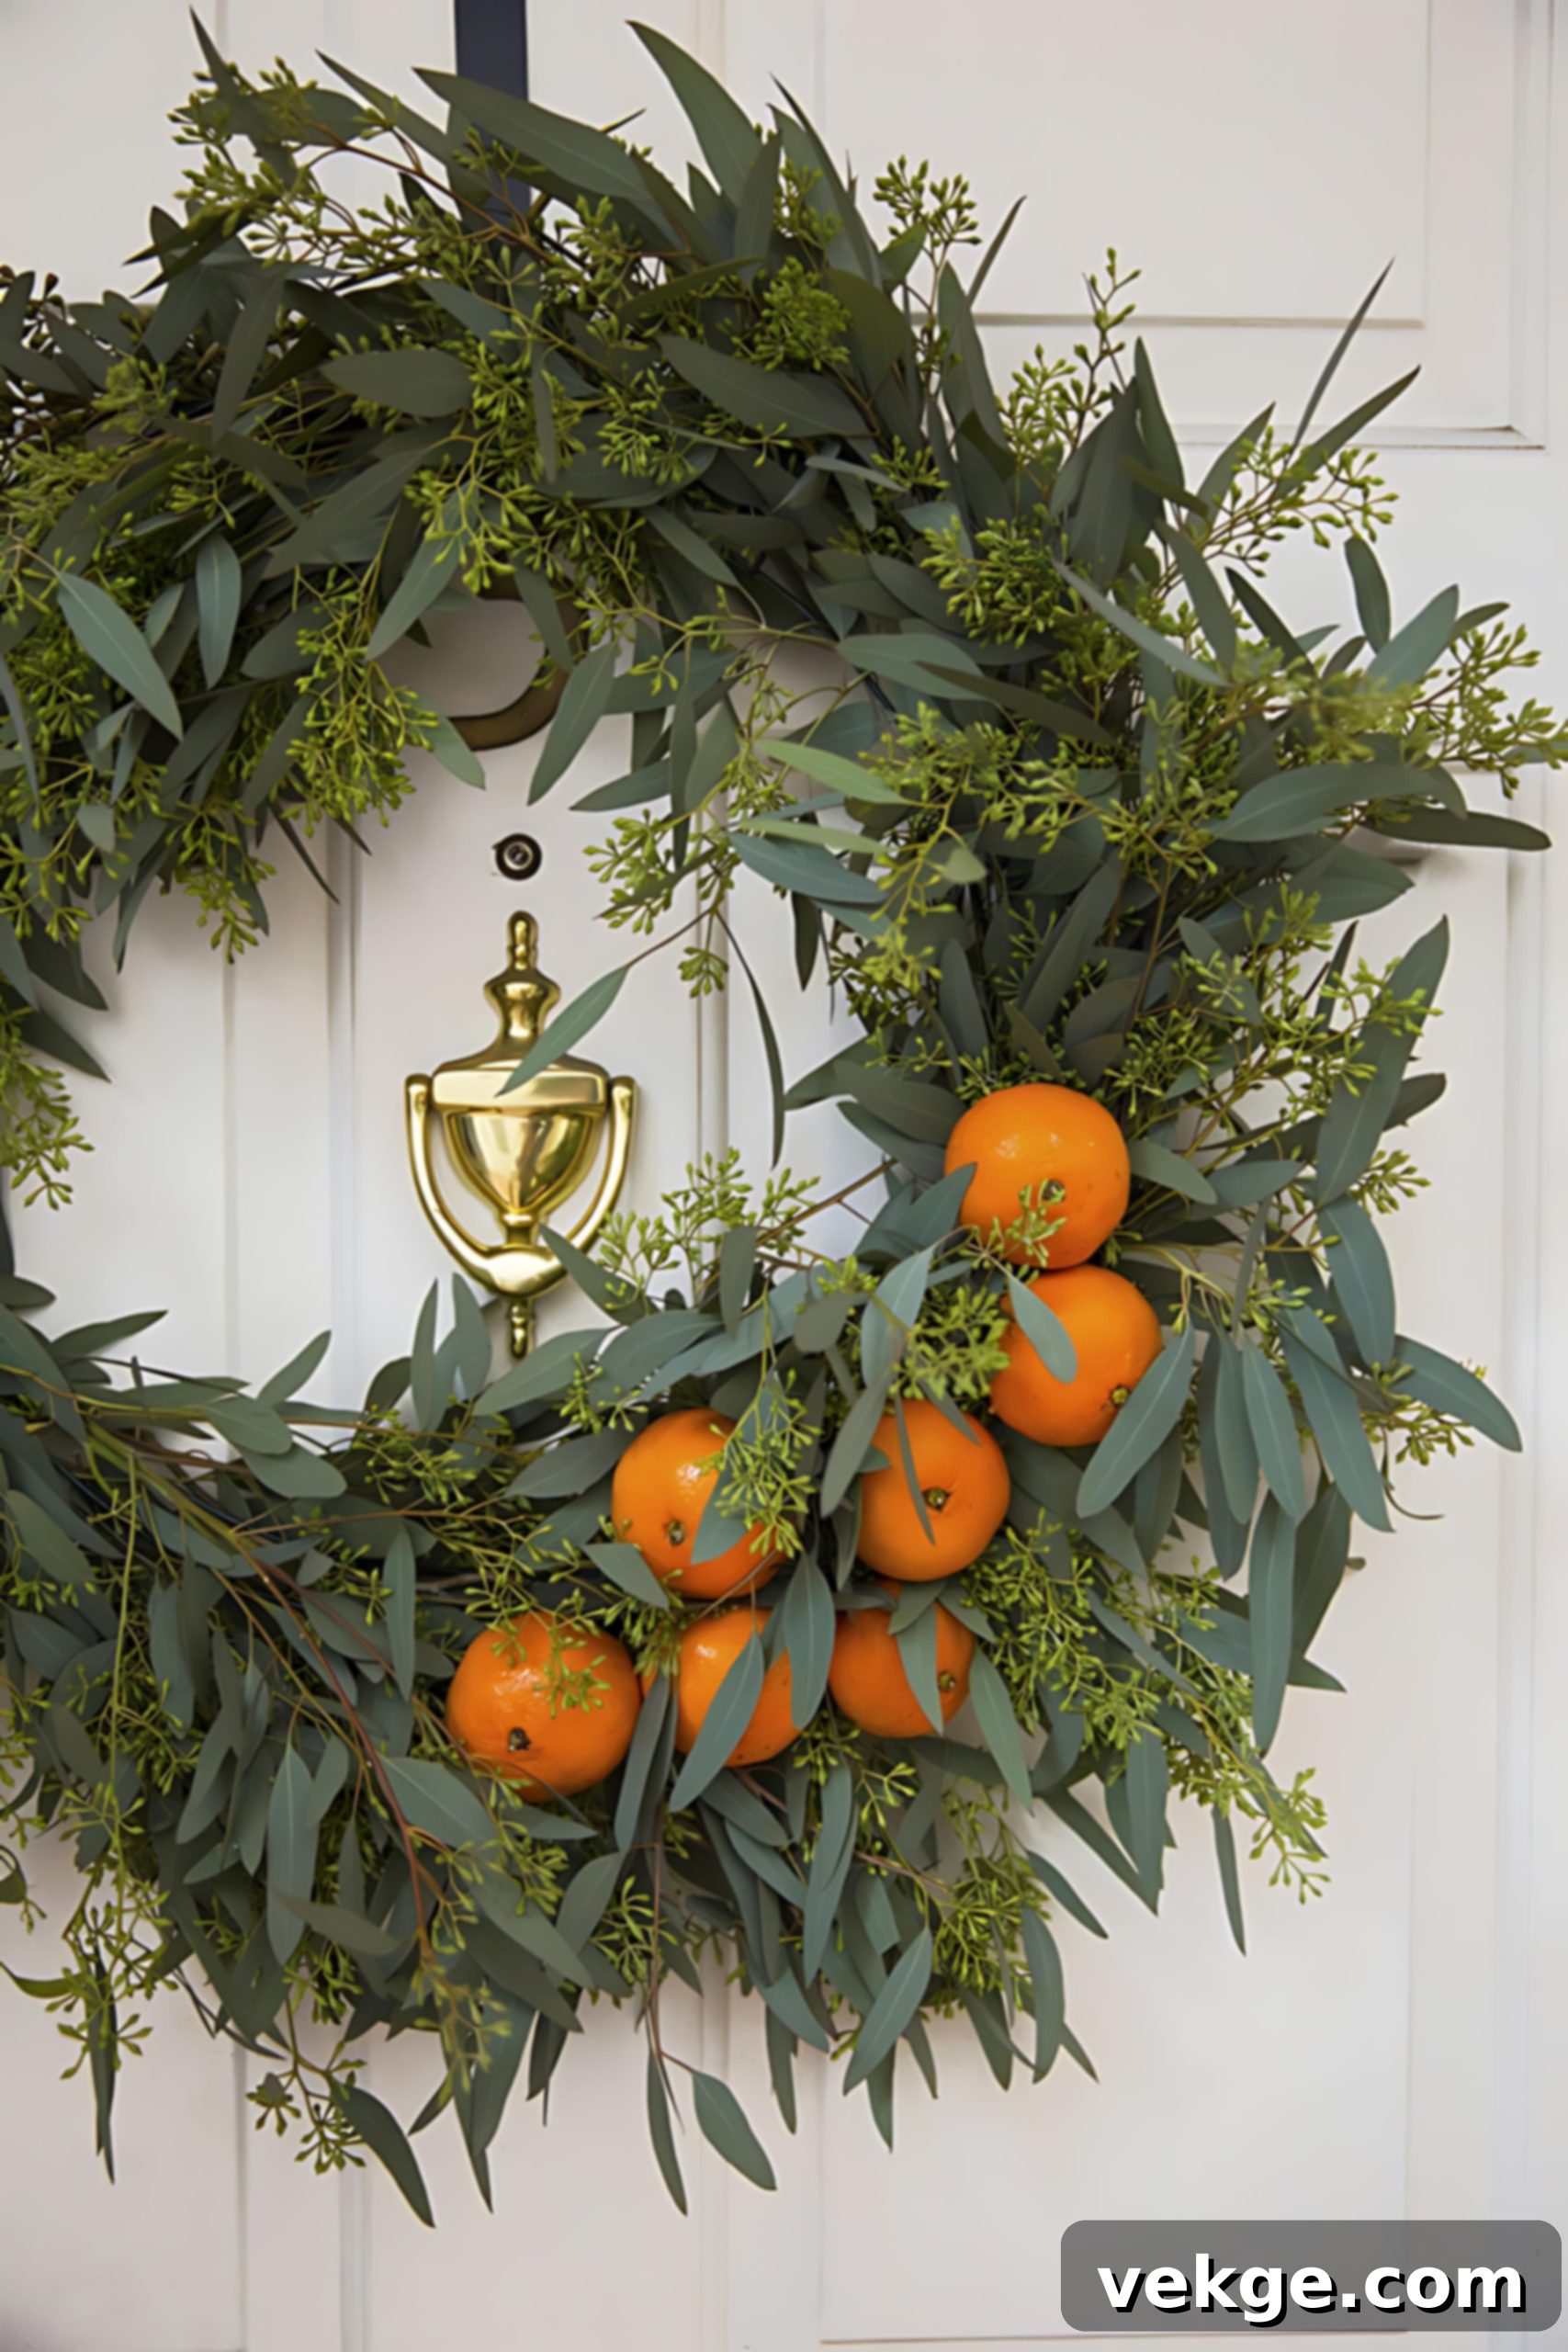
Bring the invigorating, natural scents of the season directly to your door with this beautifully fragrant orange and eucalyptus wreath. This exquisite natural creation seamlessly combines vibrant visual appeal with a delightful aromatic presence, offering a truly multi-sensory and refreshing fall experience. The bright oranges pop against the muted greens, creating an elegant and inviting statement.
Materials Required
- Fresh or thoroughly dried orange slices
- Eucalyptus stems (fresh or high-quality faux)
- Wreath form (foam or wire)
- Floral wire
- Hot glue gun and glue sticks
- Ribbon for hanging (optional, choose a natural fiber or earthy tone)
Crafting Process
- If using fresh oranges, slice them thinly and dry them thoroughly in a low-temperature oven or dehydrator until crisp.
- Begin attaching the eucalyptus stems to the wreath form, carefully securing them with floral wire to create a lush, green base.
- Artfully arrange and secure the dried orange slices among the eucalyptus using both floral wire and small dabs of hot glue.
- If desired, add a simple ribbon for hanging, complementing the natural elements of the wreath.
Full tutorial:Louise Roe
Additional Tips
- Optimal Orange Preparation: For best longevity and a beautiful translucent effect, dry your orange slices in a very low-temperature oven (around 200°F/90°C) for several hours until firm.
- Voluminous Eucalyptus Placement: Alternate the direction of the eucalyptus stems (some pointing left, some right) as you attach them to create a fuller, more dynamic, and natural-looking green base.
- Enhanced Scent Profile: For an even richer autumnal fragrance, consider incorporating additional aromatic elements like real cinnamon sticks, whole star anise pods, or dried bay leaves into the design.
30. Ombre Paper Leaf Wreath: A Colorful Fall Fantasy
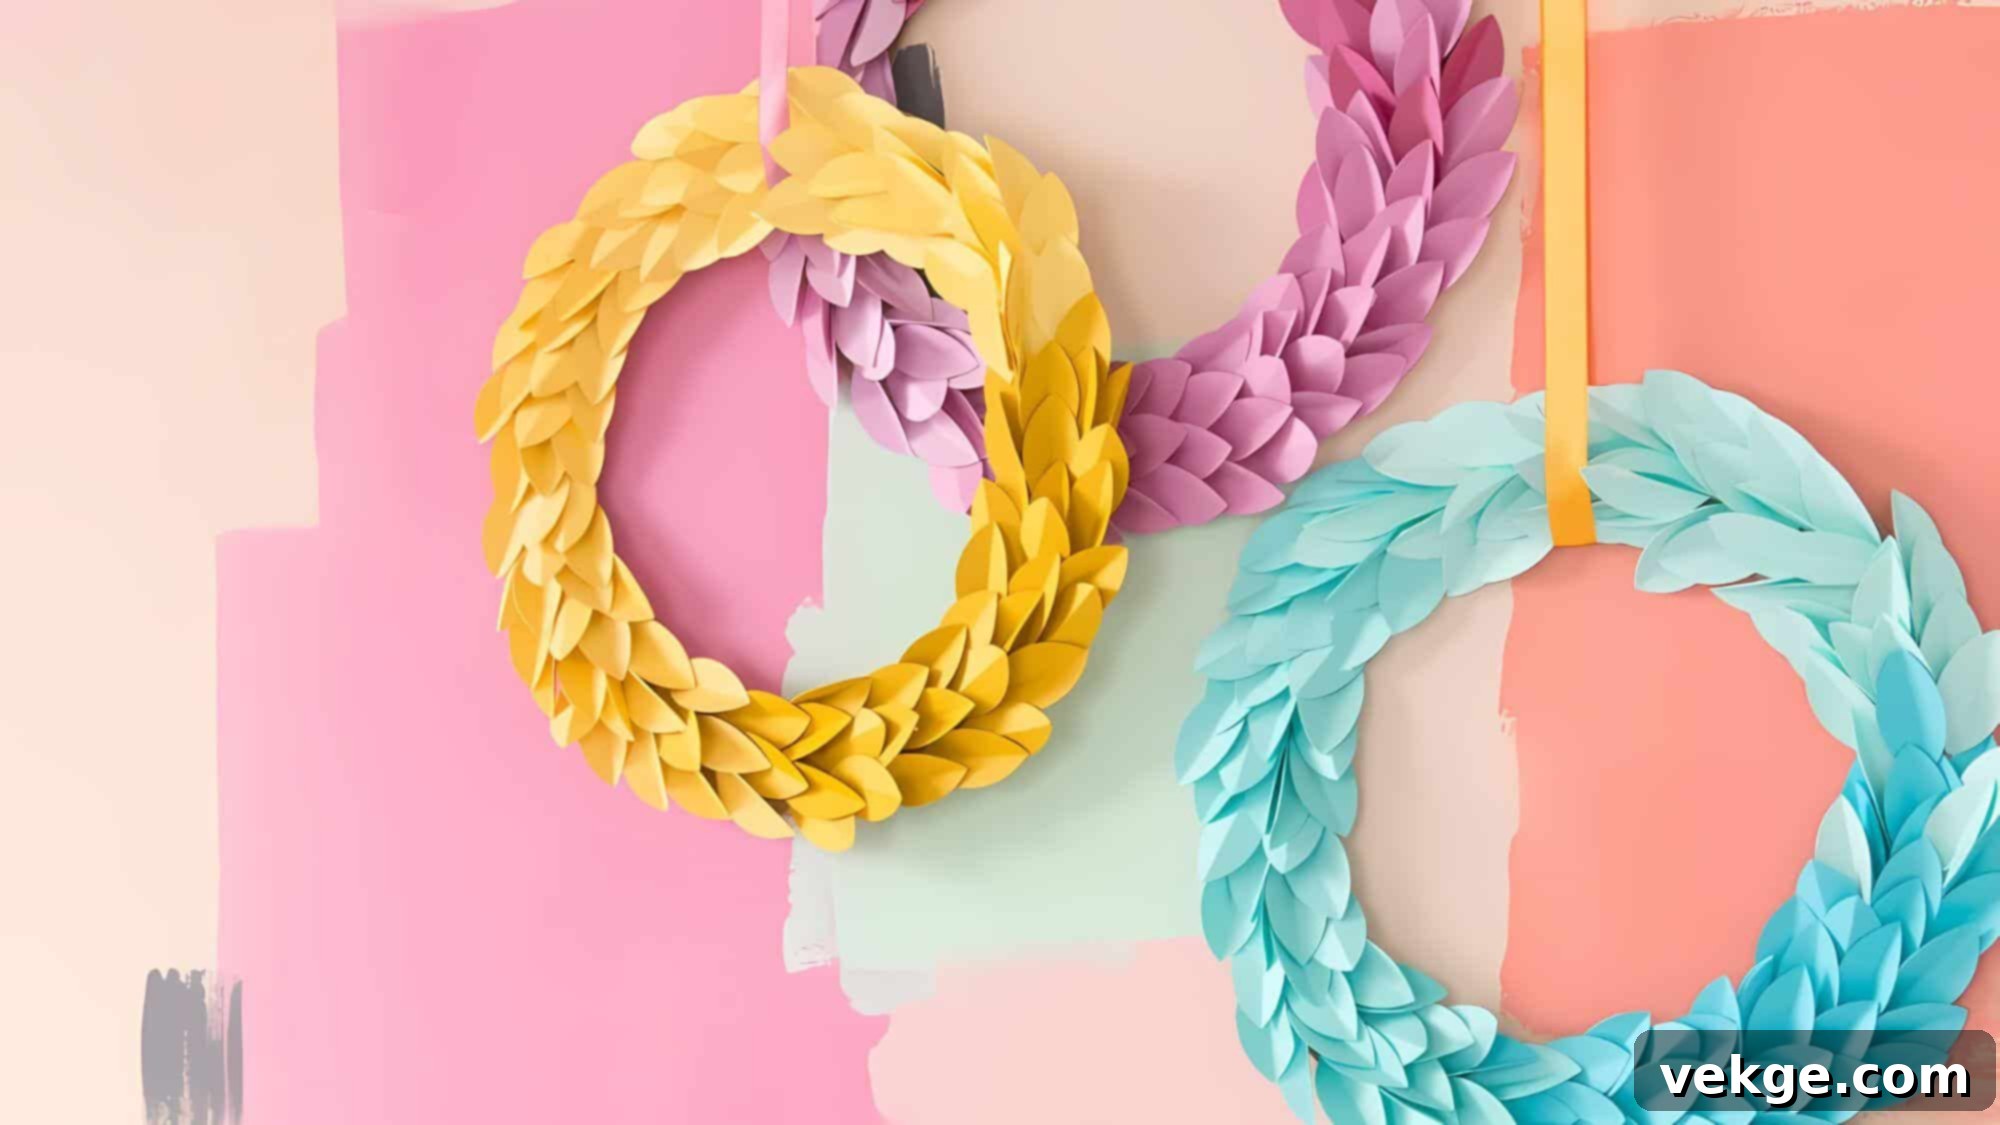
Add a wonderfully playful and visually dynamic touch to your autumn decor with this whimsical ombre paper leaf wreath. The seamless gradient of colors, transitioning from one vibrant fall hue to another, creates a visually striking and utterly captivating decoration that is sure to brighten any space. This wreath is a testament to creative paper crafting, bringing a fresh and modern energy to traditional fall themes.
Materials Required
- Scrapbook paper in a gradient of fall colors (e.g., light yellow, golden orange, burnt orange, deep red, burgundy)
- Wreath form (foam or wire)
- Scissors (or a leaf punch for efficiency)
- Hot glue gun and glue sticks
- Ribbon for hanging (optional, choose a color that blends with your gradient)
Crafting Process
- Cut out numerous leaf shapes from your scrapbook paper in various sizes, using each color in your chosen ombre gradient.
- Begin arranging the leaves on the wreath form, carefully transitioning colors to create a smooth, continuous gradient pattern.
- Secure each paper leaf firmly to the wreath form using small dabs of hot glue, ensuring they overlap for fullness.
- If desired, attach a subtle ribbon for hanging, ensuring it complements the beautiful ombre color flow.
Full tutorial:Damask Love
Additional Tips
- Seamless Color Flow: To achieve the most effective ombre effect, blend your chosen colors gradually, ensuring a smooth and subtle transition from one shade to the next.
- Enhanced Leaf Layering: Generously overlap the paper leaves and consider gently curling some edges before gluing to create fantastic depth, dimension, and a more lifelike appearance.
- Diverse Leaf Shapes: Incorporate a mix of different leaf shapes (e.g., maple, oak, birch) and sizes to add compelling visual interest and natural variation to your gradient design.
31. Dip-Dyed Corn Husk Wreath: A Bold Autumn Statement
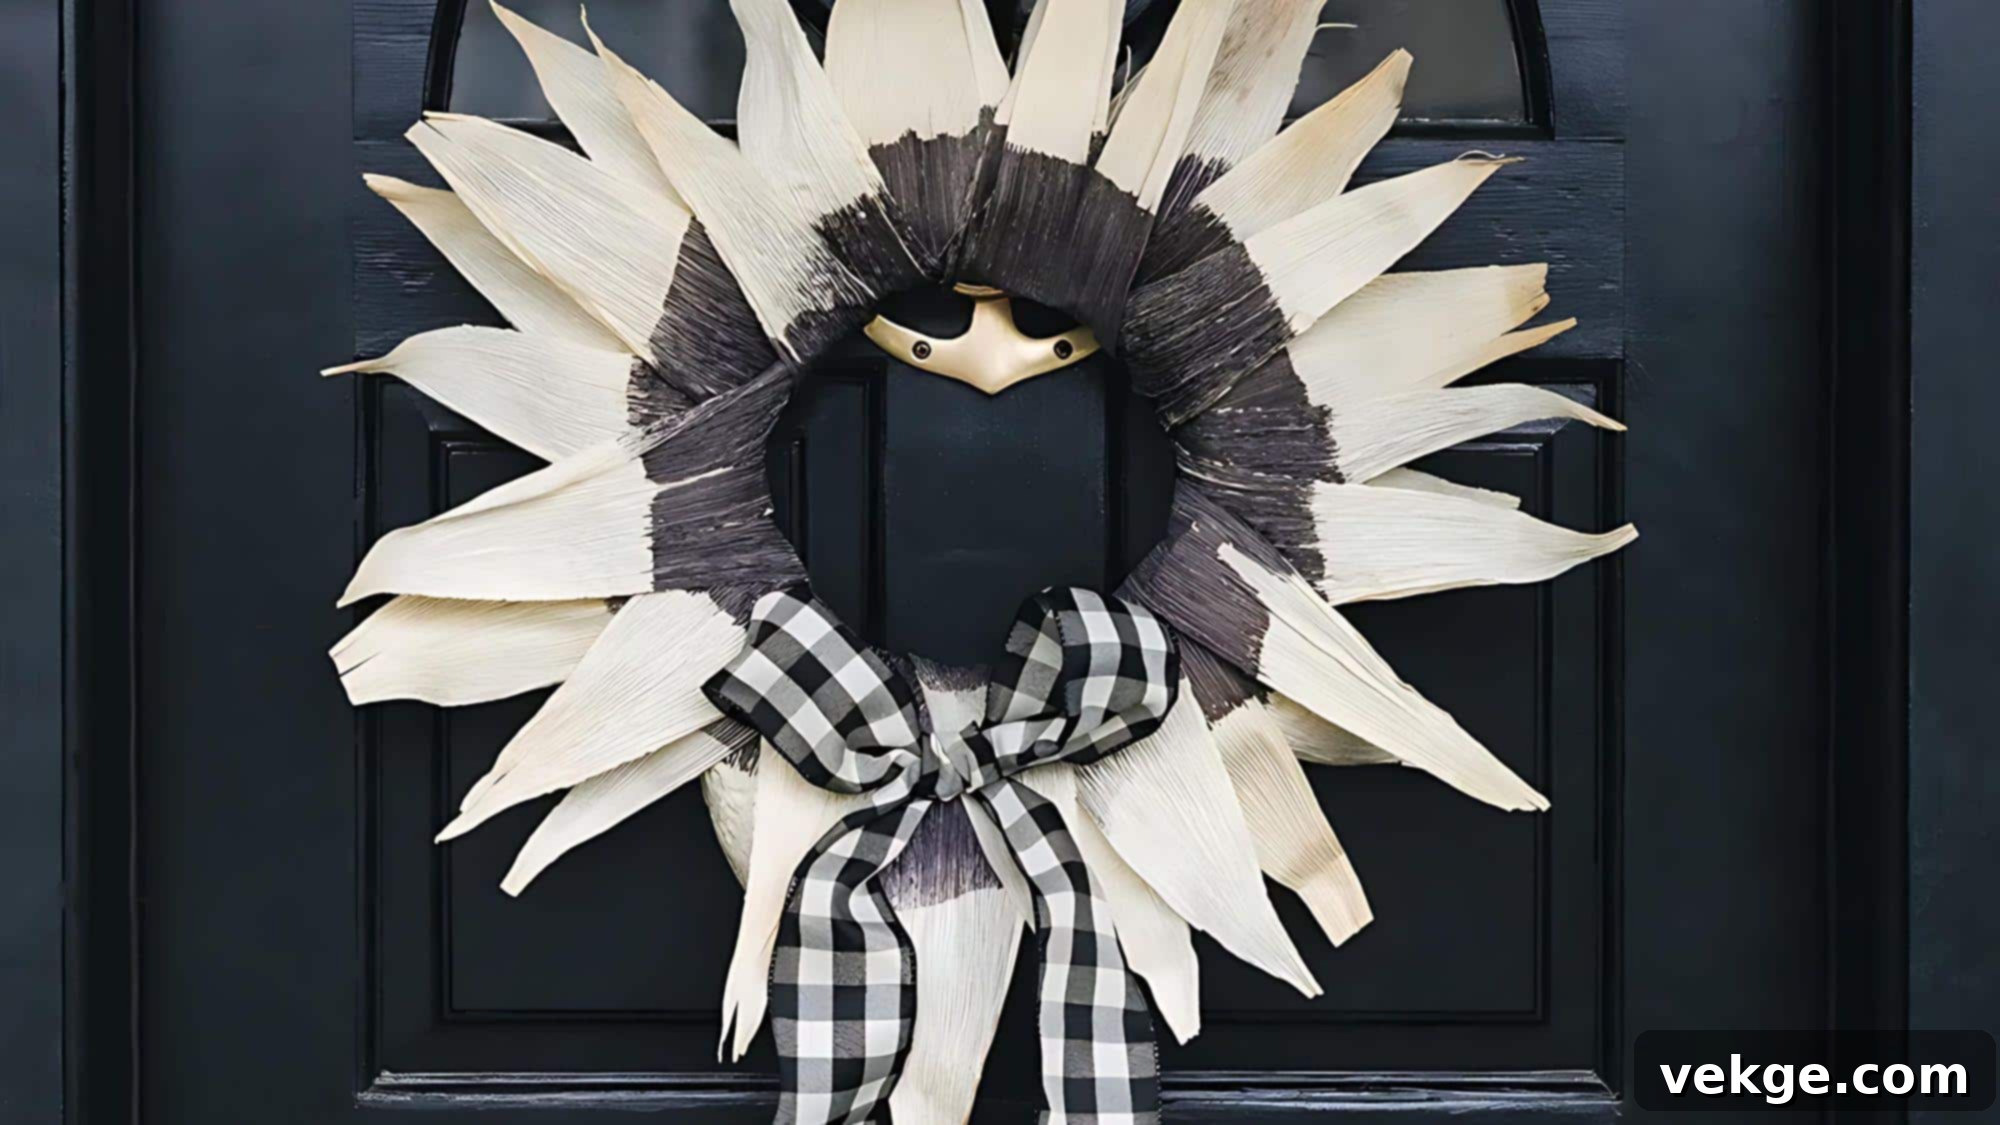
This avant-garde wreath innovatively transforms ordinary corn husks into a captivating and strikingly modern fall decoration. By artfully dip-dying the husks in a bold black hue, you create a stark, dramatic contrast that instantly catches the eye and adds an unexpected touch of contemporary sophistication to your autumn decor. The interplay of light and shadow on the dyed husks creates incredible depth and visual interest, making this wreath a standout piece for modern homes or for those looking to decisively break away from traditional fall color schemes.
Materials Required
- Dried corn husks (clean and free of debris)
- Black dye (fabric dye or RIT dye recommended)
- Large container or bowl for dyeing
- Wreath form (foam or wire)
- Floral wire
- Hot glue gun and glue sticks
- Gloves (for dyeing)
- Ribbon for hanging (optional, consider black, white, or a metallic accent)
Crafting Process
- Prepare your black dye bath according to package instructions. Dip the corn husks into the dye, holding for varying times for different shades, then hang to dry completely.
- Once thoroughly dry, begin attaching the dyed husks to the wreath form, securing them firmly using floral wire.
- Layer the husks generously and strategically, creating a full, textured, and visually dynamic appearance around the entire wreath.
- Secure any loose edges or pieces with hot glue as needed to ensure a durable and tidy finish.
Full tutorial: Jojotastic
Additional Tips
- Artistic Dye Variation: For a more subtle and organic effect, leave some husks partially undyed or dip them for shorter durations to achieve a captivating ombre or two-toned look.
- Dynamic Texture Enhancement: Before attaching, gently curl, fold, or twist some of the dried corn husks to introduce fantastic additional dimension and visual intrigue.
- Striking Accent Addition: For an extra touch of modern glamour, consider incorporating a few corn husks that have been lightly spray-painted with metallic gold, silver, or copper.
32. Simple Cattail Wreath: Rustic Minimalism
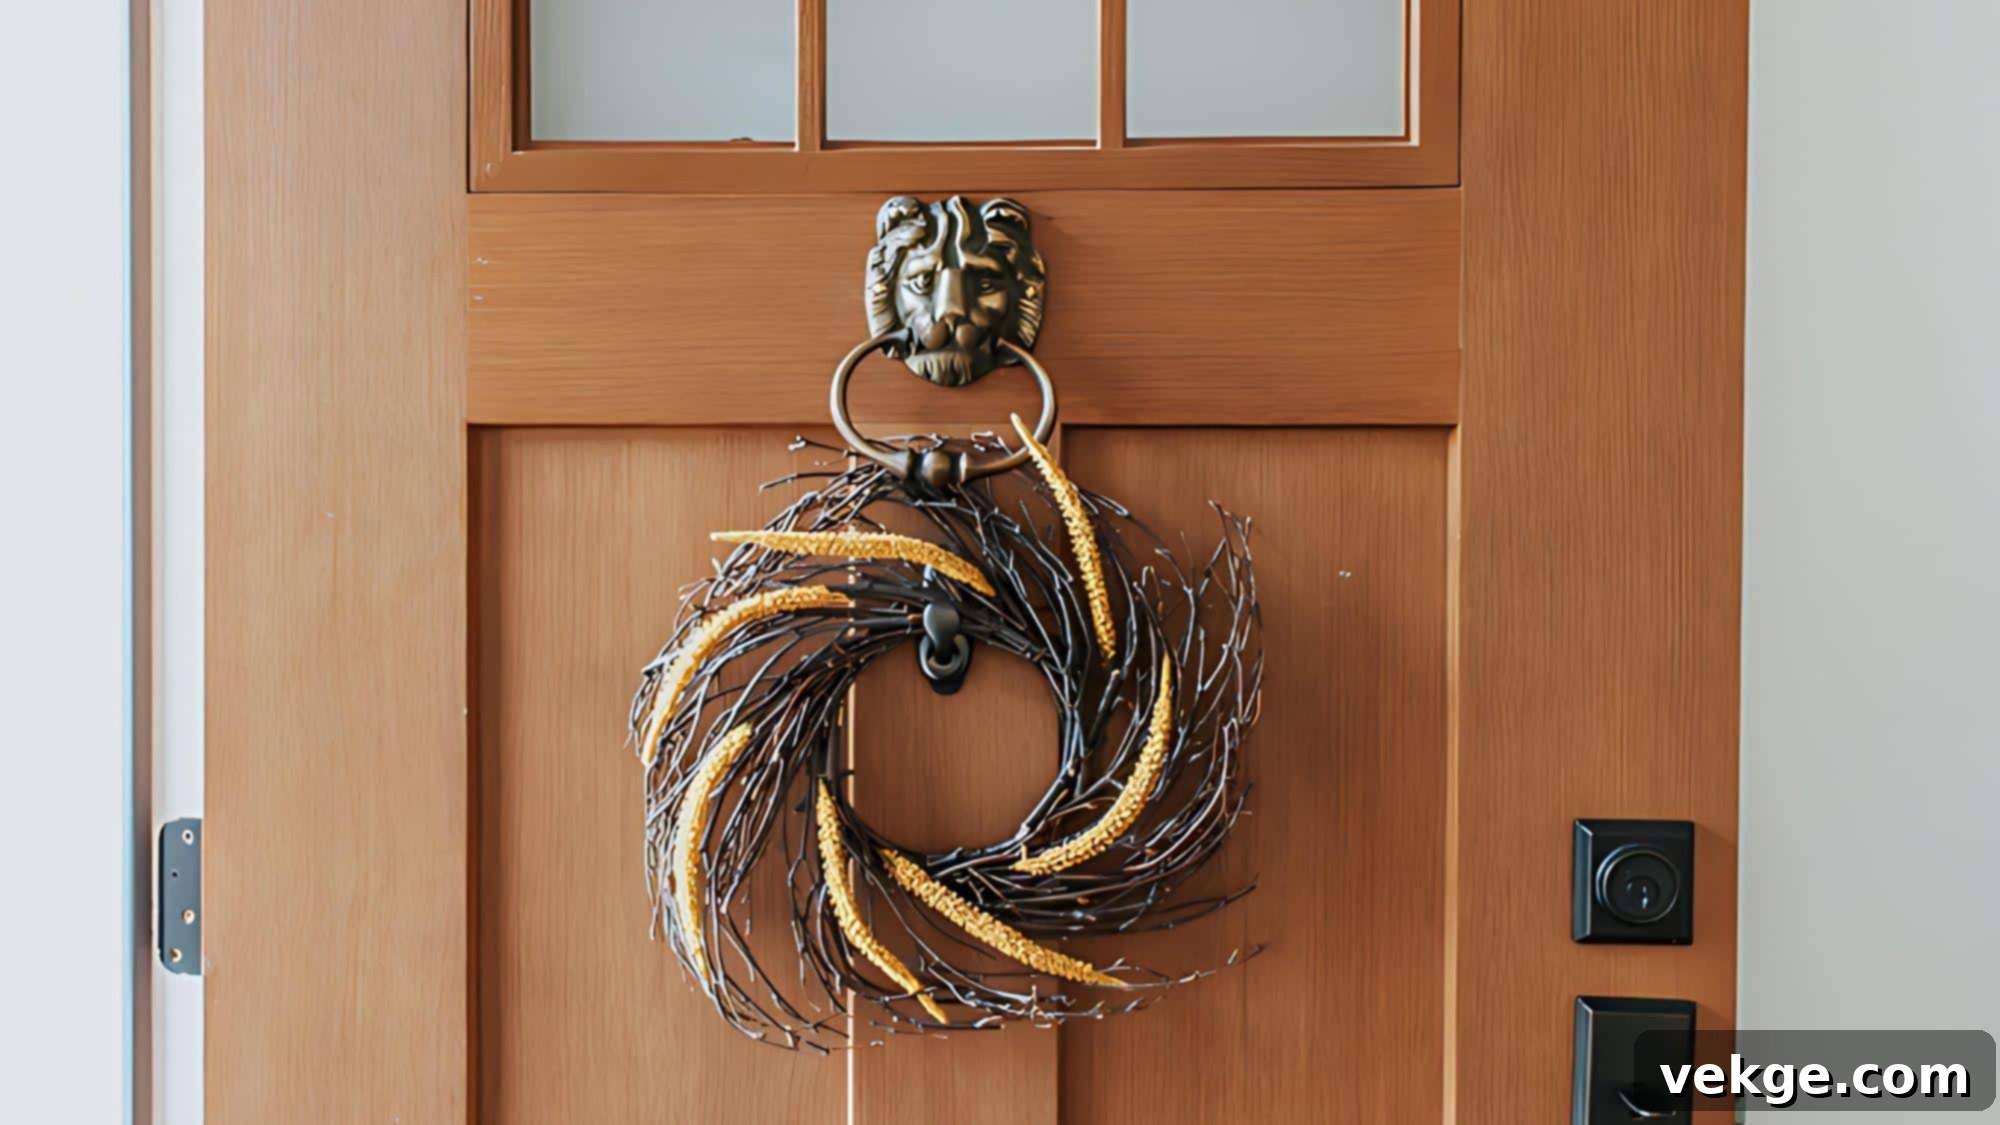
Celebrate the subtle, understated beauty of autumn with this elegantly simple cattail wreath. The slender, distinctive cylindrical shapes of the cattails evoke peaceful images of tranquil lakesides and serene marsh landscapes, instilling a sense of calm and natural beauty in your home. This wreath’s inherent simplicity allows it to effortlessly complement a wide spectrum of decor styles, from cozy country chic to sleek modern farmhouse, making it an incredibly versatile and appealing choice for any fall setting.
Materials Required
- Dried cattails (clean and free of seeds/fluff)
- Twig wreath form (or grapevine)
- Floral wire (thin gauge)
- Hot glue gun and glue sticks
- Ribbon for hanging (optional, a simple twine or rustic fabric)
Crafting Process
- Begin by attaching individual cattails or small bundles to the twig wreath form, securing them firmly with floral wire.
- Carefully position the cattails evenly around the wreath, paying attention to their direction, to achieve a balanced and harmonious look.
- Secure any loose ends or particularly fragile points with small dabs of hot glue as needed, ensuring durability.
- If desired, add a simple, rustic ribbon for hanging, allowing the natural beauty of the cattails to remain the focal point.
Full tutorial:Pretty Handy Girl
Additional Tips
- Cattail Preservation: To minimize shedding and keep your wreath tidy, lightly spray the dried cattails with an unscented hairspray or clear acrylic sealant before assembly.
- Subtle Natural Accents: For added texture and visual interest, carefully incorporate small natural elements like miniature pinecones, tiny acorns, or delicate dried seed pods.
- Pop of Color: If you desire a touch more vibrancy while maintaining the minimalist theme, strategically include a few faux fall leaves in muted, earthy tones for a subtle pop of seasonal color.
33. Boho Macramé Wreath: Artisanal Autumn Charm
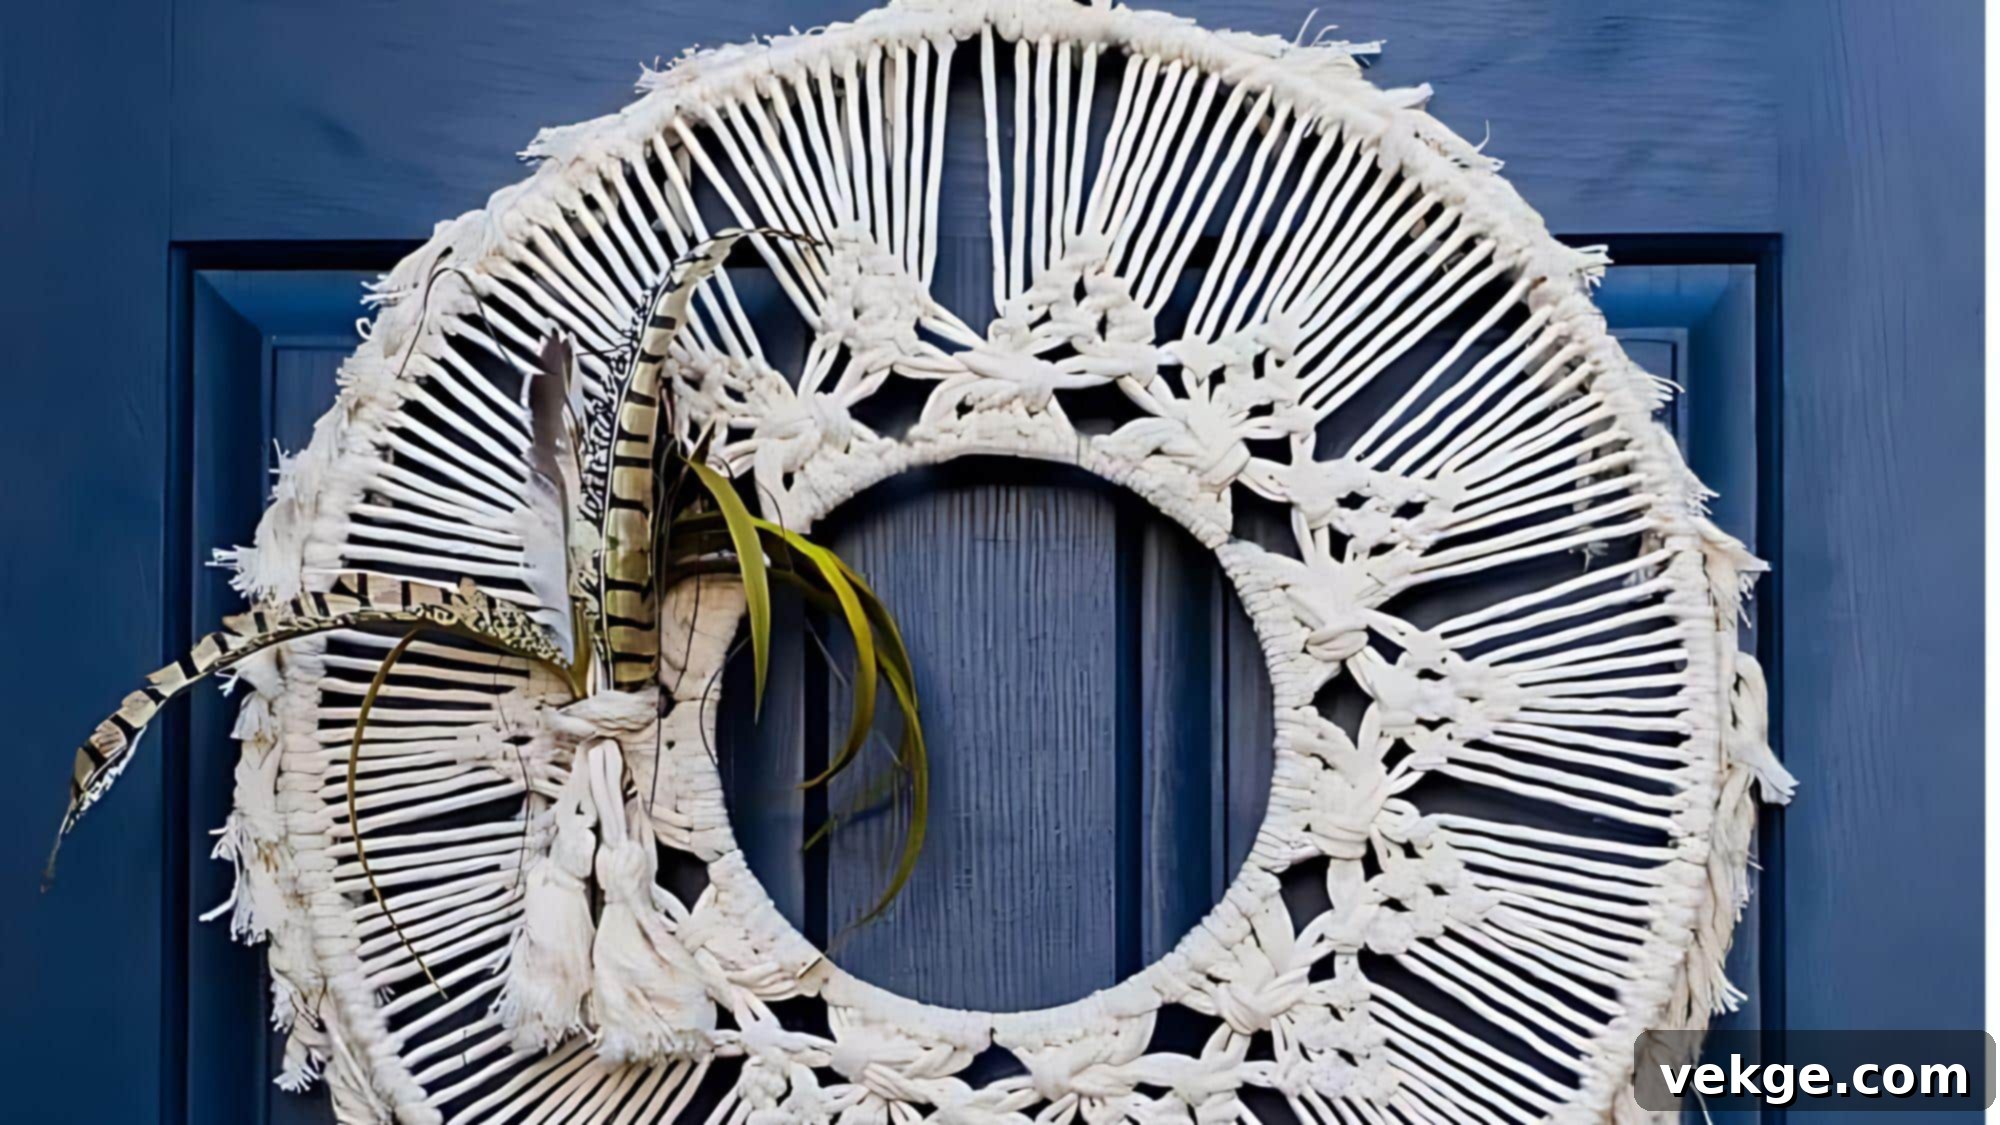
This captivating wreath gracefully marries the timeless, intricate craft of macramé with a delightful touch of seasonal fall flair. The elaborate knots and distinctive patterns of the macramé cord create a visually engaging and incredibly textured piece that instantly adds warmth and artisanal charm to your living space. The soft, natural fibers of the macramé bring a cozy, bohemian feel to your autumn decor, while the inherent design flexibility allows you to effortlessly incorporate personal touches that beautifully reflect your individual style.
Materials Required
- Macramé cord (cotton, jute, or natural fiber)
- Wreath form (metal hoop, wood hoop, or wire)
- Wooden beads (optional, for bohemian accent)
- Hot glue gun and glue sticks (for securing)
- Sharp scissors
- Ribbon for hanging (optional, a simple string or leather cord)
- Faux fall leaves or dried flowers (optional, for seasonal embellishment)
Crafting Process
- If starting from scratch, create your macramé knot design directly onto a portion of the wreath form. Alternatively, attach a pre-made macramé piece.
- Secure the macramé design firmly to the wreath form using discreet wraps of cord or small dabs of hot glue.
- Weave in optional wooden beads at various points within the macramé knots or along the hanging strands for added bohemian charm.
- If desired, attach a simple string or leather cord for hanging, maintaining the natural, handcrafted aesthetic.
- Incorporate small faux fall leaves or dried flowers into the macramé for a subtle seasonal touch, securing with glue.
Full tutorial: Place of My Taste
Additional Tips
- Beginner-Friendly Patterns: If you’re new to macramé, start with fundamental knots like the square knot and half-hitch knot to create beautiful yet achievable patterns.
- Trendy Fringe Effect: For an extra touch of bohemian style, leave longer strands of macramé cord dangling at the bottom of the wreath to create a chic, shaggy fringe.
- Natural Color Play: Experiment with naturally dyed macramé cords (e.g., in shades of rust, sage, or cream) to introduce subtle color variations that enhance the earthy feel.
34. Wheel Wreath: Rustic Charm Meets Floral Beauty
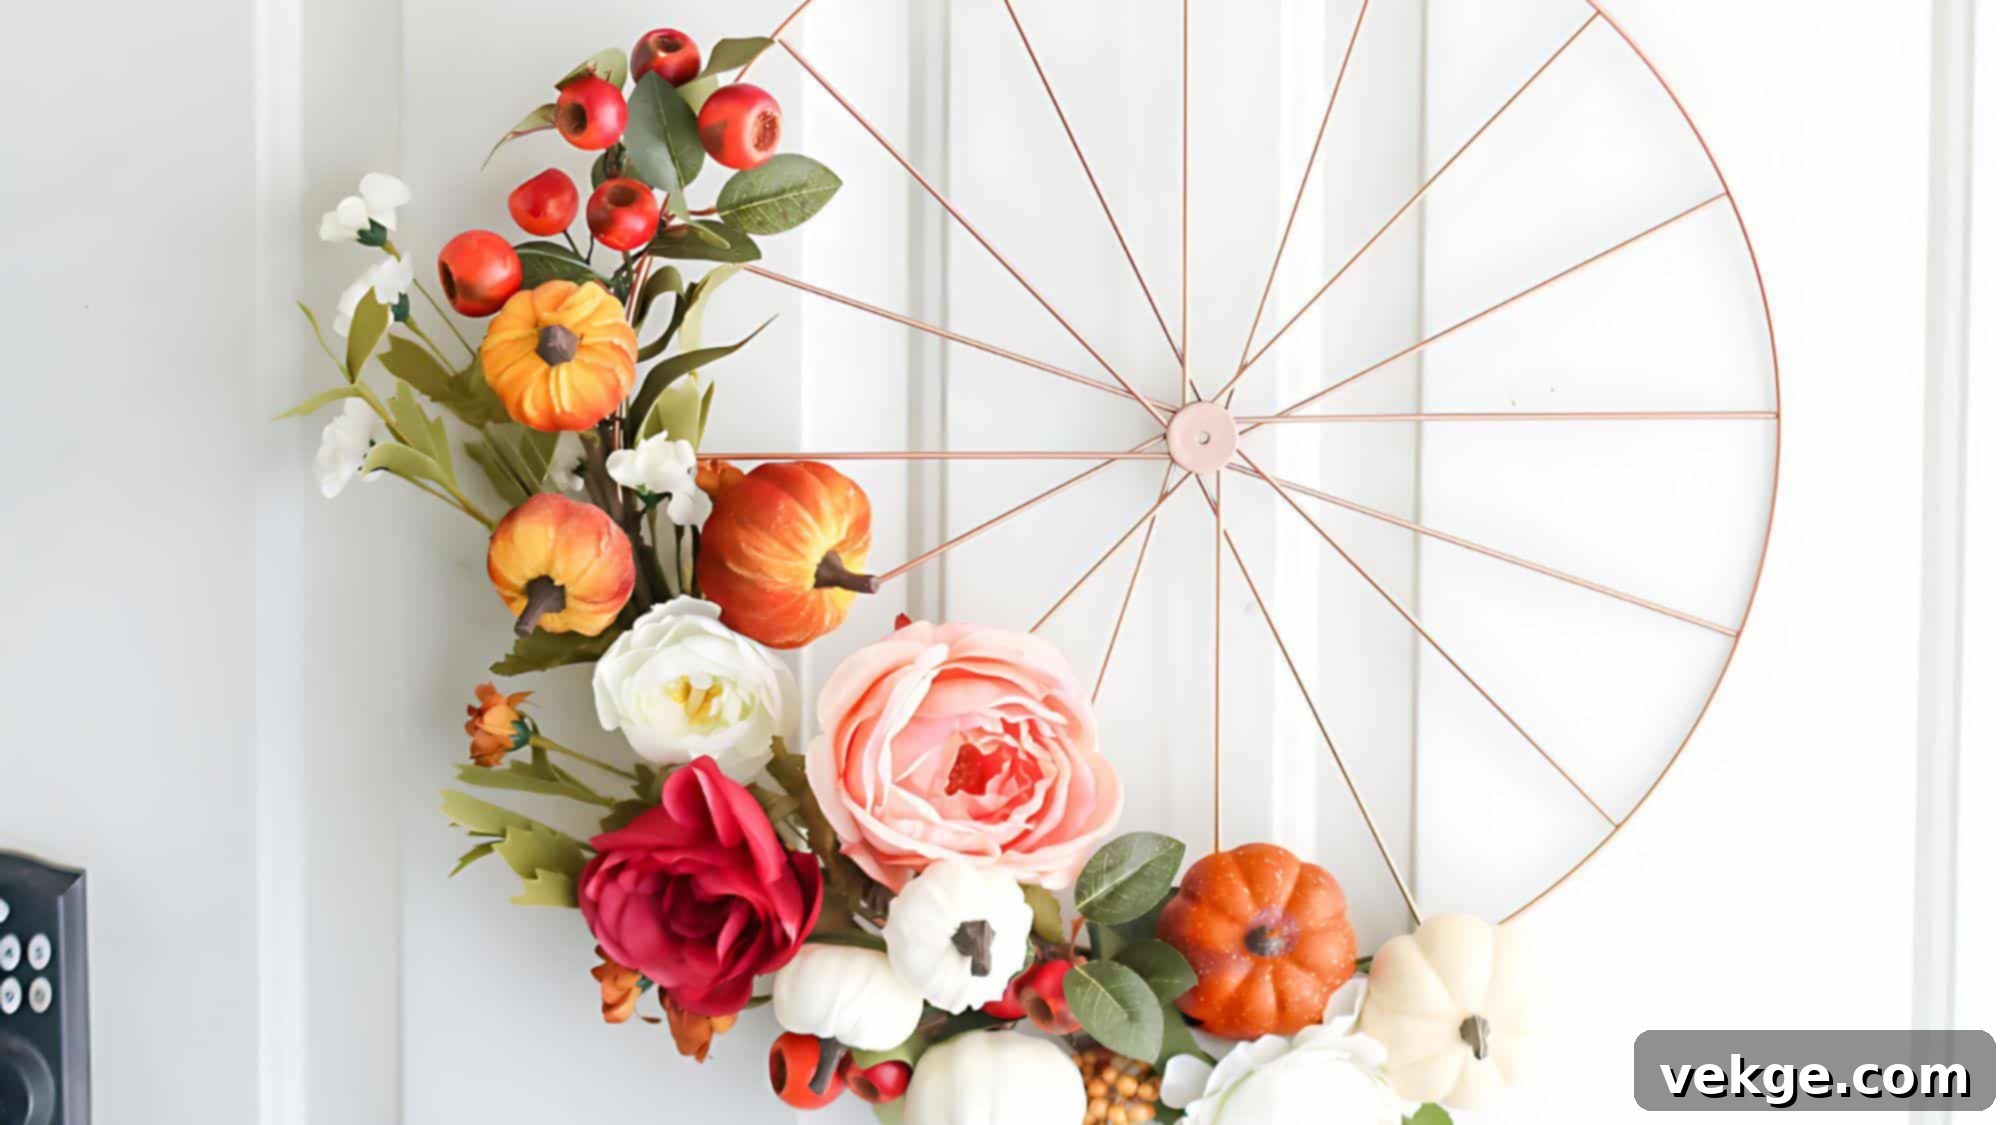
Repurpose an old bicycle wheel or a decorative wooden wheel into a truly show-stopping and unique fall decoration. This ingenious wreath elevates the concept of upcycling, transforming a functional object into a captivating piece of art. The inherent circular shape of the wheel provides an ideal, striking frame for lush faux fall blooms and foliage, creating a harmonious blend of industrial and natural elements. This distinctive wreath is not only a fantastic conversation starter but also adds a wonderful touch of whimsical, rustic beauty to your autumn decor.
Materials Required
- Old wheel (e.g., bicycle wheel, wagon wheel, or decorative wooden wheel)
- Assorted faux fall flowers (e.g., sunflowers, dahlias, mums)
- Faux fall foliage (e.g., maple leaves, berry sprays)
- Floral wire (green or brown)
- Hot glue gun and glue sticks
- Ribbon for hanging (optional, consider a wide plaid or burlap)
Crafting Process
- Thoroughly clean and prepare the wheel, ensuring it’s free of dirt, rust, or loose paint.
- Begin attaching faux fall flowers and foliage to the spokes and rim of the wheel, using floral wire to secure them firmly.
- Reinforce the attachment of flowers and foliage with small dabs of hot glue as needed, ensuring everything stays in place.
- Add a sturdy ribbon for hanging if desired, looping it securely around a section of the wheel.
Full tutorial:Lolly Jane
Additional Tips
- Dynamic Flower Selection: Mix different sizes, types, and colors of faux fall flowers to create rich visual interest and a bountiful appearance.
- Lush Greenery Addition: Incorporate ample faux leaves, vines, or delicate ferns to fill out the spaces within the wheel, creating a fuller, more natural, and cohesive look.
- Wheel Preparation & Customization: For a personalized touch, consider cleaning and then painting the wheel a color that complements your autumn decor, such as a matte black, antique bronze, or even a distressed cream.
35. Embroidery Hoop Wreath: Delicate Fall Charm
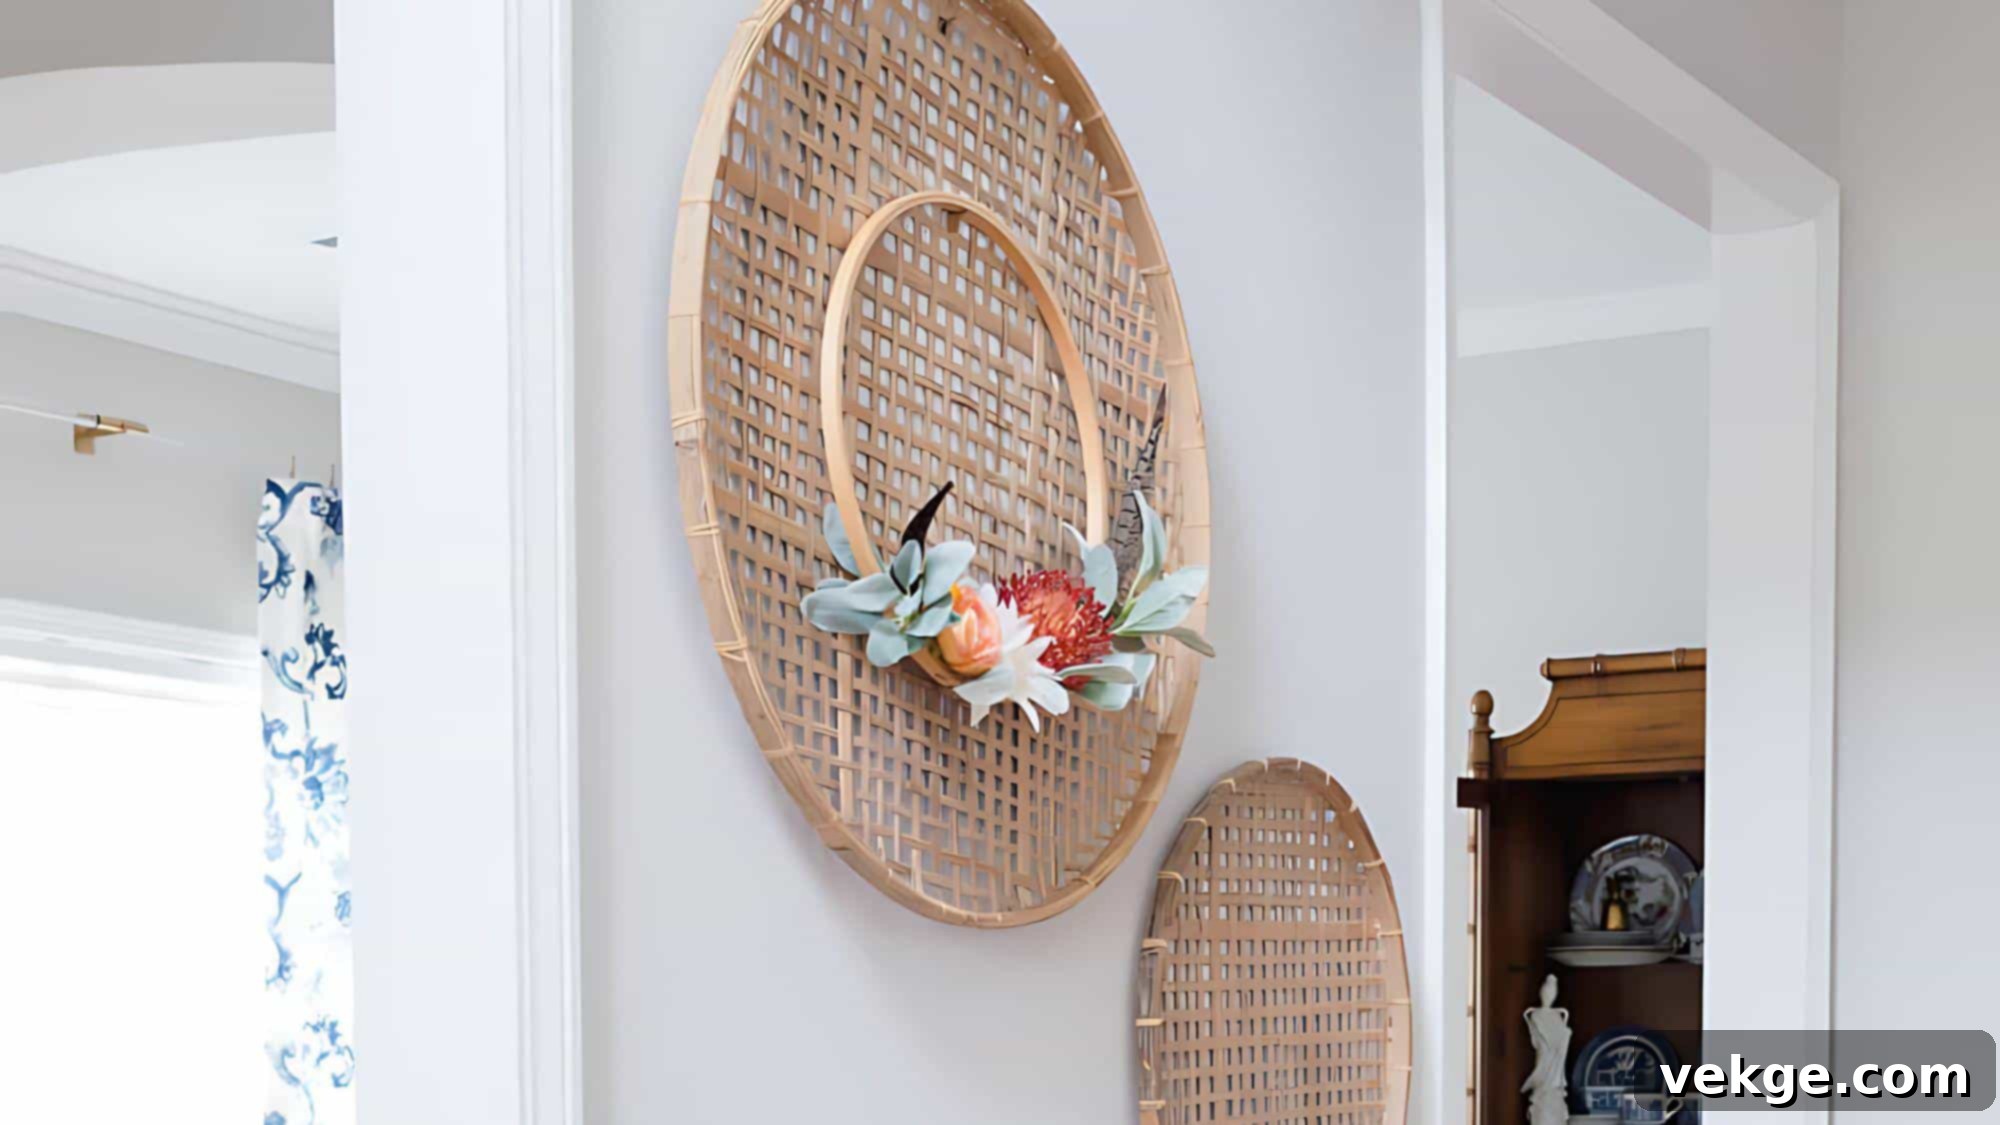
This minimalist embroidery hoop wreath brings a delightful touch of crafting nostalgia and delicate elegance to your fall decor. The inherent simplicity and clean lines of the embroidery hoop serve as a wonderfully modern and understated base, perfect for showcasing a carefully selected cluster of beautiful autumn elements. The thoughtful combination of faux florals and soft feathers allows for a captivating play of textures, resulting in a wreath that is visually interesting and charming from every perspective. Its compact size makes it an ideal choice for smaller spaces or as a complementary piece within a larger wall art arrangement.
Materials Required
- Embroidery hoop (wooden for rustic, metal for modern)
- Faux fall florals (e.g., small mums, berries, autumn leaves)
- Decorative feathers (faux or responsibly sourced real)
- Floral wire (thin gauge)
- Hot glue gun and glue sticks
- Ribbon for hanging (optional, a delicate satin or twine)
Crafting Process
- Thoughtfully arrange your chosen faux florals and feathers onto a section of the embroidery hoop, creating a balanced cluster.
- Secure all elements firmly to the hoop using thin floral wire, wrapping it discreetly.
- Reinforce the attachment of delicate items with small dabs of hot glue as needed.
- Carefully adjust the placement of each piece to ensure a harmonious and visually balanced look.
- If desired, attach a delicate ribbon for hanging, allowing the artistry of the hoop and its elements to shine.
Full tutorial:The Home I Create
Additional Tips
- Hoop Material Selection: Opt for a natural wooden embroidery hoop to enhance a rustic or farmhouse fall aesthetic, or choose a sleek metal hoop for a more modern, minimalist vibe.
- Asymmetrical Design: For a contemporary and artistic twist, concentrate your florals and feathers on one side or a specific section of the hoop, creating an intentional, eye-catching asymmetry.
- Effortless Seasonal Updates: The simple nature of this design makes it incredibly easy to refresh; simply switch out the faux florals and feathers to match different seasons or upcoming holidays.
Final Thoughts: Craft Your Perfect Autumn Welcome
Bringing your fall decor to life with a beautifully crafted DIY wreath is a truly rewarding way to embrace the season and unleash your creative spirit. From the bold, modern statement of the Dip-Dyed Corn Husk Wreath to the delicate and whimsical charm of the Embroidery Hoop Wreath, each design featured here offers a unique and personal method to celebrate the abundant beauty of autumn.
These engaging projects not only provide a fantastic opportunity to save money on seasonal decorations but also empower you to create a truly one-of-a-kind piece that perfectly reflects your personal style and complements your home’s aesthetic. Remember, the secret to a magnificent wreath lies in the details: don’t hesitate to mix various textures, play with a vibrant or subtle palette of colors, and always feel free to infuse your unique personal touches.
So, why wait? Gather your crafting supplies this weekend and choose one (or a few!) of these inspiring wreath ideas to bring to life. Your front door, and certainly your delighted guests, will undoubtedly thank you for the warm, handcrafted welcome. We’d absolutely love to see your autumn creations! Share your masterpieces in the comments below and show us how you’ve brought these wonderful ideas to life.
