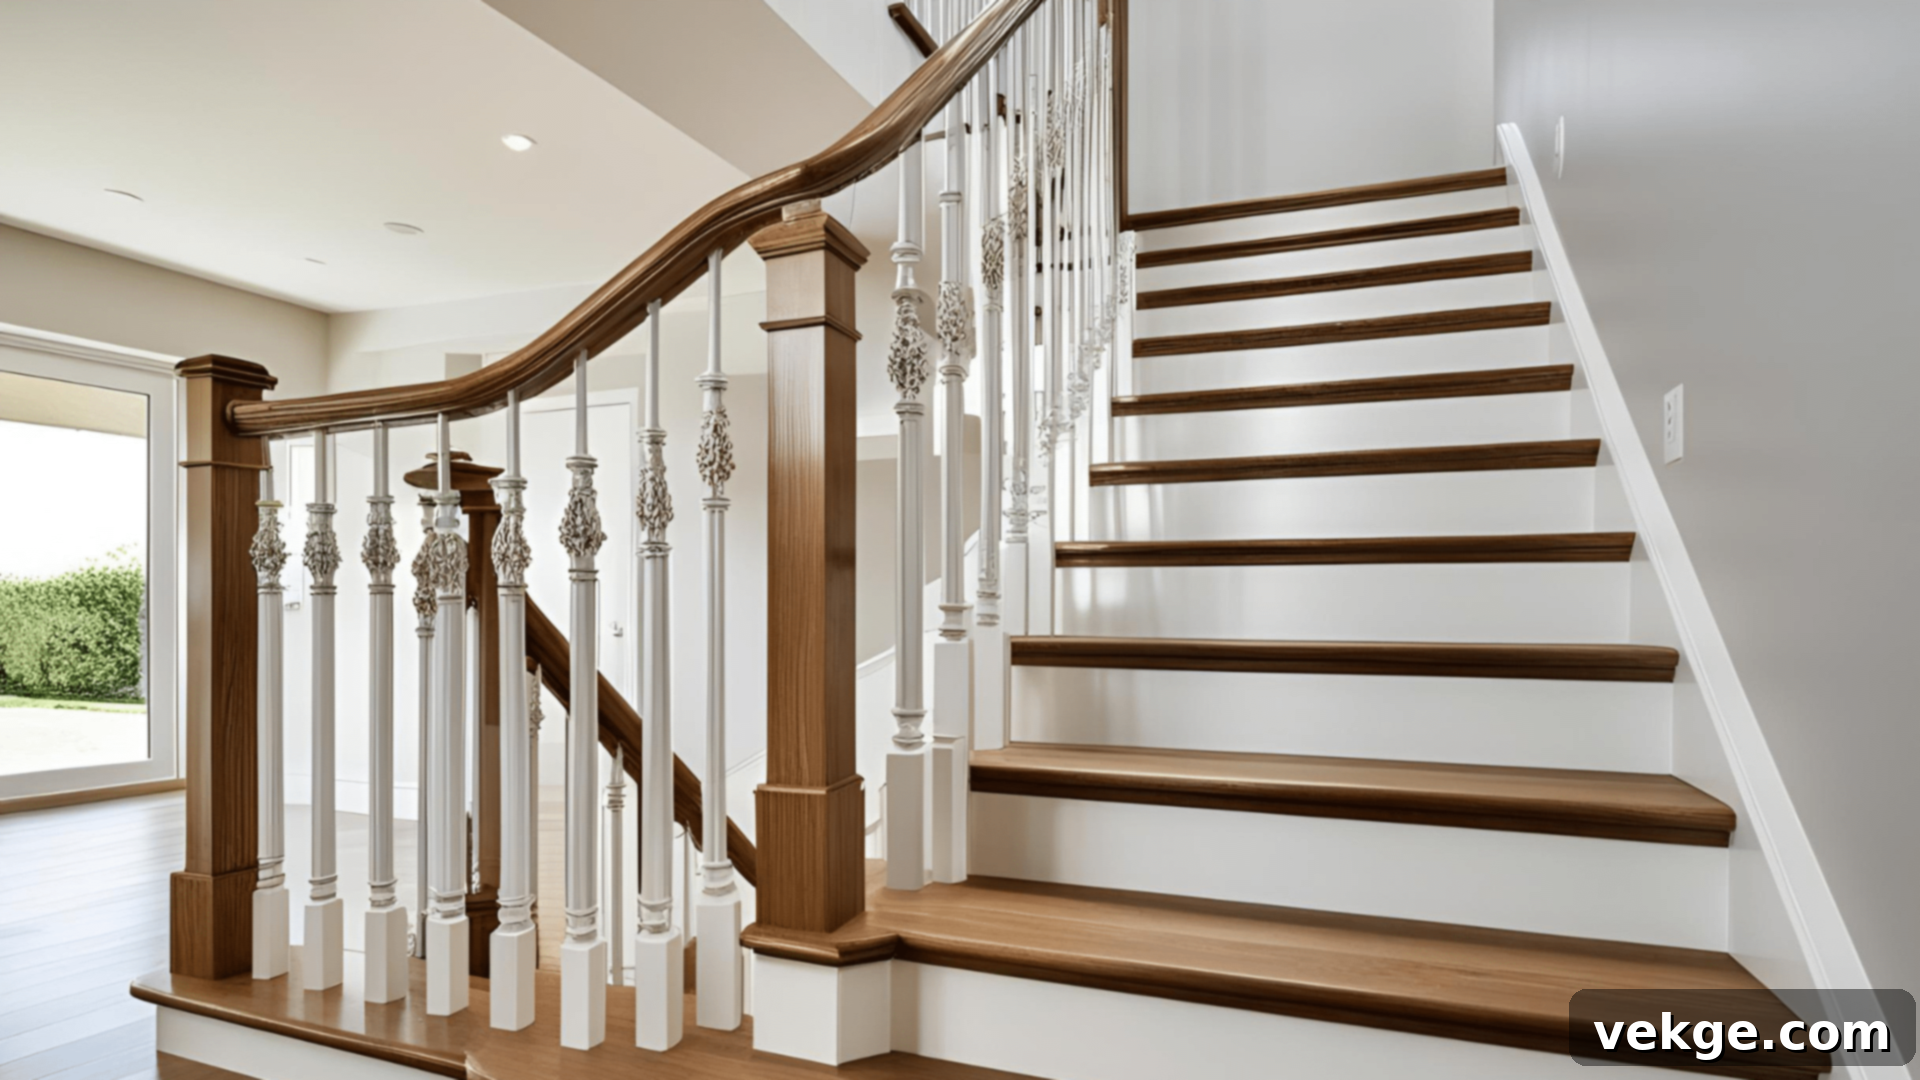
The Complete Guide to Staircase Parts: Anatomy, Design, and Safety
Staircases are far more than just functional connectors between different levels of your home; they are often pivotal architectural features that profoundly influence a building’s overall aesthetic and flow. A thoughtfully designed and expertly crafted staircase can elevate your interior design, serving as a stunning centerpiece that welcomes visitors and reflects your unique style, all while fulfilling its essential everyday role.
As you ascend or descend your stairs, you might not consciously consider the intricate interplay of components working in perfect harmony. Yet, each individual part plays a significant role in ensuring the staircase’s structural integrity, safety, and visual appeal. Understanding these components is invaluable, whether you’re embarking on the exciting journey of building a new home, undertaking a major renovation, or simply planning minor repairs or cosmetic updates to an existing staircase.
Equipping yourself with knowledge about each staircase part—its name, purpose, and design variations—empowers you to make informed decisions. This understanding is crucial when discussing potential repairs, planning impactful updates, or envisioning a complete transformation. It enables you to communicate clearly and effectively with architects, builders, and contractors, ensuring your vision is understood and executed precisely. Furthermore, this knowledge allows you to identify potential issues early, plan changes that align with your personal style and budget, and ultimately create a staircase that is both beautiful and built to last.
The Fundamental Step Parts of a Staircase
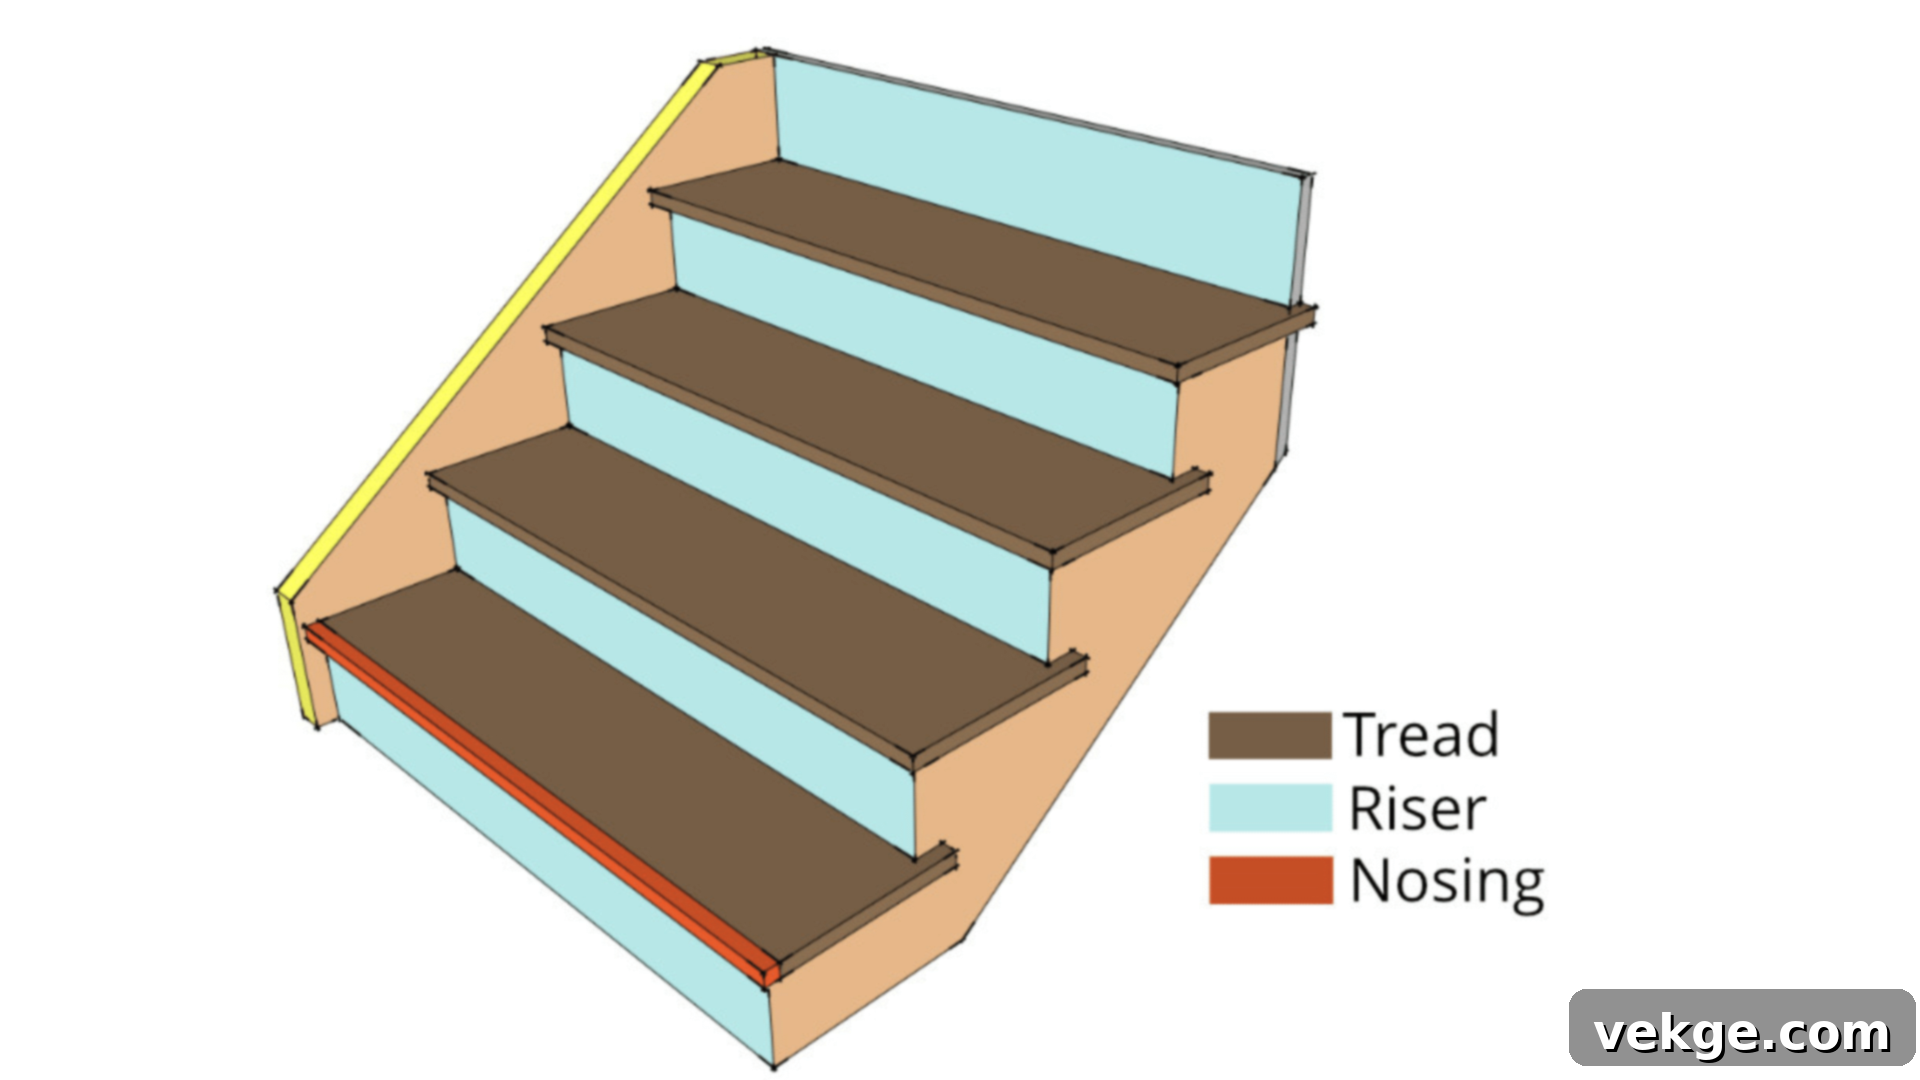
When you physically interact with a staircase, the most prominent components you engage with are, of course, the steps themselves. Each individual step is a carefully engineered unit, composed of several key elements designed for both function and form.
Treads in Stairs: The Walking Surface
The treads are the horizontal boards that form the primary walking surface of each step. These flat, sturdy platforms are engineered to withstand continuous daily foot traffic and bear the weight of those ascending and descending. Treads are manufactured from a diverse range of materials, each offering distinct aesthetic and durability characteristics. Common choices include solid hardwoods like oak, maple, or cherry for their classic appeal and resilience; engineered wood for stability; natural stone such as marble or granite for a luxurious feel; or even carpeted treads for added warmth and noise reduction. The width and depth of the treads are paramount for comfort and, more importantly, safety. Most building codes mandate a minimum tread depth, often around 10 to 11 inches, to ensure ample space for a person’s entire foot, thereby preventing missteps and promoting a secure walking experience.
Risers in Stairs: Vertical Connectors and Design Elements
Connecting each tread vertically are the risers. These upright panels bridge the gap between successive treads and play a critical role in the staircase’s structural integrity, providing additional support and stability. In traditional closed-stair designs, risers create a solid, enclosed appearance. However, in contemporary architecture, you might encounter “open risers,” where these vertical panels are intentionally omitted. This design creates a distinctive “floating” effect for the treads, allowing light and air to pass through, contributing to a more open and minimalist aesthetic. When present, risers offer a fantastic opportunity for decorative expression; they can be painted in contrasting colors, clad with unique materials, or adorned with decorative moldings or wallpaper to add visual interest and complement the overall interior design theme.
Nosings in Stairs: The Finishing Edge
The nosing is a subtle yet significant component of the tread. It refers to the slight projection of the tread that extends horizontally beyond the face of the riser below it. This small overhang serves a dual purpose: functionally, it provides a crucial bit of extra standing room, enhancing comfort and safety by giving the foot more purchase. Aesthetically, the nosing delivers a refined, finished look to each step, softening the edge and creating a visual transition. Nosings typically extend approximately 1 to 1.5 inches and can be shaped in various profiles, such as a gentle bullnose (rounded), a crisp square edge, or a subtle eased edge, depending on the desired style of the staircase and the overall architectural language of the home. Together, these three components—treads, risers, and nosings—form the complete walking surface of your staircase, seamlessly blending essential function with elegant form.
The Essential Support System of a Staircase
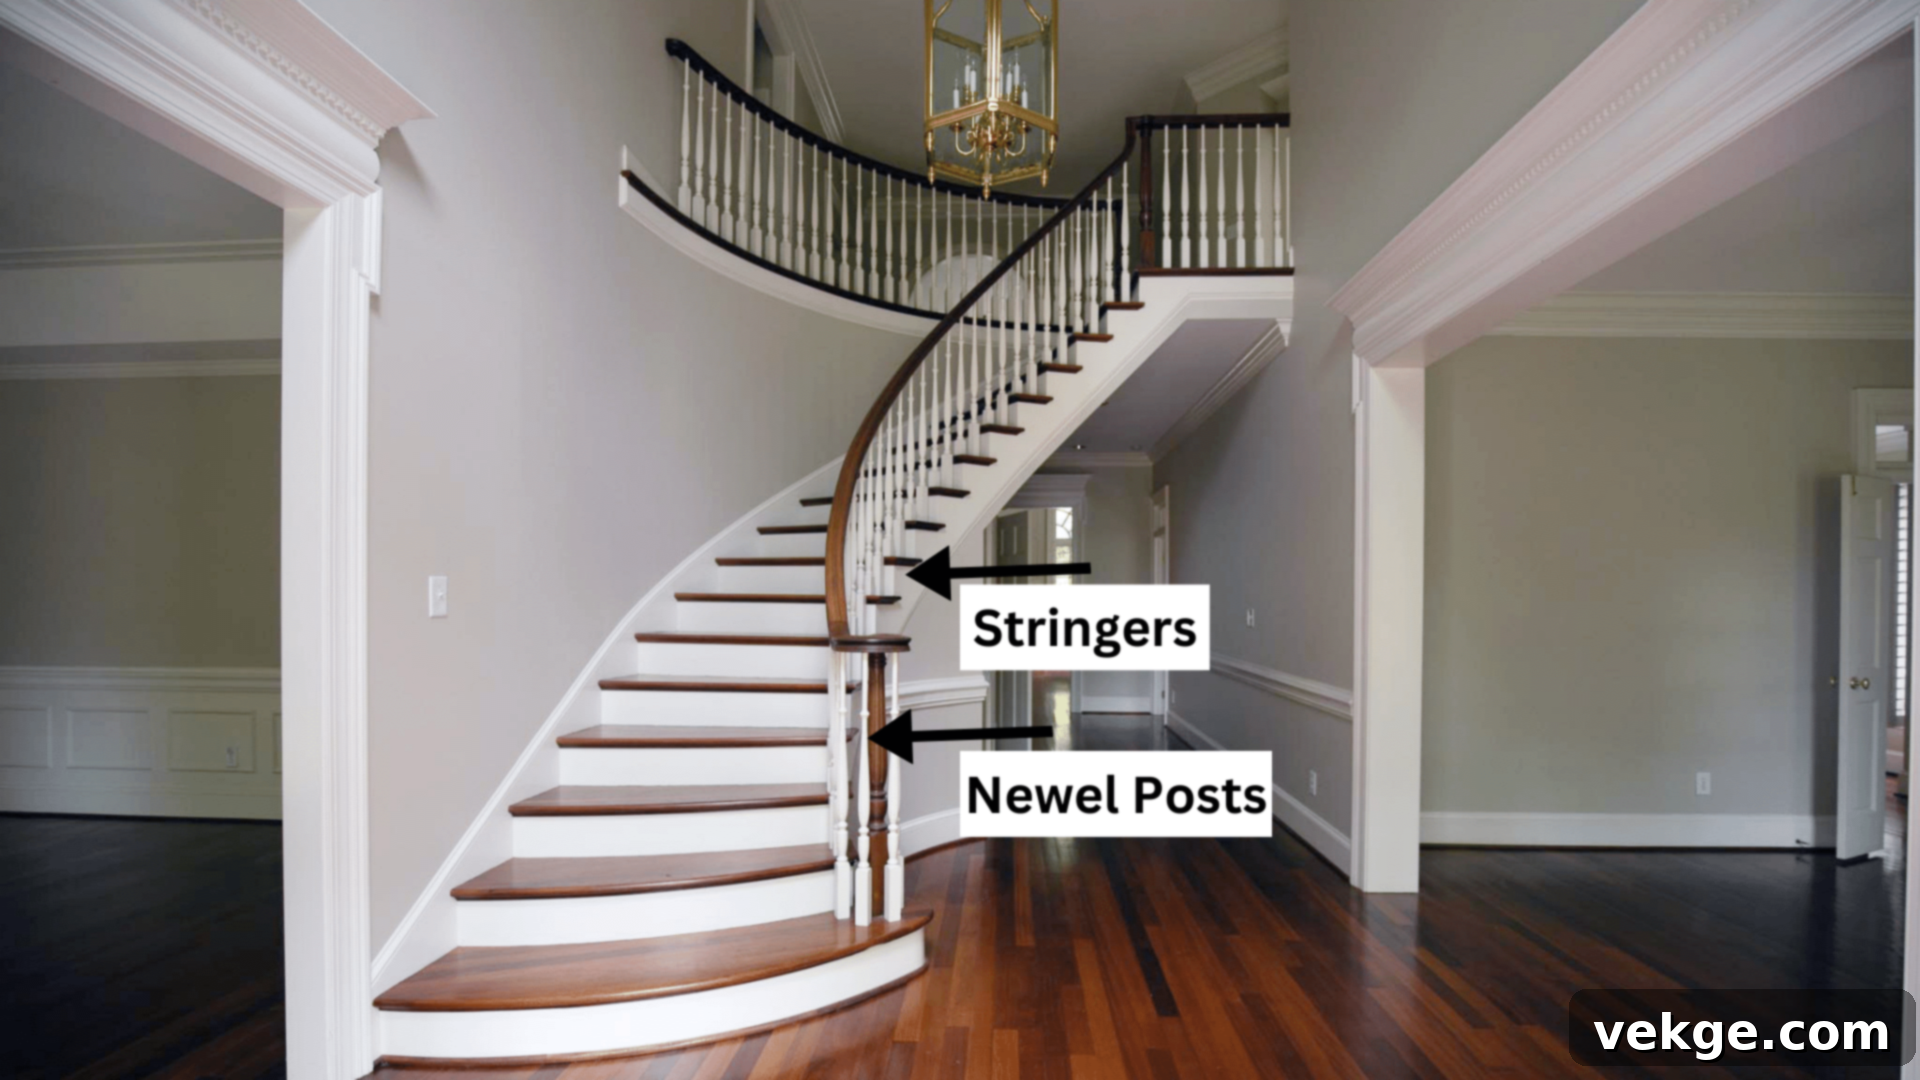
Beneath the visible steps and railings lies a robust and carefully engineered support system. These critical structural elements, though often unseen, are absolutely vital for maintaining the staircase’s safety, stability, and long-term durability. They bear the majority of the load and prevent any wobbling, sagging, or potential collapse.
Newel Posts in Stairs: The Anchoring Pillars
Newel posts are the thick, vertical posts that serve as the primary anchors for your entire staircase and its railing system. Typically positioned at the top and bottom of the staircase, as well as at any landings or significant turns, these sturdy posts are designed to handle a substantial portion of the weight and lateral forces exerted on the stairs and handrails. Historically, some newel posts were ingeniously crafted with hollow interiors, occasionally used by homeowners to discreetly store small valuables or mementos – a charming nod to traditional craftsmanship. Today, newel posts are available in an astonishing array of shapes, sizes, and decorative styles, ranging from simple, clean-lined square boxes that complement modern designs, to intricately turned and carved designs that become a standout feature in more traditional or ornate homes. Their material, often solid wood, metal, or a combination, also contributes significantly to the staircase’s character and robustness.
Stringers in Stairs: The Diagonal Backbone
Stringers are the heavy-duty diagonal supports that run along the sides or underneath the entire length of the staircase. They are the true backbone, carrying the load of the steps (treads and risers) and the people walking on them. There are three primary types of stringers, each with a distinct construction method and visual impact:
- Closed Stringers (also known as Housed or Western Stringers): These appear as solid, unbroken planks that run parallel to the slope of the stairs. Notches or “houses” are precisely cut into the inner face of the stringer, into which the treads and risers are securely fitted. This creates a solid, enclosed, and often traditional appearance, giving the staircase a robust, ‘boxed-in’ feel.
- Open Stringers (also known as Cut or Eastern Stringers): Unlike closed stringers, open stringers feature a distinctive saw-tooth pattern cut along their top edge. The treads are then placed directly on top of these cuts, often projecting slightly, and the risers fit between the stringers. This design exposes the end grain of the treads, creating a more airy, architectural, and often contemporary look.
- Mono Stringers: Representing a minimalist and modern approach, mono stringers utilize a single, central beam that runs directly underneath the middle of the staircase. The treads are then cantilevered (supported only at one end) or otherwise attached to this central beam, often with no visible side supports. This creates a striking “floating” effect for the steps, making the staircase feel light and sculptural.
These support components work in concert to form an exceptionally strong and stable framework. The stringers distribute the weight and forces efficiently, while the newel posts anchor the entire structure securely to the floor levels and the railing system. The meticulous way these pieces are joined, often using robust carpentry techniques and strong fasteners, is crucial in preventing any undesirable wobbling, sagging, or potential structural failure. Proper design and installation of these often-hidden heroes are paramount, ensuring your staircase remains solid, safe, and reliable for many decades to come.
Essential Railing Components on a Staircase: Safety and Style
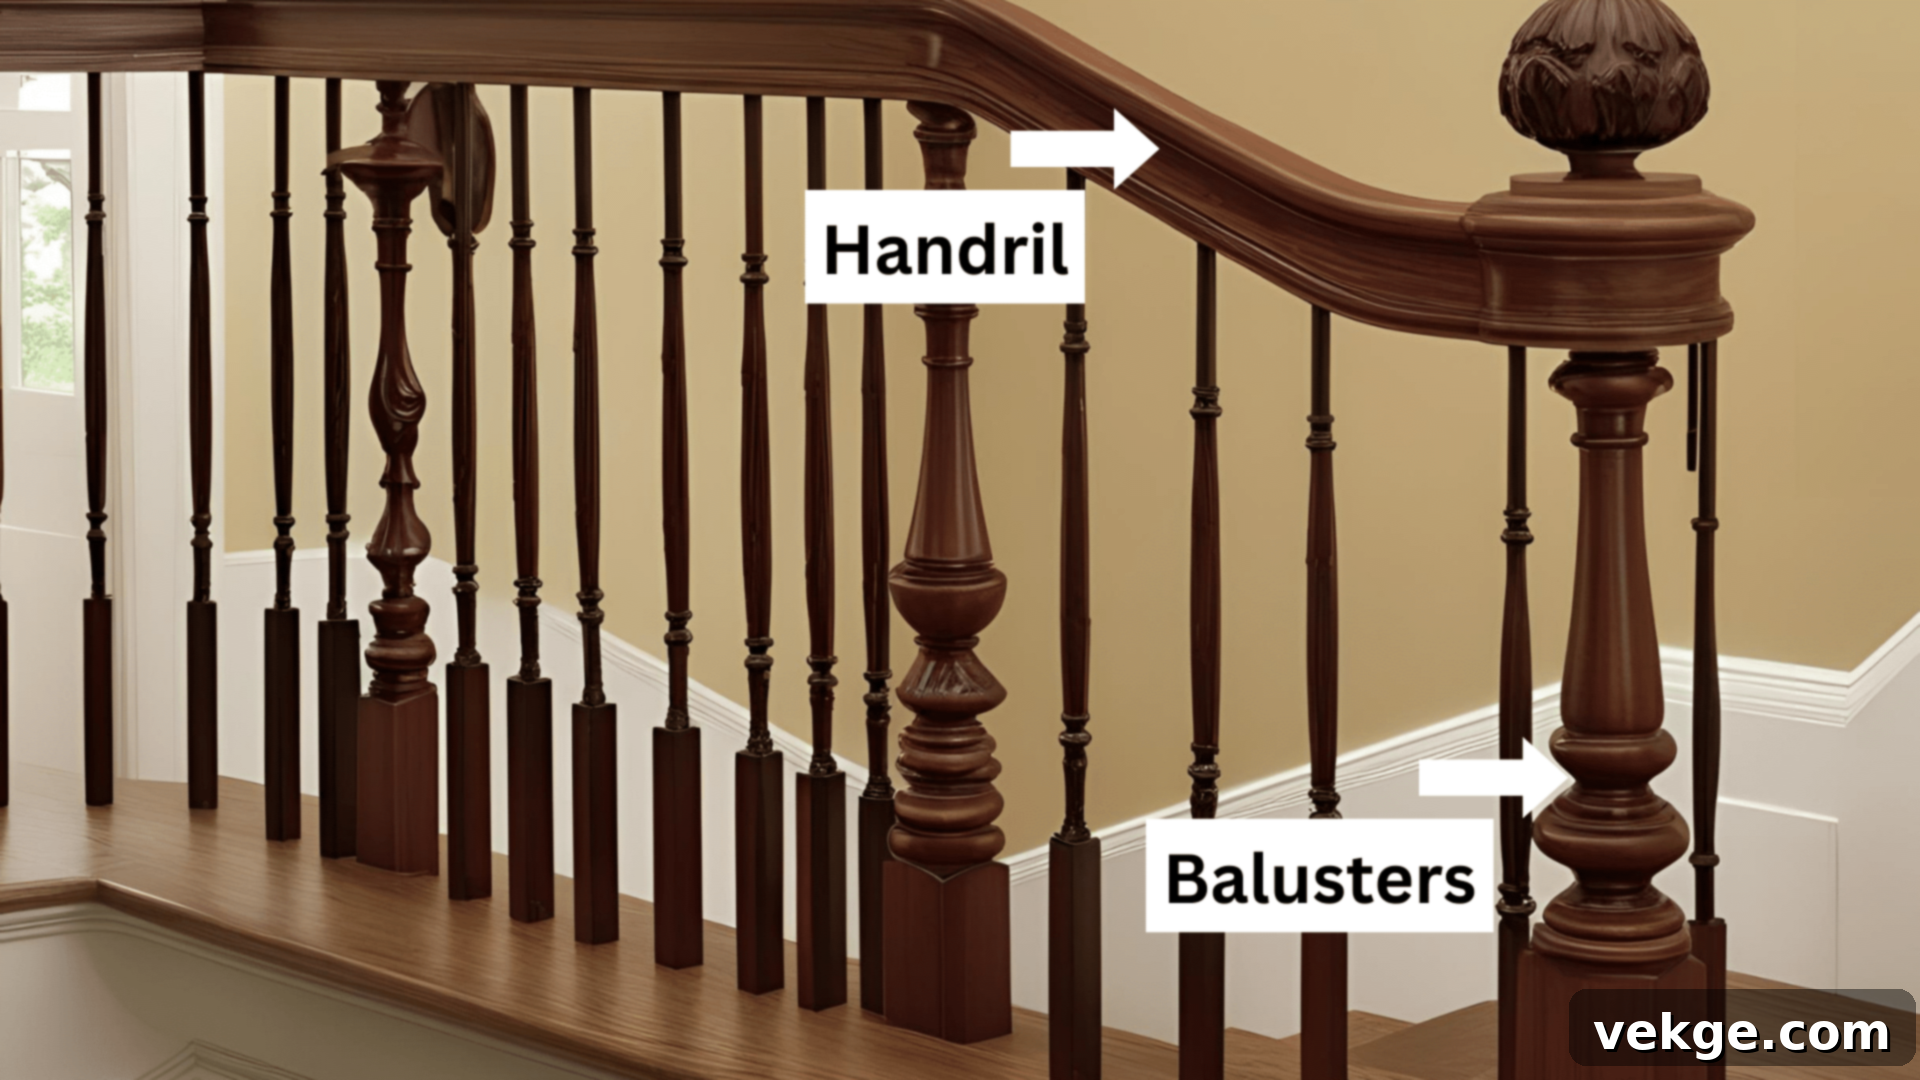
The railing system of your staircase is not merely an aesthetic embellishment; it is a fundamental safety feature designed to prevent falls, provide crucial support, and guide users safely up and down the stairs. Often referred to collectively as the “balustrade,” this system comprises several distinct parts, each vital to its overall function and appearance.
Handrails: The Guiding Support
Handrails are the horizontal or gently sloping rails that you grip for support and balance when navigating the staircase. A well-designed handrail is positioned at a comfortable and consistent height, typically mandated by building codes (usually between 34 to 38 inches above the leading edge of the steps or landing), and features a profile that is easy and secure to grasp. Building codes almost universally require handrails, particularly on staircases with more than a few steps, to mitigate the risk of falls. Handrails come in a vast array of materials and finishes to suit any design aesthetic. Wood, often richly stained or painted, is a timeless choice for traditional homes. In contrast, sleek metal (such as stainless steel or wrought iron), modern glass, or composite materials are frequently featured in contemporary designs. For maximum safety and continuous support, the handrail should ideally run uninterrupted along the full length of the staircase, providing a consistent point of contact.
Balusters: The Protective Vertical Elements
Balusters, also commonly known as spindles, are the slender, vertical posts that connect the handrail to the stair treads or the floor. Their primary function is safety: they create a protective barrier, spaced closely together (typically less than 4 inches apart to meet stringent safety codes), to prevent people, especially young children and pets, from falling through the open sides of the staircase. Beyond their critical safety role, balusters offer significant design versatility. They can range from simple, unadorned square wooden sticks to intricately turned wooden profiles, ornate wrought-iron designs, minimalist metal rods, or even sleek glass panels. Homeowners often choose to paint or stain their balusters to create visual contrast, highlight architectural details, or seamlessly blend with other elements of their interior decor. The pattern and material of the balusters heavily influence the overall character of the staircase.
The Balustrade: A Complete System
Together, the handrails, balusters, and newel posts form what is formally known as the balustrade—the complete railing system. This integrated system serves as both an indispensable safety barrier and a powerful visual frame for your staircase. A securely installed balustrade offers invaluable support when carrying items, helps to steady your balance, and provides a robust physical barrier that effectively prevents dangerous falls. When planning a new staircase or undertaking an update, it is imperative never to compromise on the quality or code compliance of these safety-critical components; they represent one of the most vital aspects of your stairs, directly impacting the well-being of everyone using them.
Stair Styles and Shapes: Designing for Impact and Function
Staircases are available in a remarkable variety of designs, allowing them to perfectly complement diverse home styles, spatial constraints, and functional requirements. The specific shape and style you select for your stairs will have a profound impact on both their visual presence and their practical usability within your home.
Straight vs. Curved Treads: A Subtle Yet Significant Difference
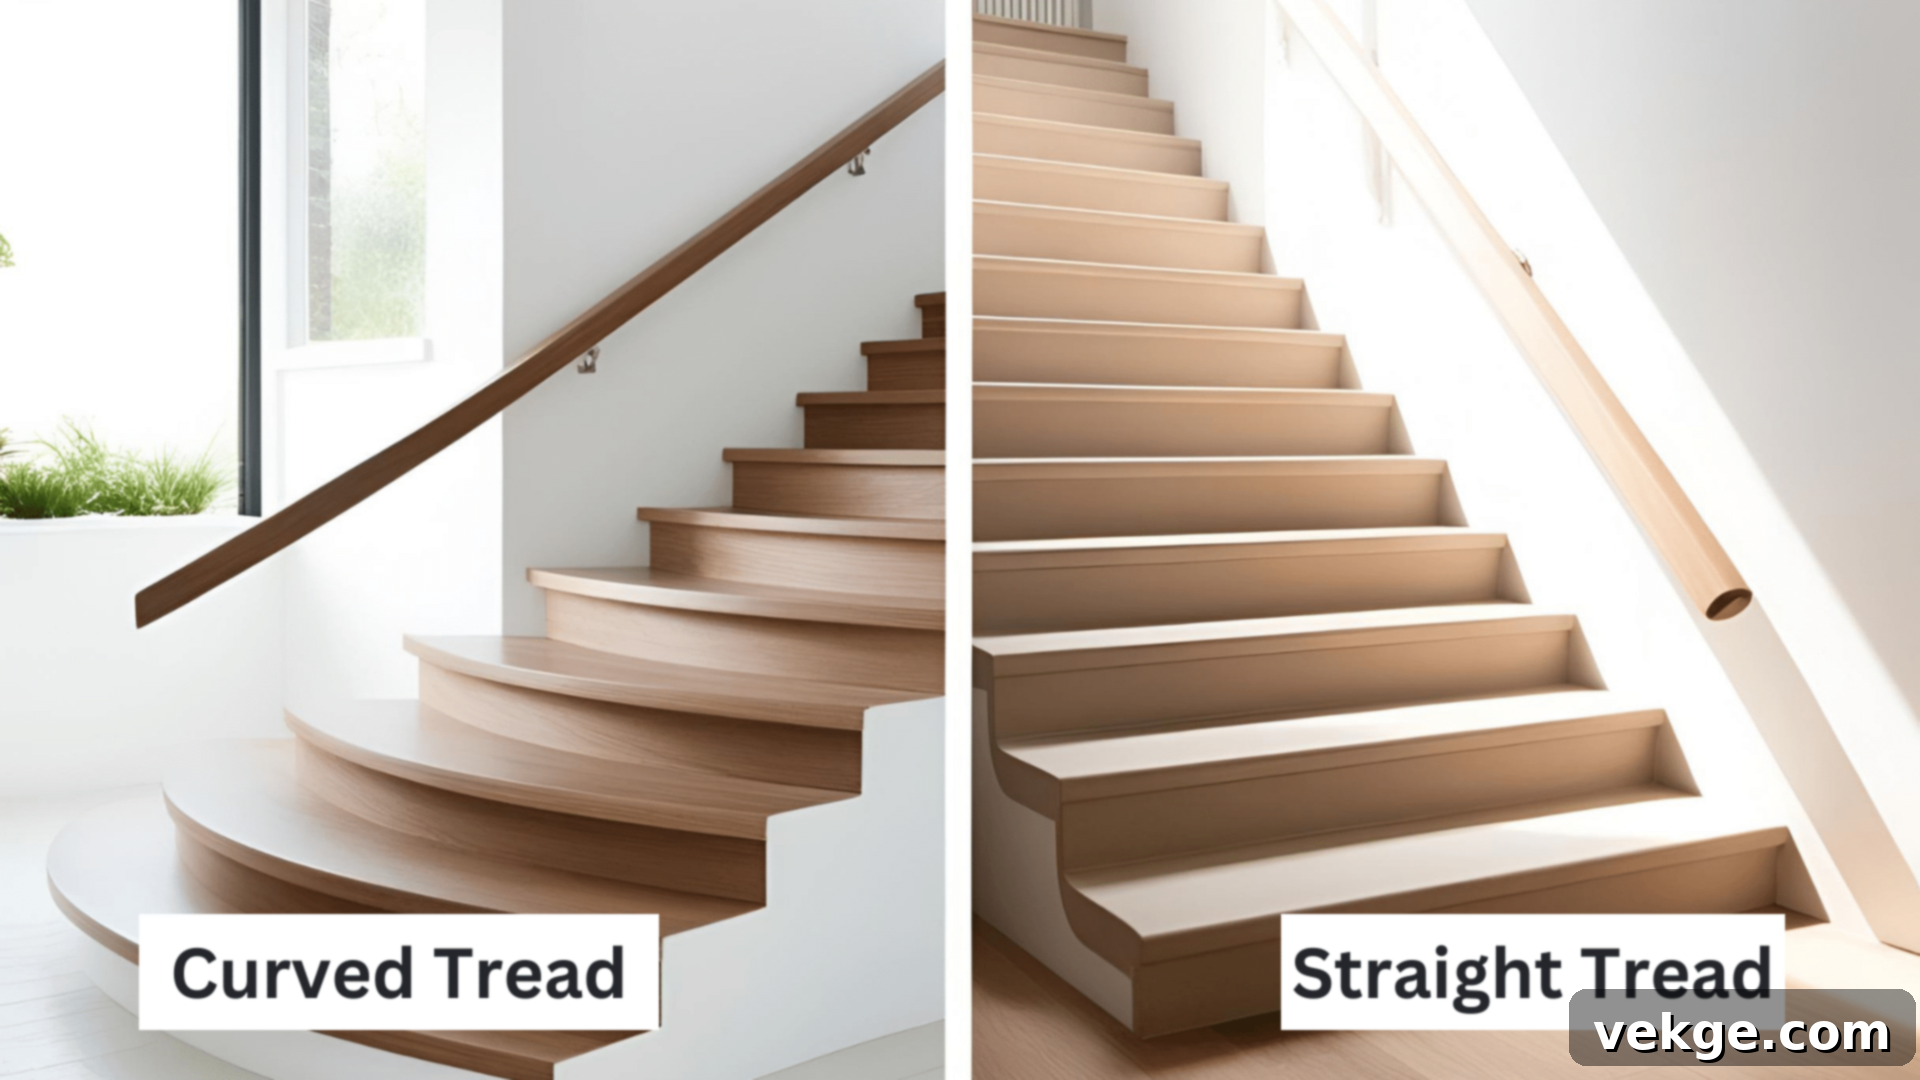
The profile of your stair treads plays a significant role in establishing the overall feel and aesthetic of your staircase. Straight treads feature a clean, even front edge, which imparts a crisp, formal, and often modern look. They are generally simpler to construct and integrate seamlessly into most home styles, offering a straightforward and efficient design. In contrast, curved treads, characterized by a gracefully bowing outward front edge, introduce a softer, more fluid, and elegant sensibility. These are frequently found in grand, classical, or formal homes, where they can make a staircase feel more expansive, welcoming, and luxurious. Curved treads require more complex construction but deliver a truly sophisticated architectural statement.
Types of Stair Stringers: Visual Impact from the Side

The type of stringer chosen dramatically alters how your stairs appear from the side, influencing the perception of solidity, lightness, or modernity:
- Closed (Housed or Western) Stringers: These create a solid, enclosed, and traditional ‘boxed-in’ look. They evoke a sense of strength and timelessness, often fitting well with classic or rustic interior designs.
- Mono Stringers: With their single, central support beam, mono stringers are the hallmark of sleek, modern, and minimalist spaces. They create a captivating ‘floating’ effect for the treads, emphasizing openness and contemporary design.
- Open (Cut or Eastern) Stringers: Characterized by their saw-tooth pattern where treads sit on top, open stringers lend an airy, often industrial or modern-farmhouse feel to the staircase. They allow more light to pass through and visually lighten the structure.
Matching Stair Styles to Your Home’s Architectural Theme
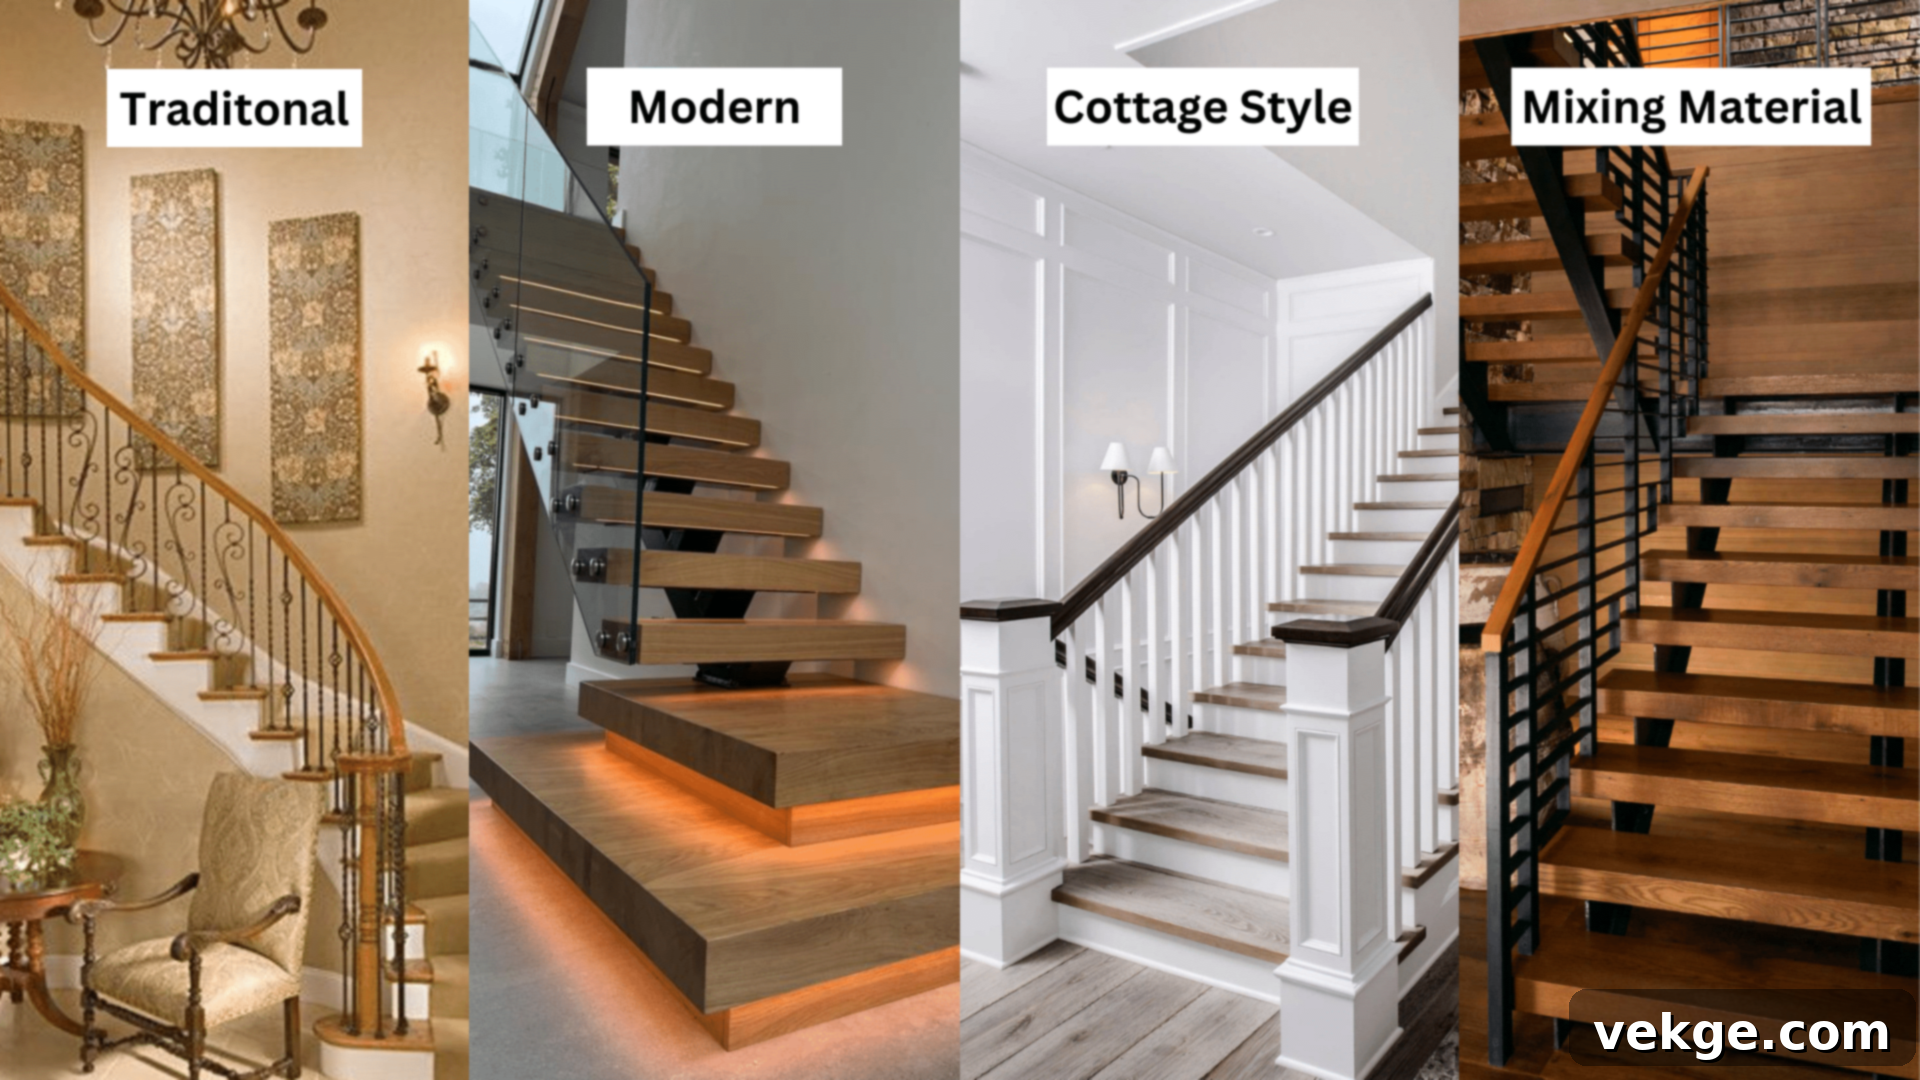
Harmonizing your staircase with your home’s overall architectural and interior design style is crucial for a cohesive and pleasing aesthetic. This can be achieved by focusing on a few key elements and material choices:
- For Traditional Homes: Timeless choices include rich wooden treads, often paired with painted risers (e.g., white), and substantial, intricately turned newel posts and balusters. Darker wood stains and classic profiles lend an air of enduring elegance.
- Modern Homes: These typically benefit from clean, minimalist lines, often incorporating materials like metal (stainless steel, matte black iron), glass panels, or cable railings. Hidden hardware, simple geometric forms, and a focus on functionality define this style.
- Farmhouse or Cottage Styles: These homes pair beautifully with painted wood components, such as white risers and balusters combined with natural wood treads. Simple, sometimes subtly turned balusters, and robust yet unpretentious newel posts contribute to a warm, inviting, and rustic charm.
- Eclectic or Transitional Styles: Mixing materials, such as robust wooden treads with contemporary metal railings or glass inserts, can create a unique look that bridges multiple design aesthetics. This approach allows for personalization and a dynamic visual appeal.
It’s important to remember that you can significantly update your stairs without necessarily replacing the entire structure. Sometimes, simply changing the balusters, adding a new handrail, or even applying a fresh coat of paint to the risers or installing a stylish runner carpet can dramatically refresh the entire look and feel of your staircase. The right stair style doesn’t just connect floors; it serves as a vital aesthetic bridge, unifying different parts of your home in both function and design.
Common Mistakes to Avoid When Building or Renovating Stairs
Undertaking a staircase project, whether building from scratch or renovating, presents several potential pitfalls that can lead to costly rectifications, significant safety hazards, and long-term dissatisfaction. Being aware of these common mistakes can save you time, money, and ensure a safe, beautiful outcome.
- Incorrect Measurements and Inconsistent Steps: This is arguably the most critical error. All steps must be consistent in height (rise) and depth (run) to within very strict tolerances. Industry standards often recommend a rise of 7-8 inches and a run (tread depth) of at least 10 inches. Uneven steps, even by a fraction of an inch, create a significant tripping hazard, disrupt natural gait, and make the stairs difficult and dangerous to use for everyone, especially children, the elderly, or those with mobility issues. Measure meticulously and use a story pole for consistent marking.
- Ignoring Building Codes and Safety Regulations: Building codes are not suggestions; they are legal requirements designed to ensure public safety. Key regulations cover handrail heights, baluster spacing (typically no more than 4 inches apart to prevent a child’s head from passing through), tread depth, riser height, and overall stair width. Failing to adhere to these codes can result in failed inspections, hefty fines, mandatory tear-downs and rebuilds, and, most importantly, serious safety risks for occupants. Always consult your local building department and relevant national codes (e.g., International Residential Code or IRC) before commencing any stair project.
- Opting for Cheap or Inappropriate Materials: While budget is always a consideration, cutting corners on materials for a high-traffic area like a staircase can lead to lasting problems. Low-grade wood treads might squeak, split, or show wear prematurely. Inferior hardware can loosen over time, compromising structural integrity. Choose materials that are durable, appropriate for the expected traffic, and suitable for the climate and specific use. For example, solid hardwoods are generally preferred for treads over softer woods or laminates in heavy-use areas.
- Mismatching Stair Style to Home’s Aesthetic: A staircase is a prominent feature, and its design should complement, rather than clash with, your home’s existing architectural style and interior decor. A highly ornate Victorian staircase in a minimalist modern home will look out of place, as will a sleek, industrial-style stair in a rustic farmhouse. Consider your existing woodwork, trim, color palette, and overall design theme when selecting stair parts and finishes. A cohesive design enhances your home’s value and visual appeal.
- Underestimating the Complexity of DIY Projects: While some minor cosmetic updates can be DIY-friendly, constructing or significantly altering a staircase is a complex structural undertaking that directly impacts safety. It requires precise measurements, advanced carpentry skills, a deep understanding of load-bearing principles, and strict adherence to codes. Attempting a DIY project beyond your skill level for critical structural components can lead to unstable, unsafe stairs. Know your limitations and do not hesitate to call licensed, experienced professionals for key structural work or complex installations. Their expertise ensures safety, compliance, and a high-quality finish.
Fixing Up Your Stairs: Smart Updates and Renovations
Your staircase can undergo a remarkable transformation without the need for a complete, costly demolition and rebuild. Strategic updates can dramatically refresh its appearance, enhance its functionality, and boost your home’s overall appeal. Here are some ideas and considerations:
Quick Updates that Make a Big Change
Even small changes can yield significant improvements for your staircase:
- Paint Power: A fresh coat of paint on balusters, risers, or both can instantly modernize, brighten, or add a dramatic contrast to your staircase. For instance, painting risers a crisp white against natural wood treads creates a classic, clean look.
- Tread Renewal: If your treads are worn, squeaky, or damaged, consider sanding and refinishing them. This can restore their beauty and eliminate minor squeaks. For more severe damage, replacing individual worn treads with new, sturdy wood can dramatically improve safety and appearance without replacing the entire structure.
- Handrail Upgrade: Changing just the handrail can give your entire staircase a contemporary or updated look. Opt for a sleek metal handrail for a modern touch, or a beautifully carved wooden one for traditional elegance, while also ensuring a better, more ergonomic grip.
- Newel Post Caps: Adding decorative caps to existing newel posts, or even replacing simple posts with more ornate designs, can transform a plain staircase into an eye-catching focal point. These small details can make a huge difference.
- Lighting: Installing subtle LED strip lighting beneath treads or along handrails not only adds a sophisticated ambiance but also significantly improves safety, especially at night.
What to Think About Before Changing Your Stairs
Before embarking on any stair renovation project, careful planning is essential:
- Structural Stability Check: Prioritize safety. Thoroughly inspect the existing structure for any signs of instability, such as loose newel posts, wobbly handrails, sagging treads, or shaky stringers. Any structural issues must be addressed and repaired by a professional before any cosmetic updates begin.
- Precise Measurements: As highlighted earlier, consistency is paramount. Measure everything twice – the rise and run of each step, baluster spacing, and handrail height – to ensure all proposed changes will meet safety and comfort standards.
- Aesthetic Cohesion: Consider how your planned changes will integrate with and complement the rest of your home’s existing architectural style and interior decor. Ensure new materials and finishes create a harmonious flow, not a jarring contrast.
- Practicality and Maintenance: Think about the long-term implications. Some stair styles or materials (e.g., open risers) might collect more dust or require more frequent cleaning. Consider the durability and maintenance requirements of new materials before committing.
- Building Codes and Permits: Always review local building codes and regulations to ensure your plans will meet all safety requirements. Significant alterations might require permits and professional inspections. Failure to comply can lead to costly rework.
- Professional Consultation: For any structural changes or complex design elements, consulting with a qualified architect, contractor, or staircase specialist is highly recommended. Their expertise can prevent costly mistakes and ensure a safe, beautiful, and code-compliant result.
Budget-Friendly Ideas for Stair Makeovers
You don’t need an extensive budget to achieve a noticeable improvement for your stairs:
- Riser Art: A fresh coat of paint on just the risers, perhaps in a contrasting color or with a stenciled pattern, creates an immediate, clean, and custom look. This is a very impactful change for minimal cost.
- Carpet Runners: Adding a stylish carpet runner can instantly protect existing treads from wear, add color and texture, reduce noise, and provide extra traction. This is a great way to update without replacing.
- Baluster Swap: Replacing basic or dated balusters with more stylish, yet affordable, options (e.g., simple square metal balusters instead of ornate wooden ones) can significantly update the railing system’s aesthetic for less than changing the entire balustrade.
- Stain, Don’t Replace: If your wooden treads are in good structural condition but look tired, consider stripping, sanding, and restaining them. This can hide marks and scratches, revive the wood’s natural beauty, and update its color for a fraction of the cost of new treads.
- Deep Clean and Polish: Sometimes, the simplest solution is the most effective. A thorough cleaning, repair of minor scuffs, and polishing of existing wood or metal components can bring back their natural luster and make your stairs look beautifully cared for again.
- DIY Accents: Add decorative touches like potted plants on landings, a gallery wall along the stairwell, or update light fixtures to complement the staircase. These elements enhance the overall presentation.
Wrap-Up: Your Journey to a Better Staircase
Armed with a comprehensive understanding of your staircase’s anatomy, you are now well-equipped to make intelligent and confident decisions regarding your home. From the foundational treads and risers to the anchoring newel posts, the supporting stringers, and the safety-critical handrails and balusters, each element plays an indispensable role in both the safety and the overall style of your home’s vertical connection.
This knowledge empowers you to engage confidently with contractors and designers, articulate your vision clearly, shop for the most appropriate materials with assurance, identify potential problems early, and allocate your budget effectively where it matters most. Whether your next project involves silencing those persistent squeaky treads, revitalizing a worn-out railing system, or completely reimagining your stair’s aesthetic, a solid grasp of these fundamental components will undoubtedly guide you toward successful and satisfying outcomes.
Are you ready to transform your stairs? Utilize the insights you’ve gained today to design, maintain, or renovate a staircase that will not only be a beautiful focal point but also a supremely functional and safe pathway for your home for many years to come.
