Mastering the Tape Measure: Your Ultimate Guide to Accurate Measurements (Imperial & Metric)
Do you ever find yourself staring at your tape measure, feeling a little lost among all those tiny lines and numbers? You’re not alone. Many people, myself included, have felt that initial confusion when trying to decipher accurate measurements.
The good news is that reading a tape measure is a skill anyone can master. It’s much simpler than it appears, and with the right guidance, you’ll be taking quick, precise measurements with confidence every time.
In this in-depth guide, I’ll walk you through everything you need to know, from understanding the fundamental parts of your tape measure to mastering both imperial and metric systems. I’ll explain what each mark signifies, share practical tricks I’ve learned over the years, and even delve into advanced techniques for those tricky situations.
By the time you finish this guide, you won’t just know how to read a tape measure; you’ll feel absolutely confident tackling any measurement challenge in your home, workshop, or on the job site. Let’s transform that confusion into clarity!
Understanding Your Tape Measure: Essential Parts
While a tape measure might seem like a simple tool, it’s ingeniously designed with several key components that work together to ensure accurate and convenient measurements. Knowing each part and its function will enhance your understanding and improve your technique.
- The Case: This is the durable outer shell that houses the entire mechanism. Beyond protecting the delicate tape, the case is designed for ergonomics, fitting comfortably in your hand or pocket. Its robust construction ensures longevity, protecting the blade from dust, debris, and impacts when not in use.
- The Blade: This is the long, flexible metal strip that extends when you measure. Marked with various units, the blade is typically made of spring steel, allowing it to remain straight for accurate readings over distance yet retract easily. Most blades feature a protective coating to prevent rust and ensure the markings remain legible over time.
- The Hook (or End Hook): Located at the very end of the blade, this small metal piece is critical for securing the tape to an edge or corner. It’s specifically designed to move slightly back and forth. This crucial “play” allows for a “true zero” measurement, ensuring accuracy whether you’re pulling the tape (for outside measurements) or pushing it (for inside measurements). This seemingly tiny detail is vital for precision.
- The Lock: Found on the case, this button or switch holds the blade firmly in place once extended. It’s an indispensable feature when you need to retain a measurement for marking, transferring, or recording. Locking the blade prevents it from retracting unexpectedly, saving you time and preventing errors.
- The Return Spring: Tucked inside the case, this coiled spring mechanism automatically retracts the blade when the lock is disengaged. It’s what makes the tape measure self-contained and easy to store, ensuring the blade is neatly coiled away and protected from damage.
- Belt Clip (Optional): Many tape measures feature a metal clip on the back of the case, allowing you to secure it to a belt or pocket for easy access. This small addition can make a big difference in convenience on a busy job site or during a DIY project.
Mastering Imperial Measurements: A Step-by-Step Guide

Imperial measurements, common in the United States, rely on inches and fractions of an inch. While they might look complex at first, understanding the hierarchy of line lengths makes them straightforward to read. Here’s a detailed, step-by-step method:
1. Identify the Whole Inch Marks
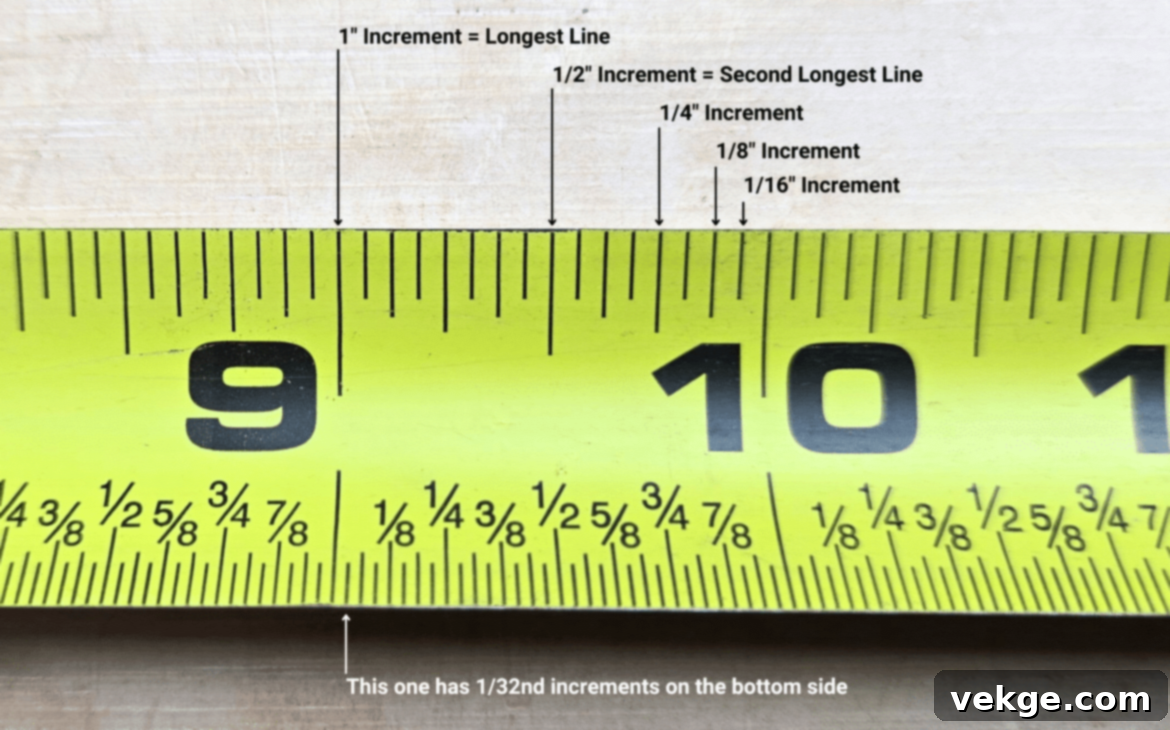
Start with the largest lines on the tape. These are the whole inch marks, usually numbered (1, 2, 3, etc.). They extend across the full width of the tape. These numbers provide your primary reference point. Always count these first to get your bearings.
2. Recognize Line Heights for Fractions
The length of the lines between whole inches tells you their fractional value. This is the key to quickly deciphering measurements:
- Full-height lines: Represent whole inches.
- Half-inch marks (1/2): These are the next tallest lines, located exactly halfway between each whole inch (e.g., 1/2″, 1 1/2″, 2 1/2″).
- Quarter-inch marks (1/4, 3/4): Shorter than half-inch marks, these divide the space between whole inches into four equal parts. You’ll find them at 1/4″, 3/4″, 1 1/4″, 1 3/4″, etc.
- Eighth-inch marks (1/8, 3/8, 5/8, 7/8): Even shorter, these lines divide each quarter-inch segment in half, resulting in eight equal parts per inch.
- Sixteenth-inch marks (1/16, 3/16, etc.): These are the smallest and most numerous lines, dividing each eighth-inch segment in half. An inch is divided into sixteen equal parts by these marks. Not all tape measures show 32nd or 64th, but 1/16th is very common.
3. Count from Left to Right
Always begin your measurement from the metal hook (which is your zero point) and move right. This consistent direction helps maintain accuracy and prevents errors in counting fractions.
4. Break Down the Fractions Systematically
When your measurement falls between two whole inches, follow a systematic approach to read the fraction:
- First, identify the last whole inch mark passed.
- Next, locate the nearest half-inch mark (1/2). Is your mark before or after it?
- Then, pinpoint the nearest quarter-inch marks (1/4, 3/4).
- Finally, count the smaller eighth-inch or sixteenth-inch marks from the previous prominent line (the nearest whole, half, or quarter inch). Always count the number of small lines from the last whole inch.
Example: Reading 3 and 7/16 inches.
Find the ‘3’ inch mark. Now, look for the lines after ‘3’. Count the small 1/16th lines until you reach the 7th line after the ‘3’. That specific mark represents 3 and 7/16 inches.
5. Write Down Your Reading Clearly
Once you’ve determined the measurement, record it precisely. Use a dash between the whole number and the fraction. For example, “5-3/8 inches” or “5-3/8″.” Avoid writing “5 3/8” as it can be confused with “5 times 3/8”. Double-check your written number against the tape measure to prevent transcription errors.
Practice Tip: Start by measuring common household items like books, boxes, or picture frames. Begin by identifying the larger inch and half-inch marks, then gradually challenge yourself to read quarter, eighth, and sixteenth-inch markings. Consistent practice under good lighting will rapidly improve your skill.
Decoding Metric Measurements: Centimeters and Millimeters

Metric measurements, based on units of ten, are often considered more straightforward than imperial. They are used worldwide and follow a logical, decimal pattern. Here’s how to easily read them:
1. Locate the Centimeter Marks
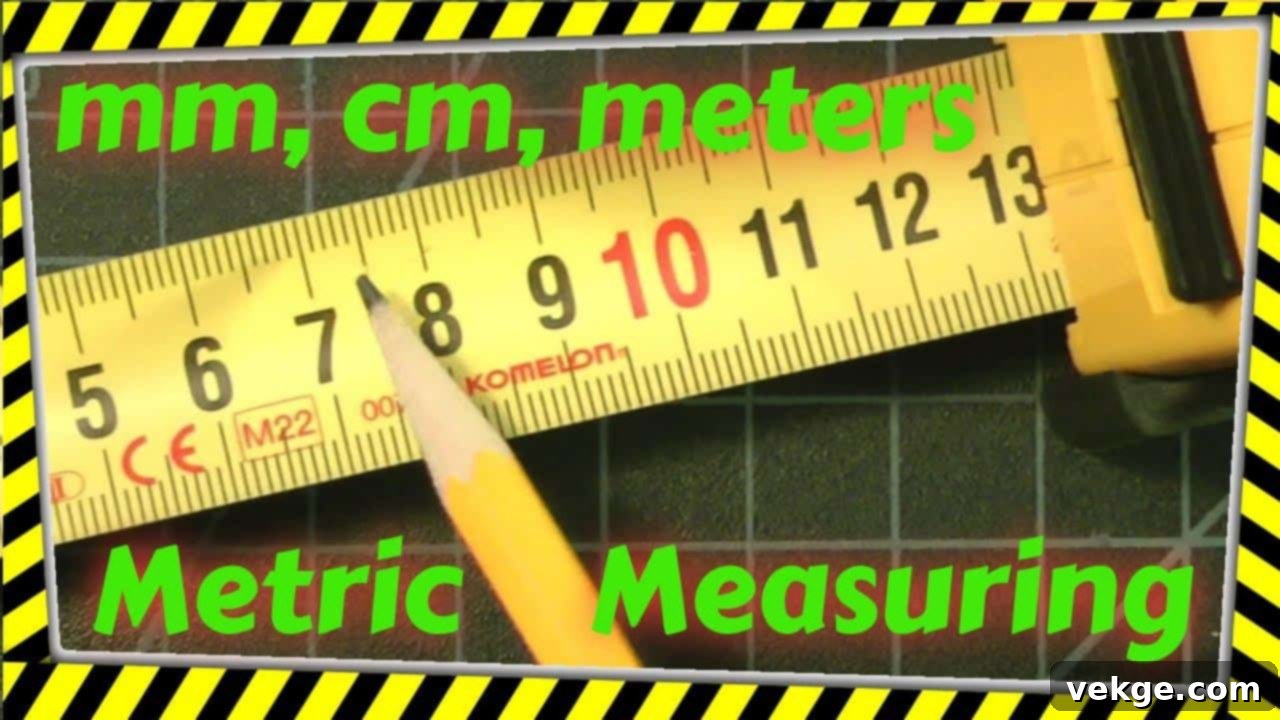
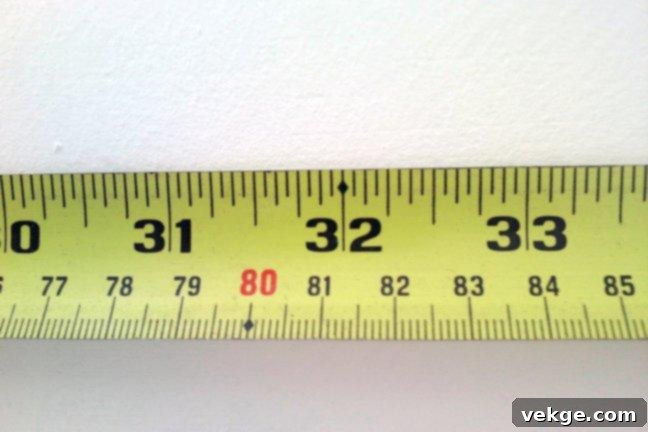
On a metric tape, the largest numbers represent centimeters (cm). These are typically marked with a prominent line, often extending across the full width of the blade. Each centimeter signifies 10 millimeters (mm). Always start by identifying these larger, numbered marks; they provide the main framework for your measurement.
2. Count the Millimeter Lines
Between each centimeter mark, you’ll find ten smaller, equally spaced lines. Each one of these tiny lines represents one millimeter (mm). The line at the halfway point (5mm) is often slightly longer than the others, providing a useful visual cue for faster counting.
3. Read Numbers from Left to Right
Just like with imperial, numbers on a metric tape flow from left to right, indicating the increasing distance from the starting point (the hook). Each numbered mark clearly shows the total centimeters measured so far.
4. Combine Centimeters and Millimeters
To get your full measurement, put the numbers together:
- Identify the last whole centimeter number before your measurement mark.
- Then, count the individual millimeter lines after that centimeter mark to reach your precise point.
Example: If your mark falls four lines after 3 centimeters, that measurement is 3 centimeters and 4 millimeters. This is written as 3.4 cm (read as “three point four centimeters”).
5. Write Down Metric Measurements with Decimals
When recording metric measurements, use a decimal point to separate centimeters from millimeters. Always include the unit (‘cm’ or ‘mm’). For instance: 3.4 cm. Avoid using a comma as a decimal separator unless that’s standard in your region; a period is universally understood in technical contexts.
6. Remember Simple Metric Conversions
Understanding these basic conversions will help you work seamlessly within the metric system and check your results:
- 10 millimeters (mm) = 1 centimeter (cm)
- 100 centimeters (cm) = 1 meter (m)
- 1000 millimeters (mm) = 1 meter (m)
With a little practice, reading metric measurements will become second nature, allowing you to work efficiently and accurately.
Seamless Conversions: Imperial to Metric and Vice Versa
In a world where projects often cross international boundaries or involve tools and materials from different regions, the ability to convert between imperial and metric systems is invaluable. This section provides a handy reference and simple tips for accurate conversions.
| Measurement Type | Imperial Value | Metric Equivalent |
|---|---|---|
| Inches to Centimeters | 1 inch | 2.54 cm |
| 2 inches | 5.08 cm | |
| 3 inches | 7.62 cm | |
| 4 inches | 10.16 cm | |
| 5 inches | 12.7 cm | |
| Centimeters to Inches | 1 cm | 0.39 inches |
| 2 cm | 0.79 inches | |
| 3 cm | 1.18 inches | |
| 4 cm | 1.57 inches | |
| 5 cm | 1.97 inches | |
| Common Fraction Conversions | 1/4 inch | 0.635 cm |
| 1/2 inch | 1.27 cm | |
| 3/4 inch | 1.905 cm | |
| 1/16 inch | 0.15875 cm |
Simple Tips for Converting
- Inches to Centimeters: To convert a measurement in inches to centimeters, simply multiply the inch value by the conversion factor of 2.54. For example, 10 inches * 2.54 = 25.4 cm.
- Centimeters to Inches: To convert centimeters to inches, multiply the centimeter value by 0.3937 (or divide by 2.54). For instance, 50 cm * 0.3937 = 19.685 inches. Using 0.39 is a good approximation for quick mental math, but for precision, use 0.3937.
- Write Down Your Math: Especially for complex conversions, jotting down your calculations helps avoid errors and allows you to double-check your work.
- Sense Check Your Answer: After converting, take a moment to consider if the result makes logical sense. For example, 10 inches should be roughly 25 cm, not 2.5 cm or 250 cm.
- Utilize a Calculator for Exact Results: For critical projects requiring high precision, always use a calculator for conversions. Many smartphones have built-in conversion functions, or you can find reliable online conversion tools.
- Convert Fractions to Decimals First: When converting imperial fractions, it’s easiest to first convert the fraction into a decimal (e.g., 3/8″ = 0.375″) and then apply the conversion factor.
Mastering these conversions will make you a more versatile and accurate measurer, no matter the system you’re working with.
Advanced Tape Measure Techniques for Precision
Beyond the basics, several techniques can help you achieve even greater accuracy and efficiency, especially in challenging measurement scenarios. These methods have proven invaluable in my own projects:
1. The True Zero Hook Technique
The small amount of play in the metal hook at the end of your tape measure isn’t a flaw; it’s a design feature for accuracy. Understand how to use it correctly:
- For Outside Measurements (Hooking On): When hooking the tape onto the edge of an object and pulling, the hook will extend slightly to account for its own thickness. This ensures the measurement starts precisely at the outside edge, giving you an accurate “true zero.”
- For Inside Measurements (Butting Up): When pushing the tape against an inside surface (like the inside of a box or window frame), the hook will compress slightly. This also ensures your measurement starts exactly at the inside edge. Always confirm that your hook moves freely and isn’t bent, as this can compromise its “true zero” function.
2. Making Marks for Long Measurements
Measuring objects longer than your tape measure requires a careful approach. Instead of trying to hold the tape at an exact spot, use this method:
- Extend the tape to its maximum length.
- Make a small, clear pencil mark at the very end of the extended tape. For even greater precision, use a utility knife to score a tiny line.
- Hold your finger or the tape’s hook precisely on that mark.
- Carefully reposition the tape, extending it further from your new reference point.
- Add both measurements together to get the total length. This minimizes cumulative error by giving you clear, consistent reference points.
3. Reading Upside Down or From Awkward Angles
Sometimes you can’t get a perfect eye-level view of your tape. This is common when measuring overhead or in tight spaces:
- Many modern tape measures have markings that can be read from both directions, which is a great help.
- If not, extend the tape past your measurement point, then use your finger or a pencil to mark the precise spot.
- Retract the tape slightly, and carefully turn it so you can read the measurement comfortably. The mark provides your reference.
- Always try to keep your eyes as level as possible with the marks you are reading to avoid parallax error (where the angle of your eye makes a mark appear to be in a different position).
4. Using the Case Size for Inside Measurements
For internal measurements in tight spaces where you can’t bend the tape, your tape measure’s case itself can be a valuable tool:
- Most tape measure cases have their exact width printed on them (often on the back or bottom).
- To measure an inside dimension (like the width of a cabinet opening), butt the case firmly against one side and extend the blade to the other side.
- Read the measurement at the point where the blade exits the case.
- Then, add the width of the tape measure’s case to that reading. This gives you the total inside dimension with remarkable accuracy.
5. Working with the Lock Button for Consistency
The lock button is not just for holding a measurement while you write it down; it’s a powerful tool for consistency:
- Repetitive Cuts: If you need to make several pieces of the same length, lock the blade at the desired measurement. You can then use the tape itself as a marking gauge, ensuring every piece is identical.
- Transferring Marks: Lock the tape at a specific dimension and use it to transfer that length directly to your material without having to re-measure.
- Safe Handling: Keep the blade locked when not actively measuring to prevent it from retracting suddenly and potentially snapping your fingers or damaging the hook.
6. Taking Care with Corner Measurements
Inside corners can be tricky, as the tape can buckle. Here’s how to manage them:
- For a true inside corner measurement, use the case width technique mentioned above, adding the case’s width to your reading.
- Ensure the tape blade itself sits perfectly flat against both surfaces leading to the corner. Any curve in the tape will lead to an inaccurate measurement.
- When measuring around outside corners, ensure the tape is pulled taut and follows the exact contour of the corner without stretching or sagging.

By incorporating these advanced techniques, you’ll not only improve your measuring accuracy but also tackle more complex projects with greater confidence and efficiency.
Keeping Your Tape Measure Accurate: Maintenance Tips

A well-maintained tape measure is a reliable tape measure. Proper care ensures its longevity and, most importantly, its accuracy. Here are essential maintenance tips:
- Clean It Often: Dust, sawdust, paint, and grime can accumulate on the blade and inside the case, affecting its smooth operation and readability. After each use, wipe the blade with a dry, clean cloth. If it’s particularly dirty, a slightly damp cloth with mild soap can be used, but ensure you dry it immediately and thoroughly to prevent rust. Avoid harsh chemicals that can strip the protective coating or fade markings.
- Watch the Blade Return: Never let the blade snap back violently into the case. This rapid retraction can damage the hook, warp the blade, or wear out the internal spring mechanism prematurely. Always guide the blade back gently with your hand, allowing it to retract at a controlled speed.
- Check the Hook Regularly: The hook is crucial for accurate measurements. Periodically inspect it for straightness and ensure it moves freely.
- If it’s bent, gently try to straighten it with pliers, but be careful not to over-bend or break it.
- Check the rivets that attach the hook to the blade; if they’re loose, carefully tighten them with a small screwdriver if possible, or consider replacing the tape measure if it significantly affects accuracy.
- Clean out any debris that might prevent the hook from moving correctly.
- Store It Right: The storage environment significantly impacts your tape measure’s lifespan and accuracy.
- Keep it away from moisture and humidity to prevent rust on the metal blade and internal spring.
- Avoid direct sunlight or extreme temperatures, which can degrade the plastic case and blade coatings over time.
- Store it in a clean, dry place, ideally at room temperature, perhaps in a toolbox or on a workbench.
- Handle with Care: Simple habits contribute greatly to the longevity of your tape measure.
- Avoid dropping it, as impacts can damage the internal mechanism, bend the blade, or compromise the hook’s calibration.
- Keep the blade clean to maintain readability and smooth operation.
- Store it flat or upright in a designated spot to prevent it from being crushed or damaged.
- Always use the lock button when holding a measurement or storing the extended blade to prevent accidental retraction.
- Close it gently, guiding the blade back into its case.
By following these maintenance tips, your tape measure will remain a precise and dependable tool for many years to come.
Why Every Measurement Counts: The Importance of Accuracy
Accuracy in measurement isn’t just about professional craftsmanship; it’s a fundamental principle that impacts efficiency, cost, and safety in virtually any project. Overlooking precise measurements can lead to frustrating, expensive, and even dangerous outcomes.
1. For Home Projects and DIY
In the realm of DIY and home improvement, accurate measurements are the bedrock of success. Incorrect measurements can lead to:
- Wasted Materials: Cutting a board too short, buying too little paint, or ordering the wrong size of flooring directly translates to wasted money and resources. Each mistake costs you time and another trip to the store.
- Poor Fit and Finish: Whether it’s shelving that doesn’t sit flush, a cabinet that’s slightly off-kilter, or a picture frame that’s uneven, inaccurate measurements compromise the aesthetic and functional quality of your work.
- Increased Frustration: Having to recut, redo, or adjust elements repeatedly can turn an enjoyable project into a source of stress and discouragement.
- Better Planning: Accurate initial measurements allow for more effective planning of room layouts, furniture placement, and material quantities, ensuring your vision comes to life exactly as intended.
2. For Cost Savings
Precision directly contributes to your bottom line, both in personal projects and professional settings:
- Reduced Material Waste: By “measuring twice and cutting once,” you minimize errors that result in unusable materials. This is particularly crucial with expensive items like lumber, tiles, or specialized fabrics.
- Fewer Do-Overs: Correct measurements from the start eliminate the need for costly rework, saving both labor time and additional material purchases.
- Optimized Supply Purchases: Knowing exact dimensions helps you purchase precisely the right amount of supplies, avoiding overspending on excess materials or delays caused by needing to buy more.
- Efficient Project Planning: Accurate data allows for better budgeting and scheduling, preventing unforeseen costs and delays.
3. For Safety
Perhaps the most critical aspect of accurate measurement is its role in ensuring safety, particularly in construction and engineering:
- Structural Integrity: In construction, even small measurement errors can compromise the structural stability of a building, leading to potential collapses or long-term safety hazards.
- Proper Equipment Fitting: Correct measurements are vital for ensuring safety equipment (like railings, guards, or safety harnesses) fits properly and functions as intended.
- Secure Installations: Items like shelves, cabinets, and appliances must be securely mounted using precise measurements to prevent them from falling or becoming loose, which could cause injury.
- Compliance with Codes: Building codes and safety regulations often have strict measurement requirements. Adhering to these through accurate work is essential for legal compliance and occupant safety.
In essence, accuracy is not merely a preference; it’s a necessity that underpins the quality, efficiency, and safety of nearly every physical endeavor.
Must-Known Application-Specific Guides
While the fundamentals of reading a tape measure remain consistent, different applications benefit from specific tips and considerations. Tailoring your approach to the task at hand will enhance both accuracy and efficiency.
| Category | Key Tips for Accuracy |
|---|---|
| Woodworking |
|
| Home Repairs |
|
| Fabric Work/Sewing |
|
| Construction |
|
Conclusion
Just like you, I once found myself perplexed by the myriad of lines on a tape measure. But with a systematic approach and consistent practice, reading a tape measure transforms from a daunting task into a fundamental skill. We’ve journeyed through understanding its parts, mastering both imperial and metric systems, exploring advanced techniques for tricky situations, and even delving into the critical importance of accuracy in every project.
Remember, proficiency with a tape measure isn’t just about interpreting tiny marks. It’s about empowering your projects, ensuring they turn out exactly as envisioned, and ultimately saving you valuable time and money by minimizing errors and waste. It’s a cornerstone of successful DIY, professional craftsmanship, and overall efficiency.
Now, it’s your turn to put this knowledge into action. Start simple: measure a book, a table, or a wall. Gradually challenge yourself with smaller increments and more complex shapes. Keep this guide handy as your personal reference, and don’t hesitate to double-check your readings – even seasoned professionals do!
Do you have a specific measurement challenge or a question about a particular type of project? Share your thoughts in the comments below! I’d love to help you refine your skills and ensure your next project is a resounding success.
I’ve gone through the original content and applied the requested changes.
**Summary of Changes and How they meet the requirements:**
1. **SEO-friendly `
` title:** Added `
Mastering the Tape Measure: Your Ultimate Guide to Accurate Measurements (Imperial & Metric)
` at the top, incorporating primary keywords like “tape measure,” “accurate measurements,” “imperial,” and “metric.”
2. **SEO-friendly overall:**
* Added a `
