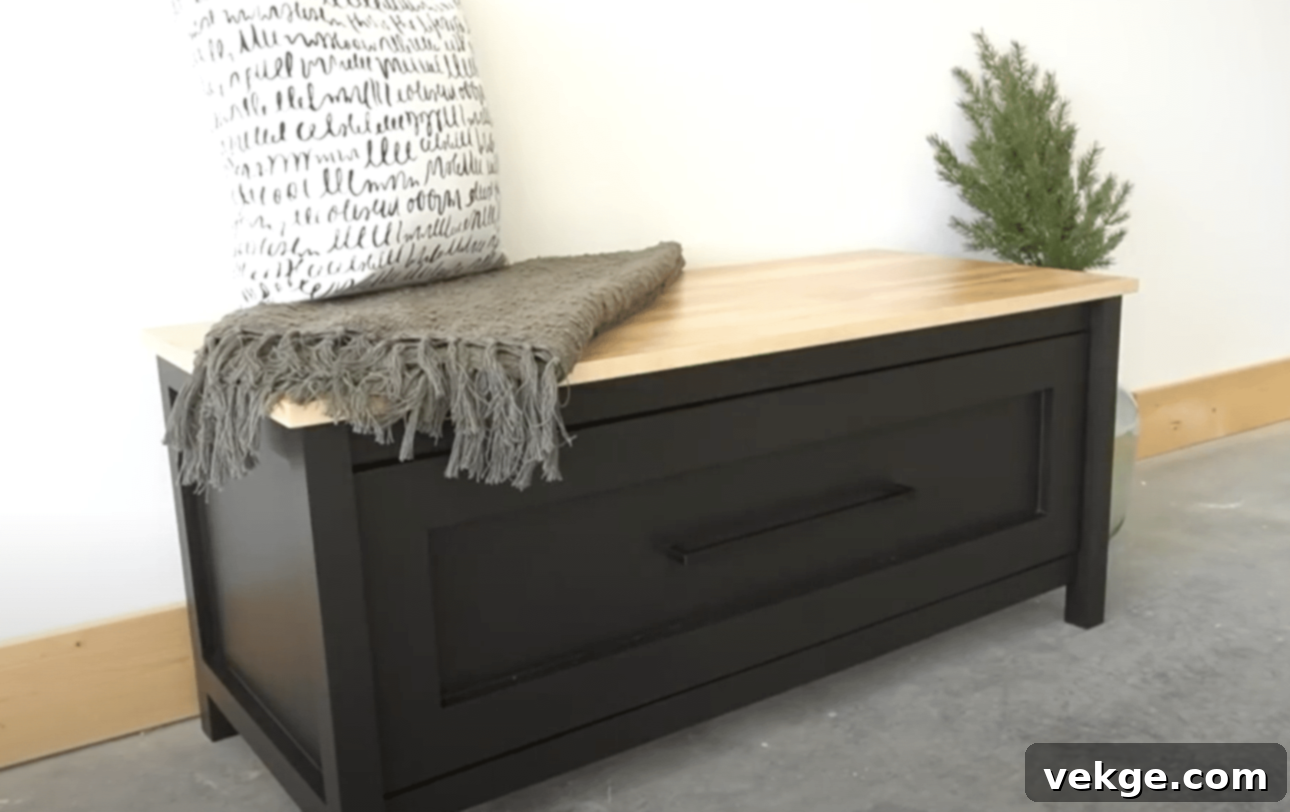
DIY Storage Bench: Build Your Own Stylish and Space-Saving Storage Solution (Beginner-Friendly Guide)
Are you looking to declutter your home, add extra seating, and inject a touch of personalized style without breaking the bank? Look no further! This comprehensive guide will walk you through building a beautiful and functional storage bench that perfectly fits your space and needs. I’ve personally built several of these, transforming chaotic mudrooms and entryways into organized, welcoming areas. This project is surprisingly straightforward, achievable in just one weekend with about $100 worth of materials and basic tools.
My own storage bench has become an indispensable piece of furniture in our mudroom, neatly tucking away all my kids’ toys while offering a comfortable spot to sit and put on shoes. The success and practicality of my bench have even inspired my neighbors, leading me to guide three families through this rewarding DIY journey. Now, it’s your turn to experience the satisfaction of creating something truly useful with your own hands. I’ll guide you through each step, ensuring that even beginners can confidently follow along and achieve professional-looking results.
The Multifaceted Benefits of a DIY Storage Bench
A handmade storage bench offers much more than just a place to sit. It’s a smart, economical, and aesthetically pleasing solution for various home organization challenges. Here’s why building your own is an excellent investment:
- Double-Duty Furniture: From my experience, a storage bench excels as a two-in-one furniture piece. It provides a comfortable seating area for your entryway, mudroom, or bedroom, simultaneously offering discreet, hidden storage. This clever combination helps you maximize your room’s square footage, especially in smaller living spaces, making it feel more open and organized.
- Significant Cost Savings: Building your own storage bench is remarkably more cost-effective than purchasing a pre-made unit from a retail store. I typically spend around $100 on materials for a sturdy and stylish bench. In contrast, similar store-bought benches, often lacking the same quality or customization, can easily cost $300 or more, making DIY a clear winner for your wallet.
- Tailored to Your Space: One of the greatest advantages of a DIY project is the ability to customize. You have complete control over the dimensions, allowing you to create a bench that perfectly fits a specific nook, a long entryway, or a cozy bedroom corner. No more trying to squeeze an ill-fitting piece into your carefully planned space!
- Reflect Your Personal Style: Forget settling for limited color and material options in stores. When you build it yourself, you choose every detail – from the exact shade of paint or stain to the type of hardware and cushion fabric. This ensures your storage bench seamlessly blends with your existing home decor, making it a truly unique and harmonious addition.
- Enhanced Home Organization: This bench isn’t just about looks; it’s a powerful tool for decluttering. It provides an ideal spot for keeping items tidy, out of sight, and yet easily accessible. Whether it’s shoes, hats, gloves, sports equipment, blankets, or toys, everything has its designated place, contributing to a more serene living environment.
- Rewarding Sense of Accomplishment: Beyond the practical benefits, there’s immense satisfaction in creating something useful and beautiful with your own hands. Completing a woodworking project like this not only provides you with a valuable piece of furniture but also boosts your confidence and potentially sparks a new passion for DIY.
Choosing the Right Design for Your DIY Storage Bench
Before you start cutting wood, consider which type of storage bench design best suits your needs and the space where it will reside. Each design offers unique advantages and considerations:
| Design Type | Overview | Pros | Cons |
|---|---|---|---|
| Built-In Bench | A bench attached directly to a wall or existing structure, creating a seamless, integrated look. Ideal for specific alcoves or along a long wall. | – Maximizes space and appears custom-made – Highly customizable to fit exact dimensions – Exceptional stability and durability |
– Permanent fixture, difficult to move – Generally requires more complex construction skills and effort |
| Standalone Bench | A movable, self-contained bench not attached to any structure, offering flexibility in placement. | – Flexibility to relocate or rearrange as needed – Easier to build and simpler in design – Can be used in various rooms or moved during cleaning |
– May occupy more floor space than a built-in – Might offer less stability compared to a securely fastened built-in |
| Bench with Drawers | A storage bench featuring integrated drawers for organized and accessible storage. Our current project will incorporate a drawer. | – Excellent for organized storage of smaller items – Items are easily accessible and neatly contained – Provides a clean, uncluttered appearance |
– More intricate to construct due to drawer slides and box assembly – Storage capacity may be limited for very large or bulky items |
| Hinged-Top Bench | A classic design where the bench top lifts to reveal a large, open storage compartment underneath. | – Offers easy access to a large, unobstructed storage area – Relatively simple design, fewer moving parts than drawers – Ideal for storing bulky items like blankets or large toys |
– Items may shift around or become disorganized without internal dividers – Requires adequate overhead clearance for the lid to open fully |
Essential Tools and Materials Required for Your Project
Gathering all your tools and materials before you start is crucial for a smooth and efficient building process. Don’t skip this step – having everything ready will prevent interruptions and make the project more enjoyable.
Tools:
- Circular Saw: Your primary tool for making straight, accurate cuts on plywood sheets. A steady hand and a good guide are key.
- Kreg Pocket Hole Jig: Essential for creating strong, concealed joints. This tool makes assembly much easier and cleaner for beginners.
- Drill/Driver: For drilling pilot holes and driving screws quickly and efficiently.
- Miter Saw: Ideal for precise cross-cuts on lumber, ensuring your legs and frame pieces are perfectly square.
- Nail Gun (optional, for trim): While not strictly necessary, a nail gun makes attaching trim pieces incredibly fast and leaves smaller, neater holes than traditional hammering.
- Table Saw (optional, for dado cuts): Highly recommended for cutting the precise grooves (dados) for the drawer bottom, ensuring a professional, sturdy drawer box. If you don’t have one, a router or multiple passes with a circular saw can be used with care.
- Measuring Tape and Square: Absolutely non-negotiable for accurate measurements and ensuring all your cuts are perfectly square. “Measure twice, cut once” is your mantra!
Materials:
- (1) sheet ¾″ plywood: This will form the main structural components of your bench, including the side panels, drawer box, and potentially the top. Opt for good quality, furniture-grade plywood for durability and a smooth finish.
- ¼ sheet ¼″ plywood: Used specifically for the drawer bottom. Its thinner profile reduces weight while providing adequate support.
- 2×2 lumber: These sturdy pieces will serve as the legs of your bench, providing stability and a foundational structure.
- 1×2 and 1×3 boards: Used for various trim elements, support pieces, and framing, adding both structural integrity and aesthetic appeal.
- 16″ ball-bearing drawer slides: These are critical for ensuring your drawer opens and closes smoothly and silently. Choose good quality slides for longevity.
- 1 ¼″ pocket hole screws: Specifically designed for use with your pocket hole jig, these create strong, hidden joints.
- 1 ¼″ brad nails: Used with a nail gun (or hammer) for attaching trim pieces securely.
- Edge Banding: An optional but highly recommended material for covering the exposed plywood edges, giving your bench a clean, finished look.
- Wood Glue: Essential for reinforcing all your joints, creating a truly robust and long-lasting bench.
- Wood Filler: Used to fill nail holes, minor imperfections, and gaps, creating a smooth surface ready for finishing.
- Paint/Stain and Clear Polyurethane: Your chosen finish will protect the wood and define the bench’s final aesthetic. Polyurethane provides a durable, protective topcoat.
Step-by-Step Guide: How to Build Your DIY Storage Bench
Follow these detailed steps carefully, taking your time with each one. Precision in cutting and assembly will ensure a high-quality, professional-looking finished product.
Step 1: Build the Side Panels
This initial step forms the foundational side structures of your bench, integrating the legs with the main panels.
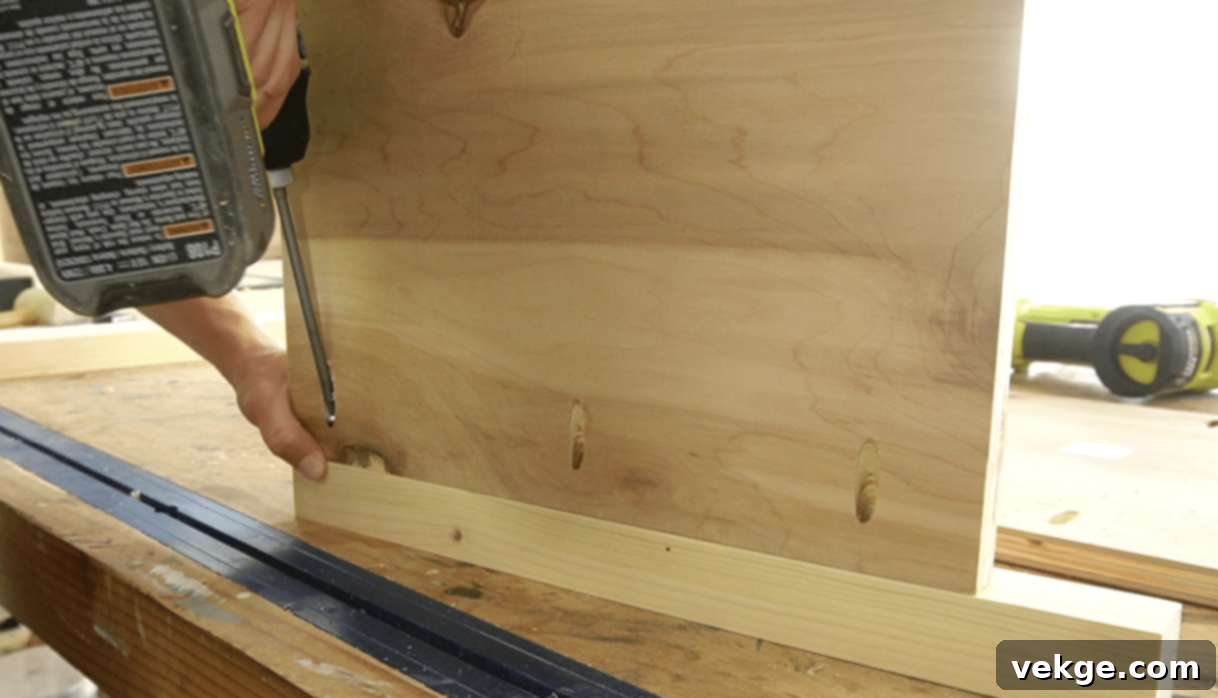
- Cut Legs and Panel Pieces: Begin by precisely cutting four pieces of 2×2 lumber, each measuring 18 ½″ in length. These will serve as the strong, stable legs for your bench. Next, cut two plywood squares (from your ¾″ sheet), each measuring 15 ½″ by 15 ½″. These squares will form the main side panels. Accuracy here is crucial for a square and level bench.
- Attach Panels to Legs: Using your Kreg pocket hole jig, drill pocket holes along the edges of each plywood square that will attach to the legs. Typically, 3-4 pocket holes per side are sufficient. Apply a thin bead of wood glue along the edges of the 2×2 legs where the plywood will attach. Then, carefully align and attach the plywood panels to the legs using 1 ¼″ pocket hole screws. Ensure the plywood panels are flush with the *inside* of the legs. This creates a neat inset on the outer side of the legs, which will be perfect for adding decorative trim later, giving your bench a more refined look.
Step 2: Assemble the Main Frame
With the side panels built, you’ll now connect them to form the front and back of the bench frame, establishing its overall length and stability.
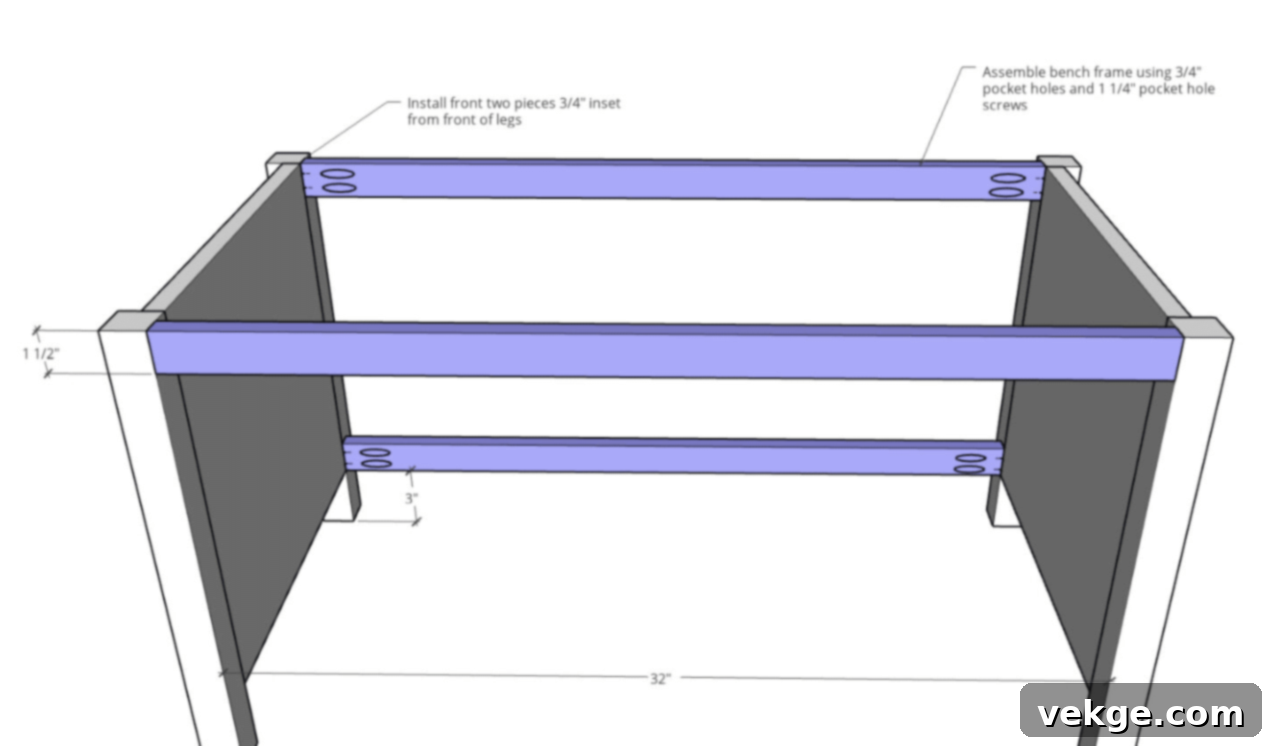
- Prepare Frame Pieces: Determine the desired overall length of your bench. For a standard bench suitable for an entryway, a length of 36-48 inches is common. Cut two strips of either ¾″ plywood (ripped to 1 ½″ wide) or 1×2 boards to fit precisely between your assembled side panels. These will form the front and back rails of your main frame.
- Attach Frame Pieces: Drill pocket holes into the ends of these frame pieces. Apply wood glue to the joints before attaching them to the side panels with 1 ¼″ pocket hole screws. It’s critical to position these pieces correctly:
- The front frame piece should be set ¾″ back from the very front of the legs. This recess is vital as it provides the necessary clearance and flush surface for the drawer front and its trim later on.
- The bottom frame piece should be positioned 3″ up from the ground. This elevation gives the bench a visually appealing lift and protects the base from floor-level scuffs.
Ensure all connections are tight and square before moving on.
Step 3: Install Top and Bottom Supports
These supports are crucial for the structural integrity of your bench and provide solid anchoring points for the bench top and bottom panel (if applicable for a drawer system).
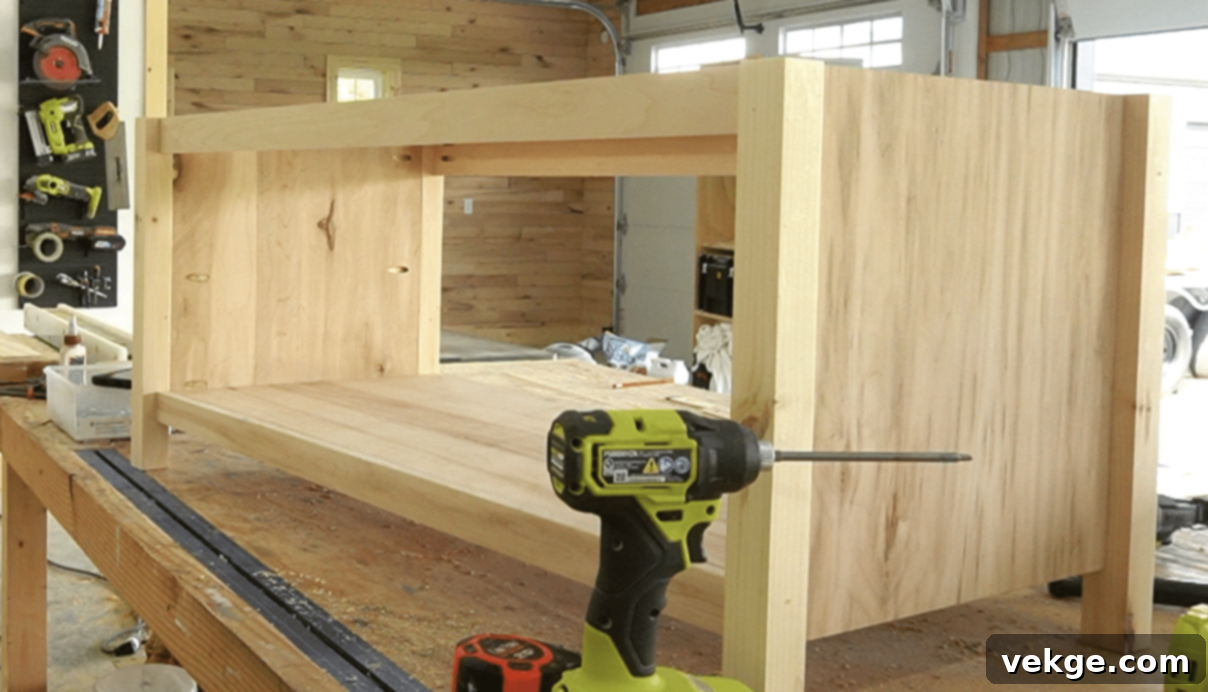
- Cut Support Boards: From your 1×3 boards or ¾″ plywood, cut two pieces (approximately 2 ½″ wide) that match the interior length of your bench. These will serve as the robust top supports.
- Attach Supports: Drill pocket holes into the ends of these supports. Apply wood glue and secure one support at the front and another at the back of the top frame, flush with the top edges of your side panels. These supports are vital; they provide a strong anchor for the bench’s top surface, preventing warping and ensuring a stable seating area. For a drawer bench, you will also need to install a bottom panel, typically a ¾″ plywood piece, cut to fit snugly inside the frame and screwed down to the bottom rails. This creates the floor for your drawer compartment.
Step 4: Install Drawer Slides
Accurate installation of drawer slides is paramount for a drawer that operates smoothly and effortlessly. Take your time with this step.
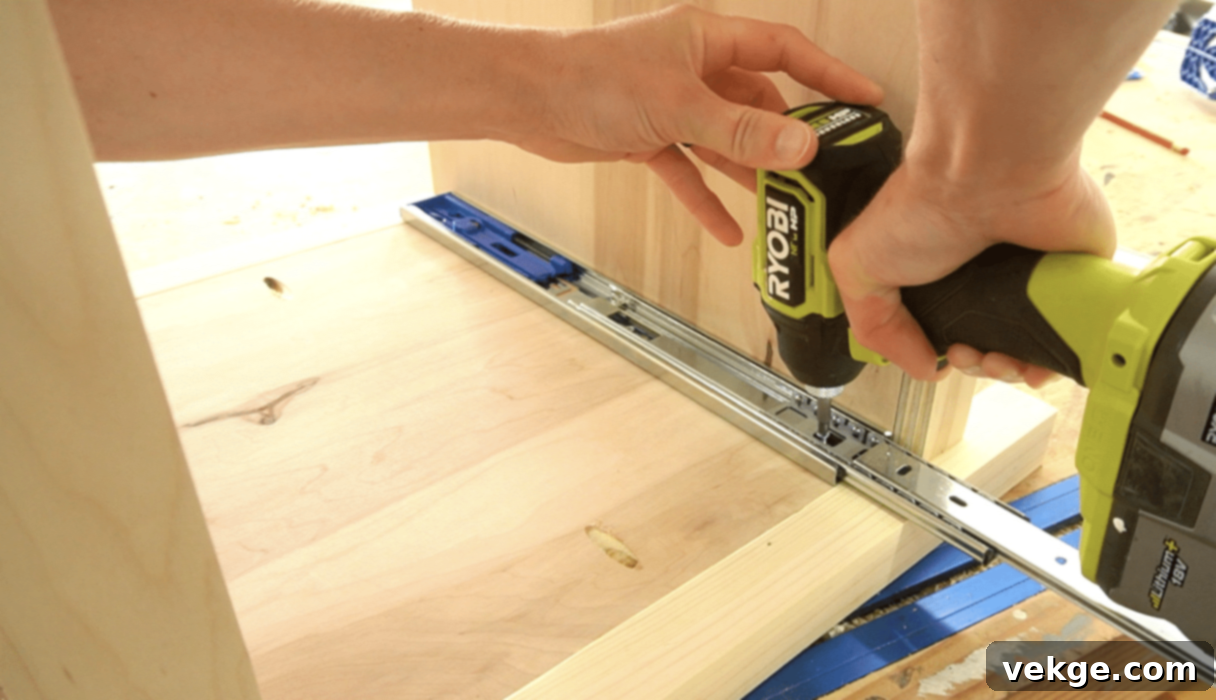
- Position Slides: Mark the exact height where your drawer slides will sit. This is typically centered within the drawer opening. The key is to position the 16″ ball-bearing drawer slides precisely ¾″ back from the front edge of the bench’s opening. This ensures the drawer front will sit flush with the front trim later on. Use a level and a measuring tape to mark your screw locations accurately. Secure the slides to the side panels of the bench frame using the appropriate screws provided with the slides.
- Check Alignment: Before proceeding, it’s absolutely crucial to double-check the alignment of both slides. They must be perfectly level with each other and parallel to the sides of the opening. Any misalignment here will result in a drawer that sticks, wiggles, or doesn’t close properly. Small shims or adjustments can make a big difference.
Step 5: Build and Install the Drawer
Building the drawer box requires precision, especially with the dado cuts, to ensure a strong and functional unit.
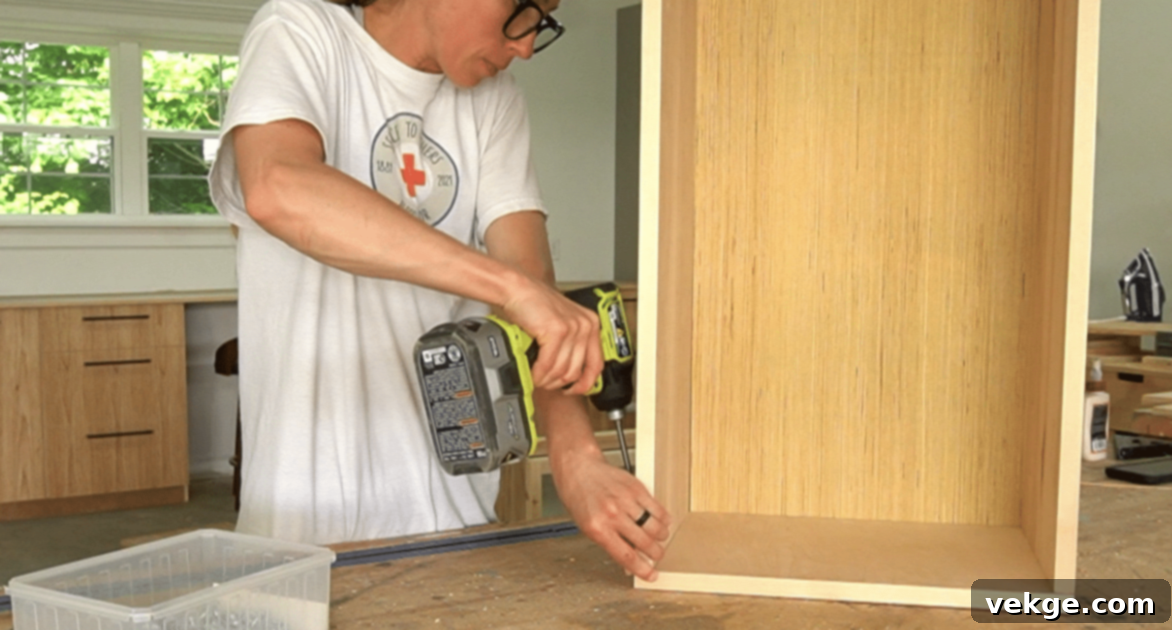
- Cut Drawer Pieces: From your ¾″ plywood, cut four pieces for the drawer sides, front, and back. The dimensions will depend on your bench’s interior opening and your slide length (e.g., for 16″ slides, your drawer box depth will be slightly less than 16″). For the drawer bottom, cut a piece of ¼″ plywood to fit the interior dimensions of your drawer box.
- Create Bottom Groove: This is a critical step for a sturdy drawer. Using a table saw or router, cut a shallow groove (¼″ wide dado) about ¼″ deep and ½″ from the bottom edge on the *inside* face of all four drawer side pieces. This dado will cradle the ¼″ plywood bottom, providing significant strength. Ensure these grooves are perfectly aligned on all pieces.
- Assemble Drawer Box: Drill pocket holes into the front and back pieces of the drawer box, ensuring they will connect to the side pieces. Apply wood glue generously to all mating surfaces and inside the dado grooves. Carefully assemble the drawer box, sliding the ¼″ bottom panel into the grooves as you connect the sides using 1 ¼″ pocket hole screws. Ensure the drawer is perfectly square before the glue sets.
- Attach Drawer to Slides: Once the drawer box is assembled and dry, attach the remaining part of the drawer slides to the exterior sides of the drawer box. Carefully slide the complete drawer box onto the slides in the bench frame. Test its movement – it should open and close smoothly without catching or binding. Make any minor adjustments needed to the slides or drawer box.
Step 6: Attach Trim and Finish
The trim pieces are where your bench truly begins to take on a professional, finished appearance. Pay attention to detail here.
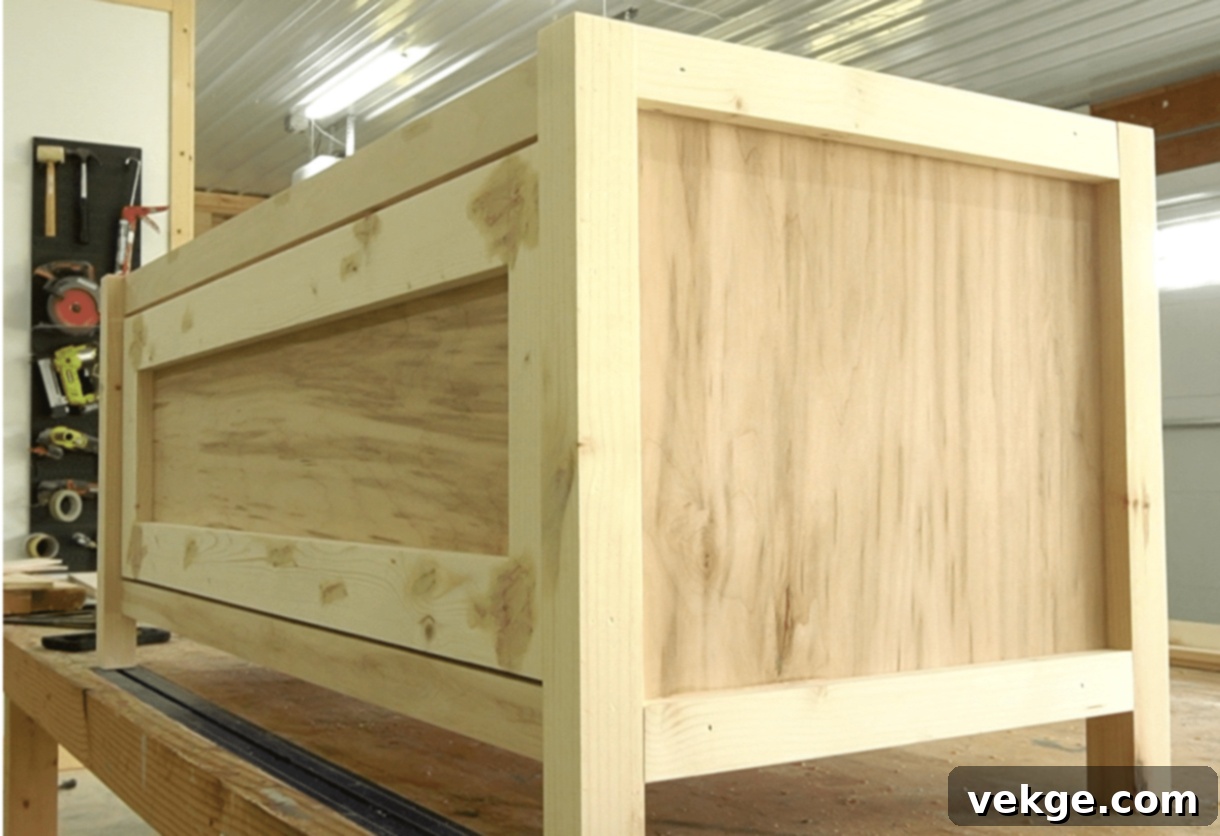
- Install Drawer Front Trim: Cut 1×3 boards to create a frame around the drawer front. These pieces will attach to the existing drawer box. Carefully dry-fit them, leaving a small, even gap (about ⅛″) around the edges for a clean, furniture-like appearance. Apply wood glue to the back of the trim pieces and secure them to the front of the drawer box using brad nails. This creates a framed, decorative face for your drawer.
- Add Side Trim: Cut 1×2 trim pieces to fit along the top and bottom edges of the bench sides, filling in the ¾″ inset created in Step 1. Glue and nail these in place, ensuring they are flush with the legs. If using edge banding, apply it to any exposed plywood edges on the bench or drawer front before painting.
- Finish and Secure: Now it’s time for sanding! Thoroughly sand all surfaces, especially all trim edges and any areas with wood filler, to achieve a perfectly smooth finish. Apply wood filler to any nail holes or minor gaps, let it dry, and sand again. Once smooth, proceed to painting or staining your bench (detailed in the next section). After the finish is dry, attach the bench top (a piece of ¾″ plywood cut to size, with edge banding applied if desired) to the bench frame. Secure it from underneath by driving screws up through the top supports into the bench top. Finally, install your chosen handle or pull on the drawer front to complete your stylish and functional storage bench!
For a more detailed visual tutorial, check out the below video:
Painting and Finishing Your Storage Bench for Durability and Style
The finishing touches are what truly bring your storage bench to life, protecting the wood and allowing its beauty to shine through. Don’t rush this stage; patience here will yield the best results.
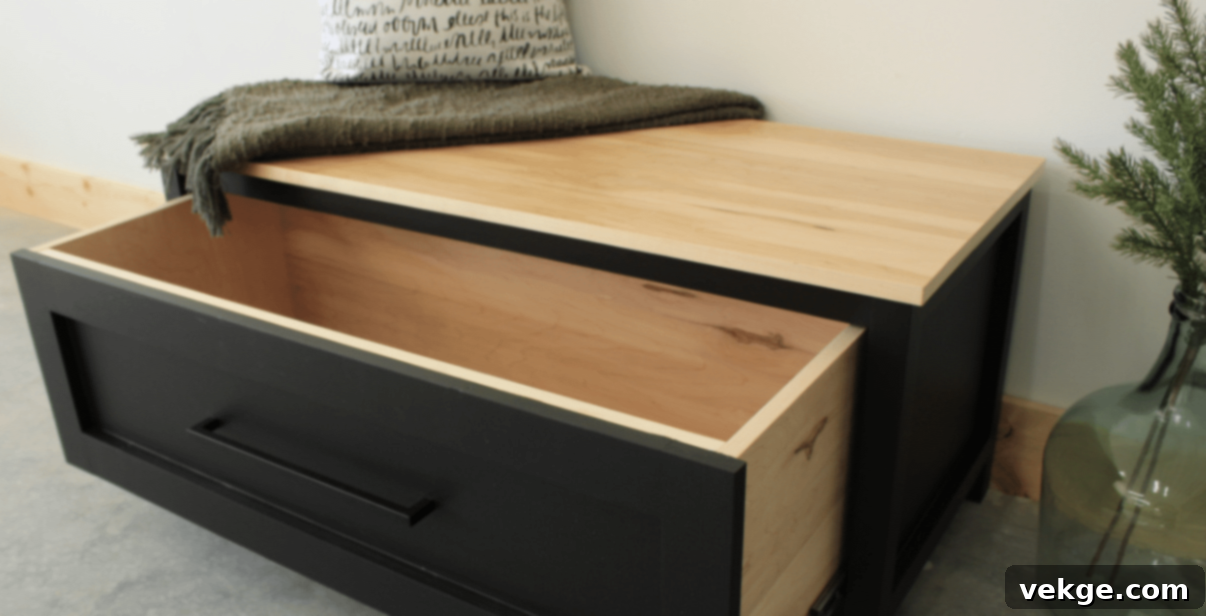
- Preparation for Painting: After the entire bench is fully assembled (including all trim), carefully remove the drawer from the bench. This allows you to paint both the bench frame and the drawer separately, ensuring thorough coverage and preventing paint from gumming up the drawer slides.
- Sanding: This is a critical step for a smooth, professional finish. Sand the entire bench and drawer front one final time. Start with a medium-grit sandpaper (around 120-150 grit) to remove any lingering rough spots or glue residue, then move to a fine-grit sandpaper (around 220 grit) to achieve a silky-smooth surface. Pay extra attention to edges and areas where wood filler was applied. Wipe away all sanding dust with a tack cloth or a damp rag.
- Priming: Applying a good quality primer is highly recommended, especially if you’re using a lighter-colored paint or painting over a type of wood that might bleed tannins (like oak). Primer helps seal the wood, provides a uniform base for your paint, and improves paint adhesion and durability. Apply one even coat of primer to all surfaces.
- Painting: Choose a durable, high-quality paint specifically designed for furniture. Acrylic latex paints are easy to clean up and come in a vast array of colors, while chalk paint offers a unique, matte finish. Use a good quality brush for edges and corners, and a small foam roller for larger flat surfaces to achieve a smooth, streak-free finish. Apply at least two thin coats, allowing adequate drying time between each coat according to the manufacturer’s instructions. Lighter colors may require additional coats.
- Clear Coat for Durability: Once your paint or stain has completely dried and cured (this can take 24-48 hours), it’s time to apply a clear protective topcoat. A water-based polyurethane or polycrylic is excellent for this purpose, as it offers strong protection against scratches and moisture without yellowing over time. Apply 2-3 thin coats, sanding lightly with 320-grit sandpaper between coats for maximum smoothness and adhesion. Be sure to wipe away dust before each subsequent coat.
- Reassemble and Final Touches: After the polyurethane has dried fully (typically 24 hours, but check product instructions), carefully reattach the drawer to the slides. Install your chosen drawer handle or pull. Take a final inspection of the entire bench for any missed spots, drips, or areas needing a touch-up. Your beautifully finished storage bench is now ready to be put to use!
Maintenance and Care Tips for Your DIY Storage Bench
To ensure your handcrafted storage bench remains beautiful and functional for years to come, regular maintenance is key. These simple tips will help preserve its finish and structural integrity:
- Regular Dusting: Dust the bench surface weekly with a soft, lint-free cloth or a microfiber duster to prevent buildup and keep it looking fresh.
- Prompt Spill Cleanup: Accidents happen! Clean spills immediately with a damp cloth and mild soap (if necessary) to prevent stains from setting into the wood finish or any fabric cushion.
- Tighten Screws Periodically: Over time, screws can loosen with use. Check and tighten all visible screws, especially pocket hole screws and drawer slide screws, every three to six months to maintain stability.
- Apply Wood Polish: For stained or natural wood finishes, apply a quality wood polish or wax twice a year. This helps protect the finish from drying out and enhances its luster.
- Lubricate Hinges (if applicable): If your bench incorporates a hinged top, apply a small amount of lubricant (like silicone spray or WD-40) to the hinges annually to prevent squeaking and ensure smooth operation.
- Vacuum Cushions: If your bench has a fabric seat cushion, vacuum it regularly with an upholstery attachment to remove dust, crumbs, and pet hair.
- Test Lid Support (if applicable): For hinged-top benches, periodically test the lid support mechanism to ensure it still holds the lid securely open, preventing accidental closures that could cause injury.
- Address Loose Joints Promptly: If you notice any wobbling or loose joints, address them as soon as possible. Minor repairs are much easier than major overhauls.
- Distribute Weight Evenly: When storing items in the compartment, place heavier items at the bottom and distribute weight evenly to prevent stress on the bench structure.
- Protect from Direct Sunlight: Position your bench away from direct, prolonged sunlight to prevent the wood finish from fading or cracking over time.
Common Mistakes to Avoid When Building Your Storage Bench
Even seasoned DIYers can make mistakes. Being aware of common pitfalls can save you time, money, and frustration during your building process.
Skipping the Planning Phase
I’ve witnessed countless DIY enthusiasts, eager to start, rush into cutting wood without a proper plan. This often leads to wasted materials, miscuts, and ultimately, a less satisfying result. Always take the time to draw out your plan, even a simple sketch, with all dimensions clearly marked. Create a detailed cut list and a shopping list for materials. Then, double-check all your measurements before making any cuts. This small investment of time upfront will save you from major headaches and expenses later on.
Wrong Wood Selection
A common mistake, especially for beginners on a budget, is opting for the cheapest wood available. While it might seem like a cost-saver initially, low-quality lumber can be prone to warping, splitting, and can make achieving a smooth finish much harder. I always suggest using a good quality ¾″ plywood for the main box structure, as it provides excellent stability and takes finishes well. For structural elements like the frame and legs, solid pine or spruce can offer good strength without significantly increasing your budget. This combination ensures durability and a professional appearance without breaking the bank.
Improper Lid Support or Drawer Slide Installation
For benches with hinged tops, poor lid support is not just an inconvenience; it’s a significant safety issue, especially in homes with children. Always invest in quality hinges and a reliable lid support mechanism (like a slow-close gas strut or spring hinge) that can hold the lid open securely. Similarly, for drawer benches, incorrectly installed drawer slides can lead to a frustrating experience. Ensure your slides are perfectly level and parallel, and that the drawer box fits snugly but moves freely. Test the lid or drawer movement multiple times throughout the assembly process before applying the final finish. Your family’s safety and the functionality of your bench are paramount.
Wrapping It Up: Your Journey to a Custom Storage Solution
Building your own storage bench is far more than just a home improvement project; it’s a deeply rewarding experience that results in a piece of furniture perfectly tailored to your needs and style. My own journey started out of a simple need for extra storage, but it blossomed into so much more: a new skill set, a sense of pride in creating something beautiful and functional, and a practical solution that effortlessly enhances my family’s living space.
Now, the opportunity is yours to embark on this creative endeavor. Approach it with careful planning, choose your materials wisely, and always prioritize safety features, particularly for lid supports and stable construction. Don’t let inexperience deter you – I’ve shared every step and tip that helped me along the way, making this project accessible even for novice DIYers.
Are you ready to transform your home with a custom-built storage bench? Grab your measuring tape, make that materials list, and get ready to create something truly special. Once your bench is complete, I’d absolutely love to hear about your building experience and see your finished masterpiece. Share your thoughts and photos in the comments section below – happy building!
