Ultimate Guide to Insulating Your Garage: Boost Comfort, Save Energy & Enhance Space
Is your garage often a cold, drafty, or scorching hot space that you avoid? Unless you’ve built your own garage and specifically ensured it’s insulated, you likely experience these common discomforts. Insulating your garage is one of the most impactful home improvement projects you can undertake. It goes a long way in making your garage a more comfortable, pleasant, and usable area, transforming it from a neglected space into a valuable extension of your home.
Beyond comfort, a well-insulated garage can significantly reduce your energy bills by preventing heat loss in winter and heat gain in summer. This makes your garage not just a better place for parking your car, but also an ideal environment for DIY projects, a home gym, a workshop, or simply a temperature-controlled storage area for sensitive items. From insulating the garage door to sealing every tiny gap, understanding the various insulation methods and materials is key to achieving an energy-efficient and comfortable garage.
Why Insulate Your Garage? The Core Benefits
Before diving into the “how-to,” let’s explore the compelling reasons why insulating your garage is a smart investment:
- Energy Savings: An uninsulated garage acts as a major thermal bridge, allowing heat to escape in winter and seep in during summer. If your garage shares a wall with your main living space, this directly impacts your home’s heating and cooling costs. Insulation significantly reduces this energy transfer, leading to noticeable savings on your utility bills.
- Enhanced Comfort: Imagine stepping into your garage without shivering in winter or sweating profusely in summer. Insulation creates a more stable temperature, making the space much more comfortable for any activity, whether you’re working on a car, doing woodworking, or simply retrieving items.
- Increased Versatility: A comfortable garage opens up a world of possibilities. It can easily be converted into a functional workshop, a play area for kids, a home gym, an art studio, or extra storage for temperature-sensitive belongings like paint, electronics, or canned goods.
- Moisture Control: Insulation, especially when combined with proper vapor barriers, helps manage condensation within the garage, reducing the risk of mold growth and protecting your tools, vehicles, and stored items from rust and deterioration.
- Noise Reduction: Beyond thermal benefits, insulation also acts as a sound barrier. It can dampen external noises from traffic or neighbors and reduce internal noise from machinery, making your home and garage quieter spaces.
- Increased Home Value: A well-insulated, functional garage is an attractive feature for potential homebuyers, potentially increasing your property’s overall value.
Choosing the Right Insulation for Your Garage
There are several types of insulation materials, each with its own advantages, disadvantages, and ideal applications. Understanding these will help you make informed decisions for your garage:
- Fiberglass Batts or Rolls: This is one of the most common and cost-effective insulation types. It comes in pre-cut batts or long rolls that fit snugly between wall studs, ceiling joists, or roof rafters. Fiberglass offers good thermal performance (R-value per inch), is relatively easy for DIY installation, and can also provide some sound dampening. However, it requires proper handling with protective gear.
- Rigid Foam Boards: Made from materials like polystyrene (EPS, XPS) or polyisocyanurate (polyiso), rigid foam boards offer a higher R-value per inch than fiberglass. They are excellent for continuous insulation, can be cut to fit, and provide good moisture resistance. They are often used for garage doors, walls (especially when finishing the interior), and ceilings. Sealing seams with tape is crucial for optimal performance.
- Spray Foam Insulation: Available as open-cell or closed-cell, spray foam is highly effective for air sealing and insulation. It expands upon application, filling cavities and gaps completely, creating an airtight barrier. Closed-cell spray foam also provides structural rigidity and vapor control. While offering superior performance and a high R-value, it’s generally more expensive and often requires professional installation due to specialized equipment and safety precautions.
- Loose-Fill or Blown-In Cellulose: Made from recycled paper treated with fire retardants, cellulose insulation is ideal for filling irregular spaces or existing wall cavities without requiring drywall removal. It offers good R-value and excellent sound dampening properties. Installation typically requires a blowing machine.
1 – Insulate the Garage Door

The garage door is often the largest uninsulated surface in your garage, making it a primary culprit for heat loss and gain. Insulating your garage door can make a remarkably significant difference in maintaining a comfortable temperature inside. Different types of garage doors, such as sectional roll-up doors, require specific insulation methods.
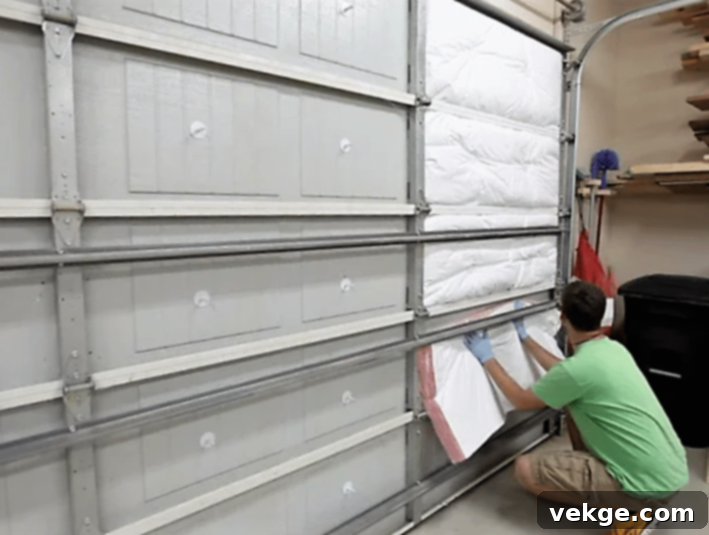
For most common sectional garage doors, DIY insulation kits are readily available. These kits typically include pre-cut rigid foam panels (often polystyrene or polyisocyanurate) or reflective foil insulation that fit snugly into the door’s recessed panels. Installation is generally straightforward: measure each panel, cut the insulation to size (if necessary), and secure it in place with adhesive or retention clips, ensuring full coverage without leaving gaps. Alternatively, if you prefer professional assistance or have a more complex door, you can hire a specialized company like North Shore Commercial Door to handle the insulation for you.
When insulating your garage door, it’s crucial to ensure the insulation is securely fastened and completely covers the entire surface to eliminate thermal bridges. Also, pay close attention to the door’s functionality. Adding insulation will increase the door’s weight, which might affect its balance. You may need to adjust the tension springs to compensate for the added weight and ensure the door can still open and close smoothly and safely. Always check that the insulation doesn’t interfere with the door’s moving parts or track system.
2 – Insulate Your Garage Walls
If your garage walls are unfinished or if you’re planning to finish them, insulating them is a critical step for comprehensive thermal control. Walls shared with your main living space are especially important, as they directly impact your home’s energy efficiency.
For walls with exposed studs, fiberglass batts are a popular and effective choice. Measure the cavities between the studs, cut the fiberglass batts to fit, and gently push them into place, ensuring they fill the space completely without compressing. Compression reduces the insulation’s R-value. A vapor barrier (typically a sheet of polyethylene plastic) should be installed on the warm side of the insulation (the interior side in most climates) to prevent moisture from condensing within the wall cavity.
Alternatively, rigid foam boards can be cut to fit between studs, offering a higher R-value and greater moisture resistance. For a superior seal and higher R-value, spray foam insulation can be applied. While often a job for professionals, DIY spray foam kits are available for smaller areas. If your garage walls are already finished, you might consider having cellulose or foam insulation blown into the cavities, a task typically handled by insulation contractors. Properly insulating your garage walls significantly contributes to maintaining a stable indoor temperature and reducing drafts.
3 – The Ceiling and Roof Insulation

Insulating the ceiling and roof of your garage is vital for maintaining consistent temperatures, especially since heat rises. The approach you take depends on whether your garage has an attic space above it or if the roof rafters are exposed.
If your garage has an accessible attic space, you can easily add insulation between the attic floor joists. Fiberglass batts or rolls are commonly used here. Simply unroll or lay down the batts evenly across the attic floor, ensuring they cover the entire area and reach into corners. It’s important to avoid blocking any soffit vents with insulation, as proper attic ventilation is crucial for preventing moisture buildup and maintaining roof longevity. You may need to use baffles to keep insulation away from vents. For enhanced thermal performance, you can add multiple layers of insulation to achieve a higher R-value.
For garages without an attic space, where the ceiling or underside of the roof rafters are exposed, you can insulate directly at the roofline. This can be achieved with rigid foam boards or spray foam insulation. Rigid foam boards are cut to fit snugly between the rafters and secured in place. All seams and edges should be sealed with specialized tape to create an effective air barrier. Spray foam, particularly closed-cell, is another excellent option for exposed rafters. It’s sprayed directly onto the surface, expanding to fill all gaps and creating a continuous, airtight, and highly insulative layer. While a DIY spray foam kit might be an option for smaller areas, larger projects often benefit from professional installation due to the equipment and expertise required for proper application and ventilation.
4 – Seal Gaps with Weather Stripping and Caulk

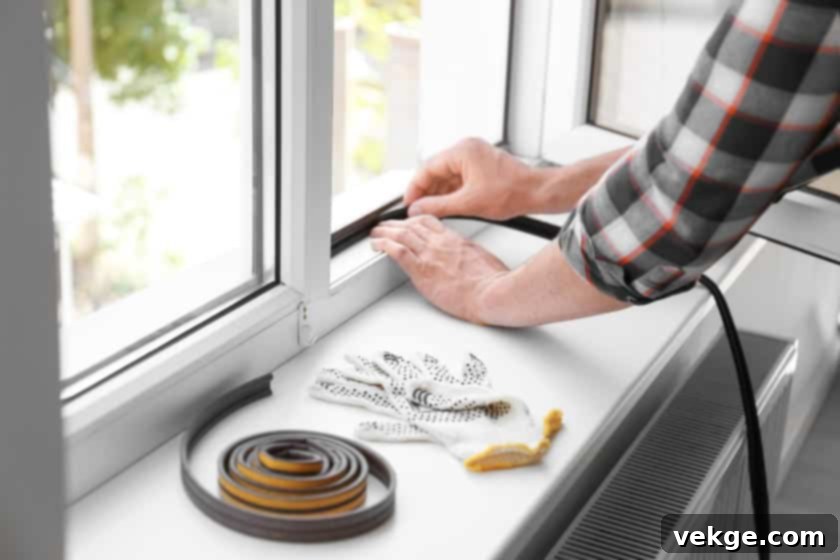
Even with excellent insulation in your garage’s major surfaces, small gaps and cracks can undermine your efforts by allowing drafts and air leakage. Air sealing is just as critical as insulation for achieving optimal energy efficiency. Adding weather stripping around your garage doors (both main and pedestrian doors) and windows, along with using caulk for smaller cracks, will make an enormous difference in the internal temperature and overall comfort.
Weather stripping is a material applied along the edges of doors and windows to seal gaps when they are closed. It effectively stops cold air from coming in and warm air from escaping, or vice versa. Various types of weather stripping are available, each suited for different applications:
- Foam Tape: Adhesive-backed, easy to install, good for sealing smaller, less frequently used gaps.
- Rubber or Vinyl Gasketing: More durable and effective for larger gaps, often applied with nails or staples, or fitted into grooves.
- Door Sweeps: Specifically designed for the bottom of pedestrian doors, these create a seal against the threshold.
- Bottom Seal for Garage Doors: For the main garage door, a sturdy rubber or vinyl seal installed along the bottom edge is essential to close the gap between the door and the uneven garage floor. This is often called a “bottom seal” or “weather seal” and is crucial for preventing drafts, water, and pests.
For your garage windows, ensure you cover all sides. For doors, pay special attention to the bottom where larger gaps typically form. Replace any old, cracked, or worn-out weather stripping promptly.
Beyond weather stripping, use caulk to seal smaller cracks and gaps in the walls, around window frames, door frames, and where different building materials meet. Look for exterior-grade caulk that is paintable and flexible. A thorough air-sealing job complements your insulation, ensuring your garage remains a truly conditioned space.
5 – Consider Insulating Your Garage Floor
While often overlooked, insulating your garage floor can significantly improve overall thermal performance, especially if you live in a cold climate or plan to spend extended time working on the floor. Most garages have concrete slab floors, which are notorious for conducting cold directly from the ground.
Insulating a concrete slab is typically done during construction, but retrofitting is possible. For existing garages, one effective method is to install an insulated subfloor system. This usually involves laying down rigid foam insulation boards directly on the concrete, followed by a plywood or OSB subfloor. This creates a thermal break, making the floor warmer underfoot and reducing heat loss. Another option is applying an insulating epoxy coating or using specialized insulated floor mats, though these offer less thermal resistance than a full subfloor system. A vapor barrier should always be used between the concrete and any insulation or subfloor to prevent moisture issues.
DIY vs. Professional Garage Insulation
Deciding whether to tackle garage insulation yourself or hire a professional depends on several factors:
- DIY Projects: Many aspects of garage insulation are suitable for DIY enthusiasts. Installing garage door insulation kits, adding fiberglass batts to exposed wall studs or attic joists, and applying weather stripping are relatively straightforward tasks. These options are budget-friendly and allow you to work at your own pace.
- Professional Help: For more complex tasks, or if you’re seeking maximum efficiency and performance, professional assistance is advisable. This includes installing spray foam insulation, blowing in loose-fill insulation into existing finished walls, or dealing with structural challenges. Professionals have the specialized equipment, experience, and knowledge to ensure proper installation, achieve optimal R-values, and address potential issues like ventilation or moisture control effectively. Companies specializing in insulation can also assess your garage’s specific needs and recommend the best solutions.
Conclusion
Insulating your garage is a highly beneficial investment that yields tangible rewards in comfort, energy efficiency, and usability. By addressing the garage door, walls, ceiling, and meticulously sealing all gaps, you can transform a once-uncomfortable space into a versatile, energy-saving extension of your home. Whether you choose to undertake these improvements yourself or enlist the help of professionals, a well-insulated garage is a smart upgrade that enhances your lifestyle and adds value to your property. Start your garage insulation project today and begin enjoying a more comfortable and efficient home year-round!
