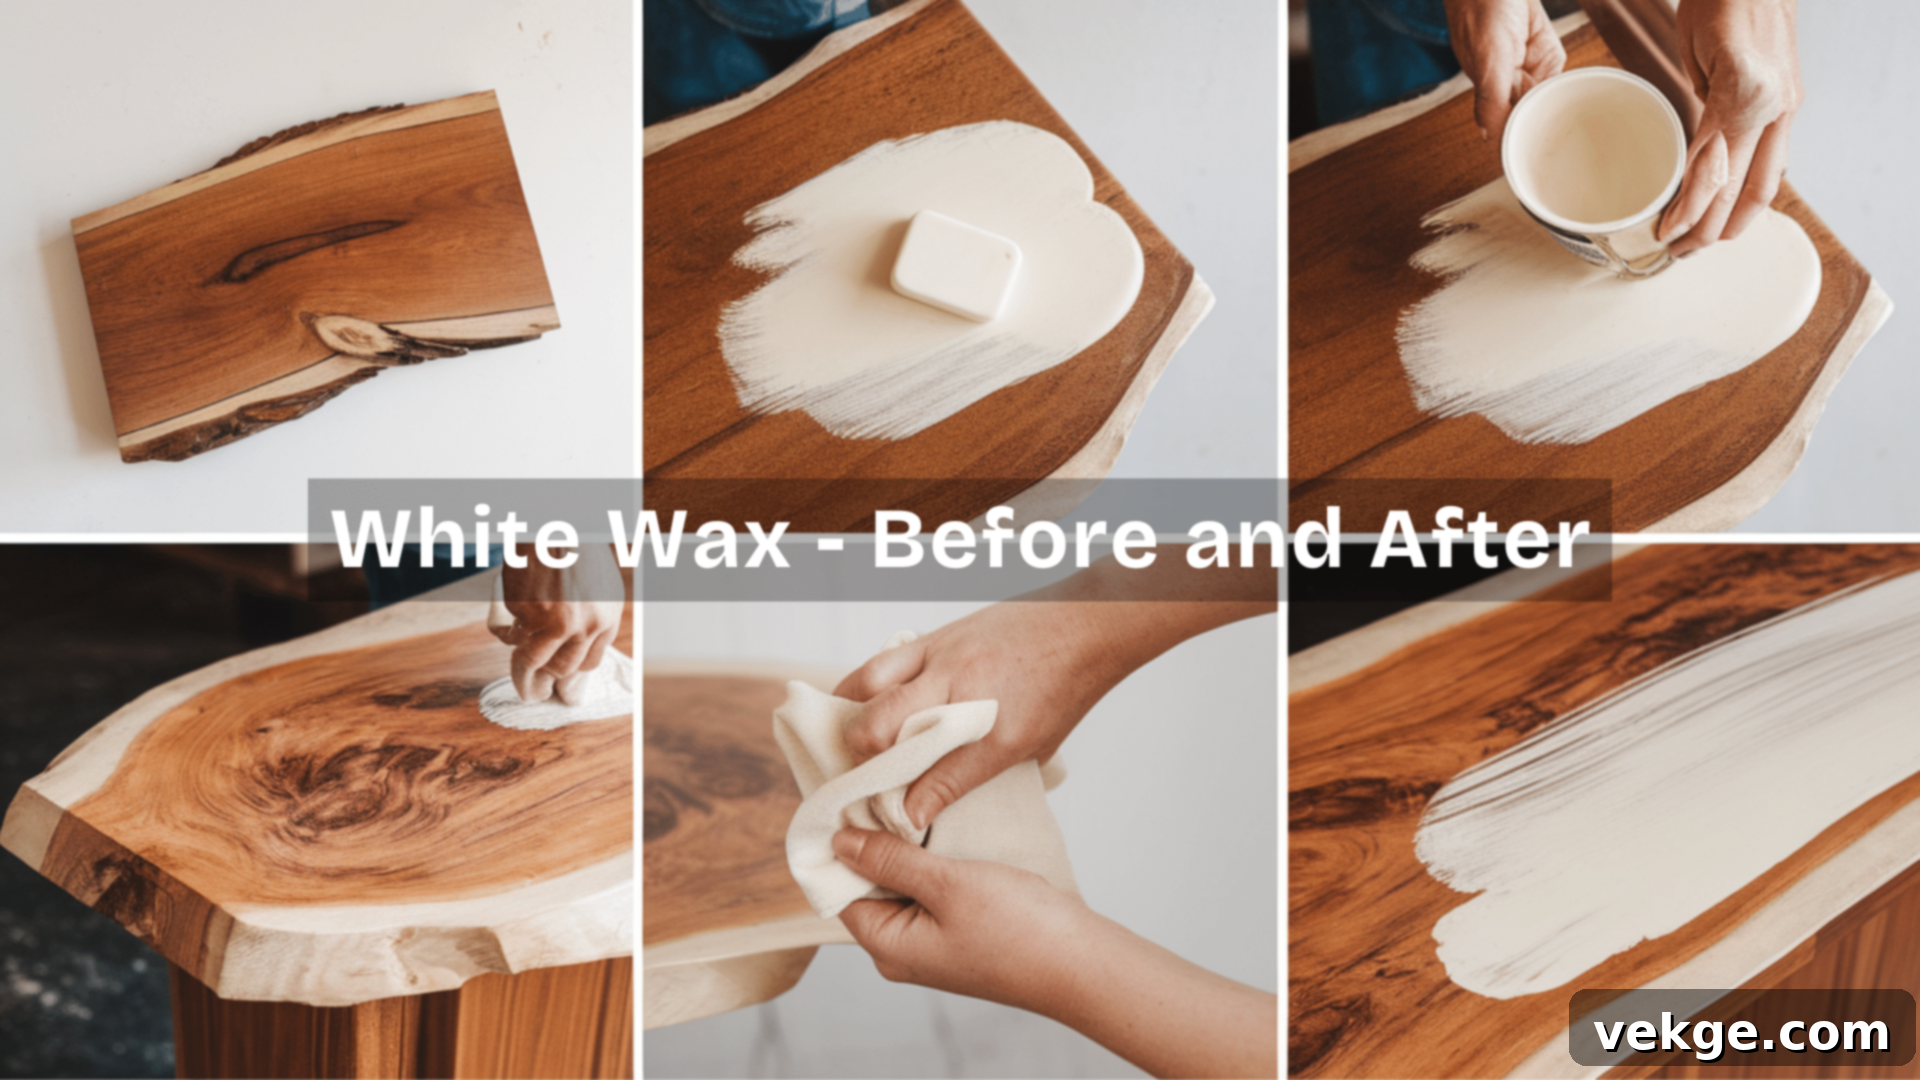
Transform Your Furniture: The Ultimate Guide to White Wax for a Vintage, Farmhouse Look
White wax is an incredibly simple yet powerful tool to breathe new life into your wood furniture, instantly giving it a fresh, charming, and distinctly vintage or farmhouse appeal. It’s a remarkably easy finish to apply, capable of completely altering the aesthetic and feel of any wooden piece, from tired old heirlooms to new, uninspired purchases.
Before the magic of white wax, your furniture might appear dark, flat, or just plain. Its natural character might be hidden, leaving it blending into the background rather than standing out. However, after applying this transformative wax, everything changes. The white wax gently lightens the surface, enhancing and highlighting the intricate patterns of the wood grain, and softening the overall look to create an inviting, rustic style that feels both timeless and sophisticated.
Whether you’re looking to brighten up a heavy oak dining table, add character to plain pine shelves, or give a dresser a beloved, aged appearance, white wax can elevate any surface. It infuses pieces with a stylish lightness, making them feel less imposing and more integrated into contemporary decor schemes that favor brightness and natural textures. In this comprehensive guide, we will delve deep into how white wax can utterly transform your furniture, provide a detailed, step-by-step application process, and share a wealth of helpful ideas and expert tips to ensure your project is a resounding success.
If you’ve ever found yourself wondering about the capabilities of white wax and the significant difference it can make to your beloved furniture, continue reading. Prepare to be inspired as we unveil the remarkable “before and after” impact of this versatile finishing product.
Understanding White Wax: More Than Just a Finish
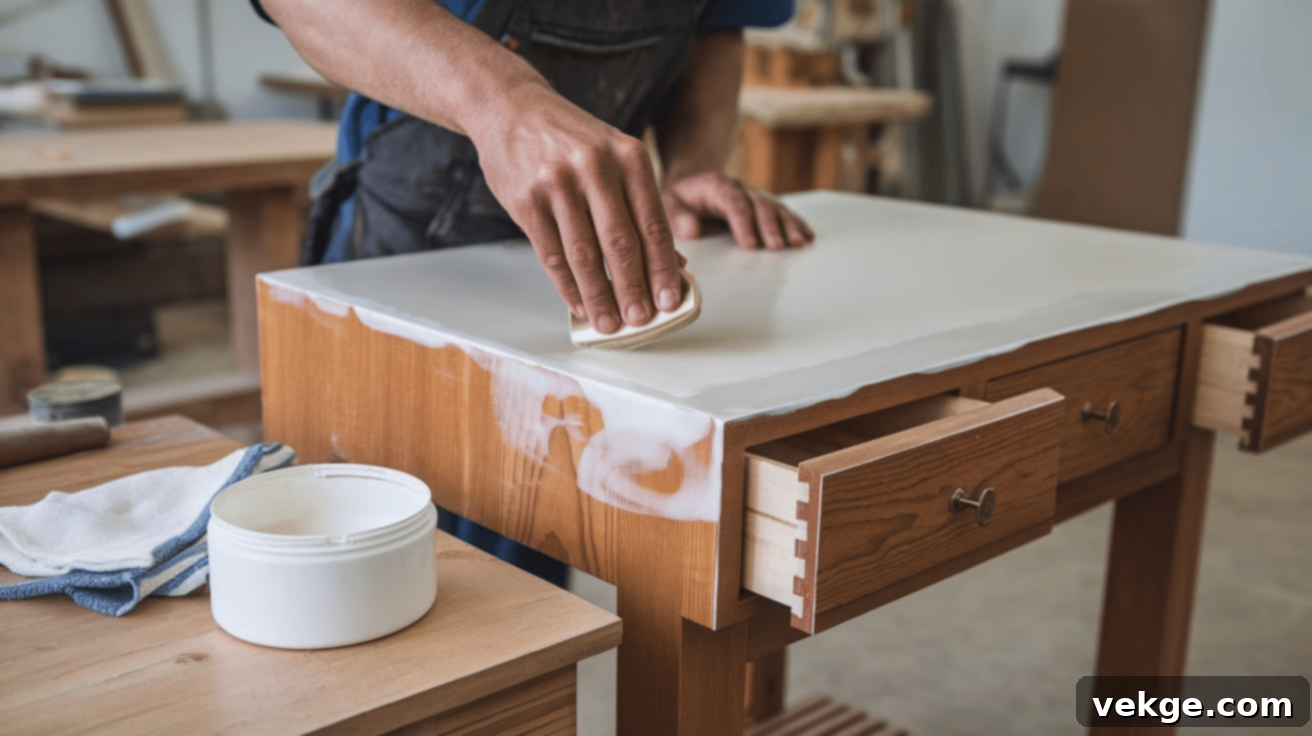
White wax, often referred to as liming wax or pickling wax, is a specialized finishing product designed to impart a beautiful, translucent white, lightened, or aged effect on wood. Unlike traditional paints that opaque and cover the wood completely, or clear waxes that merely protect and add a subtle sheen, white wax acts as a delicate veil. It contains white pigments suspended in a wax base, which allows it to settle into the pores and grain of the wood, accentuating its natural texture while simultaneously adding a soft, whitewashed hue.
This unique interaction with the wood grain is what gives white wax its distinctive charm. Instead of completely concealing the wood’s inherent character, white wax subtly tones it down, enriching the surface with depth and a unique, ‘lived-in’ aesthetic. This makes it an ideal choice for those who appreciate the natural beauty of wood but desire a lighter, softer, or more rustic appearance. Many choose white wax specifically to brighten naturally dark woods like oak, mahogany, or walnut, or to give newer furniture an instant aged, antique-like patina.
White wax is particularly popular within various interior design styles, including farmhouse, coastal, Scandinavian, shabby chic, and French country. These styles often celebrate natural materials, muted color palettes, and a sense of history or relaxed elegance, all of which are perfectly complemented by a white wax finish. A key advantage of white wax is its flexibility and forgiving nature. It’s generally not a permanent finish in the way paint can be; layers can often be built up for greater opacity or, conversely, gently sanded back if you desire a more subtle effect. This makes it an incredibly user-friendly option for beginners and seasoned DIY enthusiasts alike, offering a low-commitment way to revitalize old furniture without obscuring its natural allure or undertaking a full-scale renovation.
Why Choose White Wax? Unlocking Its Numerous Benefits
White wax offers a multitude of benefits that make it an excellent choice for refreshing and brightening your furniture. Here’s a closer look at why it continues to gain popularity among DIYers and interior designers:
- Enhances the Wood Grain: One of the most striking features of white wax is its ability to highlight and accentuate the natural grain of the wood. The white pigments settle into the recessed areas and pores of the wood, creating a beautiful contrast that makes the grain “pop” and appear more textured and defined. This adds incredible depth and visual interest, turning ordinary wood into a captivating focal point without masking its inherent beauty.
- Brightens Darker Wood: If you possess darker wood furniture that feels heavy or appears dull, white wax offers a perfect solution. It effectively lightens the wood without completely covering its natural color or grain, providing a delicate whitewashed effect. This transformation can make a traditionally dark piece feel airy, fresh, and significantly lighter, helping it integrate seamlessly with lighter, more modern, or minimalist decor schemes.
- Creates a Vintage or Rustic Look: For those who adore the cozy, lived-in charm of vintage, rustic, farmhouse, or shabby chic furniture, white wax is an indispensable tool. It lends an instant antique patina, making your pieces appear as though they have been cherished for decades. This aged aesthetic adds character, warmth, and a unique story to your furniture, transforming it into a cherished item with a timeless appeal.
- Easy to Use and Forgiving: Unlike painting, which often requires meticulous preparation and precise application, applying white wax is remarkably simple and forgiving. It doesn’t demand specialized skills or extensive experience, making it an ideal project for beginners. The application process is straightforward, and minor imperfections can often be blended or corrected, reducing the stress associated with furniture refinishing.
- Provides a Protective Layer: Beyond its aesthetic benefits, white wax also serves a practical purpose: it provides a protective layer for your furniture. Once applied and cured, the wax acts as a barrier, helping to shield the wood surface from everyday wear and tear, including dust, dirt, moisture, and minor scratches. This protective coating not only helps preserve the beauty of your newly finished piece but also extends its lifespan.
- Versatile and Customizable: White wax offers significant versatility. The intensity of the white effect can be customized by how much wax you apply and how thoroughly you wipe it off. A subtle application provides a hint of white, while multiple layers can achieve a more opaque, whitewashed finish. This adaptability allows you to tailor the look precisely to your desired aesthetic.
Before vs. After: Witnessing the White Wax Transformation
1. The Before: How Furniture Looks Before Applying White Wax
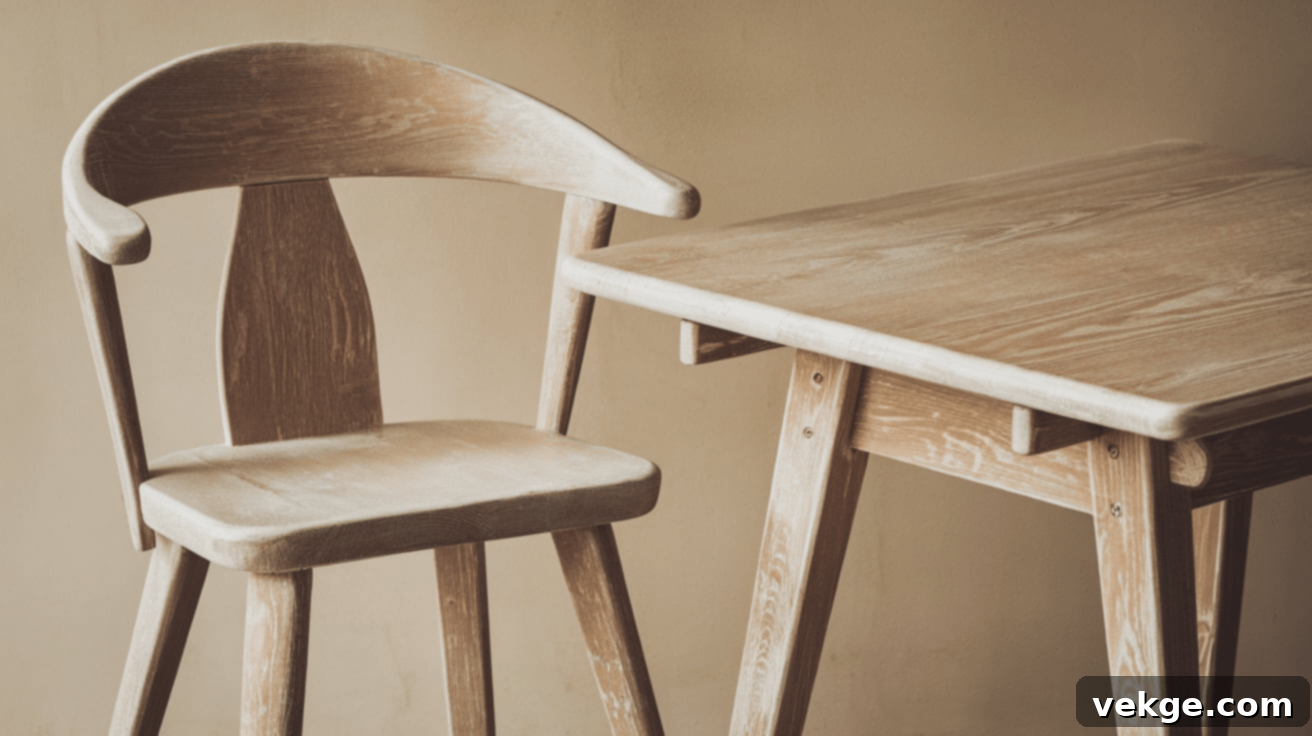
Before the application of white wax, many pieces of furniture often present as dull, heavy, and somewhat lifeless. If your furniture is crafted from darker wood species, it might contribute to a room feeling weighty and less bright, lacking that vibrant, inviting quality. The natural beauty of the wood grain, while present, may not truly stand out, remaining subdued and unappreciated.
Furthermore, older pieces might bear the marks of time and use: unsightly scuff marks, superficial scratches, or an uneven, perhaps discolored, finish. The surface could appear flat, tired, or decidedly outdated, struggling to harmonize with contemporary decor trends. Some furniture might even exhibit a rough texture or visible wear and tear accumulated over years of diligent service. Without any protective coating, the wood often feels exposed, vulnerable to accumulating dirt, absorbing moisture, and further damage.
In essence, the “before” state of furniture often signals a need for rejuvenation. It looks like a piece with potential, waiting for a touch of care and enhancement to unlock its hidden radiance and make it shine once again, transitioning from merely functional to truly captivating.
2. The After: How Furniture Looks After Applying White Wax
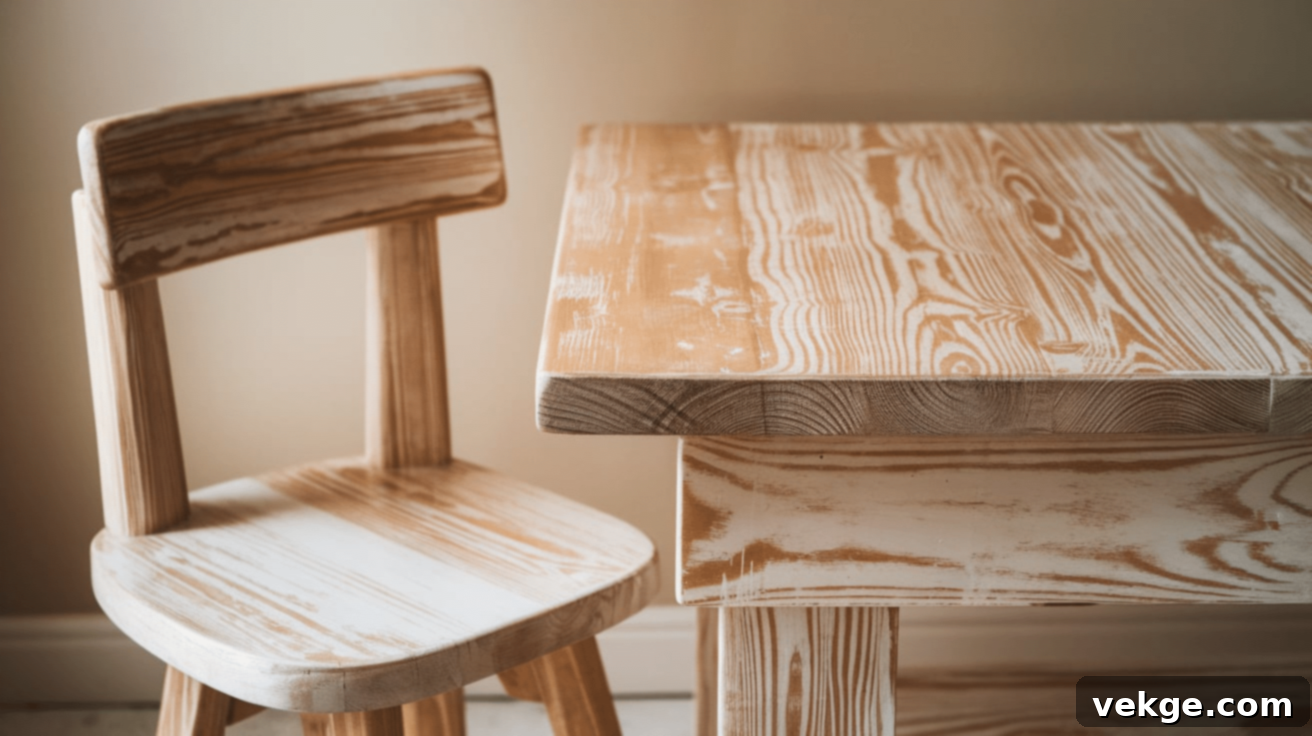
After the application of white wax, your furniture undergoes a remarkable and often astonishing transformation! The wood takes on a significantly lighter appearance, bathed in a soft, subtle, and beautifully textured finish that dramatically highlights its natural grain. The white pigments nestle into the wood’s pores, creating a striking contrast that emphasizes every curve and swirl of the grain, giving the piece character and depth it never had before.
The wax imparts a refined, polished look to the surface, yet it’s far from being overly shiny or artificial. Instead, it typically achieves a smooth, almost velvety feel, inviting touch and adding to the piece’s inherent charm. White wax is also adept at camouflaging minor imperfections; it can soften the appearance of small scratches, blend uneven tones, and generally give the furniture a refreshed, almost new, yet still authentically aged, lease on life.
Crucially, the white wax also adds a vital protective layer that helps keep the surface clean and safe from future damage, making it more durable for everyday use. Overall, after being treated with white wax, your furniture will exude a beautiful, vintage-inspired elegance, feeling bright, airy, and effortlessly stylish – a true testament to the power of a simple, yet effective, finishing technique.
How to Apply White Wax: A Step-by-Step Guide for Stunning Results
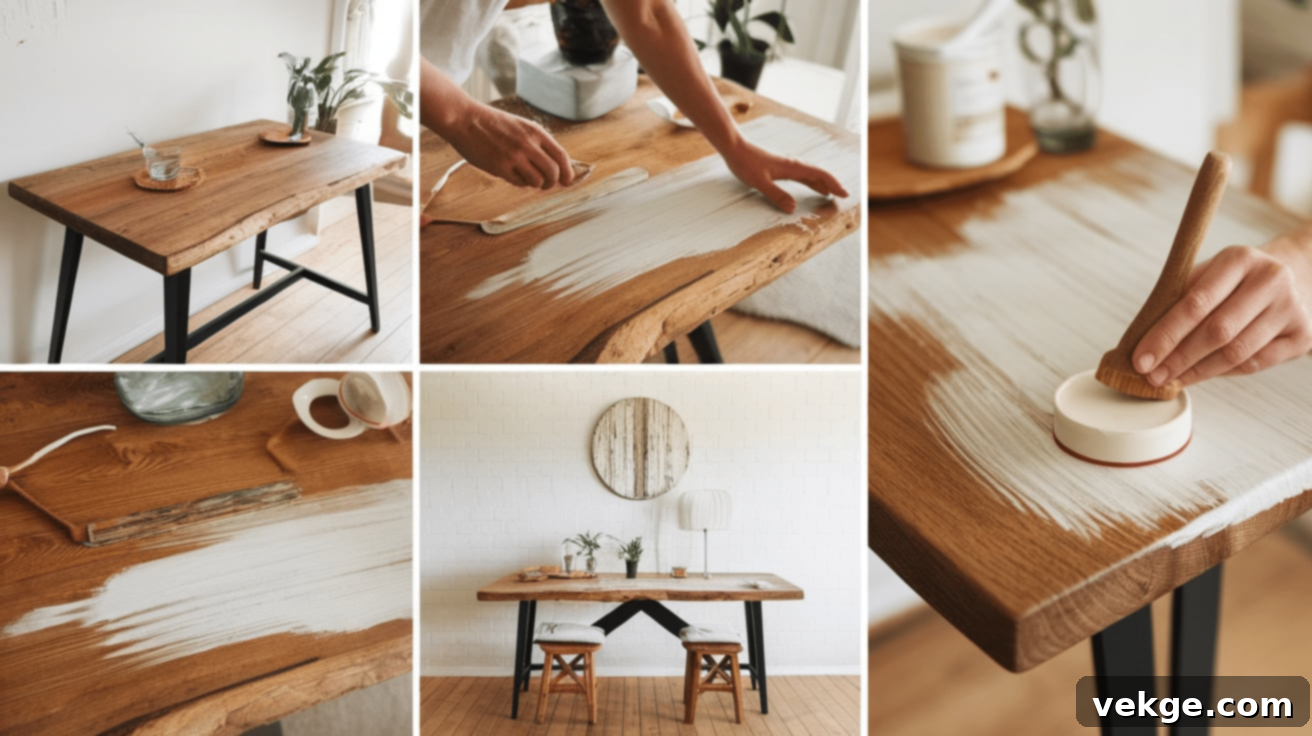
Applying white wax to your furniture is a straightforward process that can yield dramatic and beautiful results. Whether you’re a seasoned DIYer or a complete beginner, this easy-to-follow guide will walk you through each step to help you achieve that perfect vintage-inspired look.
Step 1: Gather Your Supplies
Before you begin, ensure you have all the necessary materials on hand. Quality supplies can make a difference in the final outcome.
- White Wax: Choose a reputable brand of white wax or liming wax.
- Applicator: A soft, lint-free cloth (like an old T-shirt or microfiber cloth) or a dedicated wax brush (round, stiff-bristled brushes are excellent for working wax into grain).
- Buffing Cloths: Several clean, soft, lint-free cloths for wiping off excess and buffing. Have more than you think you’ll need.
- Sandpaper (Optional but Recommended): Fine-grit (220-320) for light sanding during prep.
- Cleaner/Degreaser: A mild wood cleaner or diluted TSP substitute for thorough cleaning.
- Gloves: To protect your hands.
- Drop Cloth or Tarp: To protect your workspace.
Step 2: Prep Your Furniture for Success
Proper preparation is key to a smooth and lasting finish. Start by thoroughly cleaning the piece of furniture you intend to wax. Use a good wood cleaner or a mild degreaser to remove all traces of dirt, grime, oil, and old polishes. After cleaning, wipe it down with a clean, damp cloth and allow it to dry completely.
If the furniture has an existing finish that is peeling, chipped, or very glossy, a light sanding with fine-grit sandpaper (220-320 grit) will help the wax adhere better. You don’t need to sand down to raw wood unless there are significant imperfections you want to remove. The goal is just to create a slightly “toothed” surface for the wax to grip. Once sanded, wipe away any dust with a tack cloth or a damp, lint-free cloth, ensuring the surface is perfectly clean and dry before moving on.
Step 3: Apply the White Wax Evenly
Now it’s time for the star of the show! Open your can of white wax. Using either your wax brush or a soft cloth, pick up a small amount of wax. Remember, a little goes a long way. If using a brush, dip it lightly and wipe off any excess on the rim of the can. If using a cloth, wrap it around your finger and dab into the wax.
Apply the wax to the wood in small, manageable sections. Work in the direction of the wood grain, using long, smooth, even strokes. The goal is to spread a thin, consistent layer over the entire surface. Ensure you cover every area, working the wax into the grain, but be careful not to over-apply or build up thick patches of wax. You want to push the wax into the wood rather than just letting it sit on top.
Step 4: Blend and Wipe Off the Excess
Immediately after applying the wax to a section, take a fresh, clean, soft cloth and gently wipe off the excess wax. This is a crucial step for achieving the desired effect. The more thoroughly you wipe, the lighter and more subtle the white finish will be. If you desire a more opaque or pronounced whitewashed look, you can leave a little more wax, but always ensure it is evenly distributed and blended.
Continue wiping and blending until you are happy with the amount of white tint and the finish appears even, without streaks or thick residue. This process allows the white pigment to settle beautifully into the wood grain while the excess wax is removed from the surface. For areas where you want less white, you can even use a small amount of clear wax on your cloth to “pull back” some of the white wax.
Step 5: Buff the Surface for Sheen and Protection
Once you’ve applied and wiped off the wax to your satisfaction, allow it to dry for approximately 15-20 minutes. This allows the solvents in the wax to evaporate slightly. After this short drying time, grab another clean, dry, lint-free cloth and begin to gently buff the surface.
Buffing is essential as it works the wax deeper into the wood, smooths out any minor inconsistencies, and activates the wax to create a soft, lustrous sheen. Use circular motions with light to medium pressure. You’ll notice the wood developing a pleasant, subtle glow and a smooth, almost polished feel. This step also helps to harden the wax, enhancing its protective qualities.
Step 6: Allow Full Curing Time
While the surface may feel dry to the touch after buffing, the wax needs more time to fully cure and harden. Allow your furniture piece to dry and cure in a well-ventilated area for at least 24 hours, or even up to 72 hours for optimal durability. During this curing period, avoid placing heavy objects on the furniture or exposing it to moisture.
The longer the wax cures, the more durable and protective the finish will become. Patience during this final stage will ensure your white wax finish lasts and continues to look beautiful.
Step 7: Add Extra Coats (Optional)
If, after the first coat has cured, you feel that you need more coverage, a more intense whitewashed effect, or enhanced protection, you can certainly apply additional layers of white wax. Simply repeat the entire process: apply a thin layer, wipe off the excess, and buff.
You can build up as many layers as you deem necessary to achieve your desired aesthetic, but always remember to allow each layer to dry and lightly buff it before applying the next for the best adhesion and appearance. Building thin layers is always preferable to one thick coat.
With these simple, detailed steps, your furniture will boast a smooth, protected, and beautifully aged finish that will stand the test of time. White wax is truly an accessible and affordable way to revitalize any wooden piece, imbuing it with a fresh, vintage-inspired look that enhances your home’s character.
Perfect Furniture Pieces to Transform with White Wax
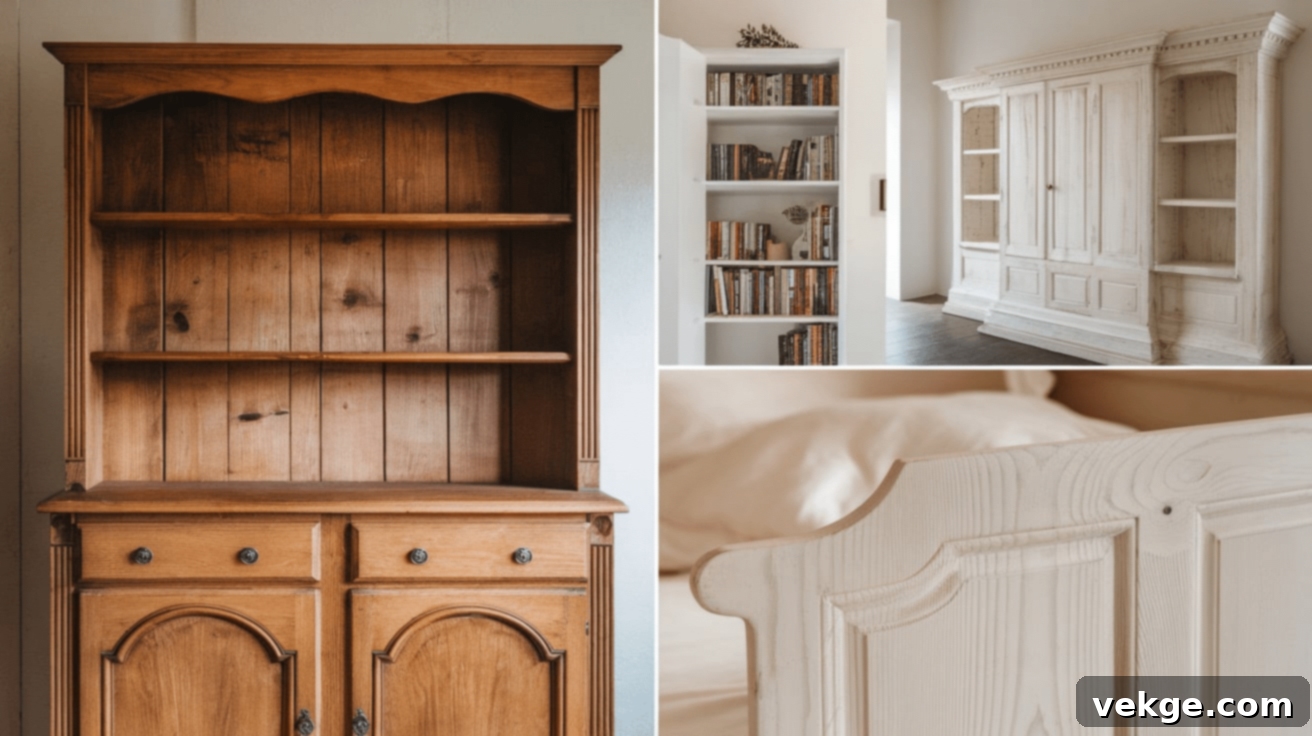
White wax is remarkably versatile and can be used on a wide array of wooden furniture and surfaces throughout your home, instantly creating a soft, inviting, and effortlessly chic finish. Here are some of the prime candidates for a stunning white wax makeover:
- Dining Tables: A dark or plain dining table can often feel heavy and dominant in a room. Applying white wax can transform it into a lighter, more inviting centerpiece, imparting a rustic farmhouse or coastal cottage look that encourages family gatherings and lively conversations. It brightens the entire dining area.
- Coffee Tables: Elevate your living room’s aesthetic by giving your coffee table a beautiful vintage touch. A white wax finish will make the wood grain pop, adding character and warmth. It’s perfect for creating a cozy, relaxed atmosphere, making your coffee table a true focal point.
- Chairs and Stools: Wooden chairs or stools, whether dining chairs, accent chairs, or bar stools, can be dramatically brightened and given a charming, cozy, and inviting vibe with white wax. This is especially effective for mixing and matching chairs or updating an older set.
- Cabinets and Dressers: White wax works exceptionally well on kitchen cabinets, bathroom vanities, or bedroom dressers. It helps these essential storage pieces look stylish and refined while still allowing the natural beauty and texture of the wood to shine through. It’s an excellent alternative to painting for a softer look.
- Shelves and Bookcases: For open shelving units or grand bookcases, white wax can significantly lighten up the wood, making the pieces feel less imposing and more integrated into a bright space. It imparts a timeless, airy look that beautifully complements displayed items, whether they are books, decor, or plants.
- Wooden Accents and Decor: Don’t limit white wax to large furniture! It’s perfect for smaller wooden decorative items like picture frames, serving trays, wooden signs, candlesticks, or even salvaged architectural pieces. These smaller projects are great for beginners to practice on and can quickly add cohesive vintage charm throughout your home.
- Nightstands: A pair of nightstands can be unified and brightened with white wax, creating a serene and cohesive look in the bedroom. This can transform a tired set into a chic, modern farmhouse statement.
- Console Tables and Entryway Pieces: These often-overlooked pieces can become welcoming statements. White wax can lighten an entryway console, making the first impression of your home feel fresh and inviting.
Essentially, white wax is your go-to solution whenever you wish to lighten, enhance, and infuse wood with a unique, aged character. It’s an incredibly versatile product that allows you to customize the look of virtually any wooden item, making your furniture truly one-of-a-kind and reflective of your personal style!
Common Mistakes to Avoid When Using White Wax for Best Results
While applying white wax is relatively simple, being aware of common pitfalls can save you time, effort, and ensure a flawless finish. Avoid these mistakes for optimal results:
- Using Too Much Wax: This is perhaps the most common mistake. A little white wax goes a very long way. Over-applying can lead to a thick, greasy, or sticky finish that is difficult to buff and blend. It can also result in an uneven, blotchy appearance. Always start with a small amount and build up if needed.
- Not Wiping Off the Excess Thoroughly: After applying, it’s crucial to diligently wipe off any excess wax with a clean, lint-free cloth. If too much wax is left on the surface, it won’t cure properly, leaving a tacky, uneven, or cloudy finish that can attract dust and grime over time. Wiping ensures the white pigment settles only where desired and the surface remains smooth.
- Not Letting It Dry (Cure) Properly: Patience is key in waxing. Many DIYers touch or use their furniture before the wax has had adequate time to dry and cure. While it might feel dry to the touch quickly, the wax needs 24-72 hours to fully harden. Rushing this step can lead to smudges, fingerprints, or a less durable finish that easily scratches or peels.
- Skipping the Prep Work: Neglecting to properly clean and, if necessary, lightly sand the wood before applying wax is a recipe for disaster. Dirt, grease, or an overly slick surface will prevent the wax from adhering correctly, resulting in an uneven, patchy finish that won’t last. Always start with a clean, dry, and lightly prepared surface.
- Not Testing First: Before committing to an entire piece, always test the white wax on an inconspicuous area (like the back or underside) or a scrap piece of the same wood. This allows you to assess the color, the intensity of the white effect, and the overall look, ensuring you’re happy with the outcome before tackling the main project.
- Ignoring Ventilation: Wax products often contain VOCs (Volatile Organic Compounds) that can be irritating or harmful if inhaled in large quantities. Always work in a well-ventilated area, preferably outdoors or with windows open, to ensure proper airflow and safety.
- Using the Wrong Applicator or Cloth: Using a cloth that sheds lint or an overly stiff brush not designed for waxing can leave fibers or streaks in your finish. Invest in a good quality wax brush or soft, lint-free cloths for the best application and buffing results.
- Not Working in Sections: Applying wax to an entire large piece at once can make it difficult to wipe off the excess evenly before it starts to dry. Work in small, manageable sections, applying and wiping within that section before moving to the next.
By keeping these common mistakes in mind and taking your time with each step, you can confidently achieve a professional-looking, durable, and beautiful white wax finish on all your furniture projects.
Conclusion: Embrace the Elegance of White Wax
In conclusion, utilizing white wax is a wonderfully accessible and affordable method to completely refresh and update the look of your wooden furniture. Whether your goal is to transform an antique table into a modern farmhouse centerpiece or to simply give a brand-new piece a soft, inviting vintage feel, white wax excels at enhancing the wood’s natural beauty while simultaneously adding a crucial protective layer.
By diligently following the straightforward application steps outlined in this guide, carefully avoiding the common mistakes that can hinder success, and dedicating a little patience to the process, you can effortlessly achieve a professional-looking finish that will garner compliments and elevate your living space. Don’t hesitate to experiment with different application techniques and have fun with the creative process; the versatility of white wax allows for a wide range of personalized looks.
Your newly waxed furniture will not only boast an enhanced aesthetic appeal but will also benefit from increased durability, ensuring it lasts and continues to bring joy for many years to come. Upgrading your space with the charming, character-rich finish of white wax is truly much easier and more rewarding than you might initially think!
Frequently Asked Questions About White Wax for Furniture
Is white wax hard to apply for beginners?
No, white wax is surprisingly easy to apply, even for beginners. With a soft cloth or a dedicated wax brush and a little practice, you can achieve excellent results. Its forgiving nature allows for adjustments during application.
How do I know if my furniture is ready for white wax?
Your furniture is ready for white wax when its surface is thoroughly clean, completely dry, and ideally, lightly sanded with fine-grit sandpaper (220-320 grit) to create a slight ‘tooth’ for the wax to adhere to. This ensures the best adhesion and an even finish.
Can I reapply white wax or add more layers?
Yes, absolutely! You can add multiple layers of white wax to achieve a stronger, more opaque white finish or to build up protection. Just ensure each layer is applied thinly, wiped off, and allowed to dry slightly before adding the next coat.
How do I clean furniture with white wax on it?
To clean furniture finished with white wax, use a soft, damp cloth to gently wipe it down. Avoid harsh chemical cleaners, abrasive scrubbers, or excessive moisture, as these can strip or damage the wax layer. For more stubborn marks, a very mild soap solution can be used sparingly, followed by a dry cloth.
Does white wax make the wood shine?
Yes, after proper buffing, white wax gives the wood a soft, smooth, and natural sheen. It’s not a high-gloss, reflective shine like varnish, but rather a more subtle, velvety luster that enhances the wood’s character without appearing overly artificial.
How long does a white wax finish typically last?
The durability of a white wax finish depends on the usage of the furniture. On high-traffic pieces like dining tables, it might need reapplication every 6-12 months. On decorative or less-used items, it can last for several years. Regular gentle cleaning also helps prolong its life.
Can white wax be applied over paint or other finishes?
Yes, white wax can often be applied over other finishes, especially chalk paint or milk paint, to add an antique or distressed look. If applying over a glossy finish, it’s recommended to lightly sand the surface first to create some ‘tooth’ for the wax to adhere to. Always test on an inconspicuous area first.
What’s the difference between white wax and liming wax?
White wax and liming wax are often used interchangeably, as they both aim to achieve a similar whitewashed, grain-enhancing effect on wood. Liming wax specifically refers to the traditional process of applying a white, lime-based paste (or wax) to oak to highlight its prominent grain. Modern “white waxes” are typically pigment-based waxes that achieve a similar result on various wood types, so for practical purposes, they function very similarly.
How do I remove white wax if I don’t like the look?
White wax can usually be removed with mineral spirits or a dedicated wax remover. Apply the solvent to a clean cloth and gently rub the waxed surface. You might need to repeat this process and potentially do some light sanding to fully remove the wax and prepare the surface for a new finish.
