Transform Your Kitchen: Creative DIY Decor Ideas with Loctite Adhesives
The kitchen often holds the esteemed title of the heart of your home – a vibrant hub where families gather, friends share laughter, delicious meals are prepared, and countless cherished memories are forged. Beyond its fundamental functionality, a well-designed kitchen also stands as a reflection of your personal style and taste, offering an inviting and aesthetically pleasing environment. Whether you’re embarking on a full-scale kitchen renovation or simply seeking to inject new life into its existing decor, high-quality adhesive products can be your ultimate secret weapon for achieving professional-looking results with DIY ease. This is precisely where Loctite adhesives shine, offering unparalleled reliability and versatility to transform your creative visions into durable and beautiful realities.
Loctite, a name synonymous with strength and performance in the world of adhesives, empowers homeowners and DIY enthusiasts alike to tackle a myriad of projects. Their extensive range of products is designed to bond a vast array of materials securely and effectively, making intricate decor updates accessible to everyone. From simple cosmetic enhancements to more ambitious structural changes, Loctite provides the robust foundation your projects need to stand the test of time. Let’s explore some innovative and creative kitchen decor ideas that you can effortlessly bring to life using the trusted power of Loctite products.
1. Create a Custom Backsplash with Tile Adhesive

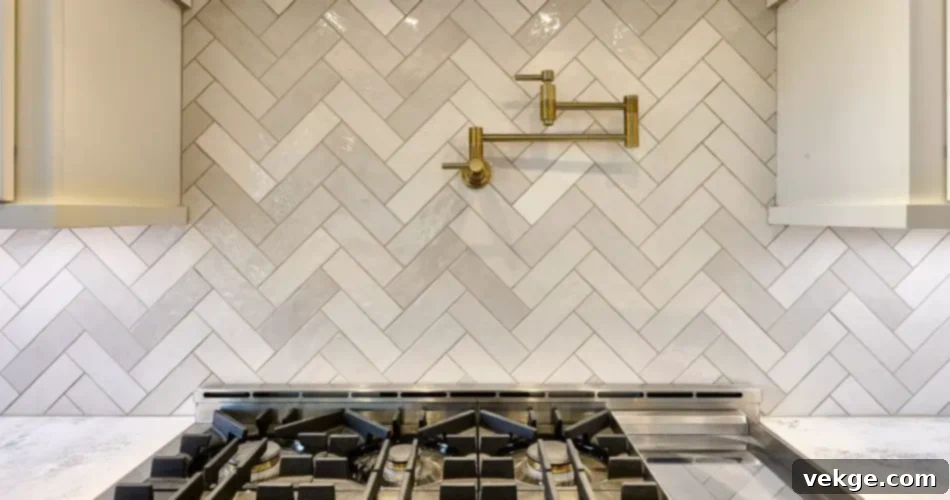
A distinctive and visually appealing backsplash has the power to dramatically elevate the entire aesthetic of your kitchen. It not only serves as a protective barrier against splashes and spills but also acts as a significant focal point that can tie your kitchen’s design elements together. Whether your preference leans towards the sleek lines of modern subway tiles, the timeless elegance of classic mosaic designs, or the vibrant energy of colorful patterned ceramics, installing your own custom backsplash has never been simpler, especially with the right adhesive. Loctite PL Premium Polyurethane Construction Adhesive is an excellent choice for this task. Renowned for its exceptional bonding capabilities, it adheres strongly to a wide range of surfaces, including ceramic, porcelain, glass tiles, and even stone, making it perfectly suited for creating a durable and stunning kitchen backsplash.
How to Install Your Custom Tile Backsplash:
- Select Your Tiles: Begin by choosing tiles that perfectly complement your kitchen’s existing theme, color scheme, and overall style. Consider size, texture, and pattern for the desired impact.
- Prepare the Surface: Thoroughly clean the wall surface where the backsplash will be installed. Ensure it is dry, free from grease, dust, and any loose paint. A smooth, clean surface is crucial for optimal adhesion.
- Apply Adhesive: Apply Loctite PL Premium adhesive in a zigzag pattern or a few dots to the back of each tile. Avoid applying too much adhesive, as it can squeeze out excessively. Firmly press each tile onto the wall, ensuring even contact.
- Use Spacers and Grout: Utilize tile spacers to maintain consistent and even grout lines between tiles. This step is vital for a professional finish. Once all tiles are in place and the adhesive has fully cured (refer to product instructions for curing times), remove the spacers and apply grout to fill the spaces between the tiles. Wipe away any excess grout immediately.
This DIY project is a remarkably simple yet highly effective way to infuse your kitchen with a personalized touch while providing essential protection for your walls, ensuring longevity and easy maintenance.
2. Install Stylish and Functional DIY Floating Shelves
Floating shelves are more than just practical storage solutions; they are elegant design features that can significantly enhance the visual appeal of your kitchen. They offer an ideal platform to beautifully display your cherished cookbooks, vibrant potted plants, unique decorative items, or even your favorite coffee mugs, all while maintaining a clean, minimalist, and modern aesthetic. For this popular kitchen upgrade, Loctite Power Grab Express Construction Adhesive is an outstanding choice, thanks to its impressive instant grab capability and superior bonding strength, allowing for immediate holding power and long-lasting durability.
Steps to Create Your Own Floating Shelves:
- Choose Your Shelf Material: Acquire sturdy wooden boards, opting for new timber for a sleek look or reclaimed wood for an inviting rustic charm. You might also consider laminates or composite materials.
- Measure and Mark: Carefully measure and mark the precise locations on the wall where you intend to install your shelves. Use a level to ensure perfect horizontal alignment for a professional appearance.
- Attach Brackets with Adhesive: Apply Loctite Power Grab Express to the back of your chosen shelf brackets. Firmly press the brackets onto the marked wall positions. The instant grab feature will hold them in place within minutes, allowing you to quickly move to the next step. Ensure the brackets are level before the adhesive fully sets. For heavier loads, it is advisable to also use screws in conjunction with the adhesive where possible, especially into wall studs.
- Secure the Boards: Once the adhesive has sufficiently set and the brackets are stable, secure your chosen wooden boards onto the installed brackets. Allow the entire assembly to cure overnight to achieve maximum strength and stability before placing items on the shelves.
These custom floating shelves will not only provide valuable additional storage but also double as an artistic display, offering a wonderful opportunity to showcase your personality and unique style within your culinary space.
3. Add Stylish Countertop Edges for a Polished Look
If a full kitchen countertop replacement isn’t in your immediate plans, but you’re still eager to refresh their appearance, adding decorative trim to the edges of your existing countertops can be a game-changer. This simple yet effective upgrade can instantly impart a more polished, upscale, and custom-designed feel to your kitchen, giving the illusion of a much more expensive renovation. For this particular project, Loctite PL Premium MAX Construction Adhesive proves incredibly useful. Formulated for heavy-duty use, it creates incredibly strong bonds across a diverse range of materials including wood, metal, laminate, and various plastics, ensuring your trim stays perfectly in place.
Revamp Your Countertops with Decorative Trim:
- Select Your Trim: Purchase a decorative trim or molding that beautifully complements the material and color scheme of your current countertops. Options range from simple wood strips to more elaborate profiles or even metal accents.
- Measure and Cut: Accurately measure the lengths of your countertop edges. Carefully cut the trim pieces to fit these dimensions, paying special attention to mitered corners for a seamless look.
- Apply Loctite PL Premium MAX: Apply a continuous bead of Loctite PL Premium MAX to the back surface of the trim. Position the trim carefully onto the edge of the countertop and press it firmly into place along its entire length.
- Cure and Clean: Wipe away any excess adhesive immediately with a damp cloth or appropriate solvent, ensuring a clean finish. Allow the adhesive to cure fully according to the product’s instructions, which may involve clamping the trim in place for the initial setting period to ensure optimal adhesion.
This quick and cost-effective upgrade can truly give your kitchen a custom-designed appearance, significantly elevating its overall style and perceived value without the extensive time and expense of a complete overhaul.
4. Design Custom Kitchen Cabinet Hardware

One of the quickest and most impactful ways to update your kitchen’s look without committing to a full-scale renovation is by simply swapping out old, outdated cabinet handles and knobs. To achieve an even more distinctive and personalized aesthetic, consider embarking on a DIY project to create your own unique cabinet hardware. This allows for unparalleled customization using materials like natural wood, elegant stone, vibrant ceramics, or even resin. Loctite Super Glue (such as Loctite 495 Instant Adhesive) is the perfect solution for securely bonding these diverse materials to standard metal backplates or knob bases, granting you the creative freedom to craft custom hardware that flawlessly aligns with your specific design vision.
Steps to Craft Your Own Cabinet Hardware:
- Gather Materials: Purchase blank cabinet knobs or handle bases (often available online or at hardware stores) and select the material you wish to use for the decorative front – think small polished stones, decorative ceramic pieces, shaped wood, or even acrylic elements.
- Design and Shape: Prepare your chosen materials. This might involve shaping small pieces of wood, painting ceramic tiles, or sanding stone. Ensure the back surface of your custom element is flat for optimal adhesion.
- Apply Loctite Super Glue: Apply a small, precise amount of Loctite Super Glue to the back of your custom material. Its rapid-setting formula is ideal for quick and strong bonds.
- Attach and Install: Carefully press the custom element firmly onto the knob or handle base. Hold it in place for a few seconds until the glue sets. Allow the glue to fully cure as per product instructions before installing the newly customized knobs or handles onto your kitchen cabinets.
This seemingly minor change can dramatically transform the overall look and feel of your kitchen, adding a bespoke, high-end element that you simply won’t find replicated in any mass-produced store.
5. Personalize Your Kitchen Walls with Easy-to-Hang Art
Infusing your kitchen walls with personal touches is an excellent way to create a warm, inviting, and truly homely atmosphere. Whether your vision involves a charming gallery of cherished family photographs, elegantly framed favorite recipes, uplifting motivational quotes, or even children’s artwork, hanging lightweight items securely without causing damage to your walls is a key concern. Loctite Fun-Tak Mounting Putty emerges as the perfect, versatile, and damage-free solution for precisely this purpose, offering flexibility and ease of use.
Damage-Free Wall Art Installation:
- Collect Your Art: Gather your chosen frames, photos, printed recipes, or any other lightweight art pieces you wish to display. Ensure they are clean and ready to hang.
- Prepare the Putty: Roll small, pea-sized amounts of Loctite Fun-Tak Mounting Putty between your fingers to warm it up and make it more pliable.
- Apply to Frames: Apply a small ball of putty to each of the four corners (and perhaps the middle of longer sides) on the back of each frame or art piece. Press firmly to ensure good adhesion to the frame.
- Mount to Wall: Press the frames firmly onto the wall surface where you wish them to hang. The putty allows for easy repositioning and adjustment if needed to get your arrangement just right.
This innovative method is particularly ideal if you value flexibility in your decor, as the putty is easily removable, repositionable, and, crucially, will not leave behind any sticky residue or damage your walls, making it perfect for renters or those who love to frequently refresh their space.
6. Create a Functional Chalkboard Paint Message Center
Bring both fun and functionality into your kitchen with a DIY message center created using chalkboard paint and a custom frame, securely assembled with Loctite PL Premium MAX Construction Adhesive. This project offers an excellent, interactive way to keep track of essential grocery lists, plan weekly meal schedules, jot down important family reminders, or even leave playful notes, all while adding a unique and engaging element to your kitchen’s decor.
Build Your Own Chalkboard Message Center:
- Choose Your Surface: Decide on the ideal location for your chalkboard. This could be a designated section of a kitchen wall, the inside of a pantry door, or even repurposing an old picture frame with a solid backing.
- Apply Chalkboard Paint: Prepare your chosen surface by cleaning it thoroughly. Apply several thin, even coats of chalkboard paint, allowing adequate drying time between each coat, according to the paint manufacturer’s instructions. This ensures a durable and smooth writing surface.
- Construct and Attach Frame: If desired, cut pieces of decorative molding or trim to create a custom frame around your freshly painted chalkboard area. Apply Loctite PL Premium MAX Construction Adhesive to the back of the trim pieces and firmly press them into place around the chalkboard.
- Cure and Enjoy: Allow the adhesive to cure completely. If your chalkboard is on a separate board, hang it securely in your kitchen using appropriate wall anchors. Stock it with colorful chalk and an eraser, and immediately begin enjoying your new, interactive message center!
This project combines practicality with playful aesthetics, providing a central communication hub that enhances your kitchen’s appeal and organization.
7. Enhance Ambiance with Under-Cabinet LED Lighting Installation
Excellent lighting is an undeniable essential in any functional kitchen, significantly impacting both usability and atmosphere. To introduce an immediate sense of upscale elegance, improve task visibility, and create a warm ambiance, installing under-cabinet LED lighting is an exceptional and highly sought-after solution. Loctite Power Grab All Purpose Construction Adhesive is the perfect partner for this upgrade, ensuring that your LED lighting strips are securely and discreetly attached beneath your cabinets, providing reliable illumination for years to come.
Steps for Under-Cabinet Lighting:
- Select LED Strips: Purchase LED lighting strips that are specifically designed for under-cabinet use and are compatible with your kitchen’s power supply. Consider warm white for a cozy feel or cool white for a brighter, modern look.
- Clean Cabinet Underside: Thoroughly clean the underside of your cabinets where the lights will be installed. Remove any grease, dust, or debris to ensure optimal adhesion. A clean, dry surface is critical.
- Apply Loctite Power Grab: Apply a continuous, thin bead of Loctite Power Grab All Purpose Construction Adhesive along the back of the LED lighting strips.
- Attach and Secure: Firmly press the lighting strips into place under the cabinets. The instant grab feature will help hold them securely while the adhesive cures. Ensure the strips are straight and evenly spaced for a professional appearance. Connect the wiring as per the manufacturer’s instructions (consider consulting an electrician for complex wiring if you are not comfortable with electrical work).
This relatively small upgrade can yield a remarkably significant difference, dramatically enhancing both the visual appeal and the practical functionality of your kitchen, making it brighter, more inviting, and highly efficient for all your culinary tasks.
Conclusion
Embracing the power and versatility of Loctite adhesives truly unlocks a vast world of creative possibilities for enhancing your kitchen decor. From undertaking minor cosmetic accents like crafting custom cabinet hardware to embarking on more ambitious and impactful projects such as installing a stunning new tile backsplash or elegant floating shelves, Loctite products stand as your reliable partner. They consistently ensure that your dedicated DIY efforts are not only durable and easy to execute but also beautifully finished, delivering results that look professionally done and stand the test of time.
The beauty of using Loctite lies in the confidence it provides. You can trust that your creations will remain firmly in place, resisting the daily wear and tear of a busy kitchen environment. Their range of specialized adhesives caters to various materials and project needs, simplifying complex tasks and making home improvement accessible to everyone. So, gather your chosen Loctite adhesive, unleash your inner creativity, and confidently begin transforming your kitchen into the stylish, highly functional, and deeply personalized space you’ve always envisioned. Your dream kitchen is just a tube of Loctite away!
