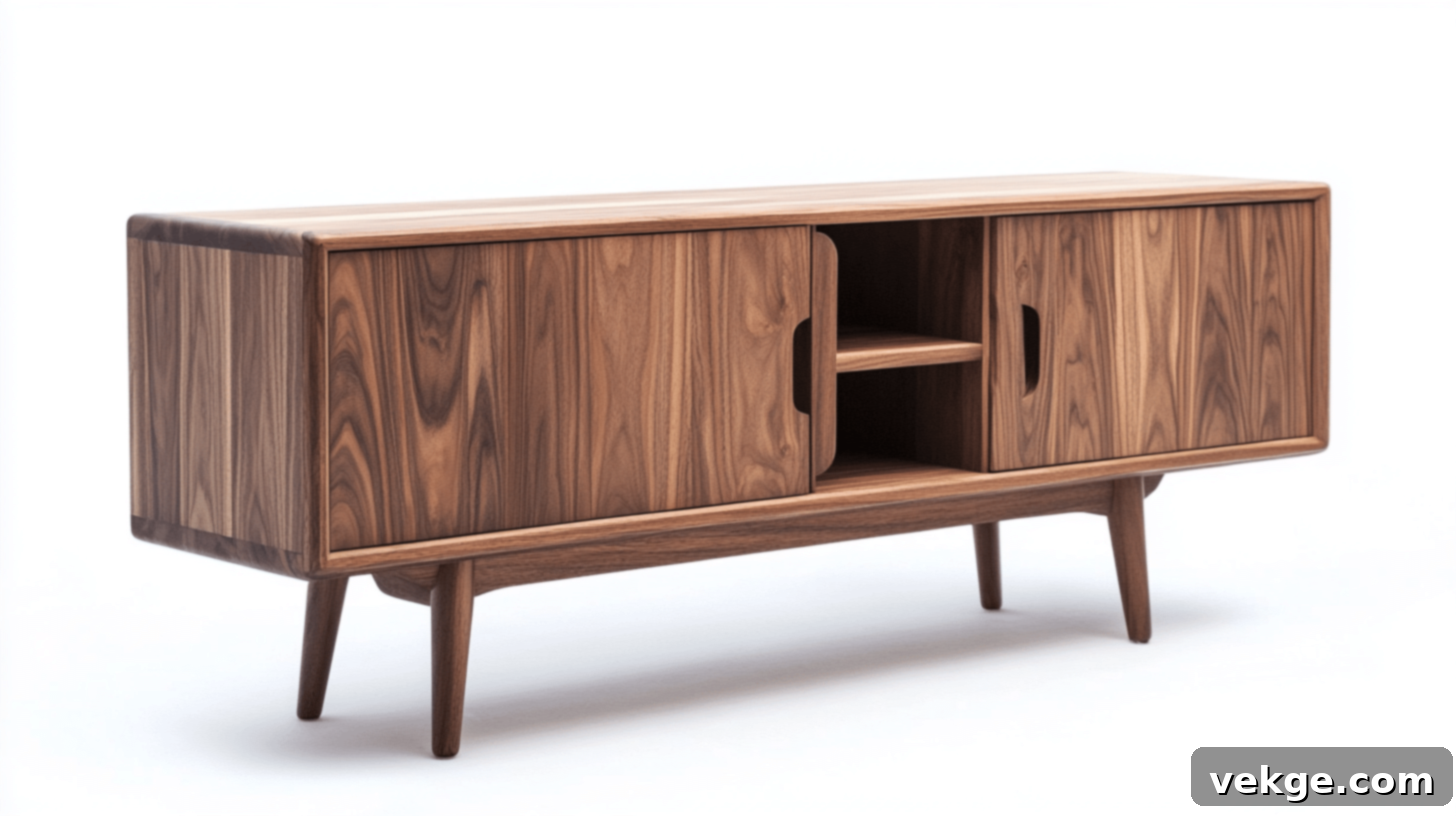
Build Your Dream DIY Sideboard: The Ultimate Step-by-Step Guide for Custom Home Storage
Ever dreamed of a furniture piece that fits your space, style, and storage needs absolutely perfectly? A custom DIY sideboard is not just a project; it’s an opportunity to bring that vision to life. Last year, I embarked on building my first sideboard, and the transformation it brought to my dining room storage was remarkable. It wasn’t just about utility; it added a personal touch and a sense of accomplishment that store-bought furniture simply can’t provide.
Building your own sideboard grants you complete creative control. You get to handpick the exact dimensions to complement your room, define the aesthetic that matches your home decor, and design the internal storage to suit your specific items. Beyond the customizability, a significant advantage is the cost savings. Crafting a piece yourself often costs a fraction of what you’d pay for a comparable item in a retail store, allowing you to invest in higher-quality materials or allocate savings to other home improvement projects.
If you’re new to woodworking, don’t let that deter you. This comprehensive guide is meticulously designed to walk you through every phase, ensuring you can create a sturdy, functional, and visually appealing piece. I’ll share invaluable insights gleaned from building multiple DIY sideboards, including practical tips that streamline the process, prevent common mistakes, and elevate the final result to a professional standard. This isn’t just a how-to; it’s a mentorship from my workshop to yours, empowering you with the knowledge to tackle this rewarding project.
Are you ready to transform raw materials into a custom masterpiece? Let’s delve into everything you need to know. From selecting your initial design concepts and gathering materials to applying the final finishing touches, you’ll acquire the skills and confidence to build a DIY sideboard that not only serves its purpose but also looks like it was meticulously crafted by a high-end furniture designer. Prepare to impress yourself and your guests with a truly unique addition to your home.
Why Embark on a DIY Sideboard Project? The Undeniable Benefits
My journey into building my first DIY sideboard last year was an eye-opener – truly worth every ounce of effort and every minute spent. Many people often ask me if making their own furniture, especially a piece as substantial as a sideboard, genuinely makes sense. From my experience, the answer is a resounding yes, particularly when you consider what you value most in your home furnishings: cost, customization, and enduring quality.
Cost Comparison: DIY vs. Buying a Store-Bought Sideboard
The price tag on store-bought sideboards can be a significant barrier for many homeowners. A basic, mass-produced model might set you back around $500, while more aesthetically pleasing or higher-quality pieces can easily climb to $2,000 or even more. These costs often reflect brand markup, shipping, and retail overhead, not necessarily superior material quality or craftsmanship.
In stark contrast, constructing a DIY sideboard typically involves a material investment ranging between $200 and $400. This estimate usually covers the core components:
- Wood: The primary material, such as plywood or solid lumber, often costs between $100-$150, depending on your choice and local prices. Opting for premium wood can slightly increase this, but still often remains below retail prices.
- Hardware: Essential items like hinges, drawer slides (if applicable), and decorative pulls or knobs generally fall into the $30-$50 range.
- Finishing Materials: Paint, stain, primer, wood filler, and sandpaper can add $40-$60 to your budget, providing the aesthetic and protective layers.
- Tools (Initial Investment): If you’re new to woodworking and need to purchase fundamental tools like a drill, saw, or sander, expect to allocate an additional $50-$100. However, these are one-time investments that will serve you for countless future projects.
The financial savings are considerable, often allowing you to either pocket the difference or reallocate it towards upgrading to superior materials or tackling another home improvement project. Furthermore, the ability to control the quality of each component that goes into your custom DIY sideboard ensures a robust and long-lasting piece that often surpasses the durability of mass-produced alternatives.
Unleashing Creativity: The Benefits of a Custom DIY Sideboard
Creating your own sideboard places you squarely in the designer’s chair, giving you unparalleled control over every minute detail. No longer are you constrained by standard sizes or limited finishes; you can dictate the exact dimensions that perfectly complement your designated space. This means no more settling for a piece that’s “close enough” but never quite right.
Do you envision specific compartments to neatly organize your dinnerware, linens, or media devices? You have the freedom to integrate them precisely as needed. Do you require a particular height to align seamlessly with existing furniture or to accommodate your personal ergonomic preferences? You can build it to that exact specification. The crucial decisions regarding the type of wood, the specific finish (paint, stain, or natural oil), and the style of hardware all remain firmly in your hands.
For instance, I purposefully made my first DIY sideboard slightly taller than standard to better suit my height. This small, personalized adjustment meant I no longer had to stoop excessively when accessing items, making daily use significantly more comfortable. Such thoughtful, user-centric touches are what truly elevate a custom piece of furniture and make a substantial difference in its functionality and enjoyment.
The quality factor is another paramount advantage. When you take on the task of building a DIY sideboard, you gain the opportunity to:
- Select Premium Wood: Choose high-grade lumber or plywood that boasts superior durability and aesthetic appeal, ensuring your piece will withstand the test of time and daily use.
- Employ Stronger Joinery: Unlike many mass-produced items that rely on staples or weak connections, you can utilize robust joinery techniques like dadoes, rabbets, or screws with glue, creating a far more stable and enduring structure.
- Add Strategic Support: Identify areas that might experience more stress or bear heavier loads and reinforce them with extra bracing or thicker materials, preventing future sagging or structural issues.
- Address Imperfections Instantly: You can spot and rectify any issues or flaws during the construction process, ensuring a flawless finish and solid build from the ground up, rather than discovering manufacturing defects later.
It’s common for store-bought furniture to employ cheaper, often less durable materials like particle board or thin veneers to minimize production costs. With your custom DIY sideboard, you possess intimate knowledge of every material and every joint, guaranteeing its integrity. My inaugural DIY sideboard, built years ago, remains a testament to this, looking as good and functioning as reliably as the day it was completed.
Essential Materials and Tools for Your DIY Sideboard Project
Before you dive into the exciting build, gathering all your materials and tools is a crucial first step. Proper preparation ensures a smooth workflow and prevents frustrating delays. This list is based on a popular and effective method of using stock cabinets as a base, which simplifies construction while still allowing for extensive customization.
| Category | Item | Details |
|---|---|---|
| Materials | Stock Wall Cabinets | (2) 36in x 30in x 12in – These form the core structure, providing built-in storage and simplifying the initial frame. |
| Birch Plywood | (1) 3/4in x 4ft x 8ft sheet – Ideal for the top, sides, and any custom shelving due to its smooth finish and stability. | |
| Edge Banding | Required for covering the exposed edges of plywood, giving it the appearance of solid wood. | |
| Pine Board | (1) 1in x 3in x 8ft – Useful for trim, additional support, or creating a base frame for the cabinets. | |
| Furniture Legs | (6) Legs (purchasing 2 packs ensures you have enough for stability and a balanced look). | |
| Furniture Leg Hardware | (2 packs purchased) – Essential mounting plates and screws for securely attaching the legs to the cabinet base. | |
| General Hardware | Assorted screws, brad nails, and other fasteners for assembly. | |
| Tools & Fasteners | 1 1/4in #8 Construction Screws | Versatile screws for securely joining cabinet bases and other structural components. |
| 2in Brad Nails | For attaching trim, back panels, or other components where a strong but discreet fastener is needed. | |
| Miter Saw | Crucial for making precise crosscuts and angled cuts on trim and smaller wood pieces. | |
| Table Saw | Indispensable for making long, straight, and accurate rips (cuts along the grain) on plywood sheets. | |
| Wood Glue | A fundamental adhesive for creating strong, lasting wood-to-wood bonds alongside mechanical fasteners. | |
| Wood Filler | Used to fill nail holes, minor gaps, or imperfections, creating a smooth surface ready for finishing. | |
| Sander (Orbital or Sheet) | Essential for smoothing surfaces, preparing wood for finish, and removing any rough spots. | |
| Paint Sprayer (Optional) | Offers a smoother, more even finish for paint than brushing, especially for larger surfaces. (Consider a budget-friendly option if not already owned). | |
| Nail Gun (Brad Nailer) | Speeds up the process of attaching components with brad nails, providing strong and nearly invisible fasteners. | |
| Safety Glasses | Non-negotiable eye protection for all cutting, drilling, and sanding operations. | |
| Drill (Corded or Cordless) | Used for drilling pilot holes, driving screws, and potentially mixing paint or stain. | |
| Iron | A standard household iron is perfect for activating the adhesive on iron-on edge banding. | |
| Extra Fine Finish Saw Blade | (Recommended brand: Diablo) – Using a high tooth count blade on your table or miter saw ensures clean, chip-free cuts, especially on plywood. | |
| Hardware Install Template | A simple jig or store-bought template for precise and consistent placement of drawer pulls and door knobs. |
Step-by-Step Guide to Creating Your Custom DIY Sideboard
Building a sideboard from scratch is an incredibly gratifying experience, allowing you to tailor every aspect to your precise desires. This detailed, step-by-step guide will demystify the process, ensuring you can bring your vision to life with confidence and precision.
Step 1: Connect Your Cabinet Bases – The Foundation of Stability
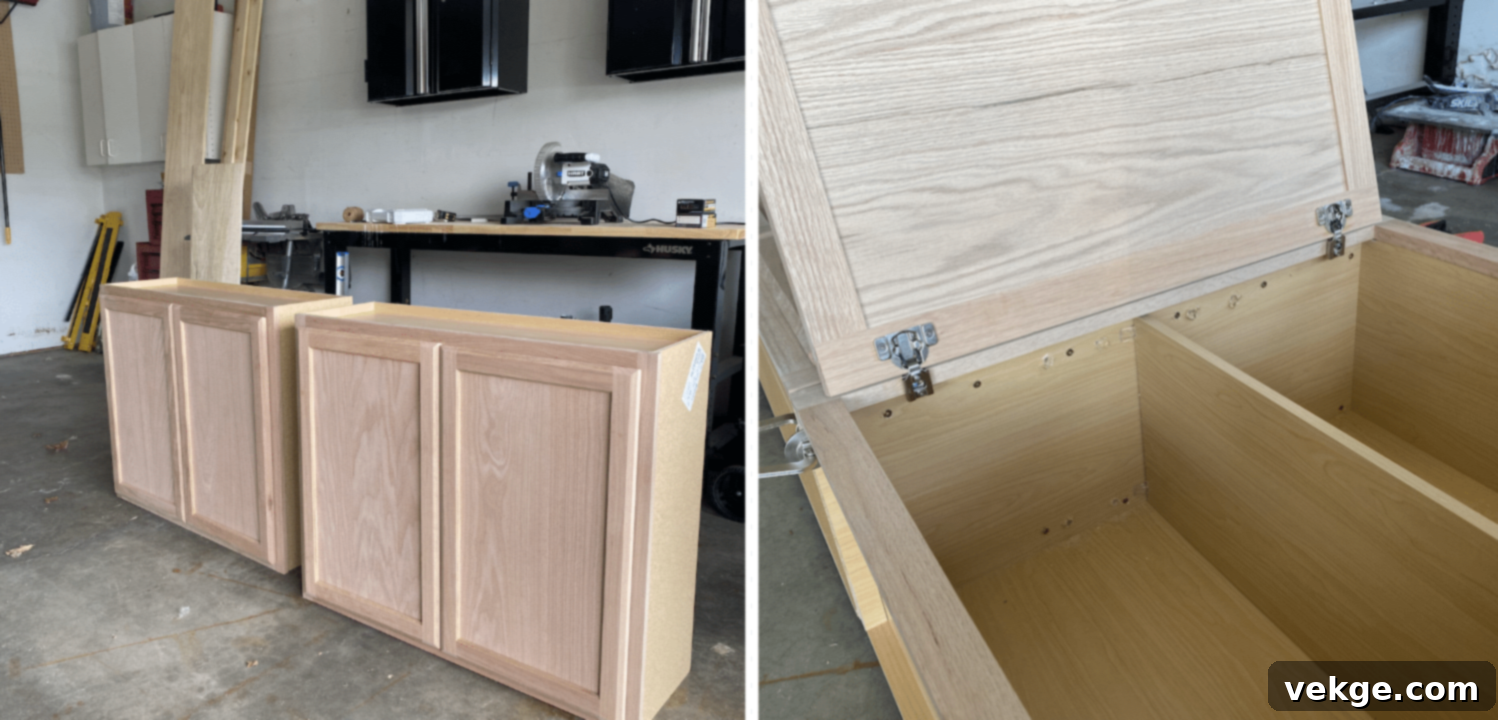
The success of your entire project hinges on establishing a solid and level foundation. From my extensive experience crafting multiple DIY sideboards, I’ve learned that careful attention here saves immense frustration later on. This step involves joining your stock cabinets to form a unified, sturdy base.
You’ll need:
- Your chosen stock cabinets (e.g., two 36in x 30in x 12in wall cabinets).
- Support boards (like the 1×3 pine) or custom wood strips.
- Appropriate wood screws (1 1/4in #8 construction screws are ideal).
- A reliable level.
- Your drill with a suitable bit.
Begin by carefully placing your two stock cabinets side-by-side on a large, flat, and stable surface – ideally your cleared workbench or workshop floor. Use your level to meticulously check that both cabinets are level not only side-to-side but also front-to-back. Slight discrepancies here can cause significant issues down the line. Next, align the front frames of the cabinets perfectly. Use clamps to hold them tightly together while you work. Drill pilot holes through the cabinet frames where they meet, usually near the top, middle, and bottom. Then, connect them with construction screws, ensuring a tight, gap-free joint. Finally, add support boards between the tops and bottoms of the cabinets at the back. These act as cross-braces, significantly enhancing the rigidity and stability of the entire structure, and preventing any racking or twisting.
Pro Tip: Even the most perfectly level floor can have minor imperfections. Use shims (small thin wedges of wood) under the cabinet base if your floor isn’t perfectly flat. Leveling at this stage prevents issues like crooked doors or uneven weight distribution once the sideboard is complete. Don’t skip this small but critical step!
Step 2: Give It Legs – Adding Sturdy and Stylish Support
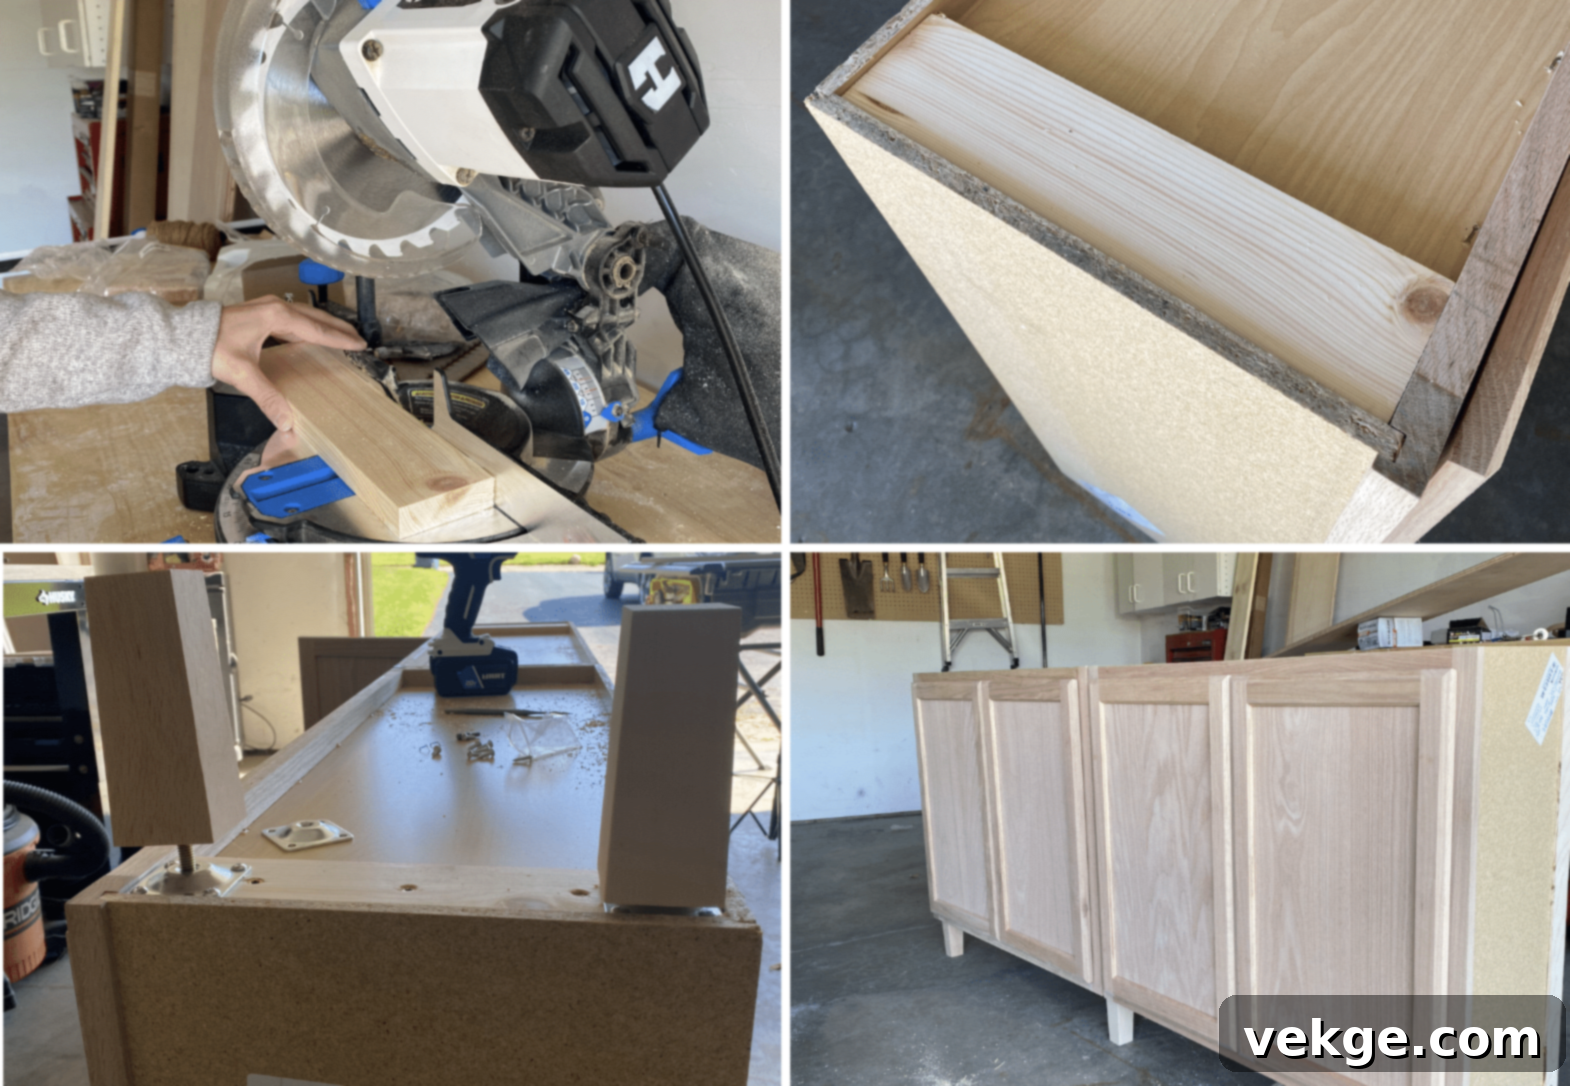
The legs of your DIY sideboard do more than just lift it off the floor; they define its overall height, contribute significantly to its aesthetic, and provide essential stability. Choosing the right legs and attaching them correctly is key to a professional-looking and durable piece.
Steps for success:
- Mark Leg Positions Carefully: Flip the connected cabinet structure onto its top, protecting the surface. Determine the precise placement for each of your six legs – typically at each corner and two in the center for optimal support. Use a tape measure and pencil to mark the exact screw-hole locations for the mounting plates. Consistency is crucial for a balanced look.
- Install Mounting Plates: Align the furniture leg mounting plates with your marked positions. Pre-drill pilot holes for the screws to prevent splitting the wood, especially if you’re attaching directly to the cabinet base or a solid wood frame. Securely attach each mounting plate with the provided screws.
- Attach Legs Firmly: Screw the furniture legs into their respective mounting plates. Hand-tighten them first, then use a wrench if necessary, but be careful not to overtighten and strip the threads.
- Check Level from All Sides: Once all legs are attached, carefully flip the sideboard upright. Place it in its intended location and use your level to check stability and levelness from every angle – side-to-side, front-to-back, and diagonally. Minor adjustments can often be made by slightly unscrewing or tightening the leg.
Before proceeding, gently push and pull on the sideboard from various directions to test its stability. Any slight wobble or instability detected now will only become more pronounced and problematic once the project is fully assembled and loaded with items. Addressing it early saves a lot of rework.
Step 3: Style the Top and Sides – Building the Elegant Frame
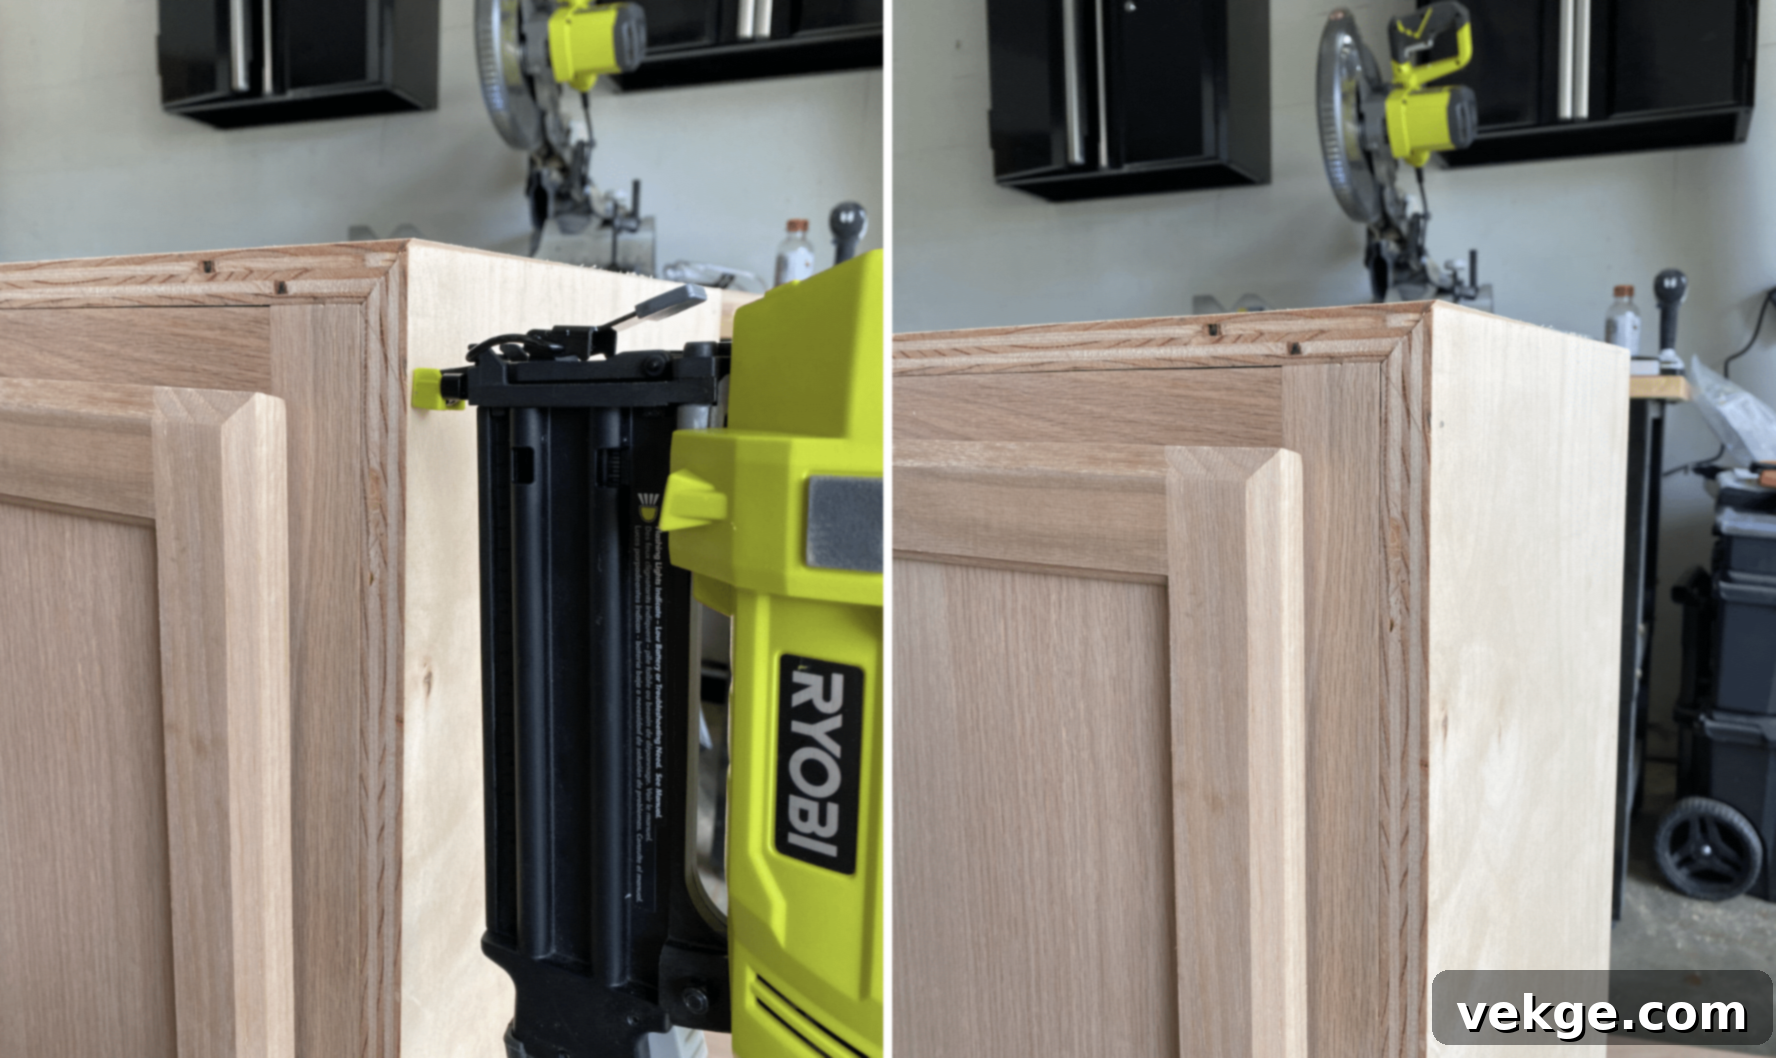
This phase is where your sideboard truly begins to take on its distinctive shape and character, transitioning from a functional base to a piece of furniture with presence. Crafting the top and side panels from birch plywood adds a refined, custom-built appearance.
For the perfect fit and finish:
- Measure Cabinet Width Plus Overhang: Accurately measure the overall width and depth of your connected cabinet base. Decide on your desired overhang for the top and sides (e.g., 1 inch on each side). Add these overhangs to your base measurements to determine the final dimensions for your plywood top and side pieces.
- Cut Plywood with Care: Using your table saw (for long, straight cuts) and miter saw (for precise crosscuts), carefully cut the birch plywood to your calculated dimensions for the top and side panels. Remember the old adage: measure twice, cut once. Use an extra-fine finish saw blade (like a Diablo blade) to minimize tear-out and achieve clean, smooth edges.
- Test Placement: Before applying any adhesive or fasteners, dry-fit the cut plywood pieces onto the cabinet base. Ensure they align perfectly, the overhangs are even, and there are no unsightly gaps. Make any necessary fine adjustments now.
- Attach with Wood Glue and Nails: Once satisfied with the fit, apply a thin, even bead of wood glue along the top edges of the cabinet frames where the plywood top will rest. Carefully place the plywood top, ensuring it’s properly aligned. Secure it by driving 2-inch brad nails through the top into the cabinet frame below, spacing them every 6-8 inches. Repeat this process for the side panels, gluing and nailing them securely to the cabinet sides.
Want mitered edges for a seamless look? For a truly high-end finish on the top and side panels, consider cutting each piece with a 45-degree bevel where they meet at the corners. This creates a clean, almost invisible joint when glued and clamped, making the sideboard look like it was crafted from a single, solid block of wood. This technique requires meticulous measurement and precise cuts but yields stunning results.
Step 4: Perfect the Edges – Adding the Smooth Banding
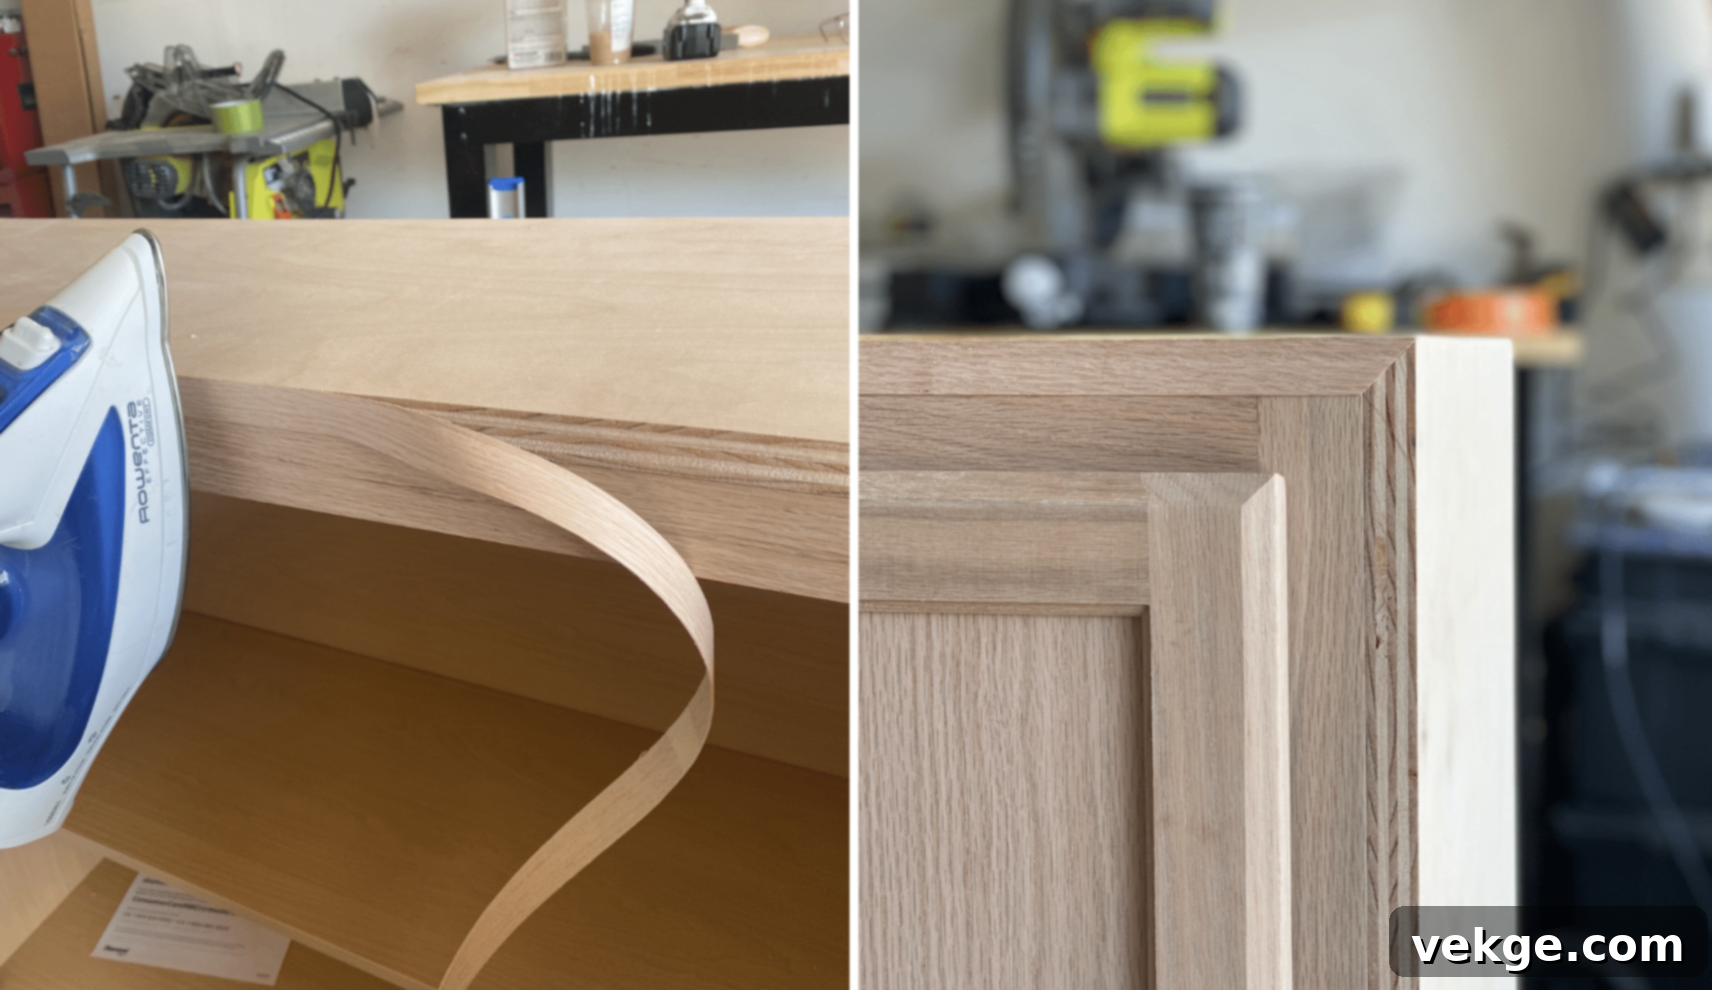
Plywood, while strong and stable, often has visible layers on its edges. Edge banding is the secret weapon to concealing these layers, making your DIY sideboard look like it’s constructed from solid, expensive wood. Here’s my tried-and-true method for a flawless application:
- Cut Banding Slightly Long: Measure the length of each exposed plywood edge you wish to cover. Cut your edge banding strips slightly longer than each measurement – an extra inch or two gives you room for error and trimming.
- Set Iron to Medium Heat: Plug in your household iron and set it to a medium, dry heat setting (no steam). Test it on a scrap piece of banding first to ensure it melts the adhesive without scorching the banding itself.
- Press Banding On Slowly and Firmly: Position the banding flush with the edge of the plywood. Starting at one end, slowly press the hot iron firmly onto the banding for about 10-15 seconds per section, moving steadily along the length. The heat activates the adhesive on the back of the banding, bonding it to the plywood. Apply consistent pressure.
- Let Cool, Then Trim and Smooth: Once the entire strip is applied, let it cool completely. This allows the adhesive to set. Then, use an edge banding trimmer (a specialized tool that makes this very easy), a sharp utility knife, or a fine-grit sandpaper block held at an angle to carefully trim any excess banding flush with the plywood surface. Be gentle to avoid tearing the banding or damaging the plywood.
Work in small, manageable sections to ensure proper adhesion and control. Take your time with this step – rushing often leads to uneven application, bubbles, or ragged edges, which will be very noticeable in the final product. A perfectly applied edge banding significantly enhances the perceived quality of your DIY sideboard.
Step 5: Smooth Out the Details – Filling, Sanding, and Refining
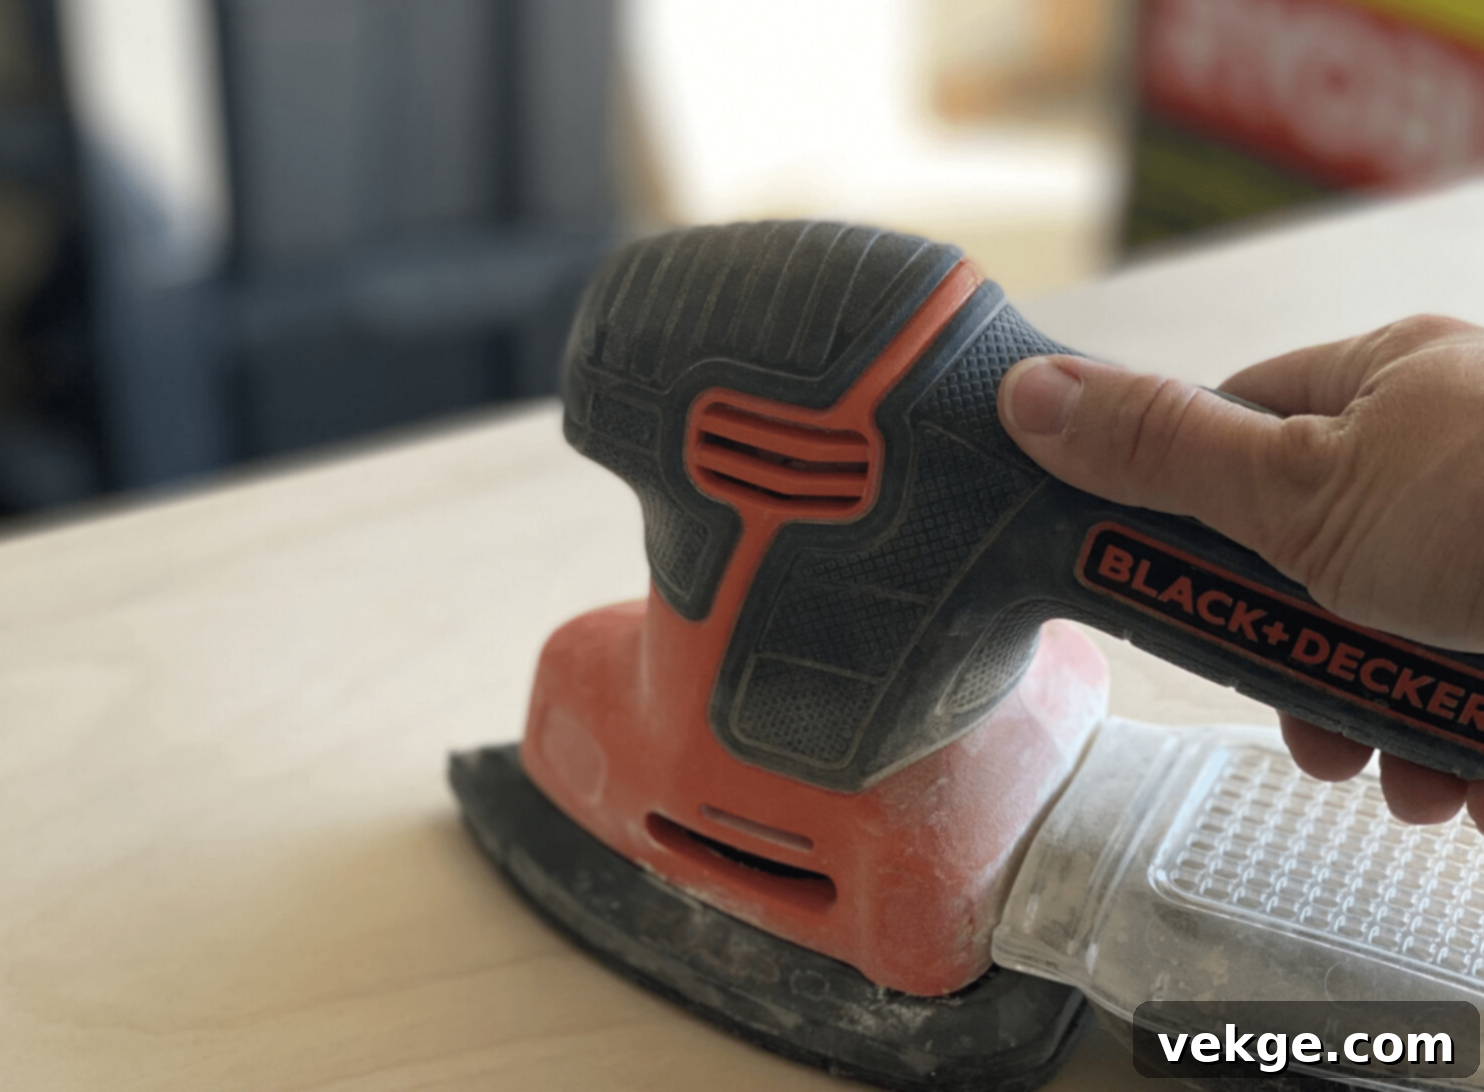
This is the transformational stage where good craftsmanship becomes truly great. Patient and thorough sanding is paramount to achieving a silky-smooth finish that will beautifully accept paint or stain. No matter how precise your cuts or how skilled your joinery, a poorly sanded piece will always look amateurish.
The meticulous process:
- Fill Holes and Imperfections with Wood Filler: Using a putty knife, apply wood filler to all visible nail holes, minor gaps, or any small imperfections on the surface of your sideboard. Ensure the filler is pressed firmly into the holes and slightly overfilled.
- Let It Dry Fully: Refer to the wood filler’s instructions for drying times. Rushing this step will lead to a messy, uneven finish. Some fillers shrink slightly as they dry, so a second thin application might be necessary for deep holes.
- Sand with Medium Grit (e.g., 120-grit): Once the filler is completely dry, begin sanding the entire sideboard with a medium-grit sandpaper (around 120-grit). This step removes excess filler, smooths out any rough areas, and begins to level the surface. Use an orbital sander for large, flat areas and a sanding block for edges and detail work.
- Switch to Fine Grit (e.g., 180-220 grit): Progress to a finer grit sandpaper (180-220 grit) to further refine the surface. This removes the scratches left by the coarser grit and prepares the wood for finishing. Always sand in the direction of the wood grain to avoid visible cross-grain scratches.
- Clean Dust Thoroughly: After the final sanding, meticulously clean off all sanding dust. Use a shop vacuum, compressed air, and then wipe the entire surface down with a tack cloth or a damp (not wet) cloth. Any lingering dust will compromise the finish, leading to a bumpy or dull appearance.
As you sand, constantly run your bare hand over the surface. Your fingertips are often more sensitive than your eyes and can detect subtle bumps, rough patches, or uneven spots that might otherwise be missed. Aim for a surface that feels perfectly smooth to the touch.
Step 6: Add Your Color – Paint or Stain to Personalize Your Sideboard
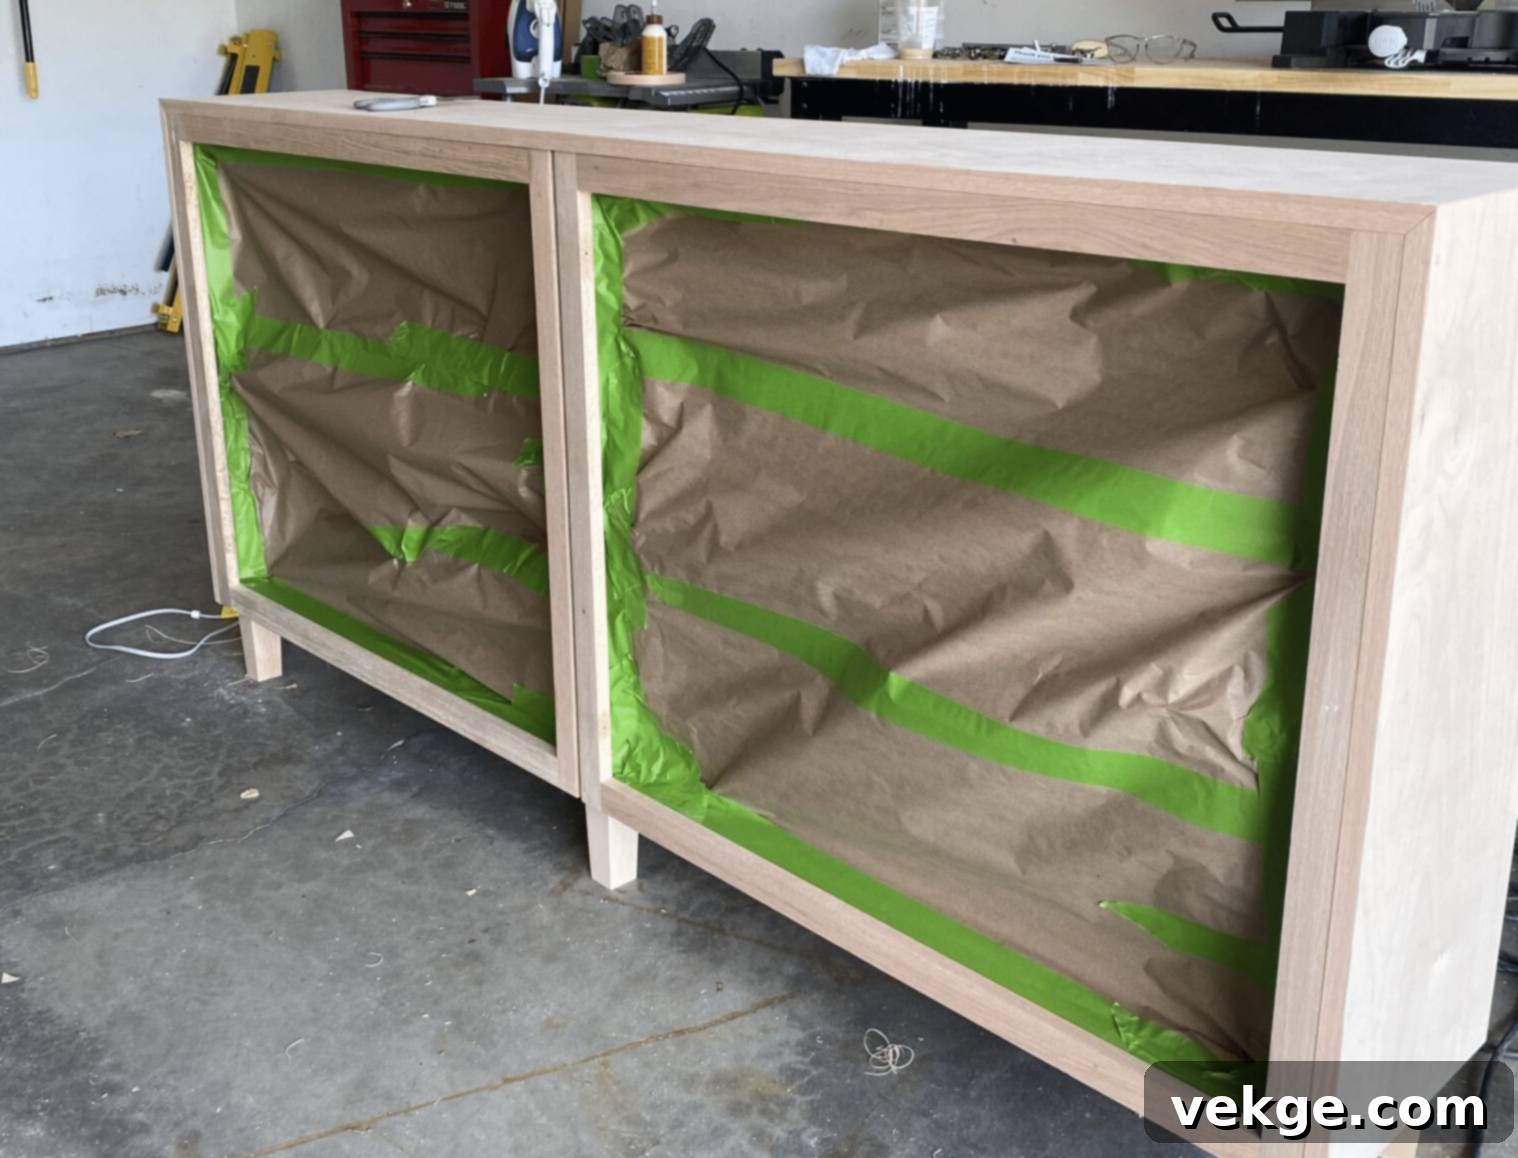
This is the moment your DIY sideboard truly comes to life, taking on the color and character that will integrate it seamlessly into your home. The choice between paint and stain offers distinct looks, and proper application is key to a professional, lasting finish.
For best results, whether painting or staining:
- Start with Clean Wood: Ensure your sideboard is free of all dust and debris from sanding (refer back to Step 5). Any dust will become trapped under the finish.
- Use Proper Primers (for Paint): If you’re painting, applying a high-quality primer is essential. Primer creates an even base, helps paint adhere better, blocks tannins from bleeding through (especially with certain woods like pine), and often requires fewer topcoats. For plywood, a shellac-based primer is excellent for sealing the wood and preventing grain raise.
- Apply Thin, Even Layers: Whether using paint or stain, always apply multiple thin coats rather than one thick coat. Thin coats dry more evenly, are less prone to drips and runs, and provide a more durable and professional-looking finish. Use a good quality brush, roller, or a paint sprayer for the smoothest application.
- Sand Lightly Between Coats: For painted finishes, a very light sanding with 220-grit or 320-grit sandpaper between coats of primer and paint (after each coat has dried) can create an incredibly smooth surface. This knocks down any raised grain or minor imperfections. For stain, sanding between coats is usually not recommended.
- Let Each Coat Dry Fully: Adhere strictly to the drying times recommended by the manufacturer for your specific paint or stain. Rushing the process can lead to tacky surfaces, poor adhesion of subsequent coats, or an uneven finish.
Remember: Good lighting is your best friend during this stage. Work in a well-lit area to easily spot any missed spots, drips, or areas that need more attention. Applying a clear topcoat (like polyurethane or a water-based clear coat) after the paint or stain has fully cured will add an extra layer of protection and durability to your beautiful DIY sideboard.
Step 7: Finish with Flair – Adding the Perfect Hardware
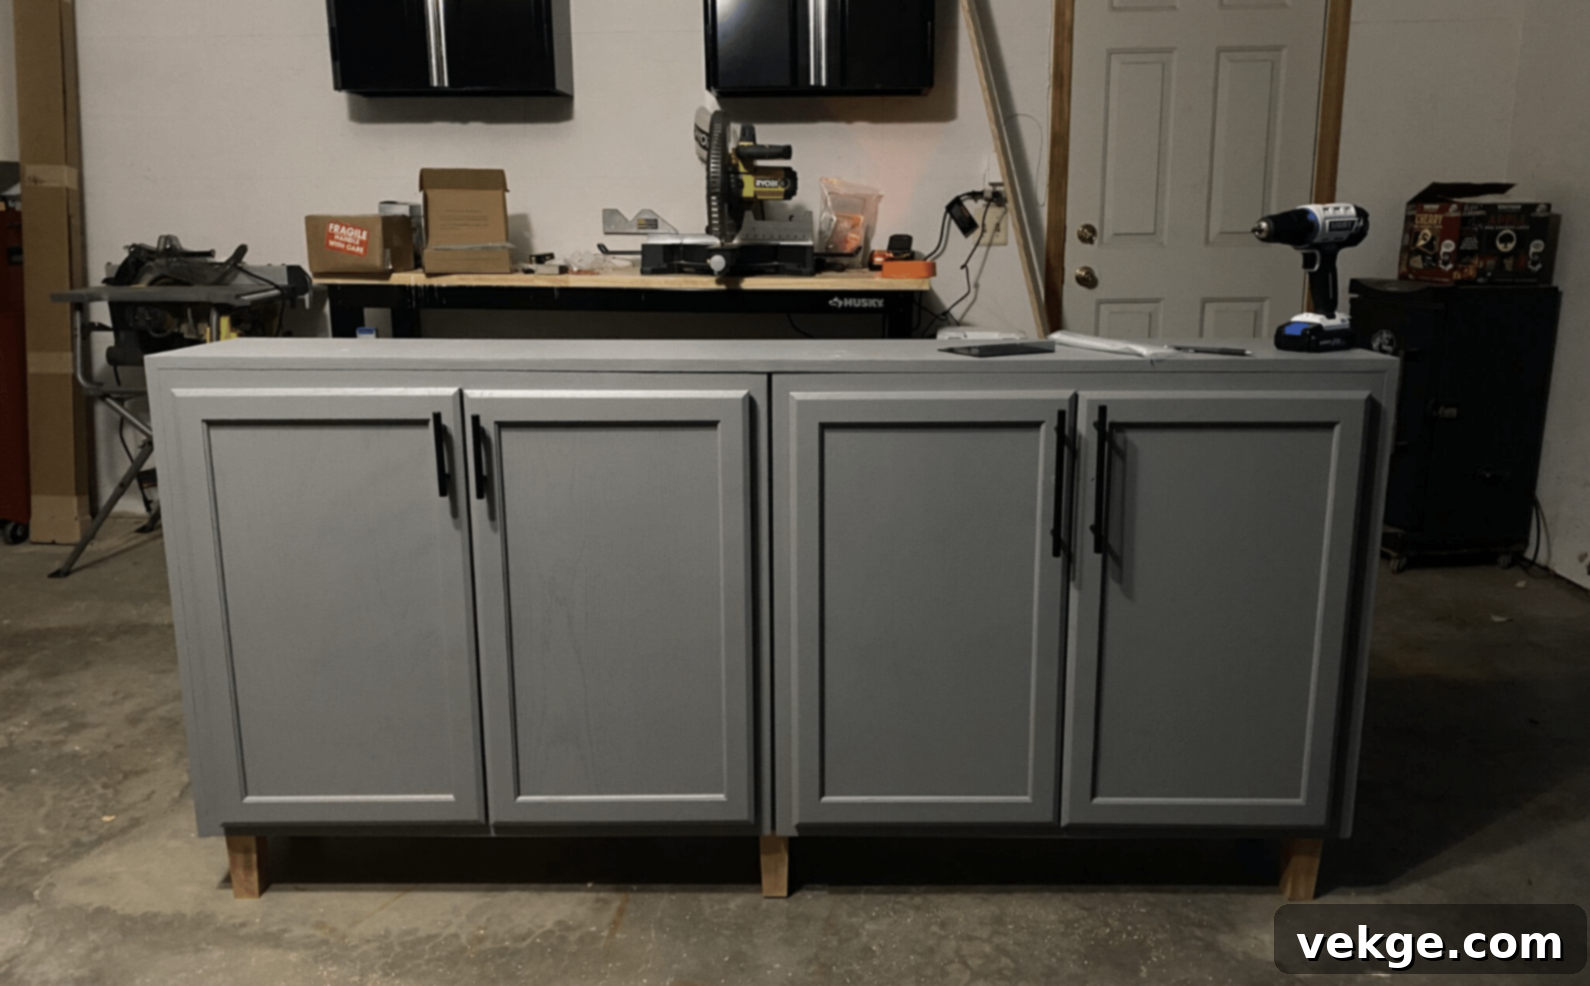
The hardware you choose and how you install it can significantly impact the overall look and feel of your DIY sideboard. It’s like adding the perfect jewelry – it should complement the style, be comfortable to use, and feel secure. Precise installation is paramount for a professional finish.
Installation tips for flawless hardware placement:
- Create or Use a Template: Whether you’re installing knobs or pulls, consistency is key. You can purchase an adjustable hardware installation template, or you can easily make your own from a piece of scrap wood or cardboard. Mark the exact desired location for each hole on the template, ensuring it’s centered and spaced correctly.
- Mark All Holes First: Place your template firmly against each door or drawer front and use a pencil to mark the precise center point(s) for your drill holes. Double-check all measurements before drilling. Even spacing across all doors/drawers makes your work look truly professional.
- Drill Pilot Holes: Select a drill bit that is slightly smaller than the shank of your hardware screws. Drill pilot holes from the front of the door/drawer. To prevent tear-out on the back side, drill slowly until the tip of the bit just breaks through, then finish drilling from the back. Alternatively, place a scrap piece of wood behind the door as you drill through.
- Install Pulls or Knobs: With the pilot holes drilled, insert the screws from the inside of the door/drawer and attach the pulls or knobs from the outside. Hand-tighten them first to ensure they are straight and aligned, then use a screwdriver to snug them up. Avoid over-tightening, which can strip screws or damage the wood.
- Test Movement and Alignment: After installing all hardware, open and close each door and drawer. Ensure the hardware feels secure, doesn’t wobble, and that all doors and drawers open and close smoothly without catching. Make any final alignment adjustments to hinges or slides if necessary.
Taking your time with measurements and using a template during this step is crucial. Even a slight misalignment in hardware can detract from an otherwise perfectly crafted DIY sideboard. Precision here ensures a polished, high-end result.
Additional Tips for a Successful DIY Sideboard Project
Beyond the step-by-step instructions, a few crucial considerations can make your DIY sideboard project smoother, safer, and ultimately more successful. These insights come from countless hours in the workshop and are designed to prevent common headaches.
Prepping Your Workspace for Efficiency and Safety
Success in any woodworking project, especially something as involved as building a DIY sideboard, begins with a well-organized and prepared workspace. You’ll need adequate room to maneuver large sheets of plywood and assembled cabinet sections. Aim for at least a 10×10 foot clear floor space to comfortably lay out materials, operate power tools, and assemble components without feeling cramped or obstructed. Choose a spot that offers excellent natural or artificial lighting and easy, safe access to power outlets.
Set up a sturdy workbench or a pair of saw horses with a stable surface. Keep this primary work area clear, reserving it only for the tools and pieces you are actively working on. Organize your materials efficiently: store your wood pieces nearby, neatly sorted by size or type. Place all small hardware components like screws, nails, and fasteners in clear, labeled containers. This keeps them visible and easily accessible, saving you precious time searching and preventing potential hazards from misplaced items. A clean and organized space isn’t just about efficiency; it significantly contributes to a safer working environment.
Safety First: Prioritizing Your Well-being
When working with tools, safety should always take precedence over speed or convenience. Before you even pick up a tool, put on your safety glasses. These are your most critical piece of personal protective equipment, shielding your eyes from flying wood chips, sawdust, and accidental splashes. Similarly, wearing work gloves can protect your hands from splinters, rough wood edges, and potential cuts or scrapes when handling sharp tools.
Always don a dust mask or respirator when performing tasks that generate a lot of airborne particles, such as cutting wood, routing, or sanding your DIY sideboard. Protecting your respiratory system from fine wood dust is vital for long-term health. For tasks involving loud power tools like table saws or miter saws, ear protection (earplugs or earmuffs) is essential to prevent hearing damage. Ensure you wear sturdy, closed-toe work shoes – never attempt woodworking barefoot or in sandals, as falling tools or sharp objects pose a significant risk.
Before each use, perform a quick inspection of your tools. Check for frayed power cords, loose guards, or damaged blades. Keep your workspace free of clutter, tripping hazards, and slippery substances. Ensure there’s adequate lighting to clearly see what you’re doing, and take regular breaks to maintain focus and prevent fatigue-related accidents. Remember, a moment of carelessness can have lasting consequences, so always remain vigilant and follow tool safety guidelines.
Testing Your Finish on Extra Materials: A Smart Strategy
Even experienced builders know that the final finish can make or break a project. Smart builders always test their finishes first. Before applying any stain, paint, or topcoat to your actual DIY sideboard, take small off-cuts or scrap pieces from the same materials you used (e.g., plywood scraps, pine trim scraps). Use these test pieces to experiment with different stains, paints, or topcoats. This will give you an accurate representation of how the finish will look on your specific wood, allowing you to fine-tune your color choice and application technique.
Test pieces are invaluable for determining ideal drying times, assessing how many coats are needed to achieve your desired depth of color or opacity, and seeing how the finish interacts with the wood grain. Always observe your test pieces in various lighting conditions – the color can appear dramatically different under natural sunlight compared to indoor artificial light. Keep detailed notes on your experiments, including the brand and color of the product, how you applied it (brush, spray, rag), and the number of coats used. This practice helps avoid costly mistakes on your finished DIY sideboard, ensuring you achieve the exact look you envisioned, and also provides valuable practice before you tackle the main piece.
DIY Sideboard Maintenance Tips: Keeping Your Custom Piece Pristine
After investing your time and effort into building a beautiful DIY sideboard, proper maintenance is key to preserving its beauty and functionality for years to come. Having built and lived with many custom pieces over the years, I’ve gathered practical, effective strategies for keeping them looking their best.
Cleaning and Care: Daily Habits for Lasting Beauty
Regular, gentle care significantly extends the lifespan and aesthetic appeal of your DIY sideboard. Start by incorporating simple daily habits. Keep a soft, microfiber cloth handy to quickly wipe away dust, fingerprints, and minor smudges as they appear. Dust is abrasive and can dull finishes over time. Always use coasters or protective pads under drinks, vases, or any other items that might cause condensation or scratches, preventing unsightly water marks or surface damage.
Weekly cleaning requires a bit more attention. First, gently remove all items from the sideboard’s surface. For general cleaning, a slightly damp cloth (dampened with plain water) is usually sufficient. Wipe down all surfaces, paying attention to any accumulated grime. Crucially, always follow up immediately by drying the surface thoroughly with a clean, dry cloth. This prevents any water from penetrating the finish or causing damage to the wood, especially important for painted or stained surfaces.
If your DIY sideboard is painted, it generally cleans well with a mild solution of dish soap and water. Dip a soft cloth into the solution, wring it out very well so it’s only slightly damp, and gently wipe the surface. It’s imperative to avoid harsh chemical cleaners, abrasive scrubbers, or polishes that contain silicone. These can strip or damage the finish, leaving streaks or dull spots. Always pat the surface dry rather than rubbing vigorously, which can wear down the paint over time, keeping your painted finish looking fresh and vibrant.
Touch-Ups and Repairs: Addressing Wear and Tear
Even with the best care, furniture can incur minor damage. Knowing how to address touch-ups and repairs will keep your DIY sideboard looking its best. For light scratches, a matching wood repair marker or a wax fill stick can often work wonders, seamlessly blending the mark into the surrounding finish. Light surface marks can sometimes be gently buffed out with a soft cloth and a dab of furniture polish. Deeper cuts, however, will require a more involved approach: lightly sand the immediate area with very fine-grit sandpaper (e.g., 400-grit), then carefully re-match the stain or paint and apply a thin layer, followed by a protective topcoat.
Small dents can often be remedied with the power of steam. Place a slightly damp cloth over the dent and gently touch it with a warm iron (no steam setting on the iron itself) for a few seconds. The moisture and heat often cause the compressed wood fibers to swell back into their original shape. For larger or more severe dents, wood filler is your best friend. Apply the filler, allow it to dry completely, then sand it perfectly level with the surrounding surface before re-applying the finish.
Sometimes, a full refinish becomes necessary. Look for clear signs such as extensive watermarks that refuse to fade, a finish that has become dull and lifeless despite cleaning, or multiple deep scratches concentrated in one area. If the wood color has significantly changed due to sun exposure, or if there are rough, worn spots where the original finish has completely eroded, it’s likely time for a comprehensive refinishing project. This involves stripping the old finish, sanding thoroughly, and then applying a fresh coat of stain or paint and a durable topcoat, effectively giving your sideboard a brand-new lease on life.
Preventive measures are always the best solution. Apply felt pads to the bottom of any items that sit on top of your sideboard to prevent scratches. When moving objects, lift them rather than sliding. Clean with a light touch, and keep basic repair supplies (matching paint/stain, wood filler, fine-grit sandpaper) readily available for quick fixes. Proactive maintenance will ensure your DIY sideboard remains a cherished and functional piece for decades.
DIY Sideboard Design Ideas for Inspiration
One of the most exciting aspects of building your own sideboard is the freedom to choose a design that truly resonates with your personal style and home decor. Having constructed a variety of custom pieces, I’ve curated a selection of popular and inspiring DIY sideboard designs to spark your creativity. Each offers unique aesthetic appeal and can be adapted to suit your specific needs.
1. Herringbone Door Buffet
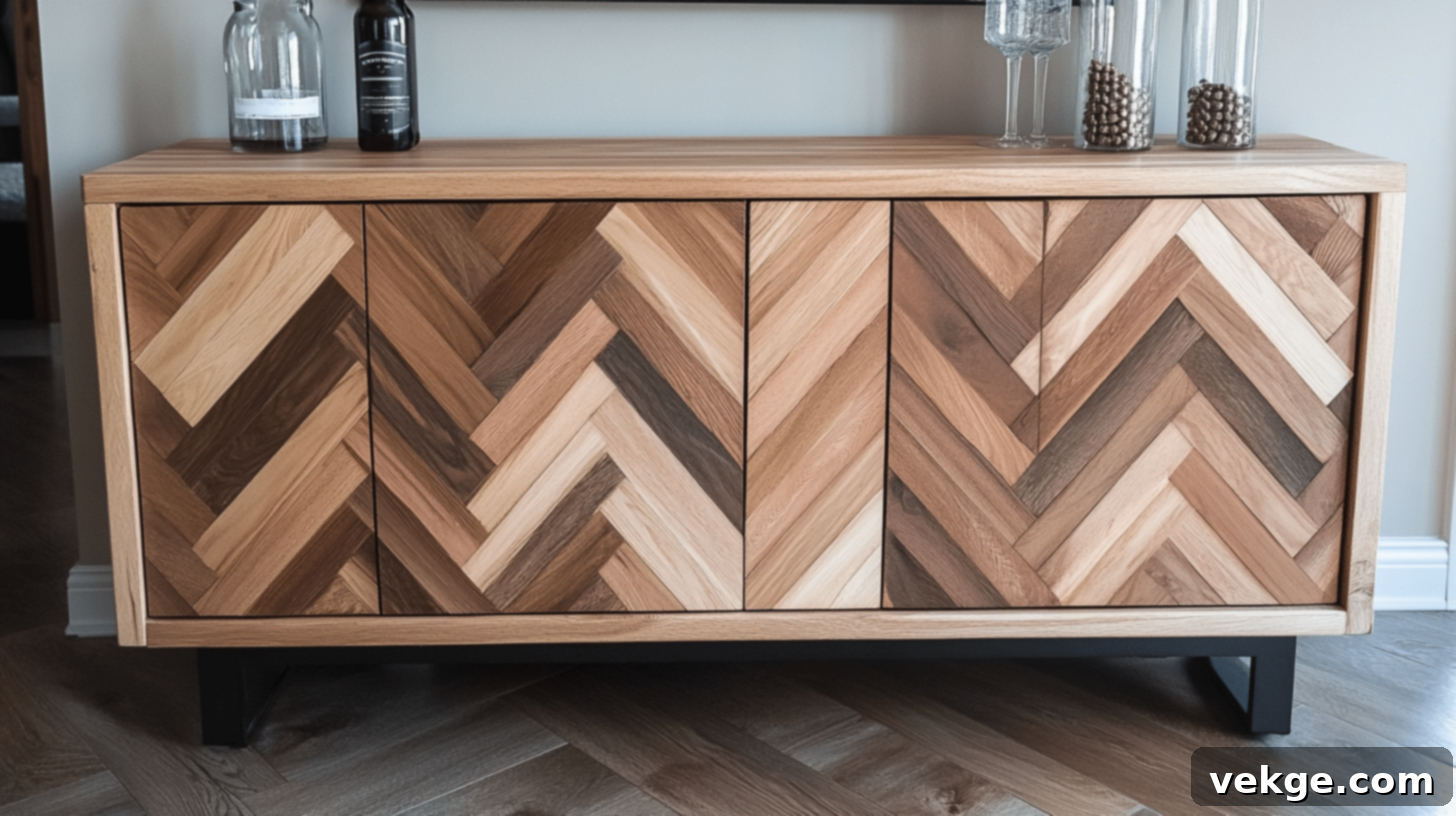
This design adds an intricate and sophisticated visual interest to your DIY sideboard. The herringbone pattern, characterized by small wood pieces arranged in a distinctive V-shape, instantly elevates a simple cabinet into a stunning focal point. I built one of these last spring, and it became the undisputed star of my kitchen, drawing compliments from everyone who saw it. It’s a fantastic way to incorporate texture and craftsmanship.
Key features often include:
- Intricate Wood Strips: Precisely cut wood strips (often veneer or thin solid wood) are laid at opposing 45-degree angles to create the iconic V-pattern on door panels.
- Natural Wood Tones: This design often shines brightest when utilizing the natural grain and varied tones of wood, perhaps with a clear sealant or light stain to enhance its inherent beauty.
- Clean Lines: Despite the intricate pattern on the doors, the overall form of the buffet typically maintains clean, straightforward lines, allowing the herringbone to be the main attraction.
- Hidden Hinges: For a truly seamless look, opting for concealed European-style hinges keeps the focus entirely on the decorative door fronts.
2. Buffet Sideboard With Circle Trim Doors
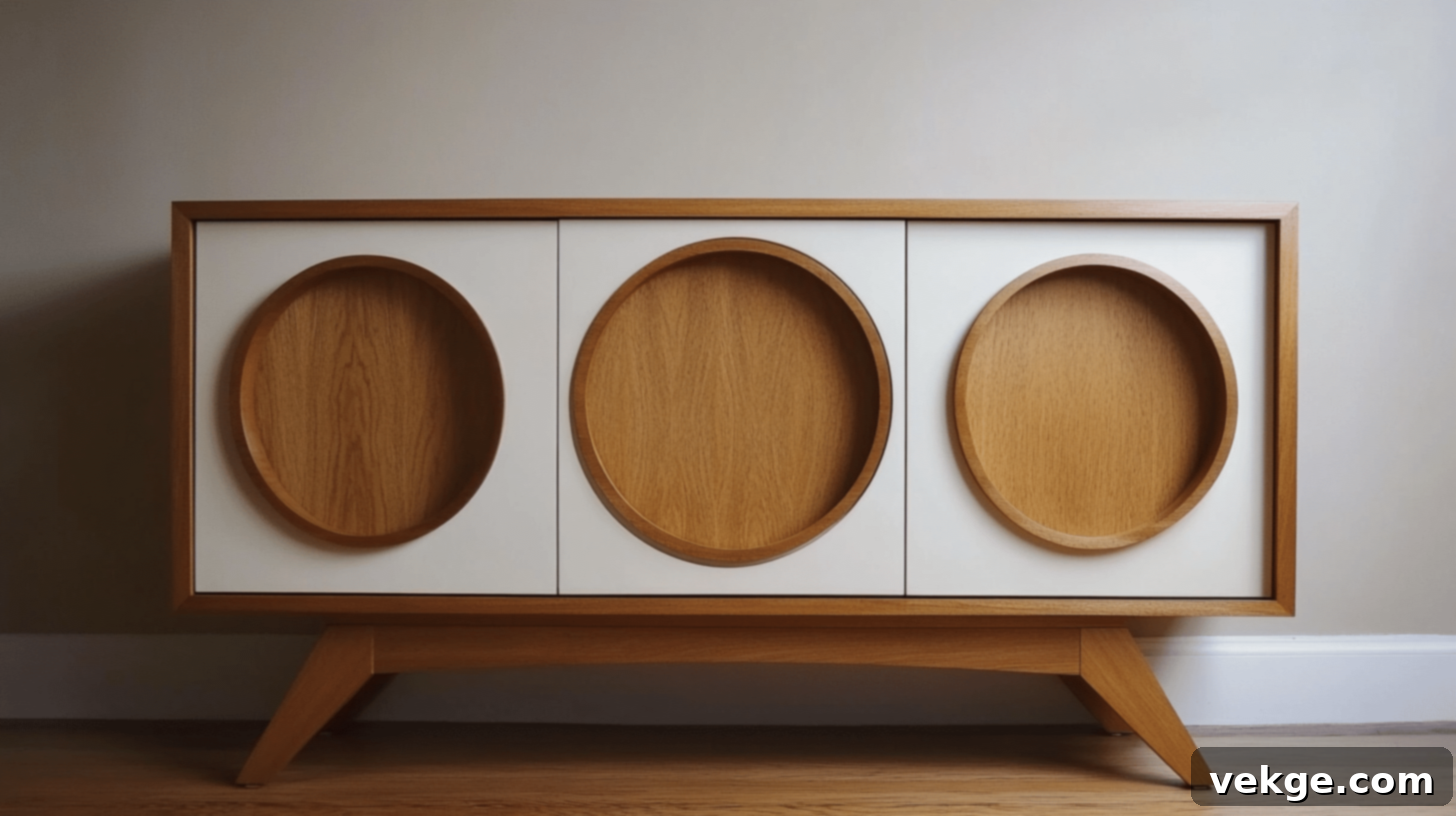
Looking for a DIY sideboard that stands out with a unique, artistic flair? Adding geometric circle trim to your door panels offers a fantastic way to blend classic cabinetry with a modern, playful touch. This style is perfect for those who appreciate both traditional craftsmanship and contemporary design elements, creating a captivating visual effect.
Main design elements typically feature:
- Round Wooden Trim Pieces: Precisely cut wooden circles or half-circles are meticulously applied to the flat panels of the doors, creating a textured, three-dimensional pattern.
- Flat Panel Doors: The simplicity of flat panel doors provides the perfect canvas for the decorative circular trim, allowing the design to truly pop.
- Simple Hardware: To keep the focus on the unique door design, opt for understated and minimalist hardware, such as simple knobs or discreet pulls.
- White or Light Finish Options: A white, off-white, or light gray finish often highlights the circular patterns most effectively, creating a crisp and airy aesthetic.
3. Modern Farmhouse Buffet
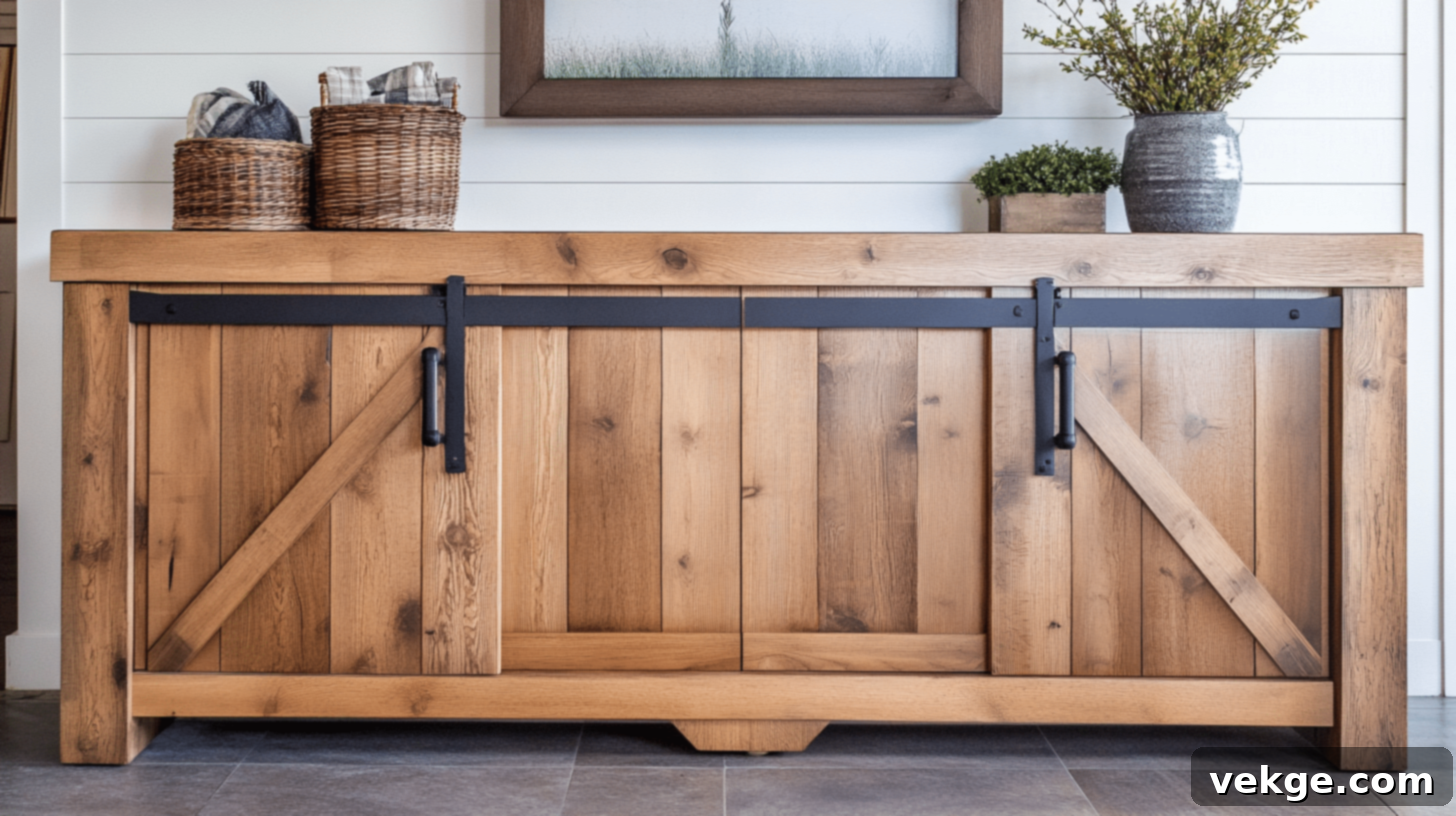
The Modern Farmhouse style remains incredibly popular for its ability to create a warm, inviting, and sophisticated atmosphere. This DIY sideboard design effortlessly bridges the gap between contemporary minimalism and rustic charm, making it a versatile choice that complements both modern and traditional home interiors. It’s about comfort and understated elegance.
Distinguishing features commonly include:
- Plain Front Panels: Doors and drawer fronts often feature simple, flat panels, emphasizing clean lines and functionality over ornate detailing.
- Black Hardware: Matte black handles, pulls, and hinges are a hallmark of this style, providing a striking contrast against lighter wood or painted finishes and adding an industrial touch.
- Light Wood Tones: Natural light-colored woods, or woods stained in light, natural hues, contribute to the airy, organic feel characteristic of modern farmhouse aesthetics. Painted options usually lean towards whites, grays, or subtle pastels.
- Straight Edges and Robust Construction: The design favors strong, straight lines and solid construction, reflecting the utilitarian origins of farmhouse furniture while updated for a contemporary sensibility.
4. DIY Shutter Sideboard
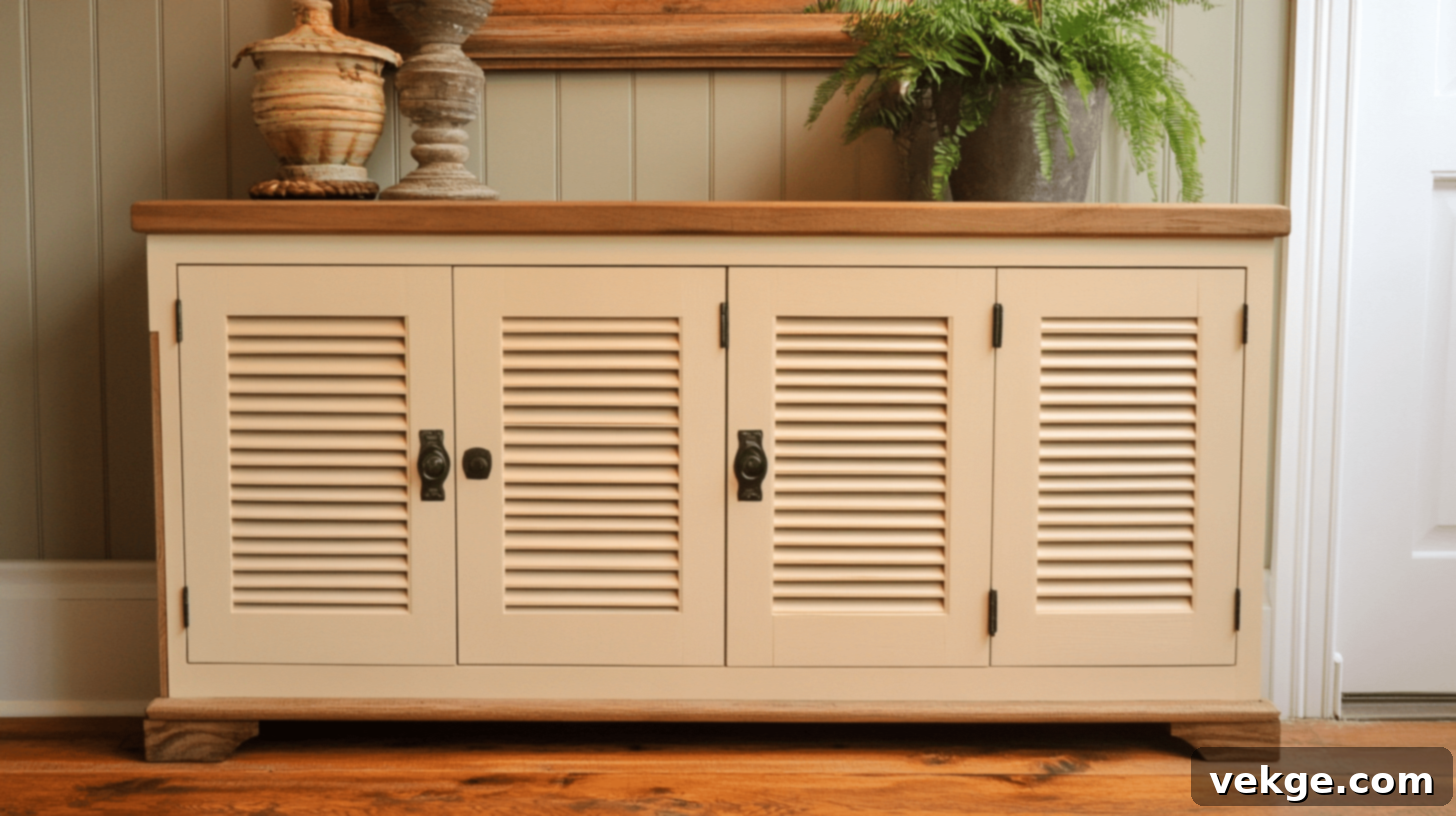
Infuse your living space with a breath of fresh air and a touch of architectural detail with a DIY Shutter Sideboard. The louvered design of the doors brings a light, airy, and textured element that is particularly well-suited for coastal-themed homes, country cottages, or any interior seeking a relaxed, informal charm. It offers both style and subtle ventilation.
Key design elements typically found are:
- Louvered Doors: The defining feature, with angled slats (louvers) that provide visual interest, subtle ventilation, and a unique textural quality. These can be functional (allowing air flow) or purely decorative.
- Versatile Paint Options: This style often looks fantastic painted in crisp whites, soft blues, seafoam greens, or muted grays, enhancing its relaxed and breezy feel.
- Adjustable Shelves: Interior shelving that can be easily repositioned adds significant versatility, allowing you to customize the storage space for various items, from books to beach towels.
- Light, Breezy Feel: The overall aesthetic evokes a sense of openness and lightness, making it an excellent choice for smaller spaces or rooms where you want to maintain an uncluttered feel.
5. Floating Sideboard
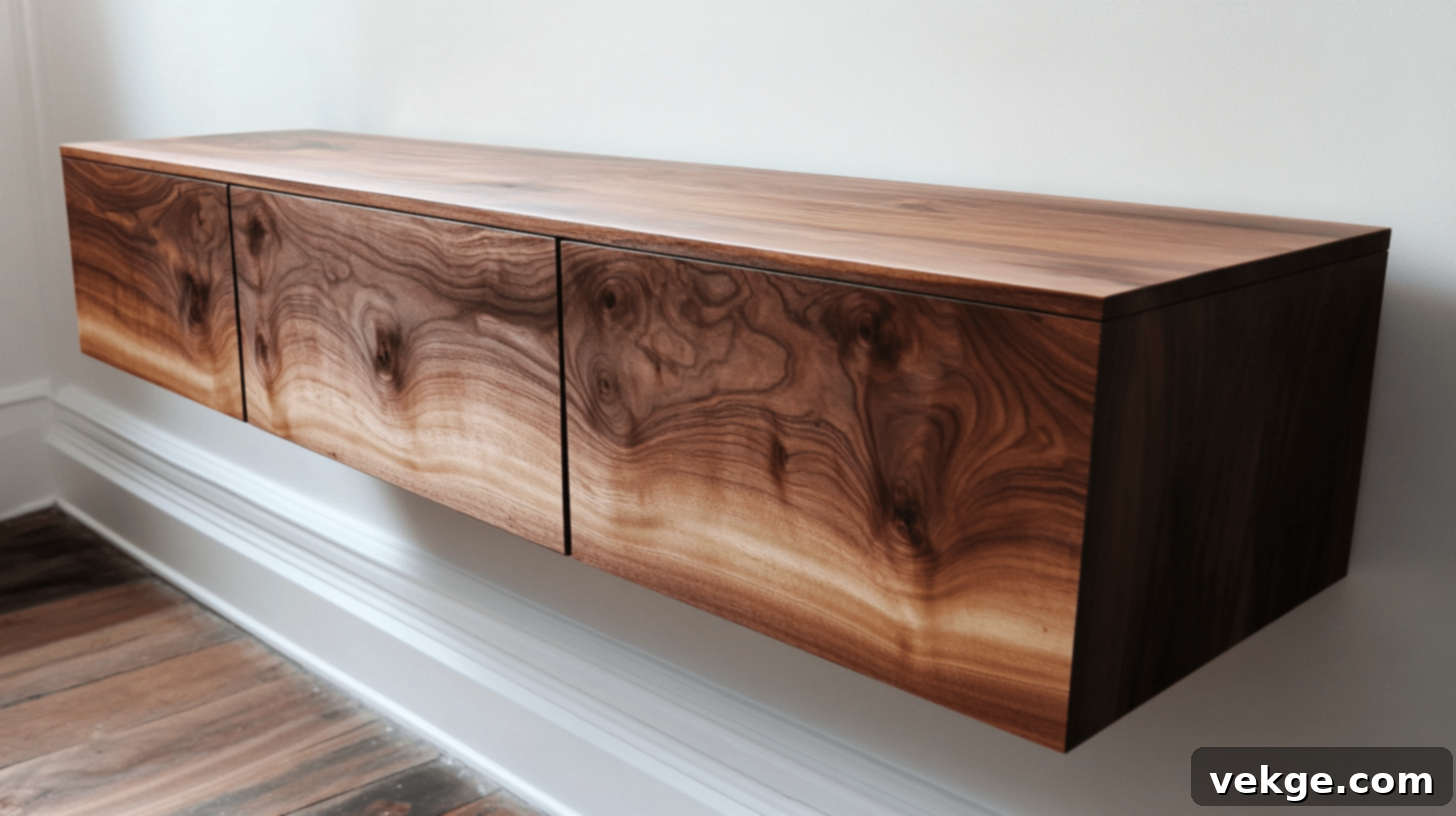
For those aiming for a minimalist, contemporary, and space-saving aesthetic, a wall-mounted or “floating” DIY sideboard is an excellent choice. By lifting the piece off the floor, it creates an illusion of greater space and a sleek, uncluttered look that is highly desirable in modern interiors. It’s a statement of sophisticated simplicity.
Important considerations and design points:
- Strong Wall Mounting System: The most critical aspect is a robust and secure cleat or bracket system designed to firmly attach the sideboard to wall studs. Safety and stability are paramount, as the entire weight of the sideboard and its contents will be borne by the wall.
- Sleek, Streamlined Design: Floating sideboards typically feature very clean lines, often without visible hardware or excessive ornamentation, to emphasize their airy, suspended appearance.
- Hidden Storage: While appearing light, these sideboards can still offer ample hidden storage behind minimalist doors or drawers, keeping clutter out of sight and maintaining a serene environment.
- Modern Look: This design inherently lends itself to modern, Scandinavian, or minimalist decor styles, contributing to an open and spacious feel in any room. It allows for easy cleaning underneath and can make a smaller room appear larger.
Conclusion: The Enduring Reward of Building Your Own Sideboard
Embarking on the journey of building your own DIY sideboard is more than just a woodworking project; it’s an incredibly rewarding experience that allows you to cultivate new skills, embrace creative freedom, and ultimately bring a truly personal piece of furniture into your home. As someone who has navigated this path multiple times, I can attest to the profound satisfaction that comes from seeing raw materials transform into a functional and beautiful object. The hours spent meticulously measuring, precisely cutting, and carefully finishing each component pay off immeasurably every single time I use one of my custom-built pieces.
Your finished DIY sideboard will tell a unique story – your story. Every thoughtful detail, every joint you meticulously crafted, and every finish you carefully applied will reflect the care, dedication, and personal touch you invested in its creation. From the initial excitement of selecting the perfect wood and design to the final, satisfying click of a perfectly installed knob, you will have created something that not only fits your home perfectly but also carries a piece of your craftsmanship and creativity.
Remember, quality craftsmanship is a product of patience, not haste. Take your time with each step, understanding that diligent attention today translates into years of reliable and beautiful use tomorrow. Embrace the process, learn from any minor setbacks, and relish the opportunity to create. And when friends or family admire your stunning new furniture piece and inquire about its origin, you will have the immense pleasure and pride of declaring, “I made this myself.”
Keep this comprehensive guide handy as your trusty companion throughout your build. Soon, you will be the proud owner of a magnificent, custom-built sideboard that not only serves your practical needs exactly as planned but also stands as a testament to your newfound woodworking skills and creative vision. Happy building!
