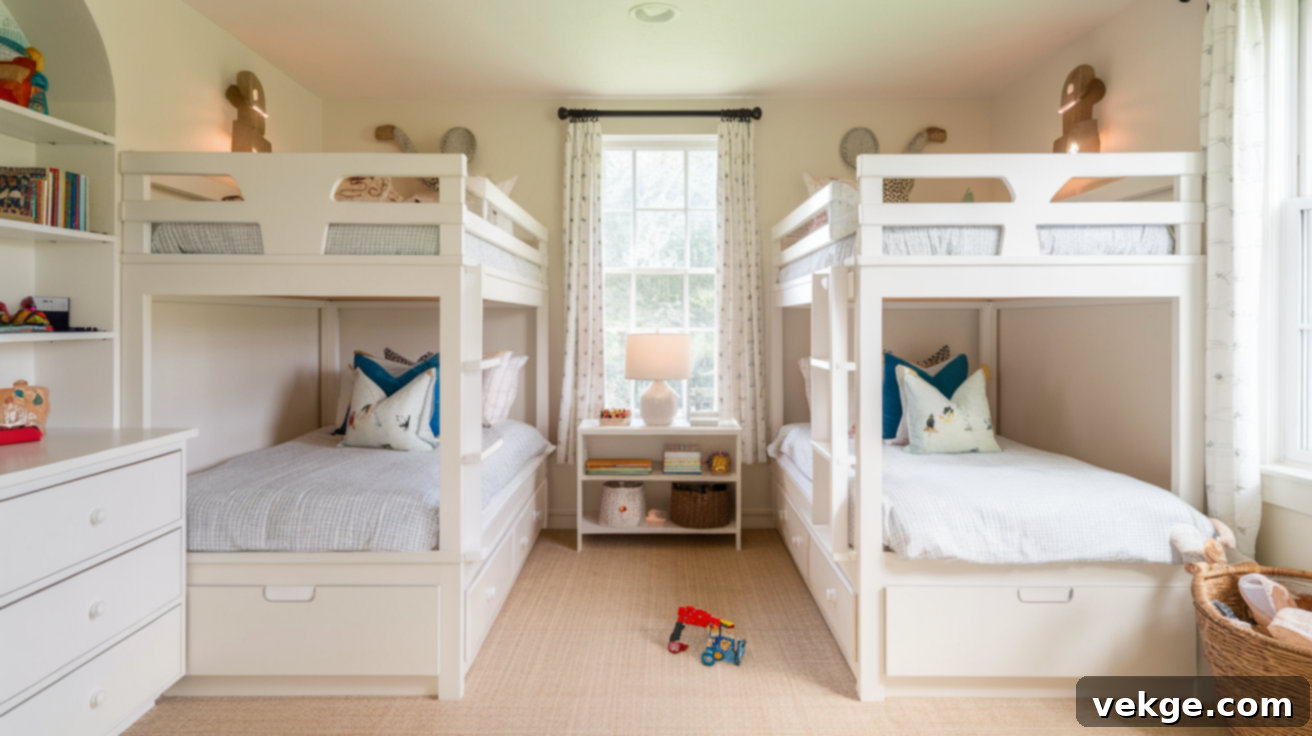
Unlock Space & Style: Your Ultimate Guide to DIY Custom Bunk Beds for Kids’ Rooms
Is your children’s bedroom feeling more like a storage closet than a sanctuary? For many families, especially those with multiple children or limited living space, maximizing every square inch is crucial. Custom bunk beds offer an ingenious solution, transforming cramped quarters into organized, functional, and even fun environments. I’ve personally experienced the challenge of a busy, shared room, and building our own custom bunk beds proved to be the most effective way to utilize vertical space, add much-needed storage, and significantly reduce clutter.
Unlike standard store-bought beds that often fail to meet specific spatial or functional requirements, designing and building your own gives you complete control. The exciting news is that you don’t need advanced carpentry skills to achieve a professional-looking and robust result. This comprehensive guide will walk you through practical custom bunk bed ideas that have worked for real families, alongside easy-to-follow steps to help you plan and execute your own project. We’ll cover everything from smart storage solutions and safe ladder placements to ensuring the entire structure is sturdy and built to last. With a few thoughtful finishing touches, you can create a cohesive and inviting space that your children will love.
Let’s turn that crowded room into a beautifully efficient and personalized haven!
Why Choose Custom Bunk Beds: The Ultimate Space-Saving Solution
Bunk beds designed precisely for your needs offer a multitude of benefits, making them an excellent choice for homes of all sizes, from sprawling houses to compact apartments. Opting for a bed built to your specific dimensions ensures you get the most value and utility from every precious inch of your room. Custom designs uniquely adapt to your room’s shape, size, and even architectural quirks, setting them apart from ready-made options and justifying the extra effort involved in their creation.
Maximize Floor Space in Shared Rooms
In homes where more than one child shares a bedroom, floor space quickly becomes a valuable commodity. Custom bunk beds are the ultimate answer, allowing you to accommodate two, three, or even more sleeping spots without consuming additional floor area. This vertical approach to sleeping arrangements keeps the main floor open and clear.
- Ideal for Multi-Child Households: Comfortably sleeps multiple children in a single room.
- Perfect for Small Bedrooms or Apartments: Frees up essential floor space for play, study, or simply moving around.
For small homes or urban apartments where every square foot counts, these ingenious, space-smart designs help maintain an open, airy feel, providing ample room for children to play, study, and relax without feeling cramped.
Tailored to Your Family’s Unique Needs and Style
Unlike off-the-shelf beds, custom options can be precisely configured to include features that cater specifically to your family’s lifestyle and preferences. Imagine integrating pull-out drawers directly beneath the bottom bunk for toy storage, a dedicated desk area for homework, or individual reading lights for each level – all seamlessly incorporated into the design.
- Integrated Functionality: Easily include built-in storage, study desks, shelving, or personalized lighting solutions.
- Adaptable to Various Settings: Designs can be optimized for both temporary, renter-friendly setups or permanent, built-in installations.
Some custom designs are crafted with portability in mind, ideal for renters who need to dismantle and move their furniture. Others can be securely built into existing walls, offering a more permanent and robust solution that enhances the home’s overall structure and aesthetic. This level of customization ensures your bunk beds aren’t just places to sleep but integrated pieces of furniture that solve multiple functional challenges.
Step-by-Step: Building Your Dream Custom Bunk Beds from Scratch
Before you even pick up a saw, a well-defined plan and the right tools are paramount. These step-by-step instructions will guide you through the process of creating custom bunk beds that are not only safe and sturdy but also perfectly integrated into your space. Remember, careful preparation prevents costly mistakes and ensures a smoother build.
Step 1: Clearing the Room and Meticulous Planning
The foundation of any successful room transformation begins with a clean slate. Start by removing all existing furniture, beds, dressers, and toys from the room. Temporarily store these items elsewhere to give yourself a completely empty space to work with. This initial clearing not only provides room to maneuver but also presents an excellent opportunity to declutter and sort through items your children may have outgrown or no longer need.
With the room cleared, it’s time for detailed planning. Measure your wall space meticulously, taking into account windows, doors, electrical outlets, and heating vents. Think about how much walking area you want to preserve and how the bunk beds will interact with other furniture. For our project, the goal was to create sleeping arrangements for four children while maximizing floor area for play. Sketching a simple diagram with precise measurements, including bed dimensions, ladder placement, and any integrated features, is invaluable for keeping your build on track and visualizing the final result. Consider using masking tape on the floor to mark out the footprint of the beds, helping you gauge space effectively.
Step 2: Crafting the Robust Frame
Once your design is finalized, create a detailed cut list. This list should itemize every piece of wood you’ll need, along with its precise dimensions. Marking off each piece as you cut it is a simple yet effective way to stay organized and prevent errors. For the main frame, you’ll construct robust side panels that will securely support the mattress platforms.
When building against walls, it’s crucial to account for existing baseboards. These small ledges can prevent your frame from sitting flush. A clever solution is to use small wooden shims or spacers behind the frame where it meets the wall, ensuring a snug fit above the baseboard. In our specific project, half-inch shims proved perfect for creating a seamless integration. The mattress platforms themselves were designed as straightforward rectangular boxes with essential center support beams, all carefully checked with a level to guarantee a perfectly flat and stable sleeping surface. Choose strong, durable lumber like pine or fir for the main structural components.
Step 3: Securing and Precision Leveling
Safety is paramount for bunk beds. The most critical step for stability is attaching the frame securely to the wall studs. Use long, strong screws specifically designed for structural fastening. This prevents any possibility of tipping and ensures the entire structure is rock-solid. In the example build, the builder strategically used only 20 screws in total to anchor the beds to the walls, with five screws for each horizontal mattress support where it meets the wall. This minimalist approach was part of their “renter-friendly” strategy, allowing for easier disassembly if needed, while still maintaining exceptional security.
It’s a common reality that most homes, especially older ones, don’t have perfectly straight walls or level floors. This is where precision leveling comes in. Utilize wooden shims between the bunk bed frame and the wall to compensate for any gaps, curves, or unevenness. This meticulous adjustment is vital not only to ensure each bunk is level on its own axis but also to guarantee that multiple bunks built side-by-side are perfectly aligned with each other. A long spirit level and a laser level can be invaluable tools for achieving this precision.
Smart Add-Ons That Make a Big Difference: Elevating Functionality
What truly distinguishes custom bunk beds from their mass-produced counterparts is the unparalleled ability to integrate features specifically tailored to your family’s needs. These thoughtful details can transform simple sleeping spots into highly versatile, multi-purpose pieces of furniture that enhance daily life.
Step 4: Integrated Storage Drawers
One of the most practical and appreciated additions to any bunk bed system is integrated storage. Full-length drawers that slide out from beneath the bottom bunk efficiently utilize space that would otherwise go to waste, providing discreet storage for toys, clothes, or extra bedding.
To construct these drawers, first build a framed box or track system that fits precisely beneath the bottom bunk, designed to house the drawer slides. The drawers themselves can be fabricated using basic woodworking techniques, often joined securely with pocket hole screws for a clean finish. While the original builder initially omitted wood glue to maintain a “renter-friendly” design, they later noted that adding glue significantly enhances the structural integrity and durability of the drawers without necessarily hindering future moves, as long as the main frame connections remain accessible. Consider smooth-gliding drawer slides for ease of use by children.
Step 5: Personal Reading Lights
Providing each child with their own dedicated light source can dramatically improve comfort and reduce conflict in a shared room. It allows one child to read or play quietly without disturbing a sibling who might be trying to sleep. A particularly clever and non-invasive way to add lighting without altering the room’s permanent electrical setup is by using plug-in outlet extenders or puck lights at each bunk level.
For a renter-friendly approach, these extenders or light fixtures can be attached using small finishing screws or strong adhesive strips, rather than permanent wiring or large holes, making them simple to remove when you move out. Ensure the chosen lights are child-safe, cool to the touch (LEDs are ideal), and have easily accessible switches for little hands.
Step 6: Safe Ladders and Sturdy Guardrails
Safety features are non-negotiable for bunk beds, especially when younger children are involved. Well-constructed ladders and robust guardrails are essential to prevent falls while still complementing the overall aesthetic of the bed.
For ladders, sturdy 2×2 wood pieces make excellent rails and steps, offering ample grip and support. Ensure the steps are evenly spaced and securely fastened. For guardrails, half-inch plywood can serve as a strong backing, reinforced with 2×2 posts and 1×2 horizontal rails to create a secure barrier. Adding edge banding to all exposed plywood edges not only creates a clean, professional finish but also eliminates any sharp corners, enhancing safety. Most importantly, thoroughly sand all wood components to achieve a super-smooth surface, preventing painful splinters and ensuring a comfortable touch for little hands.
Finishing Touches for Style and Comfort: Elevating Your DIY Bunks
The final steps of your bunk bed project are where the functional frame transforms into a professionally crafted piece that truly elevates the room. These finishing touches are crucial for both aesthetic appeal and everyday comfort, making all the difference in how the beds look and feel.
Scribing and Facing for a Seamless Look
To give your custom bunk beds a polished, built-in appearance, adding facing to cover the structural frame is key. In many rental homes, removing existing wall trim or baseboards isn’t an option. This requires a technique called scribing: carefully notching out your plywood facing to perfectly fit around the existing trim. This meticulous process allows your facing panels to sit flush against the wall, even with the baseboard in the way, creating a seamless, integrated look.
Use half-inch plywood for the facing panels. If necessary, attach small wooden blocks or furring strips to the main frame first to provide a solid attachment point for the facing. Utilize shims where needed to ensure all facing panels are perfectly flush and evenly aligned, creating a smooth, uninterrupted surface.
Thorough Sanding and Smoothing
Thorough sanding is not just about aesthetics; it’s fundamental for both safety and the quality of your paint finish. No parent wants their child to get splinters from rough wood. A meticulously sanded surface not only feels wonderfully smooth to the touch but also creates the ideal canvas for paint, allowing it to adhere better, dry more evenly, and achieve a professional, durable finish.
Work your way through different sandpaper grits, starting with a coarser grit (e.g., 80-100) for initial shaping and moving to finer grits (e.g., 180-220) for a silky-smooth finish. After sanding, meticulously clean the entire room. Vacuum the floors, wipe down all surfaces, and ensure no dust particles remain that could contaminate the wet paint, leading to a bumpy or uneven finish.
Painting and Personal Color Details
Selecting the right paint can significantly impact both the look and durability of your custom bunk beds. A semi-gloss white paint is an exceptionally practical choice for the bed frame itself. Its bright, clean appearance instantly freshens a room, and its smooth, durable finish makes it incredibly easy to wipe down and clean, an essential feature in a child’s busy room. Consider a low-VOC (Volatile Organic Compound) paint for a healthier environment.
For a playful and personalized touch, consider introducing color in unexpected places. A vibrant green ceiling, for example, paired with soft yellowish walls, can create a delightful contrast that children adore. If the room is to be shared by both boys and girls, neutral yet engaging wallpaper patterns can be a fantastic choice, appealing broadly without being gender-specific. These final splashes of color and meticulous paintwork transform a simple wood structure into a truly special and inviting space that your kids will cherish.
Final Reveal: The Complete Custom Bunk Room
After all the meticulous planning, careful construction, and diligent finishing work, the transformation is complete. What was once a cramped, chaotic shared bedroom has now become an exquisitely organized, highly functional space that brilliantly maximizes every available inch. The finished bunk room strikes a perfect balance between sophisticated aesthetics and practical utility, featuring clean white semi-gloss paint and soothing wall colors that create a serene yet playful atmosphere.
Each child now enjoys their own well-defined sleeping zone, complete with personal lighting for reading or quiet play. The integrated built-in storage drawers beneath the bunks keep toys, books, and clothes neatly tucked away, ensuring the room remains clutter-free. Despite its robust and secure construction, the entire bunk bed structure ingeniously utilizes just 20 screws into the wall studs, making it genuinely renter-friendly. All other connections are cleverly made within the bed structure itself, with screws that remain accessible, allowing for straightforward disassembly should it be time to move.
This project stands as a testament that with basic tools, thoughtful design, and careful planning, anyone can create custom furniture solutions that perfectly meet their family’s evolving needs, without ever compromising on safety, style, or future flexibility.
For a captivating visual walkthrough of this entire process, don’t miss the detailed step-by-step tutorial from Simply Handmade on their YouTube channel. Watching their comprehensive guide will help you visualize each stage and boost your confidence before you even pick up your tools!
While creating custom bunk beds for your specific space might initially seem like a daunting endeavor, with careful planning, patience, and fundamental woodworking tools, you can absolutely construct a setup that fits your room perfectly. This guide, drawing from a real family’s experience, provides a clear roadmap for transforming a small, shared bedroom into a highly efficient and beautifully designed sleeping area for multiple children.
More Innovative Custom Bunk Bed Ideas to Inspire Your Next Project
Custom bunk beds open up a world of nearly endless design possibilities, allowing you to tailor them precisely to your available space, specific needs, and children’s ages and personalities. Beyond the traditional stacked arrangement, there are countless creative ways to enhance the functionality and fun factor of your bunk beds.
1. Loft Bed + Desk Combo: The Ultimate Study Nook
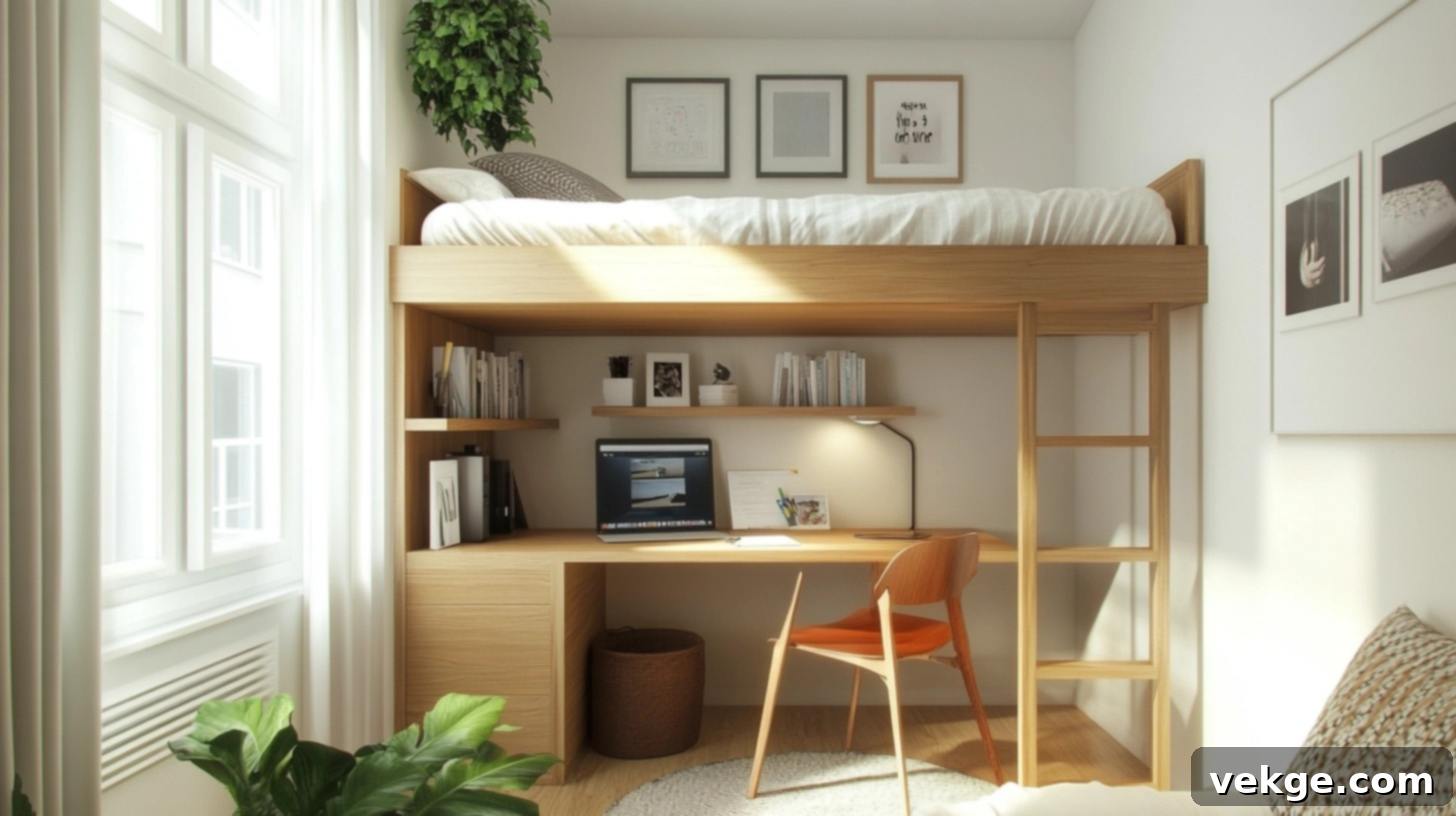
A perennial favorite for school-aged children and teenagers is the loft bed with an integrated desk combination. By elevating a single bed high enough, you create ample space underneath to fit a complete study area, including a desk, ergonomic chair, and even built-in shelving for books and supplies. This smart setup is perfectly suited for smaller rooms or multi-purpose spaces where floor area is at a premium, providing a dedicated zone for homework and creative pursuits without sacrificing valuable play space.
2. Triple Stack for Tall Ceilings: Maximizing Vertical Real Estate
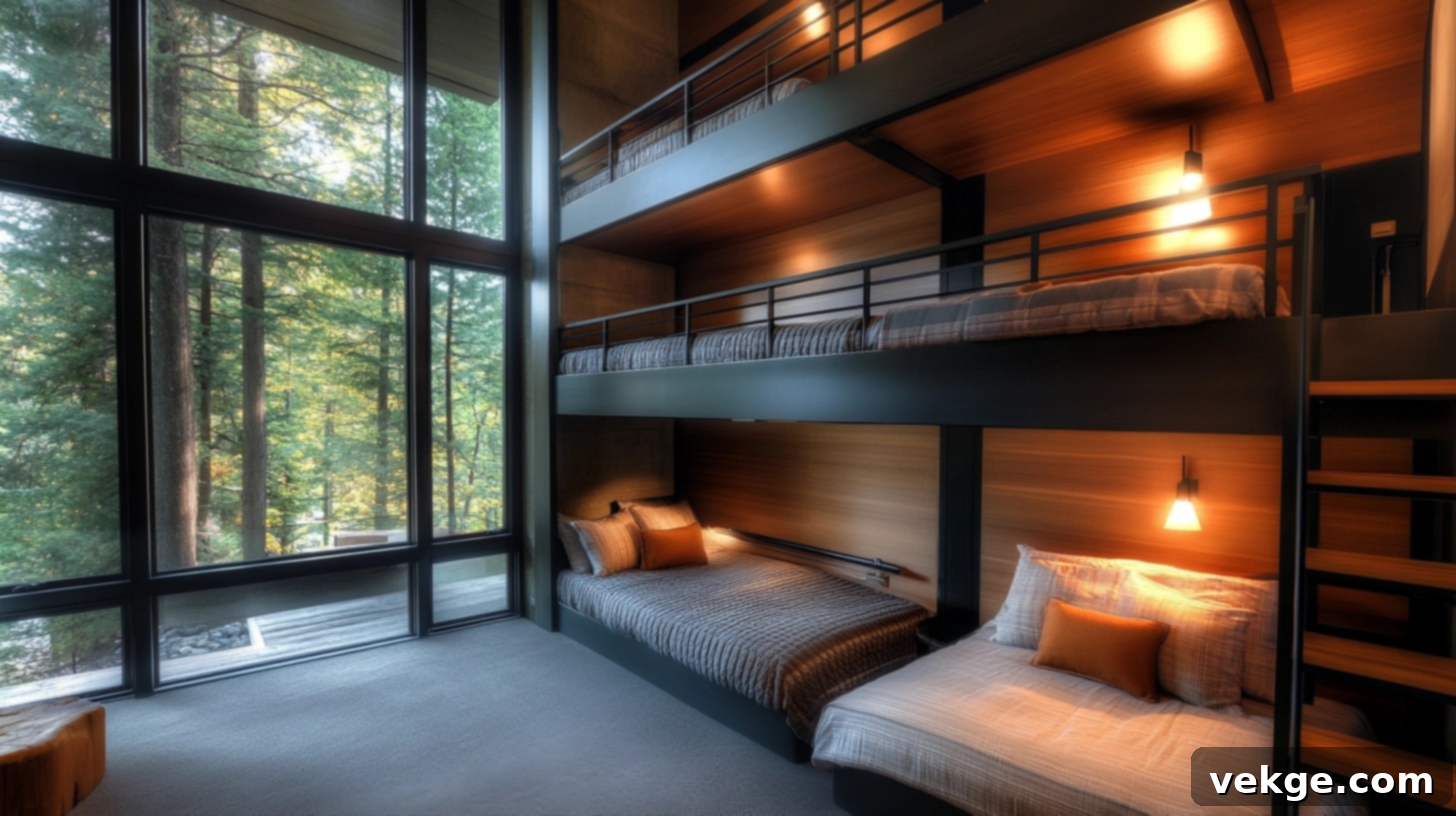
For rooms blessed with extra-high ceilings, a triple-stack design can be an absolute game-changer. These three-level bunk beds dramatically maximize sleeping capacity within a minimal floor footprint, making them an ideal solution for vacation homes, guest rooms, or large families with many children sharing a single space. When implementing a triple stack, it is paramount to include exceptionally sturdy ladders and robust safety rails for the highest levels, ensuring secure and easy access for all occupants.
3. Slide Exit for Younger Kids: Playful Bedtime Routines
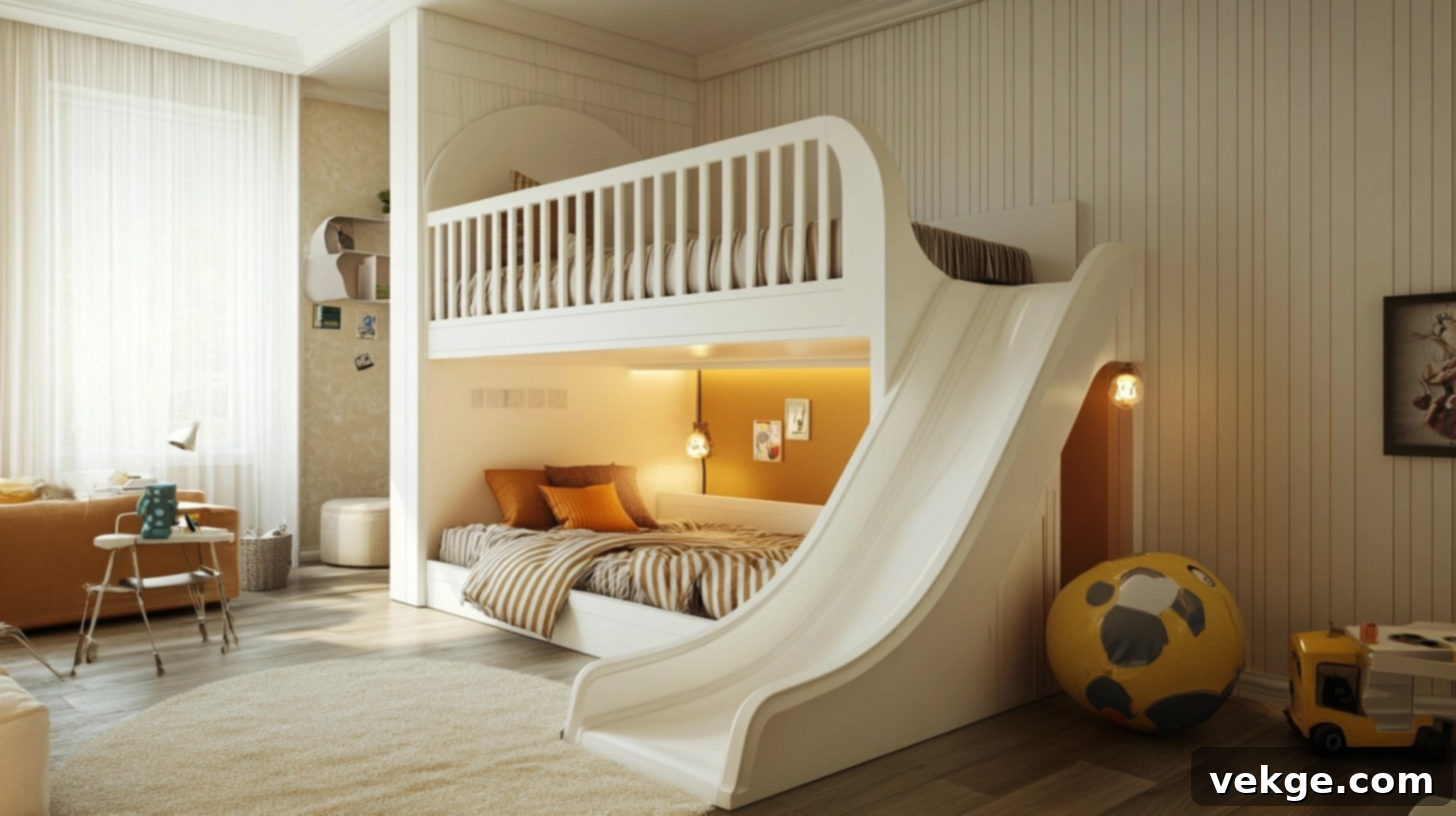
Transform bedtime into an exciting adventure with a bunk bed featuring a slide exit! Rather than simply climbing down a ladder, younger children can enjoy a thrilling descent down a slide attached to the side or end of the bed. This incredibly playful addition makes waking up and going to bed more appealing, injecting a touch of playground fun directly into their bedroom and encouraging enthusiastic starts to the day.
4. Privacy Curtains or Panels: Creating Individual Sanctuaries
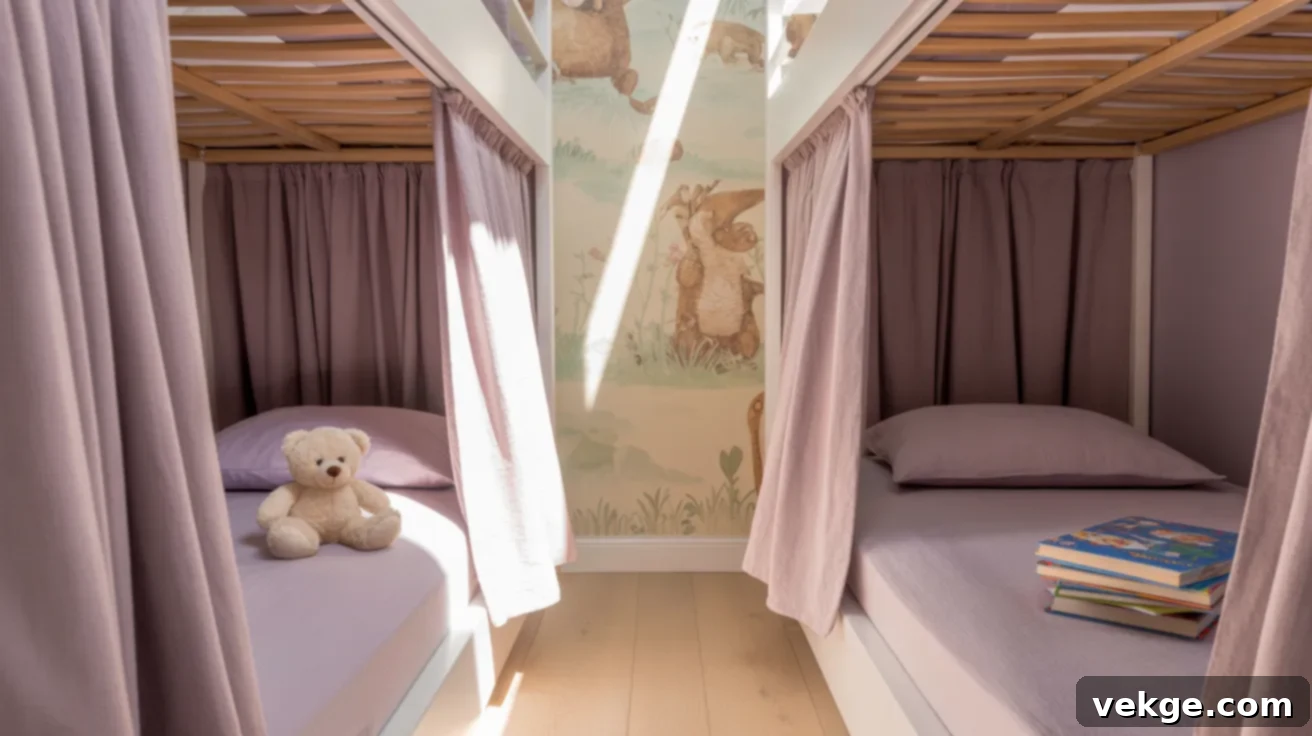
Even in shared bedrooms, personal space and privacy are incredibly important for children. Integrating curtains or sliding panels for each bunk creates cozy, private “mini-rooms” where kids can retreat with a book, play quietly, or simply enjoy a moment of solitude. These simple yet effective additions help significantly reduce conflicts in shared sleeping arrangements by granting each child a sense of ownership and control over their immediate personal space, fostering harmony and independence.
5. Bookcase Ladders: Functional and Clever Storage
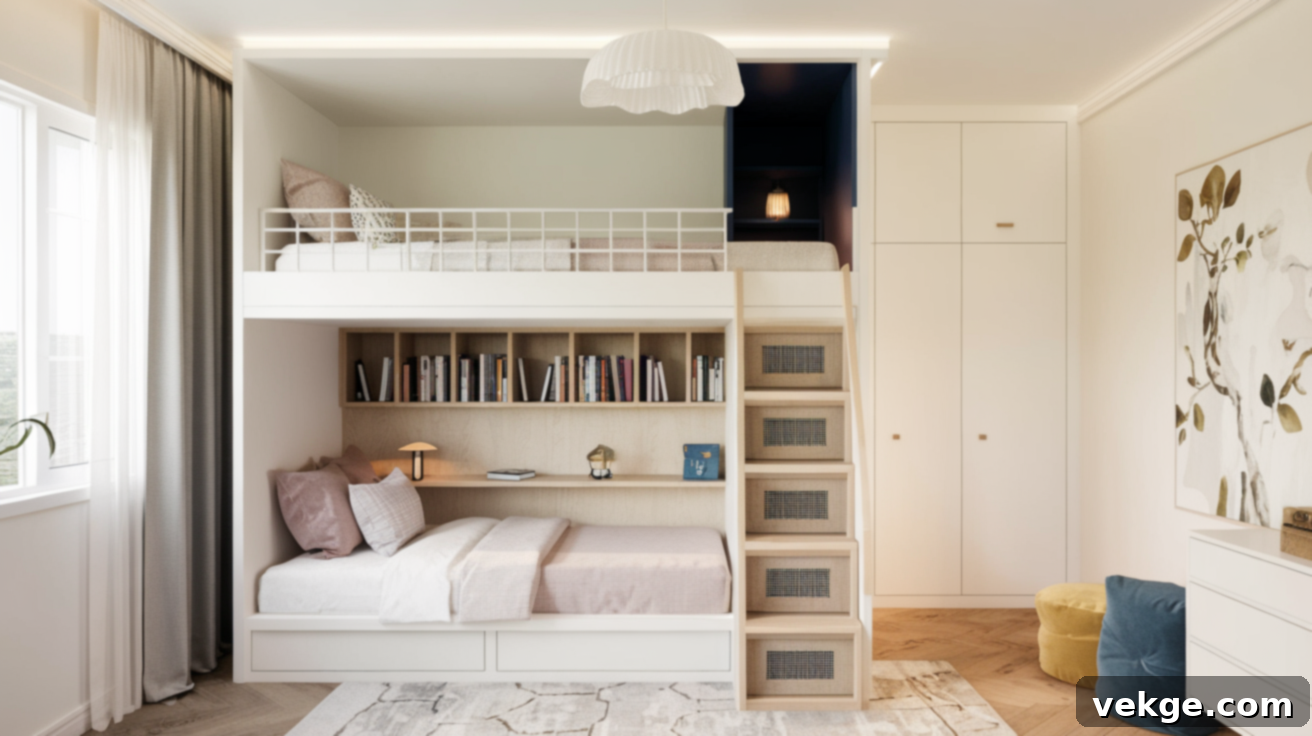
For an exceptionally smart and space-efficient storage solution, consider designing your ladder to double as a bookcase. By creating wider ladder steps that also function as small shelves or cubbies, you ingeniously build in storage for bedtime stories, small toys, or cherished trinkets, all while providing safe and convenient access to the top bunk. This clever combination eliminates the need for separate bookshelves in the room, keeping the space tidy and maximizing utility.
6. L-Shaped Corner Bunks: Optimized Room Layout
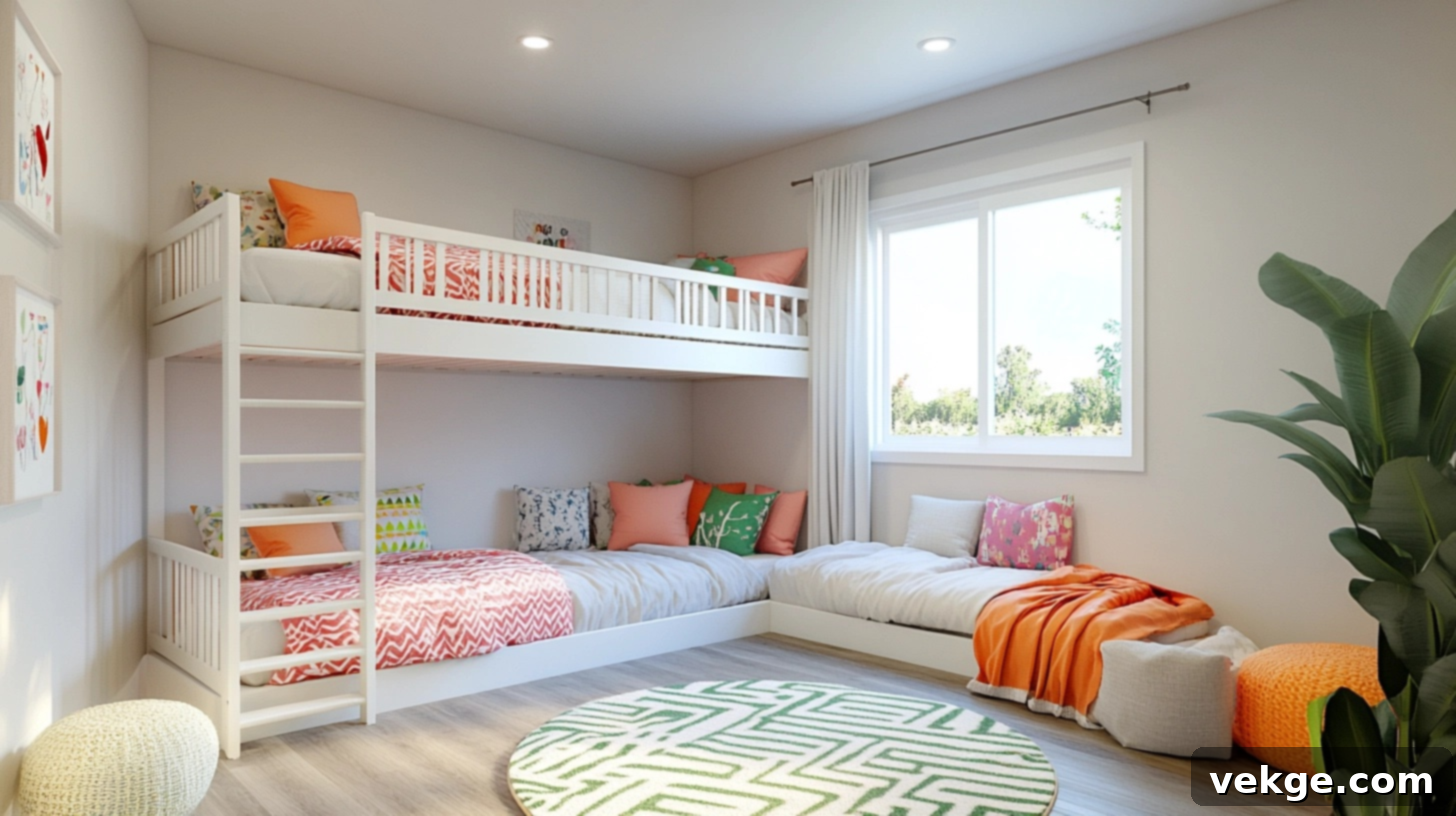
Make the most of often-underutilized corner spaces by designing L-shaped bunk beds. This intelligent layout allows for improved movement within the room and frees up more central floor space. L-shaped bunks effectively utilize room corners that might otherwise go unused, transforming them into highly functional and aesthetically pleasing sleeping areas. The L-shape also naturally creates a subtle division within the room, enhancing individual zones while keeping the main central area open for play, study, or social interaction.
7. Convertible Bed-to-Desk Setup: Dual-Purpose Design
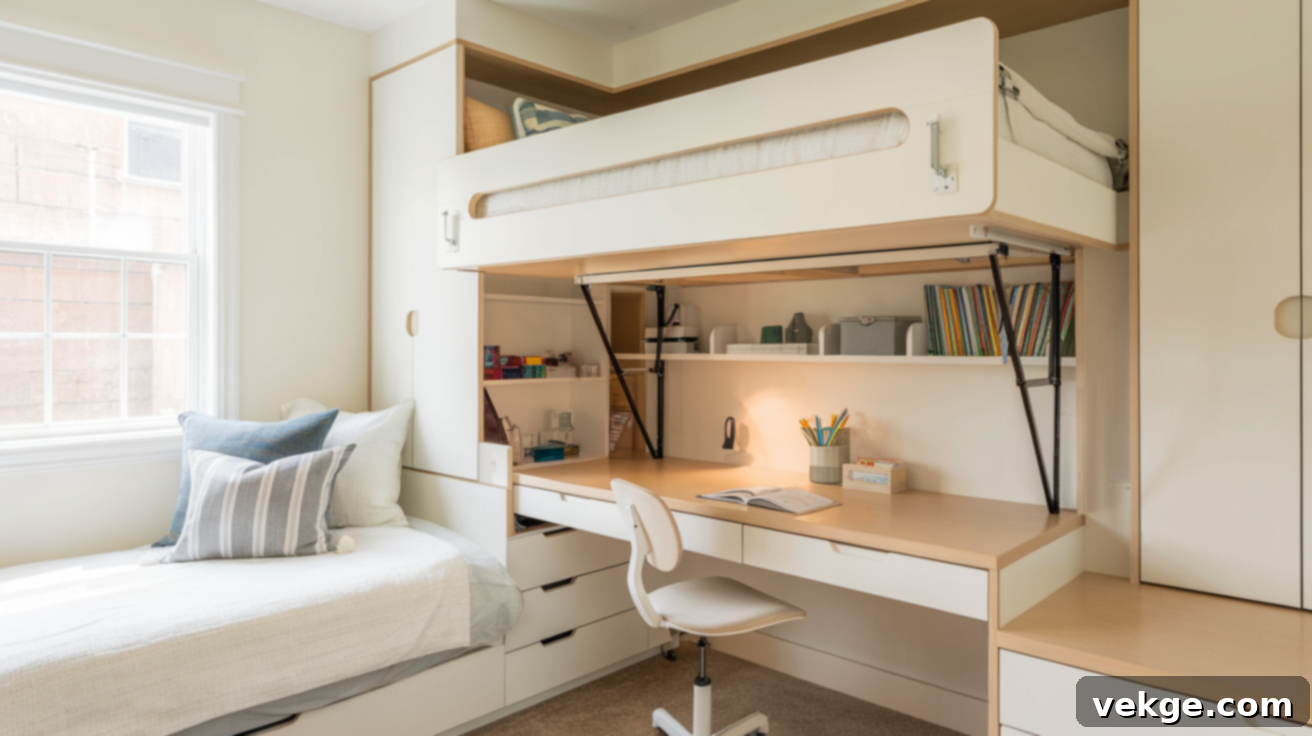
For the ultimate in space efficiency and versatility, consider a convertible bed-to-desk setup for the lower bunk. This ingenious design utilizes a fold-up mechanism that allows the bed to tilt securely up against the wall during the day, revealing a fully functional homework desk underneath. This clever system enables the same area to serve a dual purpose – providing a comfortable sleeping space at night and a productive study zone during daylight hours. A simple, robust hinge system makes the transformation quick and easy, saving valuable floor space and adapting the room to different daily needs.
Helpful Tips for a Smooth and Successful Custom Bunk Bed Build
Every DIY project, no matter how successful, comes with invaluable learning experiences. By taking heed of lessons learned by others, you can save yourself significant time, money, and potential frustration as you embark on building your own custom bunk beds. Here are some essential tips to guide your journey:
- Begin with a Detailed Plan: Always create a comprehensive design and precise cut list *before* making any cuts. Measure thrice, cut once.
- Ruthless Decluttering: Don’t waste time moving furniture or items to storage if you have no intention of keeping them long-term. Be honest about what truly needs to stay.
- Wood Glue is Your Friend: Even for “temporary” or renter-friendly builds, use wood glue on drawer assemblies and non-load-bearing joints. It dramatically increases strength and longevity without preventing future disassembly if done thoughtfully.
- Label Every Piece: As you cut lumber, label each piece according to your cut list and design. This simple step is critical for staying organized and ensuring correct assembly.
- Track Your Fasteners: Keep a checklist for screws and other fasteners to ensure every connection point is secured. Overlooking a single screw can compromise stability.
- Never Skip Thorough Sanding: This step affects both safety (no splinters!) and the final appearance. Invest the time in achieving a smooth, paint-ready surface.
- Clamps Are Essential: Use woodworking clamps liberally. They are indispensable for holding pieces securely in place during assembly and glue-up, ensuring precise, tight joints.
- Account for Imperfections: Older homes rarely have perfectly square corners, level floors, or straight walls. Be prepared to use shims and make minor adjustments to achieve a snug fit.
- Plan for Disassembly: If you anticipate moving, design with future disassembly in mind. Use accessible screw connections where possible, and avoid permanent joinery methods for primary structural components.
- Take Your Time with Finishing: The facing, sanding, and painting stages are where your project truly shines. Rushing these details will detract from the overall quality and aesthetic.
Final Thoughts: Building Beyond Beds
Custom bunk beds are far more than just space-saving furniture; they are highly personal, incredibly practical, and built with a durability that store-bought alternatives often lack. When our family found ourselves running short on space, taking on this build allowed us to reclaim control over our living environment. Whether you’re renting, embarking on a major remodel, or simply outgrowing your current setup, a custom build can introduce an unparalleled level of organization and fluidity into your daily family life.
Take the time to genuinely consider what your family truly needs and how your children utilize their space. Even seemingly small touches, like integrated shelves, hidden storage compartments, or individual reading lights, can make a monumental difference in functionality and happiness. And please, don’t get caught up in the pursuit of perfection. Remember, “done is better than perfect.” Your custom bunk beds don’t need to be flawless to be immensely useful, cherished, and a source of pride.
If you’re new to woodworking or large DIY projects, approach this with confidence and a methodical mindset. Start simple, work at your own pace, adhere closely to your plan, and trust in your ability to learn and adapt. The satisfaction of creating something so meaningful and functional for your family is truly immeasurable.
Eager for more DIY inspiration? Explore additional DIY tips and guides to empower yourself to build unique solutions that perfectly complement your home and lifestyle.
